
Master the Easy Pineapple Quilt: A Vibrant Project for Every Quilter
There’s an undeniable joy in creating something beautiful with your own hands, especially when it involves a symphony of colors and patterns. Quilting offers this unique satisfaction, transforming simple fabric pieces into intricate works of art. Among the myriad of quilt designs, the pineapple quilt block stands out as a true classic, celebrated for its dynamic geometric appeal and the endless possibilities it offers for vibrant color combinations. It’s a design that effortlessly catches the eye, making it a beloved choice for quilters around the globe.
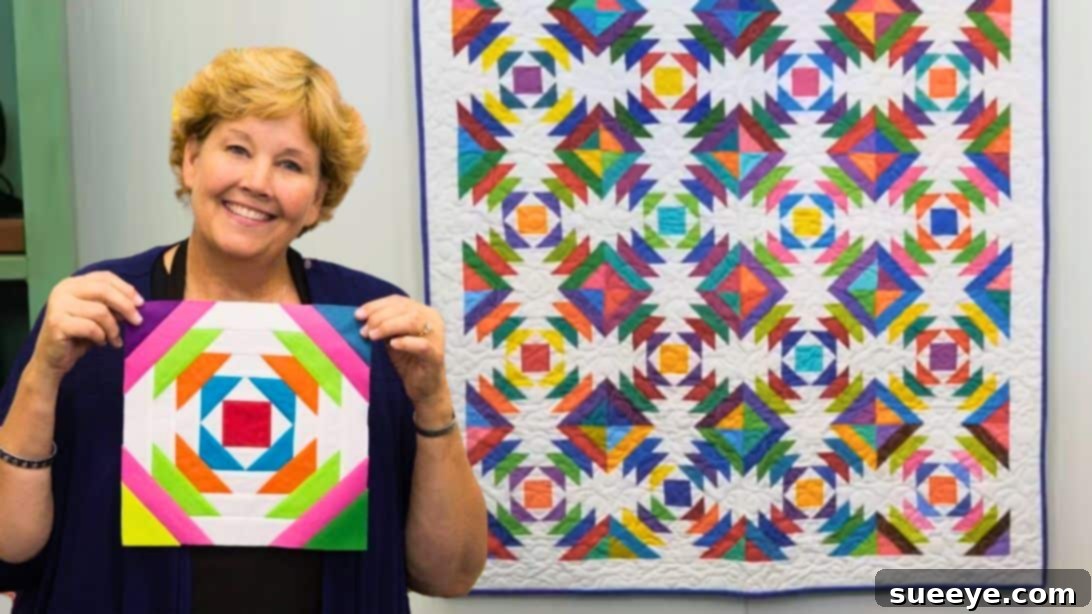
One particular pineapple quilt that exemplifies this charm is the captivating creation by Missouri Star, a project that is both stunning to behold and surprisingly accessible to make. Its unique construction and radial design come together to form an optical delight, promising a finished piece that will brighten any room and bring warmth to your home. Whether you’re a seasoned quilter looking for a fresh challenge or a beginner eager to dive into the rewarding world of fabric artistry, this project offers an exciting path to crafting a truly spectacular quilt.
RELATED: Easy Exploding Pineapple Quilt Block Tutorial
The Enduring Charm of the Pineapple Quilt Block
The pineapple quilt block is more than just a pattern; it’s a testament to geometric elegance and creative versatility. Historically, the pineapple has been a symbol of hospitality, welcome, and good fortune, making it a particularly meaningful motif to incorporate into a quilt destined for comfort and warmth. Its distinctive radial design, built around a central square with successively added strips, creates a mesmerizing spiraling effect that can be enhanced or subdued depending on your fabric choices.
What makes this block so captivating is its adaptability. With careful selection of light and dark fabrics, you can create a striking contrast that emphasizes the block’s inherent movement, drawing the viewer’s eye towards its intricate center. Alternatively, a more subtle palette can result in a softer, more blended pattern, perfect for a cozy, understated aesthetic. This flexibility ensures that every pineapple quilt, while sharing a common structure, can possess a unique personality, reflecting the maker’s individual style and vision.
Jenny Doan’s Approach: Simplicity in Design
The inspiration for this particular pineapple quilt comes from a cherished vintage pineapple quilt block discovered by the legendary Jenny Doan of Missouri Star. Known for her ingenious methods that simplify complex quilting patterns, Jenny’s version introduces a clever twist: a distinct square at the very heart of the block. This seemingly minor alteration not only streamlines the construction process but also provides a clear focal point, enhancing the visual impact of the finished design.
Jenny’s philosophy at Missouri Star has always been to empower quilters of all skill levels. Her innovative techniques break down seemingly complicated patterns into manageable steps, making the art of quilting accessible and enjoyable for everyone. While the traditional pineapple block might appear daunting at first glance due to its layered construction and precise trimming, Jenny’s method transforms it into an achievable project. Once you master the technique for the first couple of layers, the subsequent steps flow effortlessly, allowing even beginner quilters to confidently create stunning pineapple blocks. This approach makes what could be an intimidating design a truly rewarding experience, proving that beautiful quilts don’t have to be difficult to make.
Essential Materials for Your Vibrant Pineapple Quilt
Gathering the right materials is the first step towards a successful and enjoyable quilting project. For this easy pineapple quilt, Jenny Doan’s method makes excellent use of pre-cut fabrics, significantly speeding up the preparation process and ensuring consistency. Here’s a detailed list of what you’ll need to create your beautiful quilt blocks:
- 2 packs of 5″ squares: These convenient pre-cut squares will form the core of your pineapple blocks and are also used for the corner units, saving you valuable cutting time.
- 2 rolls of 1 1/2″ colored solids: These strips will be used to create the vibrant, radiating layers of your pineapple blocks, adding beautiful bursts of color. Consider selecting colors that complement each other or create a striking contrast.
- 1 roll of 1 1/2″ background strips: These strips provide the contrasting ‘background’ layers between your colored strips, defining the unique pineapple pattern. A neutral color like white, cream, or a light gray works wonderfully.
- 1 yard for the outer border: This fabric will frame your finished quilt top, giving it a polished and complete look. Choose a color that ties all your block fabrics together.
- Non-slip pineapple trim tool: This specialized ruler is absolutely crucial for achieving perfectly square and consistent pineapple blocks. Its unique markings guide your trimming, ensuring precision at every stage.
- 3 1/4 yards of backing fabric: This fabric will form the underside of your quilt, providing warmth and completing the sandwich for quilting.
- Basic Quilting Supplies: Don’t forget your essential tools such as a reliable sewing machine, sharp rotary cutter, a self-healing cutting mat, quilting rulers, pins or clips, thread (matching or coordinating with your fabrics), and an iron with a pressing surface.
Preparing for Quilting Success
Before you even make your first cut, a little preparation can go a long way in ensuring a smooth and enjoyable quilting experience. First, consider pre-washing your fabrics. While pre-cuts are often stable, washing yardage for your border and backing can prevent shrinkage issues later on. Ensure your workspace is clean, well-lit, and organized. Having all your materials and tools within reach will help maintain your creative flow. Read through all the instructions once or twice before starting, familiarizing yourself with the process. This helps you anticipate steps and visualize the progression of your block, setting you up for success.
Step-by-Step Guide: Crafting Your Easy Pineapple Quilt Block
Let’s dive into the exciting process of creating these stunning pineapple quilt blocks. Precision is key in quilting, especially with designs that rely on layered strips and careful trimming. Take your time with each step, and remember that practice makes perfect!
Step 1: Preparing Your Core Square
Begin by selecting one of your 5″ squares. Using your rotary cutter and ruler, carefully cut this square in half in both directions. This will yield four perfectly sized 2 1/2″ squares. These smaller squares are fundamental to Jenny Doan’s method, as one of them will serve as the foundational center of your very first pineapple block. Set aside the remaining three 2 1/2″ squares; you’ll use them for additional blocks or as corner units later in the process.
Step 2: Adding the First Background Strips
Take one of your 2 1/2″ center squares. Now, retrieve one of your 1 1/2″ background strips. Align the strip along one side of the 2 1/2″ square, right sides together. Sew with a precise 1/4″ seam allowance. Trim any excess fabric from the strip, then press the seam open or towards the darker fabric (the center square in this case) for a flat finish. Repeat this process for the opposite side of the square, then for the remaining two sides. By the end of this step, your center square will be fully framed by a narrow background border, forming your first complete ’round’ of the pineapple block.
Step 3: Precision Trimming for the First Round
This is where your specialized non-slip pineapple trim tool becomes indispensable. Carefully place the ruler over your bordered square. Align the white 2 1/2″ square marking on your ruler precisely with the center 2 1/2″ square of your block. Ensure all sides are perfectly aligned according to the ruler’s guides for the first layer. Using your rotary cutter, trim away the excess fabric along all four edges of the block. This critical trimming step squares up your block and prepares it for the next set of strips, ensuring each layer builds on a perfectly square foundation.
Step 4: Introducing Your First Colored Strips
Following the same method as in Step 2, take one of your 1 1/2″ colored strips. Attach it to one side of your freshly trimmed block, right sides together, using a 1/4″ seam allowance. Trim the excess strip fabric, and press your seam. Continue this process, adding a colored strip to each of the remaining three sides of your block. This creates the second ’round’ of your pineapple block, adding a vibrant pop of color and beginning to build the signature layered look.
Step 5: Trimming the Colored Round
It’s time for another precise trim. Place your pineapple trim tool over the block once more. This time, align the square on the top of your ruler (which corresponds to the size of your block at this stage) with the original center square of the block, ensuring perfect alignment for the second layer. Carefully trim all four sides as you did in Step 3. Maintaining accuracy in these trimming steps is paramount for achieving perfectly square and beautiful pineapple blocks.
Step 6: Repeating Background Strips with Careful Alignment
Now, repeat the process of adding background strips, just like you did in Step 2. Take another 1 1/2″ background strip, sew it to one side with a 1/4″ seam, trim, and press. Do this for all four sides. Once these strips are sewn and pressed, place your pineapple trim tool on top of your block. Align the white line on the flat edge of your ruler (or the designated marking for this specific layer) with the outer edge of the colored fabric you just added. Trim the excess fabric meticulously along all four sides. This completes the third layer and reinforces the alternating pattern.
Step 7: Adding More Color and Precision Trimming
Following the pattern, repeat Step 4 by adding another round of 1 1/2″ colored strips to all four sides of your block, sewing with a 1/4″ seam and pressing. After these are attached, position your pineapple trim tool once more. This time, align the second square from the top (or the appropriate measurement for this layer) with the very center square of your block. Trim the excess fabric from all four sides. You’ll notice your block growing steadily, layer by layer, with each trimming step ensuring its squareness and neatness.
Step 8: Building Layers for a Full Block
Continue to repeat Steps 6 and 7. Each cycle will add two new rounds of strips – one background, then one colored – followed by a precise trimming step. Your goal is to build up a total of eight distinct layers around your initial center square. As your block grows, consult your pineapple trim tool regularly to ensure you are aligning correctly for each successive layer’s trim. This iterative process is the heart of the pineapple block, and consistency is vital for a beautifully symmetrical result.
Step 9: Finishing the Corners of Your Block
Once you have completed all eight layers of strips, your block will be quite large. Now it’s time to add the final corner accents. Take one of your remaining 5″ squares and cut it in half diagonally, yielding two triangles. Position one of these triangles onto each of the four corners of your pineapple block, right sides together. Sew them in place with a consistent 1/4″ seam allowance. After sewing, trim away any excess fabric from the seam allowance, then press these corner triangles flat. Finally, place your standard quilting ruler (or your pineapple trim tool) on top of the block, aligning a straight edge with the newly formed edges of your square block. Trim away any overhang to achieve a perfectly squared-up and finished pineapple quilt block. You have now completed one magnificent pineapple block!
Tips for a Perfect Pineapple Quilt
Creating a pineapple quilt is a rewarding experience, and a few extra tips can help elevate your project from good to exceptional:
- Fabric Selection: Experiment with color palettes! While traditional pineapple quilts often feature high contrast, consider a more monochromatic scheme for a subtle effect, or a rainbow of brights for a truly cheerful quilt. Pay attention to how the background and colored strips interact.
- Consistent Seam Allowance: A perfect 1/4″ seam allowance throughout is crucial for accurate block construction. Invest in a good 1/4″ presser foot for your machine if you don’t have one.
- Pressing Matters: Pressing your seams after each step, rather than ironing, is key. Pressing involves lifting and placing the iron, while ironing involves sliding, which can distort your fabric. Pressing towards the darker fabric or open (depending on preference) helps reduce bulk.
- Chain Piecing: If you’re making multiple blocks, use chain piecing for efficiency. Sew several strips onto multiple center squares consecutively without cutting your thread between them.
- Stay Organized: Keep your strips and squares organized. Labeling them by color or background can save time and prevent mistakes, especially as you build more layers.
- Don’t Rush the Trimming: The trimming steps are vital. Take your time, ensure your ruler is perfectly aligned, and use a sharp rotary cutter blade for clean, crisp edges.
- Embrace Imperfection: While precision is important, remember that quilting is also an art. Don’t let minor imperfections deter you. Each stitch tells a story, and the joy of creation is paramount.
Your Journey to a Stunning Pineapple Quilt
With this detailed guide, you’re well-equipped to embark on your own pineapple quilting adventure, following in the footsteps of Jenny Doan and Missouri Star’s brilliant techniques. This project, while appearing intricate, is a testament to how foundational steps, repeated with care and precision, can yield breathtaking results. The satisfaction of watching your vibrant pineapple blocks come to life, piece by colorful piece, is truly unparalleled.
Imagine the warmth and beauty your finished pineapple quilt will bring to your home or as a cherished gift. Its eye-catching design and personal touch will make it a treasured heirloom for years to come. So gather your fabrics, fire up your sewing machine, and prepare to create a masterpiece that showcases your creativity and skill. Don’t hesitate to share your progress and finished quilts with the vibrant online quilting community – we can’t wait to see your unique take on this timeless design!
Pineapple Quilt With Jenny Doan