
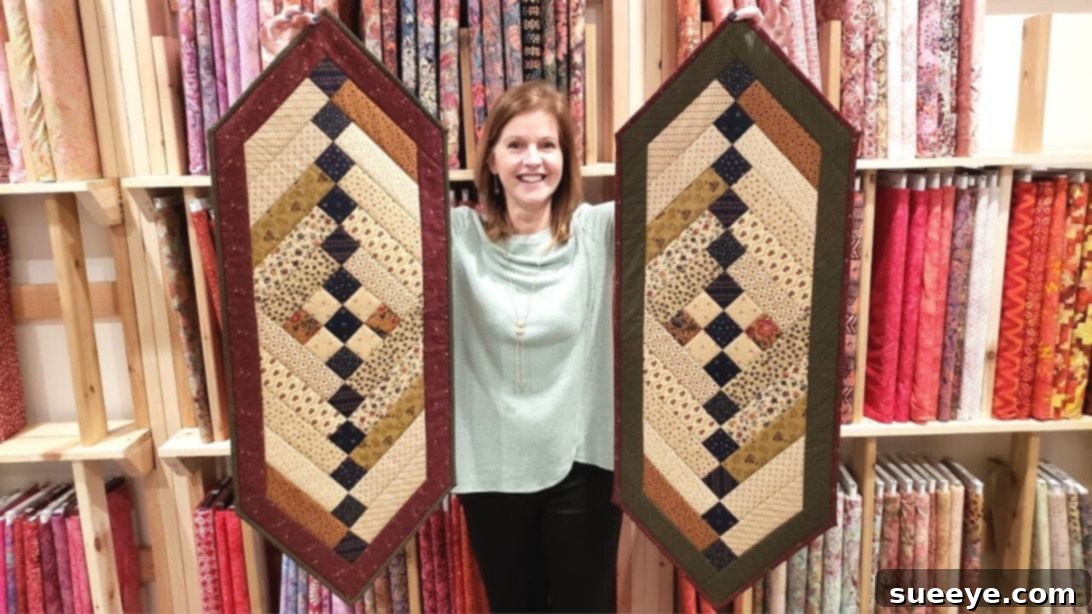
Craft a Beautiful Jelly Roll Friendship Braid Table Runner: A Step-by-Step Quilting Tutorial
Embark on a delightful quilting journey with this inspiring tutorial for a Jelly Roll Friendship Braid Table Runner. Created with guidance from the expert quilters at Jordan Fabrics, this project is designed to be both enjoyable and rewarding. Whether you’re looking for a collaborative sewing project to share with friends, or simply seeking to craft a unique piece for your own home, this table runner offers a perfect blend of creativity and accomplishment. Despite its intricately woven appearance, the “Friendship Braid” is surprisingly straightforward, making it an ideal choice for quilters of all skill levels, including adventurous beginners.
Imagine this charming patchwork design gracing your dining table, coffee table, or entryway console. Its elegant braid pattern brings a touch of handcrafted sophistication to any living space. One of the greatest joys of this project lies in its versatility; by simply changing the color palette of your fabrics, you can effortlessly adapt your table runner to match any season, holiday, or interior decor style. From vibrant spring hues to cozy autumnal tones, or classic holiday themes, the possibilities are endless. Follow along with our detailed instructions below to transform a simple jelly roll into a stunning piece of textile art.
Materials You’ll Need:
Before diving into the stitching, gather all your materials. A well-prepared workspace ensures a smooth and enjoyable crafting experience. Here’s what you’ll need for your Jelly Roll Friendship Braid Table Runner:
- Jelly Roll Fabric Strips: These pre-cut 2.5-inch wide fabric strips are the heart of your project.
- 12 medium to light-toned strips: These strips will form the brighter, more prominent sections of your braid pattern. Choose a variety of prints and solids that complement each other.
- 4 dark-toned strips: These will provide contrast and help define the intricate “braid” effect. Ensure they stand out against your medium and light fabrics.
- Border Fabric:
- 3 pieces of 2-1/2 inch strips: These will frame your braided centerpiece, adding a polished finish. Consider a solid color that ties your patchwork together or a subtle print that complements the jelly roll fabrics.
- Binding Fabric:
- 3 pieces of 2-1/2 inch strips: Binding creates a durable and attractive edge for your finished table runner. These strips will typically be sewn together to form one long continuous strip. A coordinating solid or a subtle blender works wonderfully.
- Backing Fabric: A piece of fabric for the back of your table runner. Ensure it’s slightly larger than your completed top (e.g., about 16 inches wide by 40 inches long, to allow for trimming after quilting).
- Batting: A layer of batting (e.g., cotton, polyester, or blend) to go between your top and backing. This gives the table runner its padded feel and warmth, and is essential for quilting.
- Basic Quilting Supplies: While not explicitly listed in the original, these are essential for any quilting project:
- Sewing machine with a 1/4-inch piecing foot
- Good quality polyester or cotton thread that matches or blends with your fabrics
- Rotary cutter, self-healing cutting mat, and quilting rulers (at least one long ruler, 12-1/2″ or longer, and a smaller square ruler)
- Fabric pins or Wonder Clips
- Iron and ironing board
- Fabric scissors
Step-by-Step Instructions: Crafting Your Friendship Braid Table Runner
Precision is key in quilting, especially with patchwork designs. Take your time with each step, ensuring accurate cuts and consistent seam allowances for the best results. A 1/4-inch seam allowance is standard in quilting unless otherwise specified.
Step 1: Preparing Your Fabric Strips
Begin by preparing your jelly roll strips for the intricate braid pattern. This initial cutting phase is critical for the success and visual appeal of your table runner.
- From your collection of 4 dark strips, 1 medium strip, and 1 light strip, carefully cut each into 2-1/2 inch squares. These squares will serve as the pivotal center points and turning blocks within your braid design.
- For the remaining jelly roll strips (the other 11 medium/light strips and 3 dark strips), cut them into uniform 10-inch lengths. These longer segments will form the flowing diagonal lines of the braid. Accuracy here will ensure your braid flows smoothly.
Step 2: Arranging and Sewing the Core Block
With your strips cut, it’s time to arrange the foundation of your braid. This step lays the groundwork for the entire pattern, so pay close attention to the placement of each color.
- Refer to the visual guide (Image by Jordan Fabrics) below to understand the specific arrangement pattern. You’ll be combining the 2.5-inch squares and 10-inch strips in a specific sequence to form your initial patchwork unit.
- Carefully lay out your fabric pieces according to the provided pattern. Pay close attention to the contrast between dark, medium, and light fabrics.
- Once satisfied with your layout, begin sewing these pieces together with a precise quarter-inch seam allowance. It’s often helpful to sew smaller units first and then join those units to build the larger block. After sewing each seam, press it open or to one side (away from the darker fabric is a common practice) to ensure flat, crisp blocks.
Step 3: Constructing the First Side of the Braid
Now, let’s start building the distinctive braid pattern. This step involves adding more 10-inch strips and squares, gradually expanding your table runner. Consistency in your seam allowance is crucial here to maintain the pattern’s integrity.
- Take one of your 10-inch fabric strips. Align its edge precisely with one side of your previously assembled patchwork unit.
- Next, take another 10-inch strip and position it on the adjacent side of the unit, forming an “L” shape with the two strips around a corner of your block.
- Select one of your 2.5-inch squares and place it carefully on the corner where these two strips meet. This square acts as a pivotal turning point for the braid.
- Sew these three pieces together using a consistent quarter-inch seam allowance. Start by sewing the square to one strip, then attach this unit to the main block. Or, sew the two strips to the block, then add the corner square. The video tutorial will clarify the exact order for ease.
- Repeat this process, continuously adding 10-inch strips and corner squares, moving outwards from your central block. Keep adding layers until you have successfully created 5 distinct rows of the braid pattern radiating from one side of your initial block.
- Once each seam is sewn, gently finger press all the seams away from the middle of the unit. Finger pressing helps to set the stitches temporarily and reduces bulk before a final press with an iron. This also helps in ensuring your pieces lay flat for the next step.
Step 4: Completing the Braid on the Opposite Side
Now that one side of your braid is established, it’s time to mirror the pattern on the opposite side of your central square block, bringing the full “friendship braid” effect to life.
- Replicate the exact same process from Step 3 on the other side of your initial patchwork unit. Ensure that the fabric patterns and color placements mirror or complement the first side, creating a harmonious and balanced design.
- As you add each new strip and square, pay careful attention to “sew the excess fabrics” before proceeding to the next layer. This often means ensuring your seams are properly aligned and sewn securely to the very edge, sometimes even slightly past the edge, to prevent unraveling or gaps. This is especially important for the corners.
- Once you have completed adding all the strips and squares to create the 5 rows on this second side, take your project to the ironing board. Carefully press the entire piece flat. A good, thorough pressing ensures all seams are settled, and the fabric lies smooth and even, which is crucial for the next trimming stage.
Step 5: Squaring Up and Trimming Your Table Runner Top
Trimming is a vital step that transforms your patchwork into a neat, uniform table runner top, ready for borders. This is where you achieve the final, clean dimensions.
- The goal is to trim your table runner top to a consistent width of 12 inches. This width will accommodate the subsequent border strips perfectly.
- Lay your table runner flat on your cutting mat, ensuring it is as straight and unwrinkled as possible. Use your longest quilting ruler and rotary cutter.
- Carefully align your ruler along one edge of the table runner, trimming away any uneven fabric or “dog ears.” Then, measure 12 inches across and make your second cut, creating a perfectly straight edge.
- Tip for using a 6-inch ruler: If you only have a 6-inch wide ruler, you can still achieve a 12-inch cut. First, align the edge of your ruler precisely along the center seam line (or a prominent seam) of your table runner. Trim one side to 6 inches from the center. Then, flip the table runner around (or your ruler), realign your ruler with the same center line, and trim the other side to 6 inches. This method ensures your 12-inch width is centered and even.
- Trim the ends of your table runner as well, creating clean, straight edges. You can decide on the final length based on your preference, but ensure both ends are square to the sides.
Step 6: Adding the Borders for a Finished Look
Borders add a beautiful frame to your table runner, enhancing its visual appeal and giving it a professional, finished dimension.
- Take two of your 2.5-inch border strips. These will be sewn to the longer sides of your table runner. Align one strip, right sides together, with one long edge of your trimmed table runner top. Pin thoroughly to prevent shifting.
- Sew with a quarter-inch seam allowance along the entire length. Repeat this for the opposite long edge of the table runner.
- Once sewn, gently finger press the border seams outwards, away from the central patchwork. Then, take it to your ironing board and press carefully, ensuring the borders lie flat.
- Next, you’ll need to trim off the excess border fabric at the diagonal ends of your table runner. To do this, align your ruler precisely with the diagonal lines of your braid pattern where it meets the newly attached border. Cut along this diagonal line to create crisp, pointed ends for your table runner. This gives it the characteristic pointed shape often seen in table runners.
- Finally, take your remaining border strip (or join two shorter pieces if needed to make one long enough) and sew it to the two pointed ends of the table runner. Align the strip, right sides together, with the pointed end, starting and stopping exactly at the corner intersections to avoid bulk. Sew, press, and trim any excess. This final border gives your table runner its neat, framed appearance.
Step 7: Quilting and Binding – The Final Touches
With your table runner top complete and bordered, it’s time to layer, quilt, and bind it to transform it into a durable and beautiful finished product.
Layering Your Table Runner:
- Lay your backing fabric wrong side up on a clean, flat surface, smoothing out any wrinkles. Use masking tape to secure the edges to your surface.
- Place your batting layer directly on top of the backing, centering it and smoothing it out.
- Finally, carefully center your finished table runner top, right side up, on top of the batting.
- Secure all three layers together using quilting safety pins, basting spray, or long basting stitches. Pin every few inches to prevent shifting during quilting.
Quilting Your Layers:
- Quilting is the process of stitching through all three layers (top, batting, backing) to hold them together and add texture. You can choose various quilting methods:
- Stitch-in-the-Ditch: This involves stitching precisely along the seam lines of your patchwork, which is often a great way to highlight the braid pattern without distracting from the fabric.
- Straight-Line Quilting: Use your walking foot to quilt parallel lines across the table runner, either diagonally or horizontally/vertically.
- Free-Motion Quilting: If you’re more adventurous, try free-motion quilting for organic designs or intricate patterns.
- Once quilting is complete, trim away any excess batting and backing fabric, squaring up your table runner so all edges are neat and flush with the top.
Binding Your Table Runner:
- Take your three 2.5-inch binding strips. Join them end-to-end with diagonal seams to create one continuous long strip. Press the seams open.
- Fold this long strip in half lengthwise, wrong sides together, and press well to create your binding.
- Attach the binding to the front of your table runner by aligning the raw edge of the binding with the raw edge of the table runner. Start about 6-8 inches from a corner, leaving a tail of binding. Sew with a quarter-inch seam allowance around the entire perimeter, mitering the corners as you go.
- Once sewn to the front, flip the binding to the back of the table runner, wrapping it around the raw edge. Hand stitch or machine stitch the binding in place on the back for a clean, durable finish.
Your Finished Friendship Braid Table Runner
Congratulations! You have successfully created a beautiful Jelly Roll Friendship Braid Table Runner. This project is a testament to the charm and creativity that comes with quilting. Each stitch tells a story, and the vibrant patterns of the jelly roll fabrics come alive in this unique braid design.
This table runner isn’t just a decorative item; it’s a conversation starter, a handcrafted gift, or a treasured piece of home decor made with love and dedication. Feel free to personalize your next table runner by experimenting with different fabric combinations, perhaps matching holiday themes or incorporating colors that perfectly complement your home’s aesthetic. Share your beautiful creations with friends and family, or simply enjoy the warmth and character it brings to your own space.
We hope this comprehensive tutorial has empowered you to create something truly special. Happy quilting!