
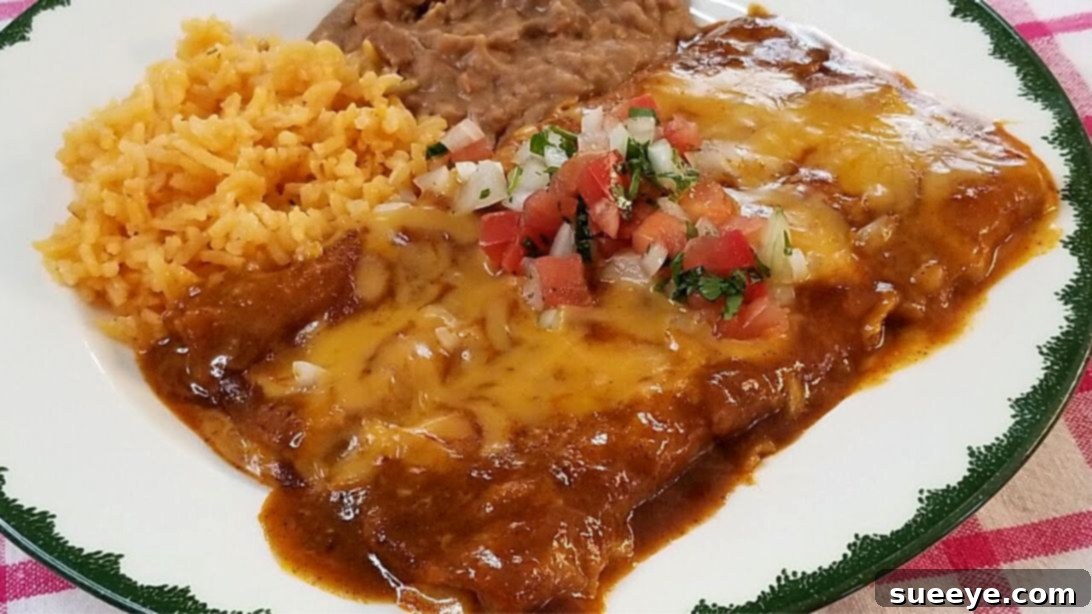
The Best Homemade Cheese Enchiladas: A Flavorful Journey to Tex-Mex Perfection
Craving the ultimate comfort food with a vibrant Tex-Mex twist? Look no further than these incredible homemade cheese enchiladas! Inspired by the culinary magic of Rachel Cooks with Love ❤, this recipe is truly a game-changer. Forget bland, store-bought versions – this dish delivers an explosion of authentic flavor that will make your taste buds sing. The secret lies in a rich, deeply savory sauce that perfectly complements the gooey, melted grated cheese, creating a harmonious blend that’s simply irresistible. When served with a fresh, zesty Pico de Gallo, you’re not just making a meal; you’re crafting an unforgettable dining experience for your entire family. Get ready to impress with this easy-to-follow guide to the best cheese enchiladas you’ll ever make!
Ingredients for Unforgettable Cheese Enchiladas
Creating these delightful cheese enchiladas begins with gathering high-quality ingredients. Each component plays a vital role in building the layered flavors that make this recipe so special, from the robust enchilada sauce to the fresh Pico de Gallo and the perfectly melted cheese. Here’s everything you’ll need:
For the Rich Enchilada Sauce:
- 2 tablespoons of melted butter: Forms the base of our roux, adding richness.
- 1 tablespoon of vegetable oil: Helps to prevent the butter from burning and ensures a smooth roux.
- 3 tablespoons of all-purpose flour: The thickening agent for our deeply flavorful sauce.
- 1 and 1/2 tablespoons of chili powder: Essential for that classic, robust enchilada flavor.
- 2 teaspoons of paprika: Adds a beautiful reddish hue and a subtle, sweet pepper note.
- 1 teaspoon of onion powder: Enhances the savory depth without adding texture.
- 2 teaspoons of garlic powder: A foundational flavor in Tex-Mex cuisine, providing aromatic depth.
- 1 teaspoon of ground cumin: Contributes an earthy, warm spice that is characteristic of authentic enchiladas.
- 1/2 teaspoon of dried oregano: Adds a fragrant, slightly bitter, and peppery note.
- 3 cups of chicken broth: The liquid base for the sauce, providing savory body.
- 2 teaspoons of tomato paste: Deepens the color and adds a concentrated umami richness.
- 1 and 1/2 teaspoons of chicken bouillon: An extra boost of savory flavor.
- 1/2 teaspoon of sugar: Balances the acidity of the tomatoes and spices, enhancing overall flavor.
- Salt to taste: Crucial for seasoning and bringing all the flavors together.
For the Enchiladas:
- Corn tortillas: The traditional choice, offering a rustic texture and flavor.
- 3/4 lb of grated American cheese: Chosen for its incredible melting properties, creating a smooth, creamy filling. (Other great melting cheeses include Monterey Jack or a Mexican blend.)
- Chopped onions (optional, for assembling): Adds a fresh, pungent crunch inside the enchiladas.
For Softening the Tortillas:
- 1/2 cup of vegetable oil: Used to briefly soften the tortillas, making them pliable and easy to roll without breaking.
- 8 corn tortillas: The number typically used for a standard baking dish.
For Fresh Pico de Gallo:
This vibrant fresh salsa provides a refreshing counterpoint to the rich enchiladas.
- 1/4 cup of chopped onions: For a crisp, pungent base.
- 1/4 cup of diced tomatoes: Adds freshness and a slight tang.
- 1/4 cup of chopped cilantro: Essential for its bright, herbaceous aroma.
- 1 seeded and chopped jalapeño: Provides a gentle kick and fresh pepper flavor. Adjust to your spice preference.
- Juice of 1/2 lime: Brightens all the flavors and adds a zesty finish.
Step-by-Step Guide: Crafting Your Perfect Homemade Cheese Enchiladas
Embark on this culinary adventure with confidence! Follow these detailed instructions to create the most incredible homemade cheese enchiladas. Remember, a little patience and attention to detail will yield spectacular results.
Step 1: Building the Flavor Foundation – The Roux
Begin by heating your cast iron skillet or a heavy-bottomed pot just below medium heat. This gentle heat is key to preventing burning. Add the melted butter and vegetable oil, allowing them to warm through. Once shimmering, whisk in the all-purpose flour. Continuously mix this mixture with a whisk, ensuring no lumps form, until it transforms into a beautiful golden-brown roux. This process usually takes about 3-5 minutes. The roux is not just a thickener; it’s a flavor base, developing a nutty aroma that will be the cornerstone of your exquisite sauce.
Step 2: Awakening the Spices
With your golden roux ready, it’s time to infuse it with vibrant spice. Add the chili powder and paprika directly into the roux, stirring them well to combine. Allow them to cook for about 30 seconds to a minute, stirring constantly. This “blooming” process in the hot fat truly awakens their flavors and aromas. Next, incorporate the onion powder, garlic powder, ground cumin, and dried oregano, continuing to mix thoroughly. The kitchen will fill with an incredible, aromatic blend that signals the deliciousness to come.
Step 3: Crafting the Silky Enchilada Sauce
Now, it’s time to create the body of your sauce. Gradually add a bit of the chicken broth to the spice-infused roux, whisking vigorously to prevent any clumps from forming. Continue adding the broth in small increments, ensuring each addition is fully incorporated and smooth before adding more. Stir in the tomato paste, which will deepen the color and add a rich umami note. Once smooth, add the remaining chicken broth, chicken bouillon, and sugar. Continue whisking constantly until the sauce comes to a very low bubble, indicating it’s thickening. Reduce the temperature to low, cover with a lid, and let it simmer gently while whisking occasionally. This simmering period is crucial for the flavors to meld and deepen, creating a complex, restaurant-quality sauce.
Step 4: Preparing the Tortillas for Rolling
While your sauce simmers to perfection, prepare your tortillas. In a small skillet, heat 1/2 cup of vegetable oil over medium heat until it’s hot but not smoking. Gently run each corn tortilla through the hot oil for just a few seconds on each side, until it becomes pliable and slightly bubbly. The goal is to soften them, not to fry them crisp. This crucial step prevents the tortillas from tearing when rolled and allows them to absorb the delicious sauce better. Remove each tortilla with tongs and place them on a plate lined with paper towels to drain any excess oil. Repeat for all remaining tortillas.
Step 5: Perfecting the Sauce Seasoning
Before assembly, perform a taste test on your simmering enchilada sauce. This is your chance to adjust the seasoning to your preference. Add salt if needed, but remember that the grated American cheese you’ll be adding will also contribute a salty flavor, so season cautiously. Once satisfied, place the lid back on the pot and continue to simmer the sauce on very low heat, allowing the flavors to marry further while you prepare for assembly.
Step 6: Assembling Your Delicious Enchiladas
Now for the exciting part – assembly! Start by spreading a thin layer of your rich enchilada sauce on the bottom of your baking dish. Take one softened corn tortilla and immerse it briefly in the warm sauce, ensuring both sides are coated. Place the sauced tortilla on a clean surface, then generously sprinkle some grated American cheese down the center. If using, add a pinch of chopped onions over the cheese. Carefully roll the tortilla tightly and place it seam-side down in your prepared baking dish. Continue this process, snugly arranging the rolled enchiladas side-by-side until your dish is full. Once all enchiladas are rolled and placed, cover them generously with more of your delicious enchilada sauce and top with an ample amount of additional grated cheese.
Step 7: Baking to Perfection & Preparing Pico de Gallo
Preheat your oven to 375°F (190°C). Cover the baking dish tightly with aluminum foil. Bake the enchiladas for 15 minutes, or just until the cheese is beautifully melted and the sauce is bubbly around the edges. The foil helps to steam the enchiladas, keeping them moist and ensuring even melting. While your enchiladas are baking, take this opportunity to prepare your fresh Pico de Gallo. In a medium bowl, combine the chopped onions, diced tomatoes, chopped cilantro, seeded and chopped jalapeño, and the juice of half a lime. Stir gently to combine. This vibrant, fresh salsa will offer a perfect bright contrast to the rich enchiladas.
Step 8: Serving and Enjoying Your Masterpiece
Once the enchiladas are out of the oven and the cheese is gloriously melted, let them rest for a few minutes before serving. This allows the sauce to settle and prevents them from falling apart when scooped. Carefully transfer a serving of these cheesy, saucy enchiladas onto plates. Garnish generously with the freshly made Pico de Gallo. For an extra touch, you can add a dollop of sour cream or a sprinkle of fresh cilantro. Serve warm and watch as your family and friends delight in every mouth-watering bite of these truly the best homemade cheese enchiladas! Enjoy the fruits of your labor.
Tips for Success: Mastering Your Homemade Cheese Enchiladas
To ensure your homemade cheese enchiladas turn out perfectly every time, keep these expert tips in mind:
- Don’t Rush the Roux: The golden-brown color and nutty aroma of the roux are crucial for deep flavor. Cooking it slowly and stirring constantly will prevent burning and develop a superior base for your sauce.
- Whisk Away Lumps: When adding broth to the roux, pour it in gradually while whisking vigorously. This technique is key to achieving a smooth, lump-free sauce.
- Taste and Adjust: Always taste your sauce before assembly and again before baking. Salt levels can vary, especially with bouillon and cheese, so adjust to your preference.
- Proper Tortilla Softening: Briefly dipping tortillas in hot oil makes them pliable and prevents tearing. Avoid over-frying, which can make them stiff or greasy. They should be just soft enough to roll.
- Cheese Choice Matters: American cheese is recommended for its excellent melting properties, ensuring a wonderfully gooey filling. If substituting, choose another good melting cheese like Monterey Jack or a blend.
- Don’t Overbake: Enchiladas are largely cooked before baking. The oven time is primarily to melt the cheese and heat everything through. Overbaking can dry out the tortillas and sauce.
Delicious Variations to Explore
While these cheese enchiladas are fantastic on their own, feel free to customize them:
- Add Protein: Easily transform these into a more substantial meal by adding cooked, shredded chicken, seasoned ground beef, or even leftover shredded pork inside the tortillas with the cheese.
- Bean and Veggie Delight: For a vegetarian option, mix black beans, corn, and sautéed bell peppers with the cheese for a hearty filling.
- Spicier Kick: For those who love heat, add a pinch of cayenne pepper to the sauce, or include extra finely diced jalapeños (or even serranos) in the Pico de Gallo or the filling.
- Cheese Blends: Experiment with different cheese combinations. A mix of Monterey Jack, mild cheddar, and a hint of cotija can add complexity.
- Green Enchilada Sauce: If you prefer a brighter, tangier flavor, adapt this recipe by using a homemade or high-quality store-bought green enchilada sauce instead of the red one.
Storage and Reheating Instructions
Leftover enchiladas are a treat! Store them covered tightly with plastic wrap or aluminum foil in the refrigerator for up to 3-4 days. To reheat, you can use the microwave for individual servings, but for best results and to prevent dryness, reheat covered in a preheated oven at 300°F (150°C) for about 20-25 minutes, or until heated through and bubbly. Add a splash of chicken broth or extra sauce if needed before reheating to maintain moisture.
Why These Homemade Cheese Enchiladas Are a Must-Try
There’s a special satisfaction that comes from making your favorite dishes from scratch, and these homemade cheese enchiladas are no exception. Beyond the incredible flavor, you have complete control over the quality of ingredients, allowing you to tailor them perfectly to your family’s preferences. This recipe, inspired by Rachel Cooks with Love, demystifies the process of creating a rich, authentic enchilada sauce that tastes far superior to anything from a can. It’s a comforting, hearty meal that brings people together, perfect for a weeknight dinner or a weekend gathering. Prepare to fall in love with the depth of flavor, the perfectly melted cheese, and the joy of creating a truly memorable Tex-Mex feast right in your own kitchen.
The Best Homemade Cheese Enchiladas Await You!
We hope this comprehensive guide inspires you to dive into the wonderful world of homemade cheese enchiladas. With a robust, flavorful sauce, perfectly softened tortillas, and generous layers of gooey cheese, this recipe guarantees a delicious outcome. Whether you’re a seasoned cook or new to Tex-Mex cuisine, following these steps will lead you to a dish that’s rich in flavor, tradition, and comfort. Don’t wait – gather your ingredients and start cooking the best homemade cheese enchiladas today!