
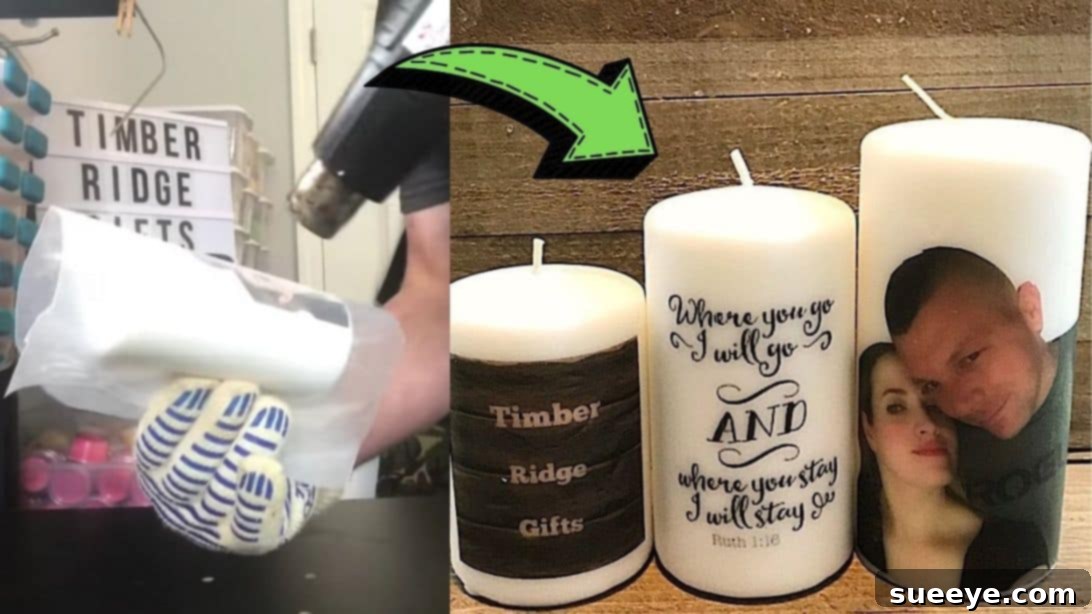
There’s something truly special about a gift that’s handcrafted and deeply personal. It speaks volumes, conveying thoughtfulness and love in a way store-bought items rarely can. Imagine combining the warm glow of a candle with a cherished memory captured in a photograph – that’s the magic we’re about to create with this simple yet incredibly effective DIY personalized photo candle tutorial. Inspired by the brilliant method shared by Timber Ridge Gifts on YouTube, this project immediately captured our imagination. Whether you’re planning a heartfelt gift for a loved one, like a grandmother’s birthday, or looking for a unique craft to sell, this candle personalization hack is guaranteed to impress with its ease and stunning results. Dive in, and let’s transform ordinary pillar candles into extraordinary keepsakes.
Essential Materials for Your Personalized Candle Project
Gathering your supplies is the first exciting step in any DIY endeavor. For this personalized photo candle craft, you’ll find that most items are readily available, perhaps even already in your craft drawer. The key is quality and preparation, ensuring a smooth and successful image transfer process. Here’s a detailed list of what you’ll need:
- Wax Paper: This is crucial for the heat transfer process. It acts as a protective layer and helps the image bond to the candle surface. Make sure you have a roll that’s wide enough to wrap around your chosen pillar candles.
- Craft Tissue Paper: Opt for white, thin craft tissue paper. The thinner the paper, the better the image transfer will be, as it allows the wax to seep through more effectively. Avoid very thick or patterned tissue paper.
- Cardstock: A sturdy piece of cardstock (or regular printer paper, though cardstock provides more stability) is necessary to provide support for the tissue paper when it goes through your printer. This prevents jams and ensures a clean print.
- White Pillar Candles: The ideal canvas for your personalized creation. Smooth, white pillar candles work best as they offer an even surface for the image and allow the photo colors to pop. Experiment with various sizes, but start with a medium-sized pillar for your first attempt.
- Scissors: Sharp scissors are essential for precise cutting of your printed image. Clean edges contribute to a professional-looking finish.
- Glue Stick: A standard washable glue stick will temporarily adhere the tissue paper to the cardstock, ensuring it feeds smoothly through your printer without shifting.
- Heat Gun: This is the hero tool of the project! A heat gun provides concentrated heat to melt the candle wax just enough to encapsulate your image. While a hairdryer might work for very small transfers, a heat gun offers superior control and efficiency, leading to a much better bond.
Step-by-Step Guide to Creating Your Custom Photo Candle
Now that you have all your materials ready, let’s walk through the simple yet magical steps to transform a plain candle into a cherished memento. Pay close attention to each detail for the best possible outcome.
Step 1: Preparing Your Image for Transfer
The success of your personalized candle begins with careful preparation of your chosen image. This step ensures that your photo is ready to be printed onto the delicate tissue paper, setting the stage for a flawless transfer. Choose a photograph that holds special meaning – a family portrait, a scenic landscape from a memorable vacation, or even a child’s drawing. Ensure the image quality is good; higher resolution will result in a clearer transfer. You can use any photo editing software to resize and adjust your image to fit the dimensions of your candle before printing.
Begin by cutting a piece of your craft tissue paper to roughly the size of your cardstock. This ensures it can pass through your printer without issues. Next, apply a thin layer of glue stick to the edges and center of one side of your cardstock. Carefully lay the tissue paper onto the glued cardstock, smoothing it out gently to remove any wrinkles or air bubbles. The glue is temporary and merely serves to stabilize the tissue paper for printing.
Load this composite sheet (tissue paper facing the print side) into your printer. Select the photo you wish to transfer to your candle from your computer. For best results, use your printer’s highest quality setting, but a standard print should also work well. Print your chosen image onto the tissue paper. Once printed, allow the ink to dry completely to prevent smudging. Carefully cut along the outline of your printed image. Be as precise as possible, removing any excess white space around the photograph. The goal is to have only your desired image on the tissue paper. Once you’re satisfied with the shape and cut, gently peel the tissue paper away from the cardstock. The glue should release easily without damaging the delicate tissue. Finally, cut a piece of wax paper that is large enough to wrap completely around your candle with some overlap – set this aside for the next step.
Step 2: Transferring the Image to the Candle with Heat
This is where the magic truly happens! With your image prepared, it’s time to bond it permanently to the candle surface. This step requires a steady hand and careful application of heat to ensure a seamless and beautiful transfer.
Take your printed tissue paper image and carefully position it onto the body of your white pillar candle. Take your time to get the placement just right – whether it’s centered, slightly off-center, or wrapped around. Once satisfied with its position, take the piece of wax paper you cut earlier. Wrap the wax paper tightly around the candle, completely covering the tissue paper image. It needs to be snug to hold the image in place and facilitate the transfer, but avoid pulling it so tight that it rips or distorts the image. Secure any excess flap of the wax paper at the back of the candle, perhaps by holding it firmly or using a small piece of tape if necessary to prevent it from shifting.
Now, grab your heat gun. Turn it on to a medium setting. Gently and continuously sweep the heat gun across the area where your image is positioned. Keep the heat gun moving constantly to ensure even heating and prevent the wax from melting too much in one spot. As you apply heat, you’ll notice the candle wax beneath the wax paper starting to melt and become slightly translucent, and the image on the tissue paper will also appear to darken and become more transparent, indicating that the ink is being absorbed into the softened candle wax. This process usually takes only a few seconds per section. Continue sweeping until the entire image appears to be adhered and slightly darker. Avoid holding the heat gun in one place for too long, as this could scorch the wax or create an uneven surface.
Once you’ve evenly heated the entire image area, turn off the heat gun and set the candle aside. Allow it to cool for a few seconds – just enough for the wax to re-harden slightly. Then, with great care, slowly and smoothly pull the wax paper off the candle. You should see your beautiful personalized image perfectly transferred onto the candle surface! The image won’t feel like a sticker; it will be integrated into the wax itself, creating a smooth finish.
It’s important to understand the nature of this transfer. The picture isn’t deeply infused into the candle but rather locked onto the surface with a thin layer of melted wax. While durable for display, if you plan on actually burning these personalized candles, please exercise caution. The tissue paper, though thin, is still a foreign material embedded in the wax, and could potentially burn differently or pose a slight fire hazard if left unattended. These candles are primarily intended for decorative purposes, making them exquisite keepsakes and thoughtful gifts.
Why Personalized Photo Candles Make the Perfect Gift
In a world saturated with mass-produced items, a personalized gift stands out. A DIY personalized photo candle is more than just an object; it’s a tangible expression of love, memory, and effort. It shows the recipient that you took the time and care to create something unique, tailored specifically for them. Imagine the delight on your grandmother’s face when she sees a candle adorned with a cherished family photo, or a couple receiving a candle featuring a picture from their engagement. These candles evoke emotions, tell stories, and create lasting impressions.
They are incredibly versatile, making them suitable for almost any occasion. Birthdays, anniversaries, weddings, Mother’s Day, Father’s Day, graduations, or even as a touching memorial for a loved one. Each candle becomes a conversation starter, a focal point in any room, and a constant reminder of a special moment or person. Beyond gifting, they also make stunning home decor pieces, adding a touch of warmth and personality to your own living space. For those with an entrepreneurial spirit, these custom candles can be a fantastic product for a small craft business, offering unique, handmade items that command attention and heartfelt appreciation.
Tips for Achieving Flawless Results
While the process is straightforward, a few expert tips can elevate your personalized candles from good to absolutely stunning:
- Choose the Right Candle: Opt for smooth, light-colored (preferably white) pillar candles. Any texture or darker color will make the image less visible and the transfer less clean.
- Image Quality Matters: Start with high-resolution photos. Blurry images will transfer as blurry images. Consider black and white photos for a classic, elegant look that often transfers beautifully.
- Practice Makes Perfect: If it’s your first time, consider doing a test run on a smaller, inexpensive candle. This allows you to get a feel for the heat gun and the transfer process without risking your main project candle.
- Even Heat Application: The key to a smooth transfer is consistent, even heating. Keep the heat gun moving in gentle, circular, or sweeping motions. Avoid concentrating heat in one spot for too long to prevent excessive melting or scorching.
- Smooth Out Air Bubbles: As you apply heat, you might notice small air bubbles under the wax paper. Gently smooth them out with your fingers (through the wax paper) as the wax softens.
- Patience During Cooling: Don’t rush to remove the wax paper. Allowing the candle to cool for a few seconds ensures the newly bonded wax sets properly, preventing the image from smudging or lifting when the wax paper is peeled away.
- Consider a Protective Seal: For display candles that might be handled often, you can apply a very thin coat of clear spray sealant (like an acrylic sealer) designed for crafts. Ensure it’s non-flammable and meant for candle surfaces if you intend to burn them (though display is generally safer for photo candles).
Creative Variations and Beyond
Once you’ve mastered the basic photo transfer technique, the possibilities for customization are endless. Don’t limit yourself to just single photos; explore these creative avenues:
- Collage Candles: Create a digital collage of several smaller photos or even a photo combined with text (like dates or names) on a single sheet of tissue paper.
- Themed Collections: Design a set of candles for specific holidays (e.g., vintage Christmas photos), seasons, or events (e.g., baby shower themes, wedding anniversaries).
- Artistic Transfers: Instead of photos, transfer line art, intricate patterns, or meaningful quotes onto your candles for a unique decorative touch.
- Scented Options: Start with pre-scented pillar candles for an added sensory dimension. The heat gun process won’t significantly alter the candle’s scent.
- Different Candle Shapes: While pillars are easiest, you can experiment with larger jar candles or even flat-sided candles for different visual effects.
- Business Opportunity: With this easy method, you can start a small business creating custom photo candles for events, personalized gifts, or even as unique memorial items. Offer different sizes, scents, and packaging options to stand out.
Final Thoughts on Your DIY Personalized Photo Candle
Creating a personalized photo candle is a deeply rewarding experience. It’s a craft that combines simplicity with profound sentiment, allowing you to capture precious memories in a beautiful, glowing form. Whether destined for a cherished family member, a dear friend, or to adorn your own home, these custom candles are sure to spark joy and admiration. The process, while engaging, requires minimal skill but yields maximum impact, making it accessible to crafters of all levels.
We extend our gratitude to Timber Ridge Gifts via YouTube for inspiring this wonderful tutorial. Their innovative approach has opened up a world of possibilities for personalized gifting and home decor. Now it’s your turn to unleash your creativity! Gather your materials, select your favorite photos, and embark on this delightful DIY journey. The warmth and personal touch of your handmade photo candle will undoubtedly become a treasured keepsake for years to come.
DIY Personalized Photo Candle Tutorial