
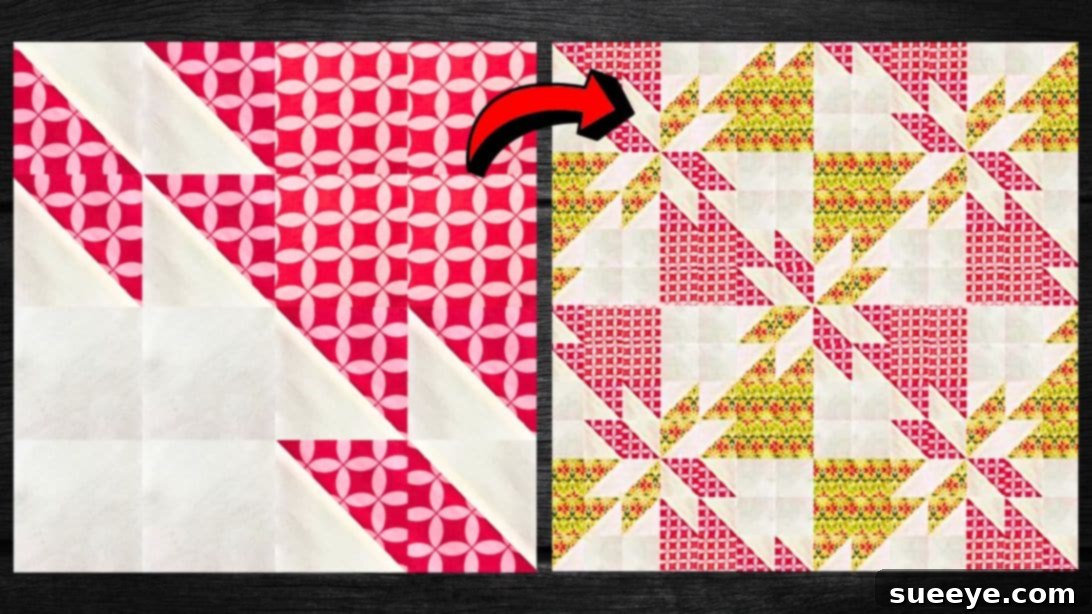
Embark on a delightful quilting journey and discover how to create the iconic Hunter’s Star quilt block with surprising ease! This beautiful and classic design, often perceived as intricate, becomes remarkably accessible thanks to the ingenious technique shared by Teresa DownUnder on YouTube. Her method simplifies the process, making it an ideal project for quilters of all skill levels, especially those just starting out. You’ll be amazed at how quickly you can piece together this stunning star, adding a touch of timeless elegance to your next quilting creation.
The Hunter’s Star quilt block is a beloved pattern, recognized for its striking geometric design that creates a beautiful illusion of depth and movement. Traditionally, it involves precise piecing of numerous small triangles, which can be daunting for novices. However, Teresa’s innovative approach streamlines these complex steps, allowing even absolute beginners to achieve a flawless finish. I’ve personally found immense joy in making these blocks, experimenting with various fabric combinations to bring out unique visual effects. Each block I create is a testament to how fun and rewarding quilting can be when you have the right guidance.
If you’re searching for a captivating new quilt project to dive into this week, look no further! This tutorial offers a refreshing and achievable goal, promising a beautiful outcome without the frustration often associated with intricate patterns. Get ready to transform simple fabric squares into a radiant Hunter’s Star. To ensure your success, we’ll walk through the step-by-step written instructions below. For an even clearer understanding and visual demonstration of each technique, make sure to complement your reading with Teresa DownUnder’s excellent video tutorial. Let’s gather our supplies and begin crafting your very own Hunter’s Star!
Why the Hunter’s Star Quilt Block is a Timeless Classic
The Hunter’s Star quilt block holds a special place in the hearts of quilters for several compelling reasons. Its distinct eight-point star motif is instantly recognizable and lends itself beautifully to a wide range of quilting styles, from traditional to modern. The magic of this block lies in its ability to create a secondary pattern when multiple blocks are joined together, forming mesmerizing chains and diamonds across the quilt top. This visual interplay adds a layer of sophistication that makes the Hunter’s Star perpetually popular.
Historically, star patterns have been a staple in quilting, often symbolizing guidance, hope, or celestial beauty. The Hunter’s Star, with its bold lines and contrasting fabrics, embodies these sentiments while offering endless possibilities for creative expression. Whether you choose bright, vibrant colors for a cheerful quilt or muted, earthy tones for a more sophisticated look, the design always shines through. Its versatility allows it to be the centerpiece of a quilt, or a striking element in a sampler quilt, proving its enduring appeal across generations of quilters.
Essential Materials for Your Hunter’s Star Quilt Block
Before you begin piecing together your stunning Hunter’s Star, gathering the right materials is crucial for a smooth and enjoyable quilting experience. Having everything prepared ensures you can focus on the creative process without interruption. Here’s a detailed list of what you’ll need:
- 9-inch Print Square: Choose a fabric with a captivating pattern or color that you want to highlight. This will form the dynamic elements of your star.
- 9-inch Background Square: Select a solid or subtly patterned fabric that contrasts well with your print square. This fabric will make your star pop and define its shape.
- Fabric Pins: Essential for holding your fabric layers securely in place during stitching. Opt for fine, sharp pins to avoid snags.
- Ruler: A clear acrylic quilting ruler with precise measurements is indispensable for accurate cutting and trimming. Look for one with a non-slip grip.
- Scissors or Rotary Cutter and a Cutting Mat: For clean, precise cuts. A rotary cutter with a sharp blade and a self-healing cutting mat are highly recommended for efficiency and accuracy in quilting.
- Needle and Thread: High-quality polyester or cotton thread that matches or blends with your fabrics. A sharp needle appropriate for quilting cotton is also key.
- Iron, for pressing: An iron is non-negotiable in quilting. Pressing seams open or to one side creates flat, precise blocks and crisp points. Ensure your iron is clean and ready.
- Sewing Machine: A reliable sewing machine is vital for consistent stitch length and strong seams. Make sure it’s threaded correctly and in good working order.
Having these tools ready will set you up for success, ensuring that each step of your Hunter’s Star quilt block comes together beautifully.
How to Make the Hunter’s Star Quilt Block: Step-by-Step Guide
This simplified method breaks down the Hunter’s Star into manageable steps, making the process enjoyable and rewarding. Follow these instructions carefully, and remember that accuracy in cutting and pressing is key to a beautiful finished block.
Step 1: Preparing Your Fabric Squares and Initial Stitching
Begin by selecting your two 9-inch squares: one print fabric and one background fabric. The key to a striking Hunter’s Star lies in the contrast between these two fabrics, so choose wisely! Place these two squares together, ensuring their right sides are facing each other. Align all edges perfectly to prevent shifting during stitching. Secure them firmly with fabric pins, placing them generously around the perimeter, especially near the corners. This step is critical for maintaining alignment.
Next, using your sewing machine, stitch all the way around the outer edges of the combined squares. Maintain a precise ¼ inch seam allowance throughout this stitching. This standard quilting seam allowance is essential for your block to finish at the correct size. Once stitched, take your ruler and rotary cutter. Carefully cut the stitched square apart diagonally in both directions. You should end up with four smaller triangular units. After making these diagonal cuts, gently trim off the pointed corners at an angle. This small trim, often referred to as “dog ears,” helps reduce bulk in your seams, leading to a flatter, more professional finish.
Step 2: Pressing, Trimming, and Assembling Your Half-Square Triangles
With your four triangular units created, the next vital step is pressing. Carefully open each unit and press the seams nicely. You can press the seams open or press them to one side, typically towards the darker fabric to prevent seam allowance shadows from showing through lighter fabrics. Pressing is not simply ironing; it involves lifting and lowering the iron rather than sliding it, which can distort your fabric. This creates crisp, flat units that are easier to work with and contribute to a more accurate final block.
After pressing, take each unit and trim them down into precise 6-inch squares. Use your quilting ruler and rotary cutter to ensure perfect 6×6 inch dimensions for each of the four squares. Accuracy here is paramount for your star points to align correctly. Once trimmed, take each 6-inch square and cut it in half, creating two strips from each. Then, cut each of these strips in half again. At this point, you will have a collection of small half-square triangles (HSTs) and solid squares. These are the building blocks of your Hunter’s Star.
Now comes the exciting part: assembling your block! Refer to Teresa DownUnder’s video tutorial for the exact arrangement, as the visual guide is incredibly helpful here. You will arrange your small HSTs and solid squares into a grid pattern that forms the distinctive Hunter’s Star design. Once you’re satisfied with your layout, stitch them together per row. Use that consistent ¼ inch seam allowance. After stitching each row, press the seams again. You can press seams within each row in opposite directions to help them nest when you join the rows. Finally, stitch the rows to each other, carefully matching seam intersections. As you join the rows, continue pressing your seams, ensuring a perfectly flat and beautifully pieced Hunter’s Star quilt block.
Tips for Perfect Quilting Results
Achieving a beautiful quilt block consistently requires attention to detail and a few best practices. Here are some invaluable tips to enhance your quilting journey, especially when tackling patterns like the Hunter’s Star:
- Accurate Cutting is Paramount: The foundation of any well-made quilt block is precise cutting. Always use a sharp rotary blade and a reliable quilting ruler. Double-check your measurements before making a cut. Even a slight discrepancy can throw off the alignment of your entire block.
- Press, Don’t Iron: As mentioned, pressing is distinct from ironing. When you press, you lift and set the iron down, which helps to flatten seams without distorting the fabric. Ironing, with its back-and-forth motion, can stretch fabric on the bias.
- Consistent Seam Allowance: The ¼-inch seam allowance is the cornerstone of quilting. Use a seam guide or a specialized ¼-inch foot on your sewing machine to maintain consistency. Any deviation will affect how your pieces fit together.
- Nest Your Seams: When joining two pieces with pressed seams (especially when pressing to one side), try to “nest” them. This means pressing one seam to the left and the other to the right. When you bring them together, the seams will interlock, creating a flatter intersection and perfectly aligned points.
- Stay Organized: Keep your cut pieces organized, especially when working on a block with many components. Lay them out in the correct order before stitching to avoid mistakes.
- Take Your Time: Quilting is an art form that benefits from patience. Don’t rush through steps. If a seam isn’t quite right, take the time to unpick and re-stitch it. It’s better to fix it early than to regret it later.
- Use Quality Materials: Good quality cotton fabrics are easier to work with, hold their shape better, and produce a more durable and beautiful quilt.
Exploring Fabric Choices for Your Hunter’s Star
The beauty of the Hunter’s Star quilt block is significantly enhanced by thoughtful fabric selection. Your choice of print and background fabrics can dramatically alter the overall aesthetic and impact of the finished design. Consider these factors when picking your textiles:
- High Contrast is Key: For the Hunter’s Star pattern to truly shine, aim for a clear contrast between your two main fabrics. A light background with a dark print, or vice versa, will make the star points pop. If your fabrics are too similar in value, the intricate design might get lost.
- Prints vs. Solids: While the original tutorial suggests a print and a solid, don’t be afraid to experiment. A solid background beautifully highlights a busy print, allowing the star’s geometry to stand out. Conversely, a subtle tone-on-tone background can add texture without distracting from a bolder star fabric. You could even use two contrasting prints, as long as one reads as distinctly lighter or darker than the other.
- Color Palette: Think about the mood you want to convey. Bright, saturated colors create a playful and energetic vibe, perfect for children’s quilts or modern designs. Muted, earthy tones or classic blues and creams offer a more traditional and serene feel. Monochromatic schemes can be incredibly striking, relying on texture and value variations to create interest.
- Scale of Print: If using a printed fabric, consider the scale of the print. Large, busy prints might get lost or chopped up in smaller pieces, especially in the HSTs. Smaller, more intricate prints or tone-on-tone designs often work well as they maintain their integrity when cut.
- Theme and Purpose: Consider the intended recipient or purpose of the quilt. A baby quilt might call for soft pastels and whimsical prints, while a seasonal throw could feature holiday-themed fabrics.
Don’t be afraid to lay out different fabric combinations before cutting. Seeing them together will help you visualize the final block and ensure you’re happy with your choices.
Easy Hunter’s Star Quilt Block Tutorial: Your Next Project Awaits
Congratulations on making it this far! You now have all the knowledge and inspiration to create your very own Hunter’s Star quilt block using Teresa DownUnder’s fantastic, beginner-friendly method. This isn’t just about making a single block; it’s about building confidence in your quilting skills and discovering the joy of transforming fabric into art.
The beauty of this tutorial lies in its simplicity and clarity, empowering you to tackle a classic pattern that might otherwise seem challenging. Remember, practice makes perfect, and each block you create will hone your skills in cutting, piecing, and pressing. Don’t hesitate to revisit the video tutorial for visual cues or re-read the instructions as you work through each step.
Once you’ve mastered this single block, imagine the possibilities! You can create multiple Hunter’s Star blocks to assemble into a stunning full-sized quilt, design a unique placemat, or even craft a beautiful cushion cover. The versatility of this block knows no bounds, and it serves as an excellent foundation for future quilting projects.
We extend our sincere gratitude to Teresa DownUnder via YouTube for generously sharing her expertise and all the images used here. Her clear instructions and clever techniques truly make complex patterns accessible to everyone. If you’ve enjoyed this project and found her teaching style helpful, we highly recommend visiting her channel and subscribing. You’ll discover a treasure trove of other inspiring quilt projects and valuable tutorials that will surely spark your creativity and help you grow as a quilter. Happy quilting!
RELATED: Explore Another Stunning Star Pattern: Easy Medina Fall Star Quilt Block Tutorial