
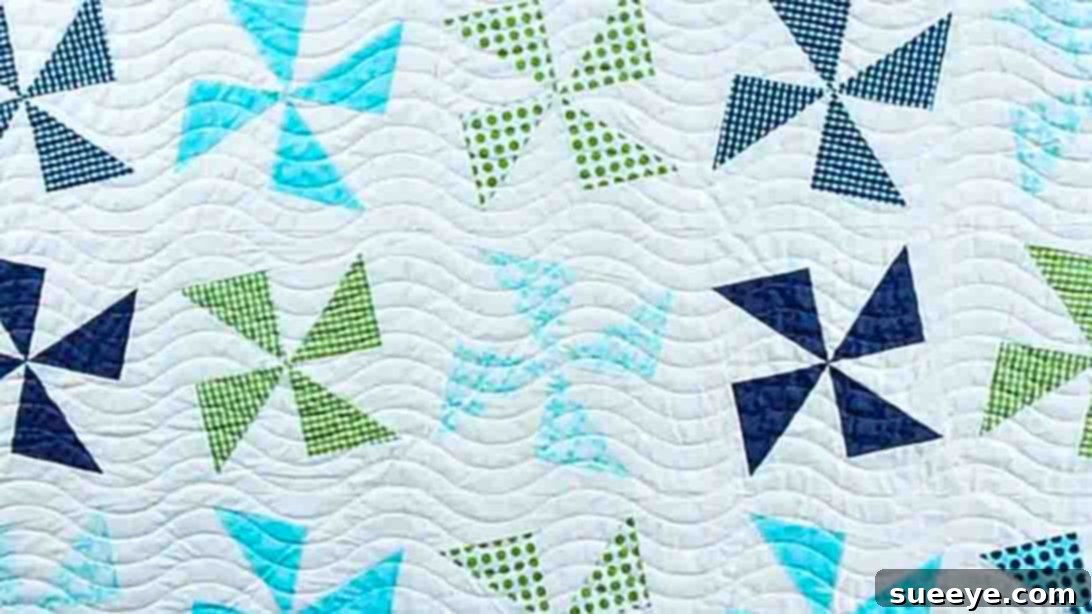
Master the Shuffle Quilt Pattern: A Beginner-Friendly Guide to Stunning Fabric Art
Embark on an exciting quilting journey with the captivating Shuffle Quilt pattern, a design that promises both a delightful challenge and immense satisfaction. Recently, while exploring new creative projects, I stumbled upon this extraordinary shuffle quilt tutorial from the renowned Fat Quarter Shop on YouTube. What immediately caught my eye was its intricate appearance, which belies its true nature as a surprisingly straightforward and beginner-friendly project. Don’t let the mesmerizing design intimidate you; this pattern is ingeniously structured to be accessible for quilters of all skill levels, even those just starting out. You’ll be astonished by how easily these gorgeous blocks come together to form a truly unique textile masterpiece, making it an ideal choice for your next quilting adventure.
The Shuffle Quilt has quickly become one of my absolute favorite patterns to construct, primarily because of its versatile nature and its incredible ability to breathe new life into your existing fabric collection. If you’re looking for an ideal “stash-busting” project that yields a stunning result, look no further. This comprehensive guide will walk you through every essential step, from preparing your fabrics to assembling the final quilt, ensuring a smooth and enjoyable crafting experience. We’ll delve into the precise techniques for creating perfect half-square triangles, assembling dynamic pinwheel blocks, and mastering the clever partial seams that give the Shuffle Quilt its distinctive charm. Get ready to transform your fabric scraps into a visually dynamic and cherished quilt that will impress everyone who sees it and become a treasured heirloom for years to come.
Essential Materials for Your Shuffle Quilt Project
Gathering the right materials is the first crucial step in any successful quilting endeavor. For the Shuffle Quilt, you’ll need a carefully curated selection of fabrics and notions to bring your vision to life. The quantities listed below are typically for a generously sized throw quilt, but remember that quilting is all about creativity – feel free to adjust sizes and fabric choices to suit your personal preferences and the dimensions of your desired final product. Always ensure your fabrics are quilting-quality cotton for the best results, as they are easier to work with, minimize fraying, and hold up well over time through washing and use.
- Feature Fabrics: 2 (5″ x 5″) charm packs OR 11 fat quarters. These will be the stars of your pinwheel blocks, offering a wonderful opportunity to showcase a variety of prints and colors. Charm packs provide pre-cut convenience, ensuring uniformity, while fat quarters (approximately 18″ x 22″) give you more control over your fabric selection, allowing you to cut specific areas of larger prints.
- Accent Fabric: 1 fat quarter. This piece can be used for a subtle pop of color, to introduce a contrasting texture, or to tie elements of your main fabrics together within your blocks. Its strategic placement can significantly enhance the quilt’s overall design.
- Background Fabric (for Pinwheels): 1 1/2 yards of white fabric. A crisp white background provides excellent contrast, making your colorful pinwheel and shuffle blocks truly pop and giving the quilt a fresh, modern feel. This yardage is primarily for the half-square triangle construction, providing the light element that defines the pinwheel’s movement.
- Secondary Background Fabric (for Block Framing): 2 1/2 yards of an additional background fabric. This fabric will frame your shuffle blocks and create the overall layout of your quilt top, providing visual cohesion and a sense of structure. Choose a color that complements your feature fabrics without overwhelming them – a subtle print or a solid in a neutral tone often works beautifully.
- Binding Fabric: 5/8 yard binding fabric. This crucial element frames your finished quilt, protecting its edges from wear and tear, and adding a polished, professional touch. Often, a coordinating solid, a subtle print, or even a scrappy binding (made from various leftover strips) is chosen to complete the aesthetic.
- Backing Fabric: 4 1/2 yards backing fabric. The backing provides the foundation for your quilt, offering warmth and stability. Consider a wide-back fabric (typically 90-108 inches wide) to avoid piecing the back, or choose a coordinating print or solid to make your quilt reversible and add another layer of visual interest.
- Batting: 74″ x 85″ batting. Batting is the cozy middle layer that gives your quilt its warmth, loft, and drape. This dimension is suitable for a standard throw quilt, providing ample comfort without being overly bulky. Popular batting types include cotton, poly-blend, bamboo, or wool, each offering different levels of warmth and drape.
- Essential Quilting Tools: While not listed in yardage, ensure you have a sharp rotary cutter (a 45mm or 60mm blade is common), a self-healing cutting mat (at least 24″x36″), an acrylic ruler (at least 6″x24″ for cutting strips and a square ruler, like 6.5″x6.5″ or 12.5″x12.5″, are highly recommended for trimming blocks), a good quality sewing machine with a 1/4″ presser foot, an iron and ironing board, quilting-specific thread (cotton or poly blend), fabric scissors, and plenty of pins or wonder clips. These tools are indispensable for achieving precise cuts and accurate seams, which are the hallmarks of a beautiful quilt.
Step-by-Step Directions: Crafting Your Shuffle Quilt Masterpiece
With your materials ready, it’s time to dive into the exciting process of constructing your Shuffle Quilt. Precision is key in quilting, especially with patterns like this that rely on accurate piecing for their striking visual effect. Take your time with each step, press frequently and carefully, and enjoy the creative journey. Remember, every stitch contributes to the beauty and integrity of your finished piece.
Step 1: Constructing the Dynamic Pinwheel Blocks
The foundation of your Shuffle Quilt lies in perfectly crafted pinwheel blocks. These classic units are formed using half-square triangles (HSTs), which might sound complex but are surprisingly simple to master with a few key techniques. Attention to detail in this step will ensure your finished blocks are crisp, vibrant, and spin with delightful accuracy.
- Prepare Your Squares for Half-Square Triangles: Begin by taking your chosen 5″ x 5″ feature fabric squares (from your charm packs or carefully cut from fat quarters). Pair each feature fabric square with a 5″ x 5″ square of your background fabric. Place these pairs right sides together, ensuring all raw edges are perfectly aligned. This careful pairing sets the stage for accurate HSTs.
- Mark and Stitch Your Diagonal Lines: Using a ruler and a fabric marking pen or pencil (one that disappears with water or heat), draw a diagonal line from one corner to the opposite corner on the wrong side of one of the squares (typically the lighter background fabric for better visibility). Once your line is drawn, stitch a precise 1/4″ seam allowance away from each side of this drawn line. This means you will have two parallel stitch lines, one on each side of your diagonal mark, effectively creating two channels for your seams. Consistency in your 1/4″ seam is paramount here.
- Cut and Press Your Half-Square Triangles: After stitching both seams, carefully cut right on your drawn diagonal line. This action will yield two half-square triangle units from each pair of squares. Gently press the seam allowance open or to one side. Traditionally, pressing towards the darker fabric is common to prevent “shadowing” on lighter fabrics, but pressing open creates a flatter block which can be advantageous. Choose your method and apply it consistently. Pressing creates flat, stable seams, which are vital for accurate piecing in subsequent steps.
- Trim for Precision and Uniformity: To ensure all your HSTs are uniform and perfectly sized, trim each unit down to 4 1/2″ x 4 1/2″. A square quilting ruler (e.g., a 6.5″ square ruler) is invaluable for this step. Place the 4 1/2″ mark of your ruler along the seam line of the HST to ensure the point is perfectly centered, then trim the excess fabric from all four sides. This meticulous trimming step guarantees perfectly sized blocks and crisp points for your pinwheels, crucial for the overall accuracy of your quilt.
- Arrange Your Pinwheel Layout: With four trimmed 4 1/2″ x 4 1/2″ HST units ready, begin arranging them to form the iconic pinwheel design. Typically, you’ll place two HSTs with their lighter triangles pointing towards the center and two with their darker triangles pointing towards the center, creating a swirling pattern. Play with the arrangement on your design wall or flat surface until you achieve your desired pinwheel orientation and visual balance.
- Assemble the Pinwheel Block: Sew the HSTs together into two rows of two units each. For the first row, sew the two top HSTs together. For the second row, sew the two bottom HSTs together. Press the seams of the first row in one direction (e.g., to the left) and the seams of the second row in the opposite direction (e.g., to the right). This technique, known as “nesting seams,” helps the seams align perfectly and reduces bulk when you join the rows. Finally, sew these two rows together to complete your pinwheel block. Press the final seam open or to one side, ensuring the center point of your pinwheel is as flat and accurate as possible.
Step 2: Building the Signature Shuffle Quilt Block with Corner Triangles
Now that you have your perfect pinwheel block, the next step is to transform it into the distinctive Shuffle Quilt block by adding corner triangles. This technique involves partial seams, which might be new to some quilters, but it’s a clever method for achieving a seamless, rotating effect around your central block. This stage truly brings the unique “shuffle” aesthetic to life, creating a dynamic framed element.
- Prepare Your Corner Triangles (Setting Triangles): For this step, you will need to cut squares from your background fabric (or accent fabric, if desired) that are slightly larger than the finished dimension of your pinwheel block. A common method is to cut squares that are approximately 1 1/2″ to 2″ larger than your finished pinwheel block size (e.g., if your pinwheel finishes at 4 1/2″ square, cut 6″ or 6 1/2″ squares). Cut these squares once diagonally from corner to corner to form two triangles from each square. These larger triangles will serve as your corner “setting” triangles, which you will attach to the sides of your pinwheel to square it up into a larger block.
- Attaching the First Triangle – The Partial Seam Technique: Take one of your newly cut corner triangles. Align its longest edge with one side of your pinwheel block, making sure everything is perfectly flush on the left side of that edge. Place the triangle right sides together with the pinwheel block. Now, stitch a partial seam: begin sewing at the top edge and stop approximately 1 to 2 inches (or about 1/4 of the way down the edge) before reaching the end of the triangle. Backstitch to secure the partial seam. This unsewn portion is crucial for the rotation that creates the unique shuffle effect.
- Press and Rotate Your Block: After sewing the partial seam, carefully press the triangle open, away from the pinwheel block. Your block will now have one triangle attached to one side, with part of its seam intentionally unstitched. Now, rotate your entire block clockwise by 90 degrees. This prepares the next side for a new triangle attachment.
- Attaching the Second Triangle – Full Seam: Take a second corner triangle and align its longest edge with the next available side of your pinwheel block, again ensuring perfect alignment on the left edge. Stitch this triangle all the way across the side, from beginning to end, using your consistent 1/4″ seam allowance. Press this triangle open, away from the pinwheel block, ensuring a flat and neat finish.
- Continue Rotating and Adding Triangles: Repeat the process of rotating the block 90 degrees clockwise, then adding another corner triangle with a full seam. Continue this sequence until you have attached three full triangles to three sides of your pinwheel block. At this point, you will have only one side left to attach the final triangle, and the partial seam from your very first triangle will be waiting to be completed.
- Completing the Final Triangle and Closing the Partial Seam: For the last side, you will attach the fourth corner triangle. Line it up as before, but this time, you will also complete the partial seam from the first triangle. Stitch all the way across this side, starting where the previous seam ended and connecting the beginning of this seam with the end of the partial seam from the very first triangle you attached. This effectively “closes the loop” and securely attaches all four triangles. Press the final triangle open, ensuring all seams are flat.
- Trim and Square Up Your Finished Block: With all four triangles attached, your block will likely have some irregular edges due to the nature of adding triangles to a square. Carefully trim off any excess fabric around the perimeter, squaring up your finished Shuffle Quilt block to a consistent size (e.g., 6 1/2″ or 8 1/2″ square, depending on your initial cut sizes and desired final block dimensions). Use your square quilting ruler to ensure precise 90-degree corners and straight edges. This final trimming step is vital for ensuring your blocks will fit together seamlessly when assembling the quilt top, leading to a professional-looking finished product.
Assembling Your Shuffle Quilt Top
Once all your individual Shuffle Quilt blocks are completed and perfectly squared up, the magic of assembly begins! This is where your quilt truly starts to take shape as a cohesive design. Take your time arranging your blocks, as this is your opportunity to play with the overall design, explore different orientations, and make sure you’re happy with the visual flow before committing to stitching.
- Arrange Your Blocks on a Design Surface: Lay out all your finished Shuffle Quilt blocks on a design wall, the floor, or any large flat surface where you can see the entire layout. Experiment with different orientations and arrangements. The beauty of the Shuffle Quilt is in its dynamic movement; try rotating individual blocks, creating repeating patterns, or simply letting the colors and prints dance together in a seemingly random yet harmonious way. This planning stage is crucial for achieving your desired aesthetic and ensures no two identical blocks are adjacent unless intended.
- Sew Blocks into Rows: Once you’re satisfied with your layout, carefully pick up the blocks for your first row, keeping them in their precise order. Sew these blocks together one by one, using a consistent 1/4″ seam allowance. After completing each row, carefully press the seams. For adjacent rows, it’s often helpful to press the seams of one row in one direction and the next row in the opposite direction. This technique facilitates “nesting seams” in the next step, where seam allowances from adjacent rows lock together, helping you achieve perfect points. Repeat this process for all your rows until you have individual completed rows.
- Join Your Rows to Form the Quilt Top: After all your individual rows are stitched and pressed, it’s time to join them to form the full quilt top. Pin your rows right sides together, paying meticulous attention to aligning all seam intersections. The nested seams you created earlier will now prove invaluable in matching up your points. Use plenty of pins to hold everything securely in place. Stitch your rows together with your consistent 1/4″ seam allowance, taking care not to stretch the fabric. Press the final seams open or to one side (usually pressed open for flatter quilt tops) to ensure a flat, smooth quilt top that lays beautifully. Your pieced quilt top is now complete!
Quilting and Finishing Your Masterpiece
You’ve poured your heart into piecing, and now it’s time for the final steps that transform your quilt top into a finished, functional, and beautiful quilt. This phase includes basting, quilting, and binding – each essential for durability, longevity, and a professional appearance. These steps add the texture and structure that complete your Shuffle Quilt.
- Basting the Quilt Layers: Basting is the process of temporarily securing your three quilt layers together: the backing fabric, the batting, and the quilt top. This crucial step prevents shifting during quilting. Lay your backing fabric wrong side up on a clean, large, flat surface (like a floor or large table), smooth it out thoroughly, and tape it securely. Place your batting smoothly over the backing, ensuring it’s centered and wrinkle-free. Finally, center your quilt top right side up over the batting. Secure all three layers using your preferred basting method:
- Safety Pin Basting: Use curved safety pins spaced every 3-4 inches across the entire quilt, starting from the center and working outwards.
- Spray Basting: Use a temporary fabric adhesive spray, following the manufacturer’s instructions for even application and good ventilation.
- Thread Basting: Use long, loose stitches to baste the layers together by hand in a grid pattern.
Ensure there are no wrinkles or puckers in any layer before moving on to quilting.
- Quilting Your Layers: Now comes the quilting itself – stitching through all three layers to create texture, design, and to hold the batting in place, preventing it from bunching up. This can be done by hand or machine. Your quilting choice can dramatically impact the final look of your Shuffle Quilt.
- Straight Line Quilting: Simple and effective, using your walking foot to create parallel lines, grids, or cross-hatching. It’s great for beginners and complements modern designs.
- Stitch-in-the-Ditch: Stitching directly in the seam lines of your pieced blocks for a subtle, defined look that makes the piecing stand out.
- Free Motion Quilting: Allows for intricate designs, loops, stipples, or custom patterns, requiring a darning foot and practice to master. It adds wonderful texture and personalization.
- Longarm Quilting: If you have access, a professional longarm machine can quilt large projects quickly and with beautiful, consistent results.
Choose a quilting design that complements your Shuffle Quilt pattern and your skill level, remembering that simpler can often be more elegant.
- Attaching the Binding: The binding provides a clean, durable edge to your quilt, protecting it from wear and tear. Using your 5/8 yard of binding fabric, cut 2.5″ wide strips. Sew these strips together end-to-end (usually with a diagonal seam for less bulk) to create one long continuous strip. Fold this strip in half lengthwise, wrong sides together, and press firmly. Attach the binding to the front edge of your quilt, aligning the raw edges of the binding with the raw edges of the quilt. Stitch all the way around, mitering the corners. Then, fold the binding over to the back of the quilt and hand-stitch or machine-stitch it down for a beautiful and secure finish. There are many excellent tutorials available for various binding techniques (machine-sewn to front and back, machine-sewn to front then hand-sewn to back, continuous bias binding).
- Add a Quilt Label: Don’t forget to add a personal label to the back of your quilt! This small but significant touch adds sentimental value and historical context. Include details such as your name, the date of completion, the pattern name (Shuffle Quilt), and if it’s a gift, the recipient’s name. This transforms your handmade item into a true heirloom.
Why the Shuffle Quilt is a Must-Try Pattern for Every Quilter
The Shuffle Quilt isn’t just another pattern; it’s an opportunity to create something truly special and showcase your creativity while enhancing your quilting skills. Its enduring appeal lies in several key aspects that make it a favorite among both novice and experienced quilters alike:
- Visually Stunning and Dynamic: The intricate interplay of pinwheels and surrounding triangles creates a captivating visual effect, making the quilt appear complex and expertly designed. The “shuffle” element gives it a sense of movement and depth that draws the eye and makes it a focal point in any room.
- Beginner-Friendly with Skill-Building Opportunities: While it introduces slightly more advanced techniques like half-square triangles and partial seams, the step-by-step nature of this pattern makes it incredibly accessible. It’s an excellent project for beginners looking to expand their skills beyond basic squares and rectangles without feeling overwhelmed, offering a satisfying learning curve.
- Exceptional Stash-Busting Potential: This pattern is a dream for utilizing your existing fabric stash. The smaller 5-inch squares for the pinwheels and the various background pieces allow you to pull from a wide array of leftover fabrics, giving each Shuffle Quilt a unique personality based on your individual fabric collection. It’s a wonderful way to give new life to cherished scraps.
- Remarkable Versatility in Design: By simply changing your fabric choices – from vibrant, contrasting prints to serene solids, or a thoughtful mix of both – you can drastically alter the quilt’s overall aesthetic. Create a modern, traditional, whimsical, or even a holiday-themed piece all with the same underlying pattern. The possibilities for customization are endless.
- Incredibly Rewarding Experience: There’s immense satisfaction in seeing those “complicated” blocks come together so elegantly, transforming simple fabric pieces into a cohesive and beautiful whole. The Shuffle Quilt provides a wonderful sense of accomplishment and results in a beautiful, functional piece of art for your home or as a heartfelt, personalized gift that will be cherished.
Whether you’re looking for a new weekend project, a long-term endeavor to perfect your quilting skills, or a unique gift for a loved one, the Shuffle Quilt offers an exceptionally rewarding experience. Its blend of classic elements and a unique assembly method ensures that each finished quilt is a testament to your patience, precision, and passion for fabric arts. So, gather your materials, set up your sewing space, and prepare to bring this stunning design to life. The journey from fabric to finished quilt is a joy, and the Shuffle Quilt is a fantastic destination. Happy quilting!