
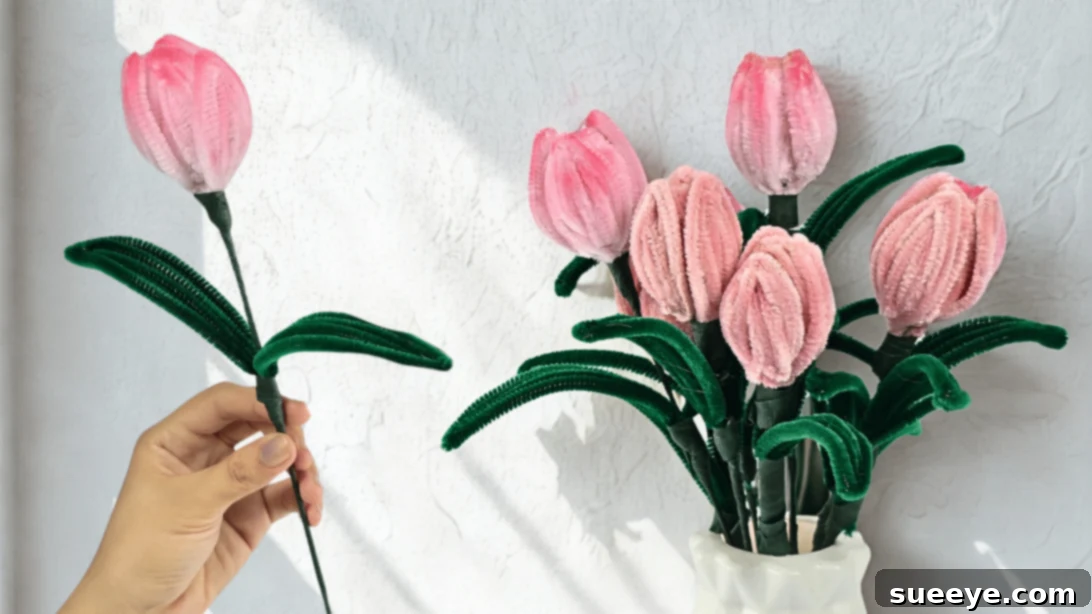
Welcome to our vibrant crafting corner where we’ll show you how to master the art of making exquisite pipe cleaner tulips! Forget about needing a green thumb; with just a handful of affordable and readily available materials, you can craft a stunning bouquet of these cheerful flowers that will never wilt. This delightful DIY project is not only incredibly easy, making it perfect for beginners and seasoned crafters alike, but it also provides a fantastic opportunity for kids to unleash their creativity. Imagine brightening any room with a perpetual touch of spring, regardless of the season outside. Get ready to twist, bend, and create beautiful, lasting blooms that bring joy and color to your home or make for heartfelt gifts. Our comprehensive guide will walk you through every step, ensuring your success in creating charming pipe cleaner flowers that look professionally made. Discover the simple pleasure of crafting and add a personal touch to your decor today.
RELATED: Explore More Easy Spring and Easter Crafts for Beginners
Just think of all the wonderful possibilities you can unlock with your handmade pipe cleaner flowers! Create an entire vibrant bouquet to adorn your dining table, craft a charming little gift for a friend or loved one, or simply add a delightful pop of color to your office desk. These versatile tulips are perfect for celebrating special occasions, enhancing home decor, or simply enjoying a relaxing afternoon craft session. They offer a unique blend of simplicity and charm, making them an ideal project for anyone looking to add a touch of handmade beauty to their life. So, gather your pipe cleaners and let your imagination blossom – you’ll be amazed at how much fun you’ll have and how absolutely adorable your finished pipe cleaner tulips will turn out!
Essential Materials for Crafting Your Own Pipe Cleaner Tulips
Crafting these beautiful pipe cleaner tulips requires only a few basic and inexpensive materials, most of which you likely already have around the house or can easily find at any craft store. The beauty of this project lies in its simplicity and accessibility. Here’s what you’ll need to get started on your DIY flower journey:
- Pipe Cleaners: These fuzzy, bendable wires are the star of our show! Choose a variety of bright colors for the tulip petals and green for the stems and leaves to create a realistic and vibrant look. You can experiment with different shades to make unique bouquets.
- Scissors: A good pair of craft scissors will be essential for cleanly cutting your pipe cleaners to the desired lengths.
- Floral Tape: This stretchy, self-adhesive tape is crucial for wrapping your tulip stems and securely attaching the leaves, giving your flowers a professional and polished finish. Green floral tape is ideal for mimicking real plant stems.
- Floral Wire: Adding floral wire inside your pipe cleaner stems provides extra stability and allows you to easily shape and arrange your tulips in a vase. It helps prevent your flowers from drooping.
- Glue Gun and Glue Sticks: A hot glue gun will be used for securely assembling the petals and other delicate parts of your tulip. Ensure you have enough glue sticks on hand.
How to Craft Stunning Pipe Cleaner Tulips: A Step-by-Step Tutorial
Follow these detailed instructions to create beautiful and lifelike pipe cleaner tulips. Each step is designed to be clear and easy, ensuring a rewarding crafting experience for everyone.
Step 1: Forming the Base Petal Structure
Begin by taking two pipe cleaners of your chosen petal color. Fold each pipe cleaner precisely in half. Next, gently insert one folded pipe cleaner into the fold of the other, forming an ‘X’ shape. Once positioned, twist the two pipe cleaners together twice at their intersection to secure them firmly. Finally, fold down both sides of the combined structure. This initial twist forms the central knot from which your petals will gracefully extend, providing a stable foundation for your tulip bloom.
Step 2: Shaping the Large Petal Sections
From the central knot you created in Step 1, measure approximately 5 cm along the two center pipe cleaners. At this 5 cm mark, twist these two center pipe cleaners together securely. Then, take the remaining two side pipe cleaners and twist them together. Finally, bring the twisted side sections towards the center and twist all four pipe cleaner ends together in the middle. This measurement of 5 cm is crucial for crafting the larger, outer petals of your tulip, giving them ample size and a graceful curve. Repeat this process until you have created all the necessary large petal foundations.
Step 3: Securing and Defining Petal Shape
To further define your petal and secure its shape, take one of the pipe cleaner ends from the back of the petal structure. Carefully thread it through the small slit or opening at the front. Once through, bring this pipe cleaner end together with the other ends at the top of the petal. Twist all of them firmly to lock the shape in place. As a final touch, gently push any excess “tail” of the pipe cleaner outward, away from the petal, to create a neat and finished edge. This step ensures your petal maintains its form and looks polished.
NOTE: For creating the smaller, inner petals, the initial steps of folding and twisting are very similar to those for the large petals. However, it’s crucial to use a shorter measurement when twisting the pipe cleaner from the central knot. Instead of 5 cm, measure and twist at approximately 4 cm for a more delicate and compact inner petal. This slight adjustment in length will create a beautiful layered effect for your tulip.
Step 4: Completing Petals – Small and Large
After successfully forming a smaller petal using the 4 cm measurement, twist its tail firmly to lock its position, then carefully push this tail inwards towards the center of the petal, concealing it for a clean finish. Continue this process until you have crafted a total of three small petals and three large petals. Consistency in your twisting and shaping will ensure uniformity among your petals, leading to a beautifully balanced tulip bloom. Take your time to perfect each one, as these will form the core of your stunning pipe cleaner flower.
Step 5: Assembling Your Tulip Bloom
Now it’s time to bring your individual petals together to form the beautiful tulip head. Start by carefully assembling the three smaller petals first, positioning them to create a tight, compact center for your flower. Once you are satisfied with their arrangement, use a hot glue gun to secure them firmly at their bases. Next, take your three larger petals. Apply a small dab of hot glue to the base of each large petal and meticulously position them around the smaller petals. Ensure the larger petals meet exactly where the small petals connect on the sides, creating a staggered, natural-looking tulip bloom. Hold each petal in place for a few seconds until the glue sets.
Step 6: Crafting the Tulip Leaves
To add a touch of realism to your pipe cleaner tulips, let’s create the leaves. Take two green pipe cleaners and fold each one precisely in half. Similar to how you started the petals, insert one folded pipe cleaner into the fold of the other, forming a ‘V’ or ‘U’ shape. Then, carefully fold down the sides of these intertwined pipe cleaners to begin shaping the characteristic leaf form. This method ensures your leaves have a natural central crease and a sturdy structure, mimicking the elegant simplicity of real tulip foliage.
Step 7: Securing and Duplicating Leaves
Once you have shaped the initial leaf structure, twist the ends of the green pipe cleaners firmly together at the base to secure the leaf’s form. This twisting motion not only locks the shape in place but also creates a small stem for attaching the leaf to the main tulip stem. For a fuller and more realistic tulip, you will need to create a total of two such leaves. Ensure both leaves are similar in size and shape for a cohesive look, adding that perfect natural flourish to your handmade flowers.
Step 8: Attaching Leaves and Finishing the Stem
With your tulip bloom and leaves ready, it’s time to assemble the complete flower. Take your prepared leaves and position them along the main pipe cleaner stem, just below the tulip head, at a natural-looking height. Once you’re happy with their placement, begin wrapping the entire stem, including the small bases of the leaves, with floral tape. Start from just under the tulip head and wrap downwards, stretching the tape slightly as you go to activate its adhesive properties and ensure a smooth, secure finish. Continue wrapping until you reach the desired stem length, trimming any excess floral tape. This step gives your tulip a sturdy, realistic stem and elegantly integrates the leaves.
CUTE TULIPS! Your charming handmade pipe cleaner tulips are now complete and ready to bring a smile to anyone’s face!

Why You’ll Adore Crafting These Pipe Cleaner Tulips
Beginner-Friendly & Family Fun
Creating vibrant pipe cleaner tulips is an incredibly simple and enjoyable craft that requires minimal materials and no prior experience. This makes it an accessible and rewarding project for crafters of all ages and skill levels. It’s a fantastic activity for families, allowing both children and adults to bond over a shared creative endeavor, fostering imagination and fine motor skills in a fun environment.
Cost-Effective & Sustainable Decor
Pipe cleaners are famously inexpensive and widely available, making this craft an economical choice for those looking to add a splash of color to their home or workspace without a hefty price tag. You can create an entire bouquet of these cheerful flowers for a fraction of the cost of real ones. Plus, unlike fresh flowers, these pipe cleaner tulips are a sustainable choice that lasts forever, reducing waste and providing continuous beauty.
Long-Lasting Beauty & Versatile Decor
One of the greatest advantages of crafting pipe cleaner tulips is their enduring beauty. Unlike real tulips, which wilt and fade after a short period, your pipe cleaner creations will remain vibrant and fresh indefinitely. They can brighten your space through every season, providing a long-lasting burst of color and cheer. Their versatility means they can be used in countless ways: as a charming table centerpiece, an accent on your desk, a playful addition to a child’s room, or even as unique party favors.
Personalized & Heartfelt Gifts
There’s something truly special about a handmade gift. These pipe cleaner tulips offer a wonderful opportunity to create personalized presents for birthdays, anniversaries, Mother’s Day, or just to show someone you care. Customizing colors to match a recipient’s favorite palette makes the gift even more thoughtful and unique, demonstrating effort and affection that store-bought items simply cannot replicate.
Boost Creativity & Relaxation
Engaging in crafts like making pipe cleaner tulips is not just about the end product; it’s also a fantastic way to boost your creativity and practice mindfulness. The process of bending, twisting, and shaping can be incredibly therapeutic and relaxing, providing a welcome break from daily stresses. It allows you to focus, express yourself, and enjoy the satisfaction of bringing a beautiful idea to life with your own hands.
Tips for Crafting Perfect Pipe Cleaner Tulips
Achieving flawless pipe cleaner tulips is easier than you think with a few helpful pointers. Here are some expert tips to ensure your handmade flowers look their absolute best:
- Choose Vibrant Colors: Don’t limit yourself to traditional tulip colors. Experiment with bright pinks, purples, oranges, or even multi-colored pipe cleaners for a truly unique bouquet. The brighter the colors, the more cheerful your finished tulips will be.
- Practice Your Twists: The key to symmetrical and sturdy petals lies in consistent twisting. Practice a few twists before starting your final petals to get a feel for the tension and tightness required. Uniform twists lead to uniform petals.
- Secure with Hot Glue: When assembling the petals, don’t be shy with a tiny dab of hot glue. It provides extra security, especially for the inner petals, ensuring your tulip head remains intact and beautiful. Remember, a little goes a long way!
- Vary Stem Lengths: For a more natural-looking bouquet, vary the lengths of your tulip stems. This mimics how real flowers grow and adds dynamic visual interest when arranged in a vase. Use floral wire inside the stem pipe cleaners for extra rigidity if desired.
- Experiment with Leaf Shapes: While our guide provides a standard leaf shape, feel free to experiment! You can create longer, narrower leaves or wider, rounder ones to give your tulips a unique personality.
- Add a Touch of Sparkle: For an extra special touch, consider using glitter pipe cleaners or lightly dusting your finished tulips with craft glitter. This can add a magical shimmer, perfect for festive decorations or gifts.
- Patience is Key: While this is an easy craft, taking your time with each step will yield the best results. Rushing can lead to uneven petals or loose connections. Enjoy the process!
Creative Ways to Display Your Handmade Pipe Cleaner Tulips
Once you’ve finished crafting your beautiful pipe cleaner tulips, the fun doesn’t stop there! These versatile flowers can be used in numerous creative ways to brighten your home, enhance celebrations, or make thoughtful gifts. Here are some ideas to inspire you:
- Charming Bouquets: Arrange a vibrant collection of your pipe cleaner tulips in a small vase or jar. They make a perpetual centerpiece for dining tables, coffee tables, or window sills. Mix and match colors for an eye-catching display.
- Desk Companions: Place a single tulip or a small cluster on your workspace to add a cheerful pop of color and a touch of nature (without the need for watering!). They’re excellent for personalizing your office or study area.
- Unique Gift Toppers: Instead of a traditional bow, use a handmade pipe cleaner tulip to adorn a gift package. It adds a personal, crafty touch that makes any present feel extra special.
- Kid’s Room Decor: These durable and colorful flowers are perfect for decorating a child’s bedroom or play area. They can be placed in small pots, hung from strings as a garland, or even used as part of a diorama.
- Party Favors or Decorations: Craft several tulips to use as adorable party favors for birthdays, bridal showers, or garden parties. They can also be incorporated into table settings or strung together to create festive garlands.
- DIY Magnets: Attach small magnets to the back of single tulip blooms to create charming refrigerator magnets. They’re a lovely way to display photos or notes with a decorative flair.
- Hair Accessories: For a whimsical touch, carefully attach a small tulip to a hair clip or headband. This makes a unique and fun accessory, especially for children.
- Wreaths and Garlands: Incorporate your pipe cleaner tulips into a DIY wreath for your front door or string them together to create a colorful garland to hang across a mantelpiece or wall.
Frequently Asked Questions (FAQ) About Pipe Cleaner Tulips
Got questions about making these adorable pipe cleaner tulips? We’ve got answers! Check out some of the most common queries from fellow crafters:
- Q: How many pipe cleaners do I need for one tulip?
A: You will typically need 6-8 pipe cleaners for one complete tulip, including the petals, stem, and leaves. This can vary slightly depending on how many inner/outer petals you choose to make and the desired length of your stem. - Q: Can children make these pipe cleaner tulips?
A: Absolutely! This project is wonderfully kid-friendly. Younger children might need some assistance with the twisting and hot gluing steps, but older kids can easily follow along with minimal supervision. It’s a fantastic craft for developing fine motor skills and encouraging creativity. - Q: What if I don’t have floral tape or floral wire?
A: While floral tape and wire give the best results for realism and stability, you can still make tulips without them. For the stem, you can simply twist several green pipe cleaners together to make a thicker, sturdier stem. For attaching leaves, you can use regular craft glue or even small pieces of masking tape wrapped around the stem, then covered with another pipe cleaner. - Q: How can I make my pipe cleaner tulips stand upright in a vase?
A: To help your tulips stand tall, ensure you’ve incorporated floral wire within the pipe cleaner stem (Step 8 mentions this). If they still feel wobbly, you can add small pebbles, marbles, or craft foam to the bottom of your vase for extra support. You can also lightly bend the floral wire inside the stem to adjust its posture. - Q: Can I use different types of pipe cleaners?
A: Yes! Experiment with glitter pipe cleaners, thicker jumbo pipe cleaners, or even metallic ones for different effects. Each type will give your tulips a unique texture and look. Just ensure they are pliable enough to twist and shape easily. - Q: How long do these pipe cleaner tulips last?
A: Indefinitely! Unlike real flowers, pipe cleaner tulips will last for years with proper care. Keep them out of direct sunlight to prevent potential fading over very long periods, and gently dust them when needed.
Explore Our Other Captivating Flower Crafts
Paper Flowers
How to Make Paper Tulips
Paper Flowers
How to Make Origami Daffodils
Yarn Crafts
How to Make Flowers Using Yarn
Paper Flowers
How to Make Crepe Paper Flowers
We hope you thoroughly enjoyed learning how to craft these enchanting pipe cleaner tulips! They’re a testament to how simple materials can create something truly beautiful and enduring. Don’t forget to visit our official website for more exciting DIY projects, follow our Facebook page for daily inspiration, and subscribe to our YouTube channel for video tutorials and endless crafting fun. Share your creations with us – we’d love to see your unique pipe cleaner tulip bouquets!