
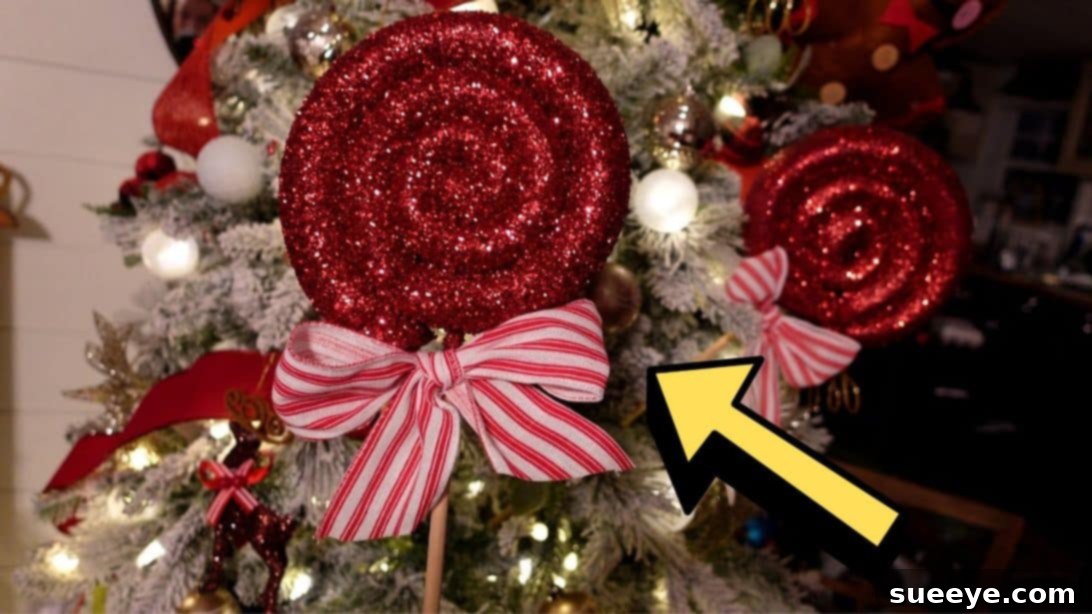
Giant DIY Christmas Lollipop Decorations: Easy Pool Noodle Craft for Festive Holiday Decor
The holiday season is a magical time, filled with warmth, joy, and the sparkle of festive decorations. While store-bought decor can be beautiful, there’s a unique charm and satisfaction that comes from creating your own custom pieces. This year, why not craft a whimsical wonderland with magnificent, oversized Christmas lollipop decorations? This incredibly fun and creative DIY project, inspired by the brilliant ideas from BELLE OF THE BLUEGRASS on YouTube, offers a stunning, yet remarkably easy and inexpensive way to deck your halls.
Imagine grand, glittering lollipops adorning your Christmas tree, gracing your entryway, or transforming your yard into a festive candy land! What makes this project truly special is its accessibility. You can find virtually all the necessary materials and supplies at your nearest dollar store, making it a delightfully budget-friendly alternative to often pricey retail decorations. Not only will you save money, but you’ll also create bespoke decor that perfectly matches your holiday vision. If you’re ready to add a touch of sweet charm to your festive setup, delve into our comprehensive guide below, offering enhanced instructions and creative tips to ensure your giant lollipops are nothing short of spectacular.
Why Choose This DIY Giant Lollipop Project?
- Uniquely Eye-Catching: Oversized decorations always make a statement, drawing attention and bringing a whimsical, larger-than-life feel to your decor.
- Budget-Friendly Brilliance: Utilizing inexpensive pool noodles and common craft supplies significantly cuts down on holiday spending compared to purchasing similar-sized decor items.
- Surprisingly Simple: The core steps are straightforward, making this a fantastic project for crafters of all skill levels, even beginners.
- Highly Customizable: With a vast array of spray paint and glitter colors, ribbons, and embellishments, you can tailor your lollipops to perfectly suit your existing holiday theme or create something entirely new.
- Versatile Display Options: These lollipops are perfect for indoor use on large trees, as mantel accents, or even for outdoor displays, adding curb appeal and festive cheer.
- Durable and Reusable: When properly sealed, these decorations can withstand the elements (if used outdoors) and be stored for many joyful seasons to come.
Essential Materials for Your Giant Lollipop Decorations:
Gathering your supplies is the first exciting step in any DIY adventure. Here’s a detailed look at what you’ll need and why:
- Hot Glue Gun & Glue Sticks: Your primary adhesive for securing elements like the bow. Ensure you have plenty of glue sticks on hand for a smooth crafting process.
- Spray Adhesive: This is crucial for evenly distributing glitter and ensuring it adheres firmly to the painted pool noodle. A strong, clear-drying adhesive is recommended.
- Pool Noodle (Standard Size): The star of our show! Opt for a standard-sized noodle, as its foam structure is easy to cut, shape, and lightweight for hanging or displaying. Consider its color if you plan on thin paint coats, though paint will cover most.
- Wooden Dowel Rods: These will serve as the sturdy “sticks” for your lollipops. Choose a diameter that feels robust enough for the size of your lollipop (e.g., 3/8-inch or 1/2-inch) and a length that suits your desired display height.
- Scissors or X-Acto Knife: For precise cutting of the pool noodle and ribbon. An X-Acto knife offers more precision for the initial pool noodle cut, while scissors are handy for ribbon. Always use with caution.
- Zip Ties: Essential for securely holding the rolled pool noodle in its spiraled lollipop shape. Opt for durable, medium-sized ties.
- Glitter: The magic ingredient for that classic, sparkling lollipop effect! Have various colors ready to match your paint scheme. Fine glitter offers a subtle shimmer, while chunky glitter delivers bolder sparkle.
- Spray Paint: Choose your desired lollipop colors. Red and white are classic, but don’t shy away from pink, blue, green, or even iridescent colors. A good quality primer spray paint can also help with adhesion and vibrancy. Ensure you work in a well-ventilated area.
- Ribbon: A festive ribbon bow adds the perfect finishing touch. Select a wired ribbon for easier shaping and choose a color and pattern that complements your lollipop design.
- Minwax Polyacrylic Spray (or similar clear sealant): This clear coat will protect your paint and glitter, prevent shedding, and add durability, especially if your lollipops will be displayed outdoors or handled frequently.
Step-by-Step Guide: Crafting Your Festive Pool Noodle Lollipops
Step 1: Preparing and Shaping the Pool Noodle Base
Begin by setting up a clean, well-ventilated workspace, preferably outdoors or in a garage, especially for painting. Lay down newspaper or a drop cloth to protect surfaces.
- Cut the Pool Noodle: A whole pool noodle can create a very large lollipop, which might be overwhelming depending on your intended display. For a more manageable size (approximately 12-14 inches in diameter), carefully cut your pool noodle in half lengthwise using sharp scissors or an X-Acto knife. This not only makes the lollipop more proportionate but also yields two lollipops from a single noodle, maximizing your craft supplies.
- Form the Lollipop Spiral: Starting from one end of the cut pool noodle, begin to roll it tightly into a spiral shape. This will form the classic circular lollipop head. Ensure the roll is as snug and even as possible to create a neat appearance.
- Secure the Shape with a Zip Tie: Once you’ve achieved your desired spiral, hold the end of the pool noodle firmly against itself. Take a zip tie and carefully thread it around the entire rolled noodle, near where the end meets the main body. Pull the zip tie taut to secure the spiral shape. Snip off any excess tail from the zip tie with your scissors for a clean finish. This ensures your lollipop maintains its form.
- Prepare for the Dowel Handle: Using the tip of your scissors, an X-Acto knife, or even the wooden dowel itself (if pointed), carefully create a small, snug hole right beside where the pool noodle’s end meets the bottom of the coiled lollipop. This hole should be just large enough for your wooden dowel to be inserted securely. Avoid making it too wide, as a tight fit is essential for stability.
- Insert the Wooden Dowel: Carefully insert the wooden dowel rod into the prepared hole. Push it firmly until it’s securely nestled into the base of the lollipop, acting as the handle. For extra stability, you can add a dab of hot glue around the base of the dowel where it enters the pool noodle, ensuring it won’t wobble or come loose during display.
Step 2: Adding Vibrant Color and Sparkle
- Spray Paint the Lollipop: Now for the fun part – color! Choose your desired spray paint color (e.g., classic red, festive green, icy blue, or a whimsical pastel). Holding the can approximately 8-12 inches away, apply light, even coats of paint to the entire lollipop, including the dowel if desired. Don’t try to cover it completely in one go. Multiple thin coats will prevent drips and ensure a smooth, vibrant finish. Allow each coat to dry completely according to the manufacturer’s instructions before applying the next. You may need two or three coats for full, opaque coverage.
- Apply Glitter for that Magical Sparkle: Once the spray paint is completely dry to the touch (this is crucial for glitter adhesion), it’s time to add the sparkle. Work in sections. Spray a generous, even layer of spray adhesive over a portion of the lollipop surface. Immediately after spraying, liberally sprinkle your chosen glitter over the adhesive. Gently tap off any excess glitter onto your drop cloth (which can be collected and reused). Continue this process, spraying adhesive and sprinkling glitter section by section, until the entire lollipop is covered to your satisfaction. For an extra dazzling effect, you can even layer different shades or types of glitter.
Step 3: The Finishing Touches and Embellishment
- Craft a Festive Ribbon Bow: Take your chosen ribbon and create a beautiful bow. A simple loop bow is often perfect, but feel free to get creative with more elaborate designs if you wish. The bow will not only add a decorative touch but also cleverly conceal the point where the wooden dowel enters the lollipop head, creating a polished, seamless look.
- Attach the Bow: Once your bow is shaped, apply a generous dab of hot glue to the top of the wooden dowel, just beneath the lollipop head. Carefully press the bow onto the hot glue, holding it in place for a few seconds until the glue sets. Adjust the bow’s loops and tails to your liking.
- Seal for Durability and Shine: To protect your beautiful creation, prevent glitter shedding, and add a lovely sheen, apply a clear protective coat. Using Minwax Polyacrylic Spray (or a similar clear craft sealant), spray light, even coats over the entire lollipop, including the glittered areas. Allow each coat to dry completely before applying the next. This step is especially important if your lollipops will be displayed outdoors, as it provides a degree of weather resistance.
Creative Ways to Display Your Giant Lollipop Decorations
Once your giant lollipops are complete and fully dry, the fun truly begins as you decide where to showcase your festive masterpieces!
- Christmas Tree Wonderland: As originally suggested, these lollipops are perfect for adding a whimsical touch to larger Christmas trees. Simply insert the dowel rod into the branches for a sweet, playful look.
- Enchanting Yard Decor: Transform your front yard into a winter candy land! Simply push the wooden dowel into the ground, or for added stability, you can attach a garden stake to the dowel. Line your walkway, border your garden beds, or create a magical display around your porch.
- Charming Entryway Accent: Greet guests with festive cheer by placing a few lollipops in a decorative pot by your front door or in your foyer.
- Mantel or Shelf Statement: Lean them against a wall on your mantelpiece or arrange them on a wide shelf to add height and a delightful focal point to your indoor decor.
- Party Backdrops: For holiday parties, use these giant lollipops as a vibrant backdrop, perfect for photo opportunities or to set a cheerful atmosphere.
- Kids’ Room Decor: Bring a touch of magic to a child’s bedroom or playroom, turning it into a temporary candy-themed haven for the holidays.
- Unique Gift Toppers: For an exceptionally large gift, one of these lollipops could serve as an unforgettable and decorative gift topper!
Tips for Long-Lasting DIY Christmas Decor
To ensure your handcrafted giant lollipops bring joy for many holiday seasons to come, consider these maintenance and storage tips:
- Proper Storage: When the season ends, gently wrap each lollipop in tissue paper or soft cloth to prevent scratching or glitter transfer. Store them in a sturdy box in a cool, dry place. Avoid heavy objects on top that could crush the foam.
- Gentle Cleaning: If your lollipops collect dust, use a soft, dry cloth or a feather duster to clean them. Avoid harsh chemicals or excessive moisture, which could damage the paint or glitter.
- Weather Considerations (Outdoor Use): While the polyacrylic spray offers some protection, prolonged exposure to heavy rain, snow, or extreme temperatures can still affect your decorations. Consider bringing them indoors during severe weather or adding an additional layer of outdoor-specific clear sealant for maximum durability.
- Safety First: If displaying outdoors, ensure the dowels are firmly secured in the ground to prevent them from tipping over in windy conditions. Keep small, delicate embellishments out of reach of very young children and pets.
The Joy of DIY Holiday Crafting
Beyond the cost savings and the stunning visual appeal, engaging in DIY holiday crafting offers numerous benefits. It’s a wonderful way to express your creativity, personalize your home, and even create new family traditions. Imagine the smiles and compliments you’ll receive from guests admiring your unique, handmade giant lollipops! This project is also a fantastic opportunity for family bonding; older children can help with glitter application, bow-making, or even painting (under supervision). It’s a chance to step away from screens, engage your hands, and infuse your home with genuine, heartfelt holiday spirit.
Conclusion: Your Festive Masterpiece Awaits!
Crafting these giant pool noodle Christmas lollipops is an incredibly rewarding experience that yields spectacular results without breaking the bank. With easy-to-find materials and straightforward steps, you can transform simple items into show-stopping festive decor that will delight everyone who sees them. So, gather your supplies, unleash your creativity, and get ready to add a truly unique and sweet touch to your holiday celebrations this year. Your home will thank you, and your festive spirit will shine brighter than ever!
*A special thank you to BELLE OF THE BLUEGRASS via YouTube for inspiring this delightful project and for the fantastic images used here. If you enjoyed this creative idea, be sure to visit her channel and subscribe for more amazing DIY inspiration!