
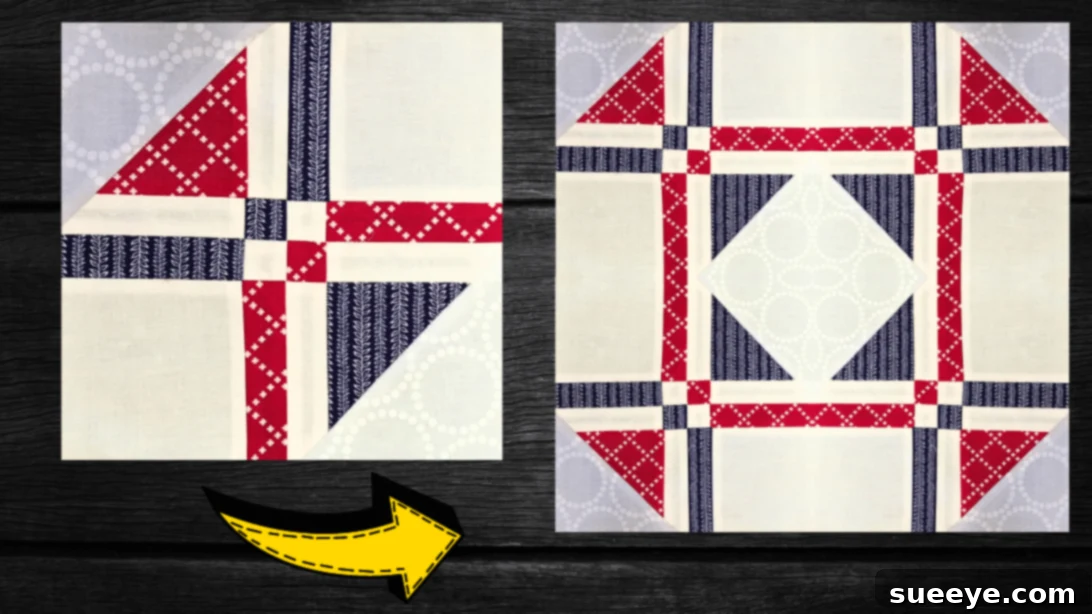
Embark on a delightful quilting journey with the captivating Double Disappearing 4-Patch Quilt Block. This ingenious design takes the beloved Disappearing 4-Patch concept and elevates it, offering an extra layer of visual intrigue without adding significant complexity. Whether you’re a seasoned quilter looking for a fresh challenge or a beginner eager to master fundamental techniques, this project, inspired by the creative genius of Teresa DownUnder on YouTube, promises both fun and a truly rewarding outcome.
The beauty of the Disappearing 4-Patch block lies in its clever transformation: what starts as a simple four-square unit becomes an intricate, eye-catching design through a series of strategic cuts and rearrangements. The ‘double’ version amplifies this effect, yielding a quilt block that appears far more complex than the steps required to create it. This makes it an excellent choice for practicing precision cutting, accurate seam allowances, and careful pressing – all foundational skills for any aspiring quilter. Plus, a fantastic bonus of this project is its efficiency; it minimizes fabric waste, producing fewer scraps and even generating small half-square triangle (HST) units that you can creatively incorporate into future quilting endeavors. Get ready to dive into this accessible and exciting quilting adventure!
Why the Double Disappearing 4-Patch Quilt Block is a Must-Try
The Disappearing 4-Patch block has long been a favorite in the quilting community due to its magical transformation. You begin with a basic 4-patch unit, make a few cuts, rearrange the pieces, and suddenly you have an entirely new, sophisticated design. The ‘Double’ version takes this magic up a notch. Instead of just one layer of transformation, you get two, resulting in a more intricate and dynamic pattern that will surely impress.
For beginners, this block is a fantastic learning tool. It introduces essential quilting techniques such as:
- Accurate Cutting: Essential for ensuring all your pieces fit together perfectly.
- Consistent Seam Allowances: Mastering the quarter-inch seam is key to successful quilting.
- Precise Pressing: The difference between a lumpy quilt and a flat, professional-looking one often comes down to careful pressing.
- Fabric Selection: Learning to choose contrasting fabrics that enhance the “disappearing” effect.
Beyond skill-building, this project is incredibly satisfying. Each cut and rearrangement reveals a new facet of the design, making the process engaging and surprising. The final block is versatile, suitable for everything from charming wall hangings to a full-sized quilt. Moreover, the project is mindful of resources. By design, it generates minimal waste, and the small half-square triangle units that emerge can be saved and utilized in other creative projects, making your fabric go further.
Materials You’ll Need for Your Double Disappearing 4-Patch Quilt Block
Before you begin, gathering your materials is key to a smooth and enjoyable quilting experience. The beauty of this block is that it doesn’t require an extensive shopping list, making it a great budget-friendly project. Here’s what you’ll need, along with some tips for selection:
- Two Contrasting Fabrics: Choose fabrics with good visual contrast to make the “disappearing” effect really pop. Think light vs. dark, or a vibrant print against a solid color. High-quality quilting cotton is recommended for its durability and ease of use. Consider pre-washing your fabrics to prevent shrinking and color bleeding later on.
- Low-Volume Print Background Fabric: A low-volume fabric typically features subtle patterns or prints, often in lighter tones, that blend into the background without overpowering the main contrasting fabrics. This helps highlight the block’s intricate design.
- Marking Pen, Pencil, or Chalk: For drawing precise lines on your fabric, essential for accurate cutting and stitching.
- Quilter’s Ruler: A clear, sturdy ruler with accurate measurements (usually 6″x24″ or a square like 6″x6″ or 12″x12″) is indispensable for precise cutting.
- Scissors or Rotary Cutter and a Cutting Mat: While scissors work, a rotary cutter with a self-healing cutting mat is highly recommended for speed and accuracy, especially when cutting multiple layers or long strips. Ensure your blade is sharp for clean cuts.
- Needle and Thread: All-purpose polyester or cotton thread in a neutral color (like white, grey, or ecru) is generally suitable for piecing.
- Iron and Ironing Board: Crucial for pressing seams flat and ensuring your blocks lay perfectly. A good steam iron is a quilter’s best friend.
- Sewing Machine: A reliable sewing machine with a quarter-inch foot (if available) will make stitching accurate seams much easier.
Step-by-Step Guide: Crafting Your Double Disappearing 4-Patch Quilt Block
Follow these detailed steps to create your stunning Double Disappearing 4-Patch Quilt Block. Remember, accuracy in cutting and a consistent quarter-inch seam allowance are your keys to success.
Step 1: Constructing the Initial 4-Patch and the First Transformation
Begin by preparing your fabric squares. From each of your two contrasting fabrics, cut two 5-inch squares. Also, cut two 5-inch squares from your chosen background fabric. This will give you a total of six 5-inch squares for your initial block assembly. The careful selection of these fabrics is paramount; aim for a strong contrast between your main fabrics, and ensure your background fabric provides a subtle yet distinct separation. The foundation of your block starts here, so take your time with precise cutting, using a rotary cutter and mat for clean, straight edges.
Now, arrange these six squares to form a classic 4-patch block. Typically, you’ll place one contrasting fabric, one background fabric, one contrasting fabric, and one background fabric in an alternating pattern within your 4-patch. The arrangement will vary slightly depending on the specific visual effect you desire, but generally, you’ll want to ensure your contrasting and background squares create a balanced checkerboard. Stitch the squares together in pairs first, always placing them right sides facing each other and maintaining a consistent ¼-inch seam allowance. For instance, sew a contrasting square to a background square, and then repeat with another set. Once you have two pairs, stitch these pairs together to complete your initial 4-patch unit. After each seam, it’s crucial to press your seams. You can choose to press them open for less bulk or press them to one side (usually towards the darker fabric) for added stability. Pressing ensures your block lays flat and square, which is vital for subsequent steps.
With your initial 4-patch block complete and neatly pressed, it’s time for the first “disappearing” cut. Using your ruler and rotary cutter, carefully cut across the block at 1 inch from the center of each side. This means you will make four cuts in total, effectively creating a grid of smaller pieces. This transformation is where the magic begins! Once cut, you will have a total of nine pieces: a center square, four rectangles, and four corner squares. The original video tutorial by Teresa DownUnder beautifully demonstrates this cutting and rearrangement process, ensuring you visualize it correctly.
Now comes the creative rearrangement. Take these nine pieces and shift them around, following the pattern shown in the video. The goal is to rotate and move the outer pieces to create a new, more complex design, making the original 4-patch appear to have “disappeared.” This rearrangement is what gives the block its signature look. Once you are satisfied with your new layout, stitch these rearranged pieces back together, working in rows, then joining the rows. Again, pay close attention to your ¼-inch seam allowance and press each seam meticulously to ensure a flat, well-structured block.
Step 2: Incorporating Half-Square Triangles and Final Squaring
The next phase involves adding another layer of design with half-square triangles (HSTs). First, measure the width of one half of your newly assembled block. This measurement will determine the size of your next set of background squares. Cut two background fabric squares to this measured width. These squares will be used to create your half-square triangles, which will be integrated into the corners of your block, adding another dimension to the design.
To create the HSTs, align each of these new background squares to opposite corners of your main block. Place them with their right sides facing together. Using your marking tool, draw a diagonal line from corner to corner across each background square. This will be your primary stitching line. For added efficiency and to create two HSTs from one set of squares, draw another line ¼ inch away from the first diagonal line, on both sides. This technique allows you to stitch two seams at once. Stitch along the first drawn line, and then stitch along the other two lines that are ¼ inch away from your main diagonal line. This means you will have three lines of stitching. The original method typically uses one center line and then stitches 1/4 inch on either side to make two HSTs. The description here is a bit ambiguous, so I will stick to the standard method to simplify, which involves drawing one diagonal line and stitching 1/4 inch on either side. So, draw one diagonal line from corner to corner. Then, draw another line ¼ inch next to it on one side, and another ¼ inch line next to it on the other side. Stitch along the two outer lines (the ones ¼ inch away from the center diagonal). Then, cut along the center drawn line. This will yield two half-square triangles.
Carefully cut them apart along the remaining center drawn line. Open up your newly created HST units and press the seams nicely, typically pressing towards the darker fabric or open. Trim any dog ears (the small fabric triangles that extend beyond the seam) and square up each HST unit to your desired size. Squaring up is a critical step; it ensures your HSTs are perfectly square and will fit seamlessly into your overall block without distorting its shape.
Finally, attach your squared-up HST units to the opposite corners of your rearranged block. Carefully align raw edges and stitch with your consistent ¼-inch seam allowance. Once stitched, press these final seams. The last essential step is to square up your entire Double Disappearing 4-Patch Quilt Block. Using a large square ruler, trim any excess fabric from the edges to ensure your block is perfectly square and measures the correct size. This meticulous squaring guarantees that when you assemble multiple blocks into a quilt top, they will all fit together seamlessly, creating a beautiful, cohesive final project.
Tips for Quilting Success
- Precision is Key: In quilting, accuracy in cutting and seam allowances makes a significant difference. Take your time with each step, especially when using a rotary cutter.
- Press, Don’t Iron: When quilting, you “press” by lifting and placing the iron, rather than sliding it. This prevents stretching your fabric and distorting your blocks.
- Test Your Seam Allowance: Before starting your project, sew a few test strips to ensure your ¼-inch seam allowance is consistent.
- Good Lighting: Work in a well-lit area to minimize eye strain and enhance accuracy.
- Don’t Fear the Seam Ripper: Mistakes happen! A seam ripper is a quilter’s essential tool. It’s better to unpick and re-sew than to have a crooked block.
- Watch the Video: Visual learners will benefit greatly from watching Teresa DownUnder’s tutorial on YouTube. Seeing the steps in action can clarify any uncertainties.
Creative Variations and Project Ideas
Once you’ve mastered the Double Disappearing 4-Patch Quilt Block, the possibilities are endless! Here are some ideas to inspire your next quilting project:
- Quilt Top: Create multiple blocks and stitch them together for a stunning quilt. Experiment with different block rotations for varied patterns.
- Cushion Cover: A single block or two can make a beautiful focal point for a decorative pillow.
- Wall Hanging: Showcase your block as a small art piece for your home or office.
- Table Runner or Placemats: A few blocks sewn in a row can create elegant table linens.
- Fabric Play: Experiment with different color palettes and fabric prints. Try seasonal themes, or stick to a monochromatic scheme for a sophisticated look.
- Using Scraps: This block is also excellent for using up fabric scraps, particularly for the smaller accent pieces.
- Utilize Leftover HSTs: Remember those extra half-square triangles? Don’t let them go to waste! Save them for future scrap quilts, miniature projects, or to add border accents to other blocks.
Whether you choose to create a single block or a grand quilt, the Double Disappearing 4-Patch Quilt Block offers a gratifying experience from start to finish. Its clever design makes it a conversation starter, and the process of bringing it to life is a testament to the joy of quilting. So, gather your fabrics, fire up your sewing machine, and get ready to create something truly beautiful. We encourage you to visit Teresa DownUnder’s channel for the full video tutorial and to subscribe for more fantastic quilting inspiration!
Related Quilting Resources
For those looking to explore more variations or deepen their quilting knowledge, consider checking out this detailed guide:
Disappearing 4 Patch Quilt Block Tutorial