
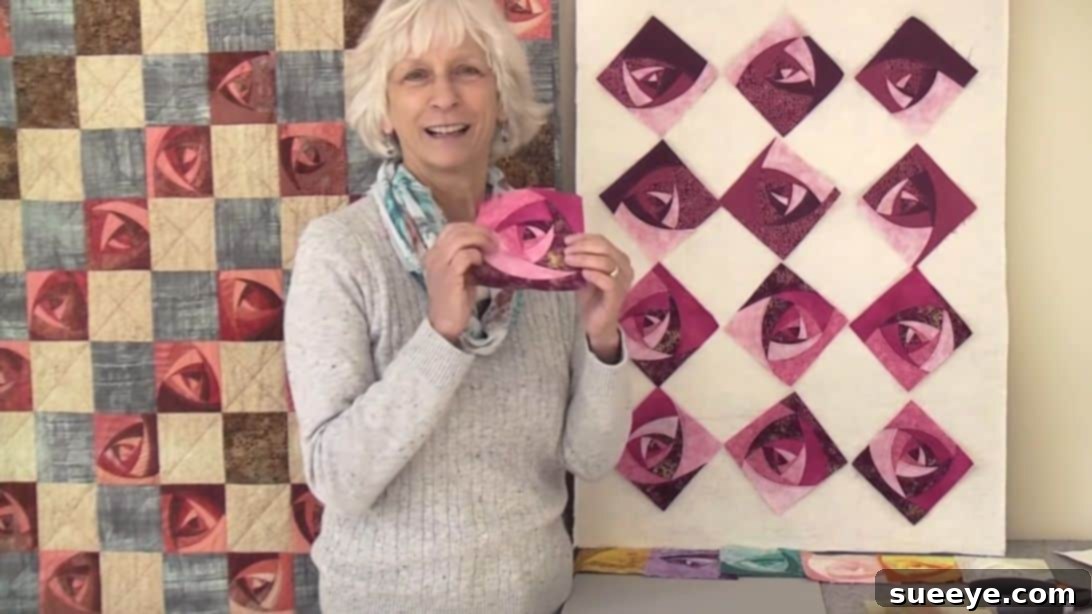
Master the Art of the Rose Twirl Quilt Block: A Comprehensive DIY Tutorial
Welcome, fellow quilters and sewing enthusiasts! If you’re searching for a captivating project that combines the beauty of nature with the artistry of fabric, look no further than the enchanting Rose Twirl Quilt Block. As someone who finds immense joy in the intricate dance of needle and thread, especially when it results in something as timeless as a rose, I can attest to the magic of this particular design. This tutorial will guide you through crafting a truly unique and visually striking quilt block, perfect for adding a touch of elegance to any quilting project.
Inspired by the brilliant work of Karen Eckmeier, this Rose Twirl Quilt Block stands out with its signature freeform curves. Unlike traditional piecing, the organic nature of these curves ensures that every single block you create will possess its own distinct personality, making your finished quilt a one-of-a-kind masterpiece. Whether you’re an experienced quilter or an adventurous beginner, this detailed guide will demystify the process, allowing you to confidently sew an array of vibrant rose twirls. Prepare to dive into a world of color and creativity as we embark on this delightful fabric journey together!
What Makes the Rose Twirl Quilt Block Unique?
The allure of the Rose Twirl Quilt Block lies in its innovative approach to traditional quilting. By embracing freeform curves, we move beyond rigid geometric shapes, mimicking the natural, unfolding petals of a rose. This technique liberates your creative spirit, allowing for artistic expression that is both fluid and captivating. The beauty of this block is not just in its final appearance but in the journey of its creation – each cut and stitch contributes to an organic flow that is impossible to replicate perfectly, ensuring a truly personalized result. This method also encourages playful experimentation with fabric choices and color gradients, making it a fantastic project for using up scraps or showcasing a specific fabric line.
Gathering Your Essential Materials
Before we begin transforming fabric into a blossoming rose, ensure you have all the necessary tools and materials at hand. Having everything organized will make the process smooth and enjoyable.
- Fabric Squares: You’ll need 4 pieces of 6½-inch squares. For the best visual effect of the rose’s depth, select one dark, two medium, and one light fabric, all within the same color family or carefully chosen to complement each other. These varying shades will give your rose a beautiful, dimensional quality.
- Rotary Cutter: An essential tool for precise and clean cuts, especially when dealing with curves.
- Cutting Mat: Protects your work surface and provides a stable base for your rotary cutter.
- Quilting Ruler: For accurate measuring and marking.
- Fabric Marking Tool: A chalk pencil or washable fabric marker for temporary lines.
- Iron and Ironing Board: Crucial for pressing seams and achieving crisp, professional results.
- Sewing Machine: Equipped with a standard presser foot.
- Matching Thread: High-quality thread that blends well with your chosen fabrics.
- Fabric Scissors (optional): Useful for small snips or trimming.
When selecting your fabrics, consider how different patterns and solids interact. Solids will highlight the curves and form of the rose, while subtle prints can add texture and depth without distracting from the design. Don’t be afraid to experiment with unexpected color combinations – a rose doesn’t always have to be red! Think about warm and cool tones, or even a monochromatic scheme for a sophisticated look.
Step-by-Step Instructions: Crafting Your Rose Twirl Quilt Block
Follow these detailed steps carefully to bring your Rose Twirl Quilt Block to life. Precision in marking and a steady hand in cutting and sewing curves will yield the most beautiful results.
Step 1: Preparing Your Fabric Foundation
Begin by taking your four 6½-inch fabric squares. Stack them neatly on top of each other, ensuring all edges are perfectly aligned. It’s crucial that all fabric pieces are right sides facing up in this stack. This initial alignment ensures that your cuts will be consistent across all layers. Next, using your quilting ruler and a fabric marking tool, mark three specific points along the bottom edge and one side edge of the top fabric square. These marks should be at ½ inch, 3 inches, and 5½ inches from the corner. These points will serve as guides for your freeform curves, helping you establish the foundational shapes for your rose petals.
Step 2: Cutting Your Freeform Curves
With your fabric squares stacked and marked, it’s time for the exciting part: cutting the curves. Carefully connect the corresponding marks on the bottom and side edges with smooth, sweeping arcs using your rotary cutter. The beauty of this “freeform” approach means these aren’t meant to be mathematically perfect arcs; rather, they should mimic the organic flow of nature. Once cut, you’ll have four sets of curved fabric pieces. Separate the stack. Take the three larger curved pieces from each set and flip them over so the wrong side is now facing up. This prepares them for the next crucial step. Now, take one piece from each stack and locate the concave (inward-curving) edge. Fold a precise quarter-inch allowance along this concave edge towards the wrong side of the fabric and press firmly with a hot iron. Repeat this pressing step for all the remaining pieces. This creates a neat, finished edge for easy assembly.
Step 3: Arranging Your Petal Pieces
After cutting and pressing, you’ll have four groups of curved fabric pieces, each group corresponding to one of your original 6½-inch squares. Now, sort these groups by size, from the smallest to the largest. For clarity, let’s refer to them as sizes 1 (smallest) through 4 (largest). This systematic arrangement is vital for the visual progression of your rose. Consider the color order you want for your rose. You might choose to progress from light to dark, or vice-versa, or even create a striking contrast. Lay them out on your cutting mat or design wall to visualize the final block. This preview allows you to experiment with your color arrangement before you start sewing, ensuring the most pleasing aesthetic for your unique Rose Twirl Quilt Block.
Step 4: Beginning the Rose Assembly – First Layer
Take one of the smallest pieces (Size 1) and position it so that its prominent arch is located in the upper right quadrant of your working area. This will be the center of your rose. Next, select one piece from the second size group (Size 2). Carefully place its concave, pressed edge just above the arch of the first, smallest piece. You’ll want to overlap these two pieces slightly, creating a smooth transition. Using your sewing machine, stitch these two pieces together with a precise 1/8-inch seam allowance from the edged curve. This narrow seam allowance is key to maintaining the organic flow of the curves and will ensure your rose petals lie flat and beautifully. Take your time when sewing curves; a slower speed and careful guidance of the fabric will prevent puckering and ensure a graceful line.
Step 5: Building the Rose: Subsequent Layers and Openings
Now, take another piece from the second size group (Size 2). This time, place it on the opposite side of the first piece you sewed, creating a mirrored effect, but leave a distinct opening between the two Size 2 pieces at the bottom. Sew this piece with the same 1/8-inch seam allowance from the edged curve. This opening is intentional and will contribute to the layering effect of the rose. Next, grab a third piece of the same size (Size 2) and sew it onto the opening at the bottom, completing the first “ring” of petals. Finally, take the last piece from the Size 2 group and arrange it so that only a small, curved triangle of the very first, smallest fabric piece you sewed is still visible. This layering technique adds depth and dimension to your rose. Stitch this last piece down, again maintaining that consistent 1/8-inch seam allowance from the curved edge. These careful placements are essential for achieving the full, blossoming effect of the Rose Twirl Quilt Block.
Step 6: Completing the Rose Structure
Once you’ve completed the assembly with the Size 2 pieces, gently rotate your block a little. Now, you will repeat the same layering and sewing process using the next size group (Size 3). Each subsequent piece should be placed deliberately so that a small, curved triangle from the previous layer is visible. This continuous layering is what creates the captivating illusion of a blossoming rose. Continue this careful process, working your way through the Size 3 pieces and then the largest Size 4 pieces, always ensuring you maintain the slight overlap and the 1/8-inch seam allowance. As you build outward, periodically check the overall size of your block. It’s important to ensure that the unfinished block remains slightly larger than your target 5-inch x 5-inch square; this will allow for accurate trimming in the final step without cutting into your design.
Step 7: Finishing Touches: Pressing and Squaring Up
With all your rose petals sewn into place, the next vital step is pressing. Take your assembled block to the ironing board and press it thoroughly with a hot iron. Pressing helps to set your seams, flatten the fabric, and give your block a professional, crisp finish. Once pressed from the front, carefully flip the block over. Using sharp scissors, meticulously cut away any excess fabric from the underlying layers. Be extremely cautious during this step to avoid cutting through the top, visible fabric layers of your beautiful rose. This trimming reduces bulk and ensures the block lies flat. Finally, using your quilting ruler and rotary cutter, square up your Rose Twirl Quilt Block to a perfect 5-inch x 5-inch square. This precise squaring is crucial for seamless integration into larger quilt tops or other projects, ensuring all your blocks will fit together beautifully.
Tips for a Stunning Rose Twirl Quilt
To ensure your Rose Twirl Quilt Block truly shines, here are a few extra tips:
- Embrace Imperfection: The beauty of freeform quilting is its organic nature. Don’t strive for machine-perfect curves; slight variations add character.
- Practice Your Curves: If sewing curves is new to you, practice on scrap fabric first. Slow and steady wins the race when it comes to smooth, even curves.
- Thread Choice Matters: While matching thread is ideal, a slightly contrasting thread can sometimes accentuate the curves in a subtle, artistic way.
- Pressing is Key: Don’t underestimate the power of a good press. It makes a huge difference in the final appearance and flatness of your block.
- Experiment with Colors: While a light, medium, dark progression works well, try gradients, contrasting colors, or even fabric scraps from a single collection for a cohesive look.
Beyond the Block: Project Ideas for Your Rose Twirl Creations
Once you’ve mastered the Rose Twirl Quilt Block, the possibilities for incorporating these beautiful fabric roses into your projects are endless! A collection of these blocks can be joined to create a breathtaking full-sized quilt, perfect as a bedspread or a wall hanging. Imagine a vibrant throw pillow adorned with a single, prominent Rose Twirl Block, or a set of placemats that add an artistic touch to your dining experience. These blocks also make fantastic additions to tote bags, fabric book covers, or even a unique embellishment on a garment. Consider combining different color schemes or even incorporating other quilt block patterns to create a truly unique and personalized textile art piece.
Join the Quilting Community
Quilting is more than just a craft; it’s a vibrant community where creativity flourishes. We encourage you to share your beautiful Rose Twirl Quilt Blocks! Your unique color choices and interpretations can inspire fellow quilters and spark new ideas. Connecting with other enthusiasts allows for an exchange of tips, encouragement, and a shared appreciation for the art of fabric. Don’t hesitate to share your progress and finished projects online – let your creativity bloom for everyone to see!
And there you have it – a comprehensive guide to creating your very own Rose Twirl Quilt Block! This project is a delightful way to explore freeform quilting, add dimension to your designs, and celebrate the timeless beauty of a rose. Each block you create will be a testament to your creativity and skill, a unique piece of fabric art. So, gather your materials, set up your sewing machine, and get ready to create something truly special. We can’t wait to see your stunning rose twirl creations!