
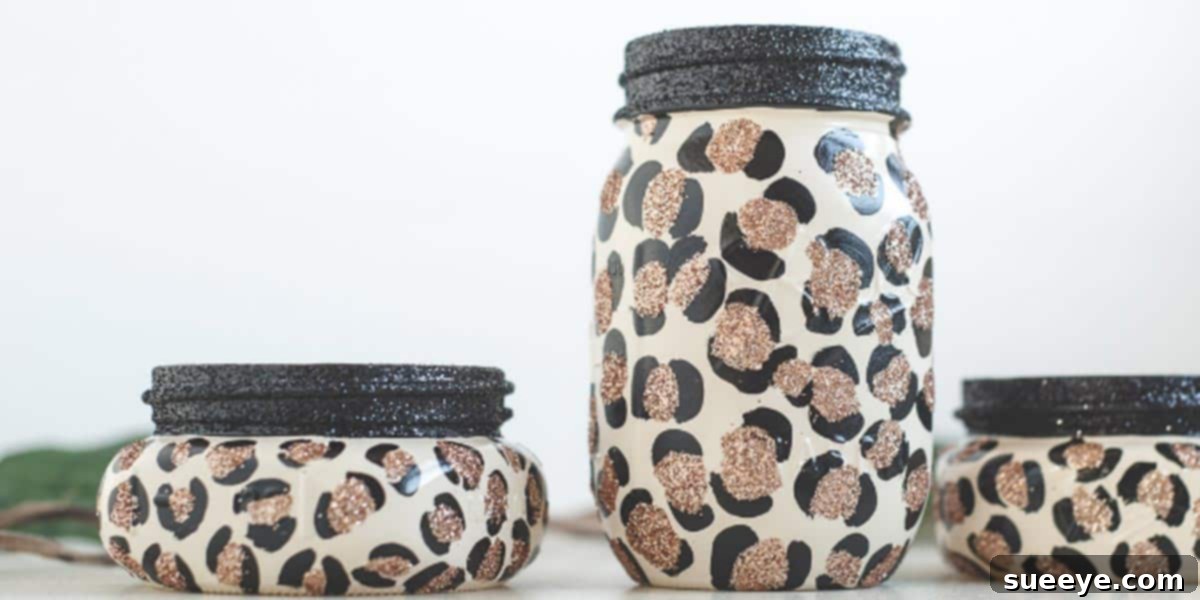
Unleash Your Inner Chic: DIY Glitter & Cheetah Print Mason Jars for Glamorous Home Decor
Are you searching for an effortless yet impactful way to infuse personality and glam into your home decor? Look no further! This captivating DIY project combines the rustic charm of Mason jars with the timeless allure of cheetah print and a touch of dazzling glitter. It’s a creative endeavor that promises significant results with minimal effort, perfect for anyone wanting to add a custom, chic flair to their living space. Whether you’re a devoted fan of animal prints or simply looking to add a distinctive accent, these glitter and cheetah print Mason jars are an absolute must-try. They embody a unique blend of sophistication and playful sparkle, transforming ordinary jars into extraordinary decorative pieces.
This particular craft holds a special place in my heart, marrying two of my absolute favorite design elements: the ubiquitous Mason jar and the iconic cheetah print. The way a subtle glitter accent, especially around a heart motif, elevates the entire piece makes it truly exceptional and deeply personal. It’s more than just a craft; it’s an expression of style, an invitation to add that unique sparkle that makes a house feel like a home.
The Enduring Appeal of Mason Jars in Home Decor
Mason jars have transcended their original purpose as canning containers to become a staple in modern home decor. Their versatility is unmatched, offering a rustic yet adaptable canvas for countless DIY projects. From practical storage solutions to elegant decorative accents, these humble glass jars prove that beauty and functionality can coexist beautifully. They are affordable, readily available, and inherently eco-friendly, making them a preferred choice for crafters and interior enthusiasts alike. Their simple, classic design allows them to seamlessly integrate into various decor styles, from farmhouse chic to contemporary glam. By choosing Mason jars for this project, you’re not just crafting; you’re embracing a legacy of utility and creativity.
The transparent nature of glass provides an ideal surface for paint, glitter, and other embellishments, allowing you to completely transform their appearance. Beyond aesthetics, their sturdy construction means your creations will be durable and long-lasting, providing beauty and utility for years to come. This project harnesses the inherent charm of Mason jars, elevating them into bespoke pieces that reflect your individual taste and flair.
Embracing the Timeless Elegance of Cheetah Print
Cheetah print is not merely a trend; it’s a fashion and decor icon that consistently reappears in the design world for good reason. Its bold yet sophisticated pattern has the power to instantly inject a sense of luxury, drama, and chic into any setting. Often considered a neutral by design aficionados, cheetah print pairs beautifully with a wide array of colors and textures, making it surprisingly versatile. A touch of this print in your home can be a powerful statement, suggesting confidence and a keen eye for style without overpowering the entire space.
From runway fashion to lavish interiors, cheetah print signifies a blend of wild beauty and refined taste. It has a way of adding an unexpected twist, a dash of the exotic, that elevates the mundane. Whether it’s subtle hints or a more prominent feature, incorporating cheetah print into your decor signals a confident and fashion-forward approach to home styling. These Mason jars are the perfect way to introduce this captivating pattern into your home, offering that desirable ‘pop’ without demanding a complete decor overhaul.
The Dazzling Effect of Glitter: A Touch of Glam
What’s a glamorous DIY without a sprinkle of sparkle? Glitter has an undeniable ability to transform the ordinary into the extraordinary, adding a festive and luxurious touch that catches the light and the eye. In this project, the glitter isn’t just an afterthought; it’s a crucial element that enhances the cheetah print, especially when artfully applied around a heart shape. This detail adds a layer of personalization and tenderness, making each jar truly unique and even more special.
The sparkle of glitter can evoke a sense of joy and celebration, turning a simple Mason jar into a conversation starter. It reflects light in myriad ways, adding depth and dimension to your craft. When paired with the bold cheetah print, the glitter creates a striking contrast that balances the wildness of the animal print with delicate, shimmering elegance. It’s the perfect finishing touch that takes your DIY project from charming to utterly glamorous.
Embarking on Your DIY Journey: Materials & Steps
This project is remarkably easy, promising significant aesthetic returns for a small investment of time and materials. It’s the kind of DIY that genuinely excites the creative spirit, offering a tangible sense of accomplishment. So, gather your supplies, don your crafting hat, and prepare to create some truly smashing Mason jar masterpieces!
Materials You’ll Need:
- Mason Jars: Any size or shape will work, depending on your intended use. Pint or quart jars are popular choices.
- Acrylic or Chalk Paint: A base color (e.g., cream, white, gold) and colors for the cheetah spots (typically black and a contrasting brown). Acrylic paint is durable, and chalk paint offers a matte finish that adheres well to glass.
- Assorted Paintbrushes: A larger flat brush for the base coat, and a very fine-tipped brush for intricate cheetah print details and glitter glue application.
- Craft Glue or Mod Podge: For adhering the glitter. Mod Podge also acts as a sealant.
- Fine Glitter: Choose a color that complements your cheetah print (e.g., gold, silver, rose gold, or black for a dramatic effect).
- Heart Stencil (Optional): If you prefer a perfectly shaped heart for your glitter accent, otherwise freehanding works beautifully.
- Rubbing Alcohol or Glass Cleaner: For thoroughly cleaning the jars before painting.
- Paper Towels or Lint-Free Cloth: For cleaning and drying.
- Clear Sealant Spray: A durable, clear sealant (glossy or matte finish) to protect your painted and glittered design.
- Newspaper or Drop Cloth: To protect your work surface.
Step-by-Step Tutorial: Crafting Your Glamorous Jars
-
Preparation is Key: Clean and Dry Your Jars
Before any painting begins, ensure your Mason jars are impeccably clean. Wash them thoroughly with soap and water, then dry them completely. For an extra clean surface that paint will adhere to better, wipe the exterior of the jars with rubbing alcohol or a glass cleaner. This step removes any oils or residues that could prevent the paint from sticking properly. Allow them to air dry completely before moving on to the next step. A clean surface is crucial for a smooth and lasting finish.
-
Apply Your Base Coat
Lay down newspaper or a drop cloth to protect your work area. Using your larger flat brush, apply an even, thin coat of your chosen base paint color (e.g., cream, gold, or white) to the exterior of the Mason jar. Work in smooth, even strokes. It’s better to apply several thin coats than one thick coat, as thick coats are prone to drips and uneven drying. Allow each coat to dry completely – typically 30 minutes to an hour – before applying the next. You’ll likely need 2-3 coats to achieve opaque coverage. Ensure the base is fully dry before proceeding to the cheetah print.
-
Crafting the Iconic Cheetah Print
Once your base coat is thoroughly dry, it’s time to add the cheetah spots. Dip your fine-tipped paintbrush into your contrasting brown paint. Create irregular, oval-like shapes or broken “C” or “U” shapes across the jar. These don’t need to be perfect; the natural imperfection adds to the charm of animal print. Ensure there’s a good amount of space between these brown spots. Let these brown spots dry for about 15-20 minutes. Next, take your black paint with the same fine-tipped brush and outline the brown spots, leaving small gaps in the outline to give it that authentic, natural cheetah look. You can also add a few small, solid black dots in between the outlined brown spots for variety. Practice on a piece of paper first if you’re nervous!
-
Adding That Special Glitter Heart
This is where your Mason jar gets its truly special, personalized touch. Decide where you want your glitter heart to be – the front of the jar is usually ideal. If using a stencil, carefully place it on the desired spot. Apply a generous, even layer of craft glue or Mod Podge within the heart shape using your fine brush. While the glue is still wet, generously sprinkle your chosen fine glitter over the glued area, ensuring complete coverage. Gently tap off any excess glitter onto your newspaper. Carefully remove the stencil if used, or if freehanding, let the glitter set. Allow the glittered heart to dry completely, which might take a few hours.
-
Sealing for Durability and Shine
Once all the paint and glitter are completely dry (ideally after waiting a full 24 hours), it’s time to seal your masterpiece. This step is crucial for protecting your design from chips, scratches, and wear. Take your jars to a well-ventilated area, preferably outdoors. Hold the clear sealant spray about 6-8 inches away from the jar and apply light, even coats over the entire painted and glittered surface. Avoid oversaturating one area, as this can cause drips. Rotate the jar to ensure full coverage. Apply 2-3 thin coats, allowing each coat to dry for about 15-20 minutes in between. The sealant will give your jars a beautiful, protective finish, either glossy or matte depending on your choice.
-
Final Curing and Enjoyment
Even after the sealant feels dry to the touch, it needs time to fully cure and harden. For best results and maximum durability, allow your finished Mason jars to cure for at least 48-72 hours before heavy handling or placing items inside. This patience will ensure your beautiful craft lasts longer. Once cured, your glamorous cheetah print and glitter Mason jars are ready to adorn your home or be gifted to someone special!
Styling Your Cheetah Print Mason Jars: Creative Uses
Now that you’ve created these stunning pieces, how do you incorporate them into your home? The possibilities are as endless as your imagination!
- Bathroom Organizer: As mentioned, they are perfect for holding makeup brushes, cotton balls, Q-tips, or even a small potpourri sachet, instantly adding a spa-like glam to your vanity.
- Vase for Flowers: Showcase a small bouquet of fresh flowers or elegant silk arrangements, bringing life and color to any room.
- Desk Companion: Keep your pens, pencils, and other office supplies neatly organized while adding a touch of personalized style to your workspace.
- Candle Holder: Place battery-operated LED pillar candles inside for a safe and warm glow, creating a cozy and inviting ambiance (avoid real flames due to flammability of paint/sealant).
- Kitchen Utensil Caddy: Organize smaller kitchen tools or simply use them as decorative accents on open shelving.
- Decorative Accent: Arrange them on bookshelves, mantelpieces, or coffee tables as standalone decorative pieces, catching the eye with their unique design.
- Unique Gift Packaging: Fill them with homemade treats, small gifts, or craft supplies for a truly personalized and memorable present.
- Party & Event Decor: Use them as centerpieces for birthdays, bridal showers, or other celebrations, setting a chic and festive tone.
Tips for a Flawless Finish and Creative Variations
- Work in a Well-Ventilated Area: Especially when using spray sealants, ensure good air circulation.
- Patience is a Virtue: Rushing the drying process between coats can lead to a less durable and aesthetically pleasing finish.
- Experiment with Colors: While classic black and brown cheetah print is stunning, don’t be afraid to experiment with different color palettes – gold and black, pink and white, or even metallic shades for a different vibe.
- Different Prints: Apply the same technique to create other animal prints like leopard, zebra, or even abstract patterns.
- Layering Glitter: For extra sparkle, you can apply a second thin layer of glue over the first glitter layer (once dry) and sprinkle more glitter.
- Distressing (Optional): For a more rustic-chic look, lightly sand certain areas of the base paint once dry before sealing to create a distressed effect.
Caring for Your DIY Creations
To ensure the longevity of your beautifully crafted Mason jars, gentle care is recommended. Hand wash them gently with a soft cloth and mild soap. Avoid abrasive scrubbers or harsh chemicals, which could damage the paint and sealant. These jars are not dishwasher safe. With proper care, your glamorous cheetah print and glitter Mason jars will continue to sparkle and delight for a long time.
Beyond the Spots: Embracing Your Creativity
This project is just the beginning! The techniques learned here can be applied to a myriad of other items, from vases and picture frames to small furniture pieces. Let these cheetah print Mason jars inspire you to look at everyday objects as potential canvases for your unique artistic expression. Your home is a reflection of you, and handmade decor infused with personal touches tells a wonderful story.
Conclusion: Craft Your Style, Sparkle Your Space
This DIY glitter and cheetah print Mason jar project is more than just a craft; it’s an invitation to infuse your personal style and a dash of glamour into your surroundings. It’s incredibly satisfying to create something beautiful and functional with your own hands, especially when the results are as stunning as these jars. They serve as perfect organizational tools, charming decorative accents, or thoughtful handmade gifts, all while adding that coveted chic and wild elegance to your home. So, gather your materials, follow these simple steps, and prepare to be delighted by the transformation. Get ready to enjoy your very own set of glamorous Mason jars that truly make a statement!
Photo Credit: KA Styles