
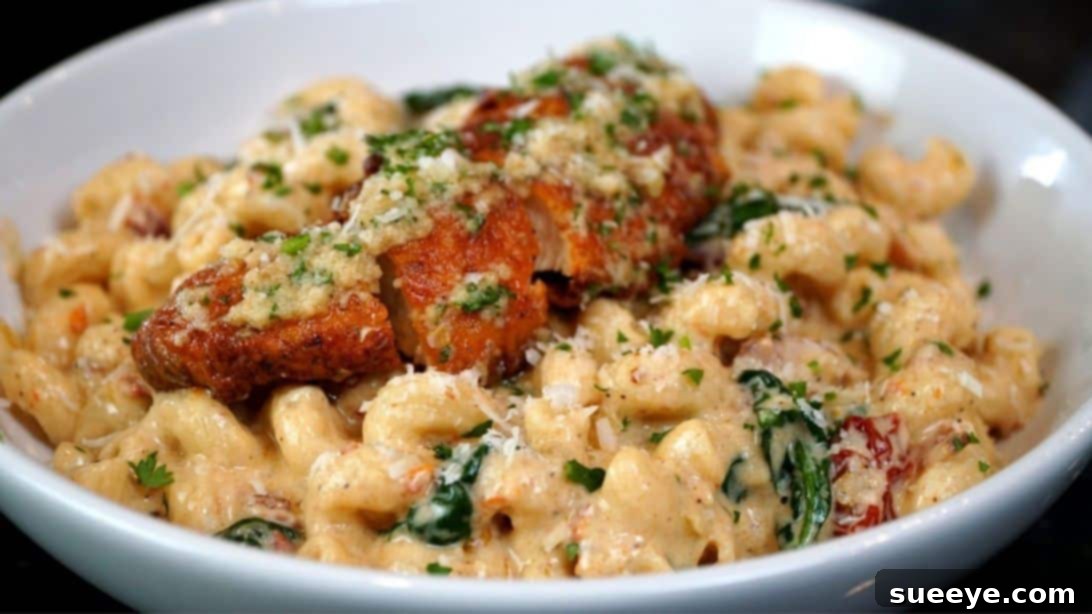
The Ultimate Creamy Garlic Parmesan Chicken Pasta: A Crowd-Pleasing Indulgence
Prepare your taste buds for an unforgettable culinary journey! This over-the-top creamy garlic parmesan chicken pasta, inspired by the incredible Mr. Make It Happen, is more than just a meal; it’s a symphony of flavors and textures designed to impress. Imagine tender pasta coated in a rich, velvety sauce, bursting with the savory notes of roasted garlic, sun-dried tomatoes, and the irresistible crunch of crispy bacon. Crowned with golden, juicy garlic parmesan chicken tenders, this dish is a testament to comfort food at its finest. Whether you’re hosting a dinner party or simply craving a truly special homemade meal, this creamy garlic parmesan chicken pasta will undoubtedly be the star of your table. Get ready to elevate your pasta night from ordinary to extraordinary with this fully-loaded, heavenly recipe!
Gather Your Culinary Arsenal: What You’ll Need
Crafting this masterpiece requires a thoughtful selection of fresh, high-quality ingredients. Here’s a detailed list to ensure you have everything on hand for both the rich pasta sauce and the perfectly seasoned chicken tenders.
For the Creamy Garlic Parm Pasta:
- 4 Strips of Bacon: Choose thick-cut bacon for maximum flavor and texture. This will be rendered to create crispy bits and flavorful drippings for our sauce base.
- 1/2 Onion (Diced): A medium yellow or white onion, finely diced, will provide a sweet aromatic foundation for the sauce.
- 1/4 Cup Sun-Dried Tomatoes: Oil-packed sun-dried tomatoes, drained and thinly sliced, offer a concentrated burst of sweet and tangy umami, adding depth and a beautiful hue to the sauce.
- 2 Cups Fresh Spinach: Washed and roughly chopped, fresh spinach wilts beautifully into the warm sauce, adding a touch of freshness, color, and essential nutrients.
- 1 Tablespoon Fresh Garlic (Minced): Beyond the roasted garlic, this additional fresh garlic provides a pungent kick and layers the garlic flavor profile.
- 1 to 2 Tablespoons All-Purpose Flour: Used as a roux base, the flour helps thicken the sauce, creating that desirable creamy consistency.
- 1 Cup Heavy Cream: The cornerstone of our rich, luxurious sauce, heavy cream provides unparalleled richness and a silky texture.
- 1 Cup Half and Half: A lighter dairy complement to the heavy cream, half and half helps balance the richness without sacrificing creaminess.
- 1/2 Cup Shredded Mozzarella Cheese: Adds a delightful stretch and mild, milky flavor to the sauce, helping it cling beautifully to the pasta.
- 1/2 Cup Shredded Parmesan Cheese: Essential for its salty, nutty, and savory notes, Parmesan cheese deepens the flavor profile of the creamy sauce.
- 1 Pound Cavatappi Noodles (or your preferred pasta): Cavatappi, with its corkscrew shape, is excellent for catching and holding the creamy sauce. Other great options include fettuccine, penne, or rigatoni.
- 1 Stick of Butter (1/2 melted, 1/2 at room temperature): Butter is crucial for both cooking the sauce and creating the luscious garlic parm coating for the chicken. Melting half and keeping half at room temperature ensures ease of use for different stages of the recipe.
- Red Pepper Flakes (to taste): A pinch or two of red pepper flakes adds a subtle warmth and gentle heat, perfectly complementing the rich flavors without overpowering them.
For the Crispy Garlic Parm Tenders:
- Buttermilk (or 2 Large Eggs): Buttermilk acts as a tenderizer and helps the seasoned flour adhere to the chicken, creating a crispier crust. Eggs can be used as a substitute for the dredge.
- 1 Pound Chicken Tenders: Boneless, skinless chicken tenders are ideal for quick frying and provide tender, juicy bites.
- 1/2 Stick Melted Butter: The base for our decadent garlic parmesan sauce that coats the fried chicken.
- 1/2 Cup Grated Parmesan Cheese (plus more for topping): Finely grated Parmesan is key for the garlic parm sauce and for adding a final flourish.
- 1 to 2 Tablespoons Olive Oil: Used in the garlic parm sauce for flavor and smoothness.
- 2 Cloves Fresh Garlic (Grated or Minced): Fresh garlic is paramount for the vibrant flavor of the garlic parm coating.
- Fresh Parsley (Chopped): Adds a touch of herbaceous freshness and a pop of color to the chicken.
- All-Purpose Seasoning: A foundational seasoning blend (or simply salt, black pepper, garlic powder, and onion powder) for the chicken marinade and flour dredge.
- Cajun or Creole Seasoning: Adds a fantastic savory kick and depth of flavor to the chicken.
- Cayenne Pepper: For an extra layer of heat and a beautiful reddish hue on the chicken.
- Oil for Frying: Vegetable, canola, or peanut oil are excellent choices for deep frying, chosen for their high smoke point.
- 2 Cups All-Purpose Flour: The primary component of our dredge, ensuring a crispy, golden crust on the chicken tenders.
- Sazon Seasoning: A fantastic blend that adds a vibrant color and savory, earthy notes to the flour dredge, making the chicken extra flavorful.
Cooking Mastery: Your Guide to Creamy Garlic Parm Chicken Pasta
Follow these detailed instructions to create a restaurant-quality meal right in your own kitchen. Precision and passion are your best ingredients!
Step 1: The Soul of the Sauce – Roasting the Garlic
Begin by preparing your roasted garlic, which will infuse your sauce with a deep, mellow, and slightly sweet garlic flavor that is simply irresistible. Take a whole head of garlic, carefully slice about a quarter-inch off the very top to expose the cloves. Remove some of the loose outer skin, but keep the head intact. Place the garlic head onto a piece of aluminum foil. Drizzle generously with olive oil, ensuring each exposed clove gets a coating, then sprinkle lightly with salt and black pepper. Wrap the foil tightly around the garlic, creating a secure packet. Place this packet in a preheated oven at 400°F (200°C) and roast for approximately 40 minutes, or until the cloves are incredibly soft and golden brown. Once done, remove from the oven and set aside to cool slightly. This roasted garlic will be easy to squeeze out and will melt into your sauce, creating incredible depth.
Step 2: Preparing the Chicken – A Flavorful Marinade
While your garlic roasts, turn your attention to the chicken tenders. Place the 1 pound of chicken tenders in a medium-sized bowl. Season them generously with all-purpose seasoning (or a blend of salt, black pepper, garlic powder, and onion powder), a good sprinkle of Cajun or Creole seasoning for a zesty kick, and a pinch of cayenne pepper for a subtle warmth. Mix everything thoroughly with your hands, ensuring each piece of chicken is evenly coated with the spices. Next, pour in the buttermilk (or whisked eggs, if using). Mix again until all chicken pieces are well-coated. Buttermilk not only adds flavor but also helps tenderize the chicken and ensures a fantastic crust. Cover the bowl and refrigerate for at least 30 minutes, or ideally for an hour or more, to allow the flavors to meld and the chicken to tenderize.
Step 3: Crafting the Crispy Coating & Garlic Parm Glaze
Now, let’s prepare the components for our crispy chicken and its glorious garlic parmesan glaze. In a shallow bowl, combine 2 cups of all-purpose flour. To this, add a good dash of cayenne pepper for color and heat, a generous amount of all-purpose seasoning, and a packet or two of Sazon seasoning. Sazon adds a beautiful golden color and a savory, earthy depth to the flour. Mix these dry ingredients until fully combined; this is your flavorful dredge. In a separate bowl, prepare your irresistible garlic parm sauce. Add half of the room-temperature butter to the melted butter. Whisk them together until smooth. Then, fold in the grated fresh garlic, finely diced fresh parsley, the specified amount of grated Parmesan cheese, and a sprinkle of all-purpose seasoning. Mix vigorously until all ingredients are well combined into a luscious, aromatic sauce. Set both the flour dredge and the garlic parm sauce aside.
Step 4: Perfecting the Pasta
Bring a large pot of generously salted water to a rolling boil. Add your cavatappi noodles (or chosen pasta) to the boiling water. Cook according to the package instructions until al dente – that perfect point where the pasta is tender but still has a slight bite. Remember, pasta continues to cook slightly after it’s drained, so err on the side of slightly undercooked rather than overcooked. Before draining, reserve about 1 cup of the starchy pasta water; this liquid is a secret weapon for achieving a silky, emulsified sauce. Drain the remaining pasta and set it aside.
Step 5: Building the Creamy Sauce – A Symphony of Flavors
In a large, deep skillet or Dutch oven, cook the bacon strips over medium heat until they are perfectly crispy and golden brown. Remove the cooked bacon strips and place them on a paper towel-lined plate to drain, reserving the bacon fat in the pan. Once cooled, chop the bacon into small bits. In the same pan with the bacon drippings, reduce the heat to medium-low and add the diced onions. Sauté for 3 to 4 minutes, or until softened and translucent, scraping up any browned bits from the bottom of the pan. This is where the flavor begins to build! Next, add the sliced sun-dried tomatoes, the roasted garlic (squeezed from its skin), the fresh minced garlic, the all-purpose flour, a good pinch of all-purpose seasoning, and the red pepper flakes. Cook for another 3 to 4 minutes, stirring constantly, allowing the flour to cook out and the flavors to meld into a fragrant paste. This step creates the roux that will thicken your sauce. Gradually pour in the heavy cream and half and half, whisking continuously to prevent lumps. Bring the mixture to a gentle boil, stirring occasionally to ensure nothing sticks to the bottom. Once boiling, reduce the heat to low, add the fresh spinach, and stir until it wilts completely. Finally, fold in the crispy bacon bits and the shredded mozzarella cheese. Stir until the cheese is fully melted and incorporated, creating a rich, homogenous sauce.
Step 6: Uniting Pasta and Sauce
Carefully add the cooked and drained cavatappi pasta directly into the creamy sauce in the skillet. Using tongs, gently toss the pasta, ensuring every noodle is beautifully coated in the luscious sauce. If the sauce appears too thick, add a splash of the reserved pasta water, a tablespoon at a time, until you reach your desired consistency. The pasta water helps to create a glossy, emulsified sauce that adheres perfectly to the noodles. Taste the sauce and adjust the seasoning if needed – perhaps a little more salt, pepper, or red pepper flakes to suit your preference. Once perfectly coated and seasoned, turn off the heat and transfer the pasta to individual plates or a large serving platter. Keep it warm while you prepare the chicken tenders.
Step 7: The Grand Finale – Crispy Garlic Parm Chicken Tenders
Retrieve your marinated chicken tenders from the fridge. Working one by one or in small batches, remove the chicken from the buttermilk and dredge each tender fully into the seasoned flour mixture. Press firmly to ensure a thick, even coating. Place the coated tenders on a separate plate. Heat your frying oil in a deep pot or Dutch oven to 350°F (175°C). Use a candy thermometer or deep-fry thermometer to monitor the temperature accurately. Carefully drop the coated chicken tenders into the hot oil, ensuring not to overcrowd the pan, which can lower the oil temperature and result in greasy chicken. Fry the chicken for approximately 5 to 6 minutes, flipping occasionally, or until they are a beautiful golden brown and cooked through (internal temperature should reach 165°F / 74°C). Once cooked, remove the chicken tenders from the oil and place them on a wire rack set over a paper towel-lined baking sheet to drain any excess oil. While the chicken is still hot, immediately dip each tender into the prepared garlic parm sauce, tossing gently to ensure an even, generous coating. The warmth of the chicken will help the butter and cheese meld beautifully. Once coated, slice the chicken tenders into bite-sized pieces and artfully arrange them on top of your creamy pasta. Garnish with a sprinkle of fresh parsley and extra grated Parmesan cheese for a picture-perfect presentation.
Tips for the Perfect Creamy Garlic Parm Chicken Pasta
- Quality Ingredients Matter: Fresh garlic, good quality Parmesan, and thick-cut bacon will significantly impact the final flavor. Don’t skimp!
- Don’t Overcook the Pasta: Al dente pasta holds its shape better and absorbs the sauce without becoming mushy. Remember, it will continue to cook slightly when added to the hot sauce.
- Reserve Pasta Water: This starchy liquid is your best friend for achieving a perfectly emulsified and creamy sauce. It helps bind the sauce to the pasta beautifully.
- Temperature Control for Frying: Maintaining a consistent oil temperature (around 350°F / 175°C) is crucial for crispy, evenly cooked chicken tenders. Use a thermometer to avoid greasy or burnt chicken.
- Season in Layers: Season the chicken, the flour, and the sauce at different stages. Tasting and adjusting seasoning as you go ensures a perfectly balanced flavor profile.
- Roast Garlic Ahead: You can roast the garlic a day or two in advance to save time. Store it in an airtight container in the fridge.
Serving Suggestions and Variations to Explore
This creamy garlic parm chicken pasta is a hearty meal on its own, but you can elevate the dining experience with a few thoughtful additions or creative variations.
What to Serve With Your Pasta:
- Fresh Green Salad: A simple mixed green salad with a light vinaigrette offers a refreshing contrast to the richness of the pasta.
- Crusty Bread or Garlic Bread: Perfect for soaking up every last drop of that incredible creamy sauce.
- Steamed Vegetables: A side of steamed broccoli, asparagus, or green beans can add a healthy balance.
Exciting Recipe Variations:
- Spicy Kick: Increase the red pepper flakes in the sauce and cayenne pepper on the chicken for those who love extra heat. A drizzle of hot honey on the fried chicken can also be a delightful addition.
- Vegetable Boost: Feel free to add other quick-cooking vegetables to the sauce, such as sliced mushrooms, bell peppers, or even a handful of chopped kale along with the spinach.
- Different Proteins: While chicken tenders are fantastic, you could substitute boneless, skinless chicken thighs, or even shrimp for a seafood twist. Adjust cooking times accordingly.
- Herb Garden Freshness: Experiment with different fresh herbs. Besides parsley, a touch of fresh basil or oregano could add another layer of aromatic complexity to the sauce.
- Cheese Exploration: Try substituting or adding other cheeses like smoked gouda for a smoky note, or a sharper cheddar for a more pronounced cheesy flavor.
Storage and Reheating Tips
If you’re lucky enough to have leftovers of this delectable dish, proper storage and reheating will ensure you can enjoy it again.
- Storage: Store any leftover creamy garlic parm chicken pasta in an airtight container in the refrigerator for up to 3 days. The chicken tenders can be stored separately to maintain their crispness if desired.
- Reheating: For best results, reheat the pasta gently on the stovetop over medium-low heat. You may need to add a splash of milk, cream, or chicken broth to loosen the sauce and restore its creamy consistency, as it tends to thicken in the fridge. Stir frequently until heated through. The chicken tenders can be reheated in a toaster oven or air fryer for about 5-8 minutes at 350°F (175°C) to regain some of their crispness, rather than in the microwave, which can make them soggy.
Indulge in Perfection!
This creamy garlic parmesan chicken pasta is more than just a recipe; it’s an experience. From the melt-in-your-mouth roasted garlic to the perfectly fried, flavor-packed chicken tenders and the luxuriously rich sauce, every component comes together to create a dish that truly satisfies. It’s a testament to the fact that with a little time and passion, you can create extraordinary meals at home. So go ahead, gather your ingredients, follow these steps, and prepare to delight yourself and your loved ones with a plate of pure, creamy, garlicky, cheesy chicken pasta perfection. Enjoy every mouthwatering bite!