
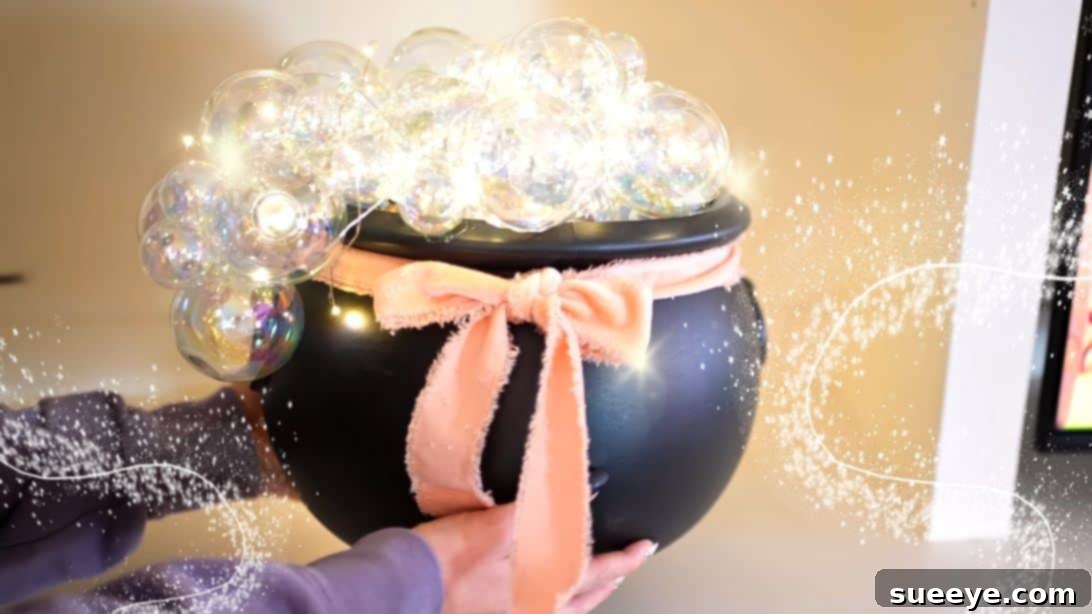
DIY Enchanted Witch Cauldron Halloween Decor: A Spellbinding Display
Halloween is a time for magic, mystery, and captivating decorations that transform your home into a truly enchanting space. If you’re searching for a centerpiece that embodies the spirit of the season while being surprisingly simple to create, look no further than this brilliant DIY witch cauldron project. Inspired by the incredible creativity of Its Rose Lewis on YouTube, this decoration takes the classic witch’s brew concept and elevates it with a touch of elegance and whimsy. The innovative use of clear ornaments to mimic sparkling bubbles, combined with the warm glow of fairy lights, creates a truly mesmerizing effect that will impress both children and adults alike.
Forget generic store-bought decorations; this fun and easy DIY project allows you to craft a unique, one-of-a-kind piece that truly reflects your festive spirit. Whether you’re hosting a Halloween party, looking to add a spooky yet sophisticated touch to your entryway, or simply love indulging in creative crafts, this bubbling cauldron will undoubtedly become a showstopper. Ready to brew up some magic? Dive into our comprehensive guide below for full instructions and tips to bring this fantastic decoration to life. You can also explore additional design inspiration by watching the original video.
Essential Materials for Your Magical Cauldron
Gathering your supplies is the first step in creating any enchanting DIY project. For this bewitching cauldron, you’ll need a few readily available items. Many of these can be found at craft stores, discount retailers, or even around your home. Selecting the right materials ensures both the beauty and durability of your finished Halloween decor.
- Black Plastic Cauldron: The cornerstone of your witchy display. A standard plastic cauldron is ideal for its lightweight nature and classic look. If you don’t have one, a round vase or pot can be painted black to achieve a similar effect. Consider the size based on where you plan to display your finished piece – a larger cauldron makes a grander statement.
- Large Foam Ball: This acts as the internal support structure for your “bubbles.” Choose a foam ball with a diameter that fits snugly just below the rim of your cauldron. This provides a stable base and helps create the overflowing dome shape for your ornaments, reducing the number of clear ornaments you’ll need to fill the entire cauldron.
- Hot Glue Gun and Glue Sticks: Your primary tool for attaching the ornaments securely. A good quality glue gun with plenty of glue sticks is crucial. Always prioritize safety when using hot glue.
- Clear Ornament Bubbles (Assorted Sizes): These are the magic makers! You’ll need a good quantity of both large and small clear plastic or glass ornaments. The variety in sizes is key to creating a realistic and dynamic bubbling effect, mimicking natural foam and froth. Look for shatterproof plastic options for greater durability, especially if children are around.
- Fairy Lights (Battery-Operated Recommended): These lights will illuminate your bubbles from within, giving your cauldron that enchanting, mystical glow. Battery-operated fairy lights offer flexibility in placement, as you won’t need to worry about proximity to an outlet. Warm white lights provide a classic magical feel, while green or purple lights can add an extra spooky touch.
- Velvet Ribbon: A beautiful finishing touch that adds a touch of elegance and texture to your cauldron. Black velvet is classic, but deep purple, forest green, or even a rich orange could also complement your Halloween theme.
Optional Materials for Enhanced Magic:
- Glitter: A sprinkle of iridescent or silver glitter on some of the ornaments can make them sparkle even more under the fairy lights.
- Small Plastic Spiders or Bat Confetti: For an extra touch of spooky charm, these can be strategically placed among the bubbles or on the cauldron itself.
- Faux Spiderwebs: Draped lightly around the base of the cauldron can enhance the eerie atmosphere.
- Dry Ice Machine (for advanced display): For a truly theatrical effect, you can place a small dry ice fog machine behind or underneath the cauldron for a continuous stream of rolling mist. (Ensure proper ventilation and safety precautions if using dry ice.)
Step-by-Step Instructions: Conjuring Your Bubbling Cauldron
Crafting this DIY witch cauldron is an enjoyable process that yields spectacular results. Follow these detailed instructions carefully to ensure your decoration is both beautiful and sturdy. Remember to work in a well-lit area and take your time with each step.
Step 1: Laying the Foundation – The Cauldron’s Core
The first step involves preparing the interior of your cauldron to provide a stable base for your bubbling ornaments. This foundation is essential for achieving the desired overflowing look and helps conserve your clear ornaments.
Carefully place the large foam ball inside your black plastic cauldron. Ensure it sits securely and creates a slightly domed surface just below the rim. The purpose of this foam ball is twofold: it elevates the “bubbles” so they appear to overflow, and it provides a sturdy, glue-friendly surface for attaching your ornaments. While you could use crumpled paper or other objects to fill the cauldron, a foam ball offers a cleaner, more consistent base, making the subsequent steps much easier. If your foam ball doesn’t fit perfectly, you can gently trim it or add a small amount of filler underneath to achieve the ideal height.
Step 2: Crafting the Effervescent Bubbles
This is where the magic truly begins! Creating the realistic bubbling and overflowing effect requires careful placement and a steady hand with your hot glue gun. Remember, safety first – hot glue can cause burns if not handled properly.
Begin by attaching the largest clear ornaments around the entire rim of the cauldron, directly onto the foam ball. Apply a generous dot of hot glue to the top or side of each ornament (where it will make contact with the foam or other ornaments) and press firmly into place. Work your way around the circumference, ensuring a continuous layer of large bubbles. Once the rim is covered, start filling the remaining open space in the middle of the foam ball with more large ornaments. This creates a foundation for the overflowing look, building up the “bubble mound.”
Next, to create the spectacular overflowing effect, begin gluing additional large ornaments on top of the first layer. Don’t be afraid to stack them slightly, allowing some to extend beyond the cauldron’s edge. This gives the illusion that the cauldron is vigorously bubbling over. Continue this layering, focusing on building height and volume. Then, strategically extend the bubble formation down one side of the cauldron, gluing ornaments in a cascading pattern to simulate a dripping or spilling effect. This adds incredible realism and dynamism to your display.
Finally, once the larger structures are in place, integrate the smaller clear ornaments. Glue these tiny bubbles in the gaps between the bigger ones, and especially along the dripping trail. The small ornaments add intricate detail and texture, making the entire bubbling effect much more convincing and realistic. Allow all the hot glue to dry completely and cure for at least an hour before moving to the next step to ensure everything is securely bonded.
Step 3: Illuminating the Magic – Adding the Fairy Lights
With your bubbles securely in place, it’s time to bring your cauldron to life with light. The fairy lights will give your project its captivating glow, transforming it into a truly magical spectacle.
Gently weave the strand of fairy lights among and around your clear ornaments. Start by tucking the battery pack (if applicable) discreetly behind or within a gap in the bubbles so it’s easily accessible but not visible. Then, carefully thread the lights, ensuring they are evenly distributed throughout the bubble arrangement. The goal is to have the light catch and reflect within the clear ornaments, creating a radiant, ethereal glow. You can wrap them loosely, letting them settle naturally, or secure small sections with tiny dots of hot glue if needed, being careful not to melt the light wires. Once illuminated, step back and adjust the lights until you are satisfied with the magical glow emanating from your cauldron.
Step 4: The Finishing Touch – Elegant Ribbon Detailing
The final step adds a touch of sophistication and completes the aesthetic of your DIY witch cauldron, elevating it from a simple craft to a polished piece of decor.
Take your velvet ribbon and wrap it gracefully around the body of the cauldron. Position it just below the rim or around the middle, depending on what looks best with your cauldron’s shape. Once wrapped, tie the ribbon into a neat bow, allowing the ends to drape elegantly. The luxurious texture of the velvet adds a beautiful contrast to the glossy bubbles and classic black cauldron, enhancing its overall appeal. Now, step back and admire your beautiful, showstopping Halloween decor! It’s ready to enchant any corner of your home.
Displaying Your Enchanting Cauldron
Once your DIY witch cauldron is complete, consider its placement to maximize its impact. This versatile piece can elevate various areas of your home, creating a truly immersive Halloween atmosphere.
- Entryway: Place it on a console table near your front door to greet guests with a mystical welcome.
- Mantlepiece: A perfect spot for a smaller cauldron, flanked by other Halloween trinkets and faux spiderwebs.
- Party Table Centerpiece: Make it the focal point of your Halloween feast, surrounded by spooky treats and themed tableware.
- Bedroom or Reading Nook: For a subtle touch of magic, a mini cauldron can bring a cozy, mysterious glow.
- Outdoor (Sheltered): If your cauldron is made from weather-resistant materials and the fairy lights are rated for outdoor use, you could place it on a covered porch or patio for an outdoor spectacle. Always ensure battery packs are protected from moisture.
Enhance the display by adding complementary elements like faux cobwebs, scattered autumn leaves, miniature pumpkins, or even a small witch’s hat placed nearby. The soft glow of the fairy lights will cast a captivating ambiance, making your cauldron the star of your Halloween setup.
Customization and Creative Variations
While the classic black cauldron with clear bubbles is stunning, don’t hesitate to personalize your creation to match your unique style or party theme. Here are a few ideas to spark your imagination:
- Color Theme: Instead of clear ornaments, try using green or purple plastic ornaments for a “toxic potion” effect, or orange and black for a traditional Halloween feel. You can also spray-paint clear ornaments with translucent craft paint for custom colors.
- Different Lights: Experiment with different colored fairy lights (e.g., green, purple, orange) to change the mood. Twinkling fairy lights can add an extra dynamic sparkle.
- Glow-in-the-Dark Accents: Apply glow-in-the-dark paint to some of the small ornaments or even the cauldron itself for an eerie effect when the main lights are off.
- Aromatherapy: Place a small, battery-operated essential oil diffuser (with a non-flammable base) near the cauldron and use autumnal scents like pumpkin spice, cinnamon, or apple cider to engage another sense.
- Sound Effects: For a truly immersive experience, hide a small, battery-operated speaker nearby playing subtle bubbling sounds or spooky witch cackles.
Safety First: Important Considerations
As with any DIY project involving tools and electrical components, safety should always be a priority:
- Hot Glue Gun: Always be cautious when using a hot glue gun. Keep your fingers clear of the nozzle and heated glue. If working with children, supervise them closely or handle the glue gun yourself.
- Fairy Lights: Ensure your fairy lights are in good condition with no frayed wires. If using plug-in lights, ensure they are not overloaded and placed away from water. Battery-operated lights are generally safer for decorative purposes.
- Placement: Place your finished cauldron on a stable, flat surface where it won’t be easily knocked over. Keep it away from open flames, heat sources, and out of reach of very young children or pets who might be tempted to pull on the ornaments or lights.
Unleash Your Inner Witch or Wizard!
Creating this DIY witch cauldron is more than just a craft project; it’s an opportunity to infuse your home with the enchanting spirit of Halloween. Its sparkling bubbles and magical glow are sure to captivate and delight everyone who sees it. This project proves that with a little creativity and a few simple materials, you can conjure up truly extraordinary decorations.
So, gather your supplies, put on your favorite spooky playlist, and get ready to create a Halloween masterpiece. We encourage you to share your unique cauldron creations and inspire others with your magical touch. Happy crafting, and have a wonderfully bewitching Halloween!