
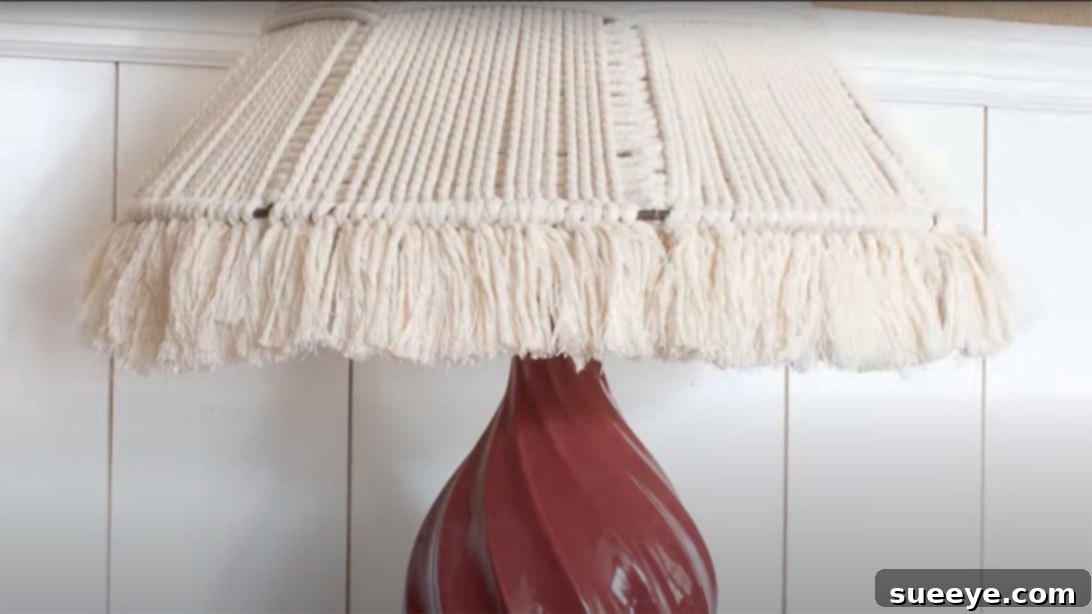
DIY Woven Lampshade: Crafting Unique Lighting for Your Home
There’s a special satisfaction that comes with creating something beautiful for your home with your own hands. Custom lighting fixtures, in particular, can transform the ambiance of any room, adding a personal touch that store-bought items often lack. If you’ve ever found yourself admiring a beautiful lamp but wishing for a lampshade that perfectly complements your decor, then crafting your own woven lampshade is an incredibly rewarding project. It’s an opportunity to infuse your personality into your home while practicing a wonderfully meditative craft.
My own journey into woven lampshade making began just a few weeks ago when I acquired a pair of stunning lamps that were, unfortunately, without their shades. Rather than settling for generic replacements, I decided to embark on a DIY adventure. Inspired by an incredible tutorial titled A Butterfly House on YouTube, I discovered a method that allowed for extensive customization. After a little experimentation and some careful adjustments, I managed to create shades that were not only the perfect size and shape for my new lamps but also reflected my personal aesthetic. This project, while taking many enjoyable hours and approximately 400 yards of cord, resulted in truly unique pieces that now illuminate my home beautifully.
Why Choose to DIY Your Lampshade?
Beyond the simple pleasure of crafting, there are numerous compelling reasons to undertake a DIY lampshade project:
- Personalization and Unique Decor: Mass-produced lampshades can be limiting. Crafting your own allows you to choose specific colors, textures, and patterns that perfectly match your existing decor or introduce a fresh, custom element to your space. You can create a piece that is truly one-of-a-kind.
- Cost Savings: High-quality, uniquely designed lampshades can often come with a hefty price tag. By sourcing materials yourself and repurposing an old frame, you can achieve a sophisticated look for a fraction of the cost.
- Eco-Friendly Upcycling: This project is a fantastic way to give new life to an old, damaged, or outdated lampshade frame that might otherwise end up in a landfill. It’s a sustainable choice that reduces waste and promotes creative reuse.
- A Sense of Accomplishment: There’s immense satisfaction in seeing a project through from start to finish and then proudly displaying your creation. Each time you switch on your lamp, you’ll be reminded of your skill and effort.
- Therapeutic Crafting Experience: The repetitive motions of wrapping and weaving can be incredibly calming and meditative. It offers a wonderful way to de-stress and engage in a focused, creative activity.
Essential Materials for Your Woven Lampshade Project
Before you begin, gathering all your materials is key to a smooth and enjoyable crafting experience. Here’s a detailed list of what you’ll need, along with some considerations for each item:
- Lamp Base: Ensure your lamp base is sturdy and in good working order. The size and style of your base will help determine the ideal dimensions and aesthetic for your new lampshade.
- Lampshade Frame (Wire Skeleton): This is the foundation of your woven lampshade.
- Option 1: Upcycling an Old Lampshade: If you have an old lampshade whose fabric is worn or outdated, you can carefully strip it down to its bare wire frame. This is a cost-effective and eco-friendly approach.
- Option 2: Purchasing a Bare Frame: Craft stores or online retailers often sell bare wire lampshade frames in various shapes and sizes (e.g., drum, empire, bell). Choose one that suits your lamp base and desired look.
- Weaving Cord/Yarn/Rope: This is where your creative choices truly shine!
- Type: Consider materials like cotton cord, jute twine, macrame rope, or even thick decorative yarn. The texture will significantly impact the final look. For a robust weave, aim for a cord thickness of 2-5mm.
- Color: Select colors that complement your room’s palette or stand out as a vibrant accent.
- Quantity: This is crucial. For a standard medium-sized lampshade, you might need anywhere from 200 to 600 yards of cord, depending on its thickness and the density of your weave. The original project used 400 yards for two shades, so estimate generously, perhaps 200-300 yards per shade as a safe starting point. It’s always better to overestimate than run out mid-project.
- Sharp Scissors: Essential for clean cuts of your cord.
- Measuring Tape or Ruler: For precise measurements of cord lengths and fringe.
- Fabric Glue or Hot Glue Gun (Optional): Can be useful for securing knots, especially at the beginning and end of sections, or for attaching a fabric liner if desired.
- Clips or Clothes Pins (Optional but Recommended): Handy for holding cords in place temporarily while you work, especially during the initial wrapping stages.
- Needle (Large Eye, Optional): A large-eye needle can help in weaving in ends neatly.
Step-by-Step Guide to Crafting Your Custom Woven Lampshade
Now that you have your materials ready, let’s dive into the creative process of making your unique woven lampshade. Take your time with each step, enjoying the transformation of simple cord into a beautiful lighting element.
Step 1: Preparing Your Lampshade Frame
If you’re using an old lampshade, the first crucial step is to meticulously remove all existing fabric, trim, and adhesive from the frame. Use sharp scissors or a utility knife to cut away the old material. Take care not to bend or damage the wire frame itself. Once the fabric is removed, ensure the frame is completely clean and smooth, free of any sharp edges or sticky residue that could snag your new cord. If you’ve purchased a bare frame, simply ensure it’s clean and ready for weaving.
Step 2: Mastering the Vertical Wrap (The Warp Foundation)
This phase establishes the foundational vertical cords that your horizontal weave will interact with. The key here is consistency in tension and spacing for a professional finish.
- Initial Attachment: Begin by taking a long piece of your chosen cord. Select one of the vertical wires on your lampshade frame. Tie one end of the cord securely to the top ring of the frame, right next to this vertical wire. A simple, tight double knot should suffice. Ensure it’s firm, as this will be the anchor point for your entire vertical wrap.
- Wrapping Downwards: Guide the cord downwards, wrapping it snugly around the vertical wire. Each time you reach the bottom ring of the lampshade frame, wrap the cord once around the bottom ring, then bring it back up to the top ring along the next vertical wire. Continue this process, wrapping once around the top ring and once around the bottom ring each time you transition to a new vertical wire. The goal is to create a series of parallel vertical cords that are evenly spaced around the entire frame.
- Maintaining Tension: Throughout this wrapping process, it is paramount to maintain consistent tension on your cord. This prevents sagging and ensures a taut, professional-looking foundation.
- Estimating Cord Length: As you near the completion of wrapping all the vertical wires, begin to estimate how much more cord you will need to finish the final section and tie off. It’s always best to overestimate your needs significantly. Running out of cord in the middle of a wrap can disrupt the flow and make it difficult to achieve a seamless finish. Once you’ve wrapped all vertical wires, secure the end of the cord to the bottom ring with a simple, firm knot, similar to how you started.
- Refining the Base: At this stage, you should have a frame completely covered with vertical cords, forming a base for your weaving. Ensure all knots are tight and tucked away.
Step 3: Weaving the Horizontal Pattern (The Weft)
This is where your lampshade truly starts to take shape and where you can introduce various weaving patterns. The original tutorial suggests a specific method involving segments, which can be interpreted as creating distinct sections with varying cord counts or knotting styles. Let’s elaborate on this concept for a rich, textured design.
- Segmenting Your Shade: Consider dividing your lampshade into several horizontal sections. For example, you might create a top section, a middle section, and a bottom section, each with a different weaving density or pattern. The original instruction “For each segment, put six cords on the top wire section and five cords on the top corded portion” suggests varying the number of horizontal weaving cords attached per segment for texture or pattern. This means you might attach 6 new horizontal cords to the top wire in one section and 5 in another to create a varied look. Alternatively, this could refer to how many times you wrap around the vertical cords.
- Attaching Horizontal Cords: For each horizontal weaving cord, begin by making a slipknot or a secure larks head knot onto either the top wire of the frame or onto one of the existing vertical cords at your desired starting height. Ensure these initial knots are strong and evenly spaced.
- The Weaving Process: Using an “over and under” technique, or any other simple weaving pattern, interlace your horizontal cords through the vertical cords you created in Step 2.
- Basic Weave: Pass the horizontal cord over one vertical cord, then under the next, and so on, continuing around the circumference of the shade.
- Variations: Experiment with different patterns, such as skipping two vertical cords before going under, or doubling up on passes for a thicker texture.
- Securing the Weave: As you weave each horizontal row, gently push the cords together to eliminate gaps and create a cohesive fabric. The original mentions “The ends of the lampshade should be tucked into the middle of the shade and brought back to the front about two-thirds of the way through. Then, tie each rope in a simple knot at the shade’s bottom.” This is likely referring to how you manage the trailing ends of your weaving cords. Once a horizontal cord reaches its desired length or completes its pass around the shade, tuck its end neatly into the inner side of the shade’s weave, bringing it out briefly about two-thirds down, and then securing it with a simple knot at the bottom ring of the frame or against a vertical cord. Ensure all bottom knots are tied consistently for a uniform look.
- Consistency is Key: Whatever knotting or weaving pattern you choose, strive for absolute consistency. This uniformity is what will give your finished lampshade a professional and polished appearance. Maintaining consistent tension throughout the horizontal weaving is just as important as it was for the vertical wrap.
Step 4: Crafting the Perfect Fringe and Final Assembly
The fringe adds a delightful decorative element and a soft finish to your woven lampshade. This step allows for a final touch of personalization.
- Determine Fringe Length: Decide on the desired length for your fringe. This will typically extend beyond the bottom edge of your woven shade. You should have a few extra inches of cord dangling from your horizontal weaving, as mentioned in the original text (e.g., “Make certain you have a few extra inches of cord to serve as fringe. That will be removed in the following phase.”).
- Precision Trimming: Lay your lampshade on a flat surface or hang it, ensuring it’s stable. Using sharp scissors, carefully trim all the dangling cord ends to your chosen uniform length. Imagine you’re giving your lampshade a haircut – precision is important for a clean, even edge. You can use a ruler or a fixed point as a guide.
- Unraveling for Softness: For a softer, fuller, and more bohemian look, gently unravel the individual strands of the trimmed cords. This separates the plies of the rope or yarn, creating a beautiful, feathery effect. Use your fingers or a comb to tease out the fibers until you achieve the desired fluffiness.
- Final Attachment: Once your fringe is perfectly shaped and styled, your woven lampshade is complete! Carefully place it onto your lamp base. Ensure it sits securely and is level. Install your preferred light bulb, and step back to admire your handmade creation.
Tips for a Flawless DIY Lampshade
- Practice Knots: If you’re new to macrame or knotting, practice your chosen knots on a scrap piece of cord first to ensure uniformity and strength.
- Consistent Tension: This cannot be stressed enough. Even tension is the secret to a professional-looking weave.
- Measure Twice, Cut Once: Especially for cord lengths, always double-check your measurements. It’s better to have a bit extra than not enough.
- Consider Light Bulb Type: LED bulbs are generally recommended for woven lampshades as they produce very little heat, reducing any potential fire hazard from close contact with fibrous materials.
- Experiment with Textures and Colors: Don’t be afraid to mix different types of cords or colors for a truly unique and artistic design.
- Patience is a Virtue: Crafting takes time. Don’t rush the process. Enjoy each step, and if something isn’t perfect, remember it adds to the unique charm of a handmade item.
- Protect Your Workspace: Lay down a drop cloth or old newspaper to keep your work area clean, especially if you’re working with natural fibers that might shed.
Caring for Your Handmade Woven Lampshade
To keep your beautiful woven lampshade looking its best, follow these simple care guidelines:
- Regular Dusting: Use a soft brush, a lint roller, or a vacuum cleaner with a brush attachment on a low setting to gently remove dust and debris.
- Spot Cleaning: For any small marks or spills, use a slightly damp cloth with a mild soap. Blot gently and allow to air dry completely. Avoid saturating the cord.
- Avoid Direct Sunlight: Prolonged exposure to direct sunlight can cause natural fibers to fade or become brittle over time. Position your lamp away from harsh sun exposure if possible.
- Handle with Care: When moving or cleaning the lampshade, handle it gently to avoid snagging or distorting the weave.
Conclusion: Illuminate Your Home with Personal Style
Crafting a DIY woven lampshade is more than just a home decor project; it’s an opportunity to create a functional piece of art that reflects your personal style and enhances your living space. From selecting the perfect cord to meticulously weaving each strand, the process is deeply satisfying, culminating in a beautiful and unique addition to your home. Whether you’re aiming for a cozy bohemian vibe, a minimalist modern look, or something entirely your own, a handmade lampshade offers unparalleled customization.
So, gather your materials, set aside some dedicated crafting time, and let your creativity flow. You’ll be amazed at what you can achieve with a little patience and a lot of cord. Light up your world with a custom-made woven lampshade and enjoy the warm glow of your own craftsmanship!