
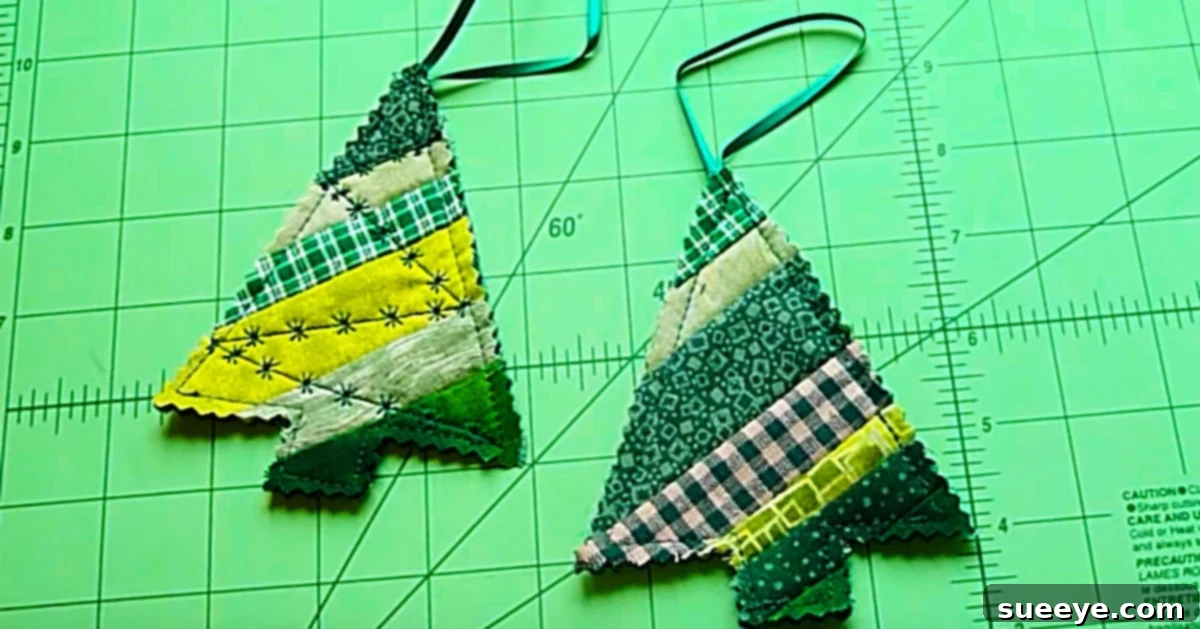
Craft Charming DIY Scrappy Christmas Tree Ornaments from Fabric Scraps
The holiday season is a magical time, filled with warmth, joy, and the beauty of cherished traditions. For many of us, creating handmade decorations adds an extra layer of enchantment to our homes. There’s something truly special about displaying ornaments crafted with love, each telling a unique story. If you’re looking for an incredibly rewarding, budget-friendly, and beginner-friendly sewing project to infuse your home with festive cheer, look no further than these delightful DIY Scrappy Christmas Tree Ornaments. Perfect for using up those beloved fabric remnants and jelly rolls, these little trees bring a heartwarming, rustic charm to any holiday setting.
As an avid crafter, especially when the holidays roll around, I’m always on the hunt for creative ways to transform simple materials into extraordinary decorations. Recently, I stumbled upon a stash of Christmas fabric scraps and jelly rolls I’d acquired on sale – too good to pass up, but without a clear purpose. My quest for inspiration led me to a brilliant tutorial for “scrappy trees” that instantly captured my imagination. The concept of taking small fabric pieces and assembling them into adorable mini Christmas trees using a simple “quilt-as-you-go” technique was simply irresistible. This project is not only easy to follow but also incredibly versatile, allowing for endless creativity in color and pattern combinations. Let’s gather our supplies and dive into creating these charming little treasures!
Why Scrappy Trees Are the Perfect Holiday Sewing Project
Before we delve into the step-by-step instructions, let’s explore why these fabric scrap trees are an absolute must-try for your holiday crafting list:
- Eco-Friendly & Budget-Conscious: This project is a fantastic way to utilize those leftover fabric scraps, jelly roll strips, or even old clothing that you can’t bear to part with. It’s an eco-conscious choice that reduces waste and saves you money on new supplies.
- Beginner-Friendly: Even if you’re new to sewing, the “quilt-as-you-go” method for these ornaments is remarkably straightforward. There are no complicated patterns, precise matching, or intricate techniques involved, making it a perfect entry point into the world of quilting and fabric crafts.
- Highly Customizable: The beauty of scrappy designs lies in their individuality. You have complete freedom to mix and match colors, patterns, and textures. Want a traditional red and green tree? Go for it! Prefer a modern farmhouse look with neutrals? Absolutely! The possibilities are truly endless, allowing each ornament to reflect your personal style.
- Adds a Handmade Touch: There’s an undeniable warmth and authenticity that handmade decorations bring to your home. These scrappy trees instantly create a cozy, homey atmosphere, reminding everyone of the care and effort put into the holiday preparations.
- Versatile Decor: While they make charming Christmas tree ornaments, these little fabric trees can be so much more. Use them as unique gift toppers, string them together to create a festive garland, adorn a holiday wreath, or even incorporate them into a festive centerpiece.
Materials You’ll Need for Your Scrappy Tree Ornaments
One of the best aspects of this project is that it requires minimal specialized tools, and many of the materials you might already have on hand. Here’s a comprehensive list to get you started:
- Fabric Scraps: A delightful assortment of Christmas-themed or coordinating cotton fabric scraps. These can be various sizes and shapes, as you’ll be cutting them into strips or squares. Jelly roll strips (2.5 inches wide) are ideal, but any remnants will do!
- Batting or Felt: A piece of quilt batting or stiff felt. This will provide structure and a soft, slightly puffy texture to your trees. A size slightly larger than your intended tree ornament is sufficient for each.
- Backing Fabric: A single piece of fabric for the back of your ornament. Choose something coordinating or a solid color that complements your scraps. This piece should be slightly larger than your batting/felt.
- Ribbon or Twine: A small length (about 6-8 inches) of thin ribbon, twine, or baker’s string for creating a hanging loop.
- Matching Thread: High-quality polyester or cotton thread that matches your dominant fabric colors.
- Sewing Machine: A basic sewing machine is all you need. (Though hand-sewing is also an option if you prefer, it will take more time).
- Basic Sewing Kit:
- Fabric scissors or a rotary cutter and mat (highly recommended for quick, accurate cuts).
- Sewing pins or fabric clips.
- Tailor’s chalk, a fabric marker, or a fine-tip pen.
- Seam ripper (just in case!).
- Pinking Shears (Optional but Recommended): These specialized scissors create a zig-zag edge, which prevents fraying and adds a lovely decorative finish.
- Iron and Ironing Board: Essential for pressing seams and achieving a professional, crisp finish.
- Christmas Tree Template (Optional): You can freehand a tree shape, use a cookie cutter, or print a simple tree silhouette from the internet.
Step-by-Step Guide: Crafting Your Adorable Scrappy Trees
This project employs a “quilt-as-you-go” method, which is incredibly satisfying and yields beautiful results. Follow these simple steps to bring your fabric scrap trees to life:
Step 1: Prepare Your Fabric Scraps and Base Layers
Begin by selecting your fabric scraps. There’s no need for extreme precision here – the scrappy look is part of the charm! Cut your chosen scraps into strips or squares. For a more uniform look, aim for strips roughly 1.5 to 2.5 inches wide, but varying widths also create a dynamic appearance. Arrange them roughly into a pleasing color and pattern sequence on your cutting table. Consider how contrasting colors will pop or how harmonious shades will blend.
Next, prepare your base layers. Place your backing fabric right side up on your work surface. Lay a piece of batting or felt directly on top of the backing fabric. Ensure both pieces are smooth and relatively flat. Pin them together around the edges to prevent shifting.
Step 2: Start Your “Quilt-as-You-Go” Panel
Take your first fabric strip. Position it diagonally across the center of your batting/felt base, right side up. This will be the foundational strip for your tree. Pin it in place. Then, take a second fabric strip. Place it right sides together with the first strip, aligning one long edge. Using a 1/4-inch seam allowance, sew along that aligned edge, through all three layers (the two fabric strips, batting, and backing fabric). This is the magic of “quilt-as-you-go” – you’re building the top fabric layer directly onto the batting and backing!
Step 3: Continue Adding Fabric Strips
After sewing the second strip, flip it open so it lays flat, right side up. Press the seam flat with an iron. This pressing step is crucial for a neat and professional finish. Now, take your third fabric strip and place it right sides together with the previous strip you just laid flat, aligning the raw edges. Sew with a 1/4-inch seam allowance, flip open, and press. Continue this process, adding strips one by one, until one side of your batting is completely covered. Trim any excess fabric from the edges as you go to keep things tidy.
Once one side is covered, rotate your piece 180 degrees and repeat the process for the other side of your initial diagonal strip. Continue adding strips, flipping, and pressing until the entire batting/felt square is covered with your scrappy fabric design. You should now have a fabric “quilt sandwich” with a beautifully pieced top layer, batting in the middle, and a solid backing.
Step 4: Shaping Your Christmas Tree Ornament
Now that your scrappy fabric panel is complete, it’s time to transform it into a tree. Take your chosen Christmas tree template (or freehand a shape) and place it on top of your scrappy fabric panel. Position it carefully to best showcase your fabric arrangement. Using tailor’s chalk or a fabric marker, trace the outline of the tree onto your fabric panel. Ensure the lines are clear and easy to follow.
Before sewing, create the hanging loop. Take a 6-8 inch piece of ribbon or twine, fold it in half to form a loop, and position the raw ends at the very top center of your traced tree shape, facing inwards (towards the center of the tree). The loop should extend outwards, beyond the top point of the tree. Pin it securely in place so it won’t shift during sewing.
Step 5: Stitching and Trimming Your Tree
With your ribbon loop pinned and your tree shape traced, head back to your sewing machine. Carefully sew along the traced chalk line, just inside the line to ensure a clean finish. Go slowly, especially around the corners and points of the tree, to maintain a smooth curve or sharp angle. Make sure to backstitch at the beginning and end, and definitely over the ribbon loop area, to reinforce it.
Once stitched, it’s time to cut out your tree! Using your pinking shears (or regular sharp fabric scissors), cut along the outside of your stitched line. The pinking shears will give your ornament a lovely, decorative, anti-fray edge that looks perfectly finished. If using regular scissors, you might consider making small, frequent snips around the curves to prevent bulk and allow the fabric to lie flatter.
Step 6: The Final Reveal and Finishing Touches
And just like that, you’re done! Your adorable scrappy Christmas tree ornament is ready. Give it one last gentle press with your iron if needed, to ensure all edges are crisp and flat. Step back and admire your beautiful, handmade creation.
Tips for Elevating Your Scrappy Tree Creations
- Experiment with Fabric Textures: While cotton is standard, consider incorporating small pieces of flannel, linen, or even velvet for added textural interest.
- Add Embellishments: Elevate your trees with a touch of sparkle or charm. Sew on small buttons, beads, sequins, or a tiny bell after the tree is cut out. A little embroidery can also add delightful detail.
- Vary Your Templates: Don’t limit yourself to just one tree shape. Try different sizes and styles – tall and slender, short and wide, or even a whimsical, slightly curved tree. You can also adapt this technique for other shapes like stars, hearts, or stockings.
- Make it a Family Activity: This project is simple enough for older children (with supervision for sewing machine use) to participate. Let them choose fabric scraps and help arrange the strips.
- Gift with Love: These handmade scrappy trees make incredibly thoughtful and unique gifts. Attach one to a present as a decorative tag, use them as stocking stuffers, or bundle a few together as a hostess gift.
Beyond the Ornament: Expanding Your Scrappy Creativity
The “quilt-as-you-go” technique used for these ornaments is incredibly versatile. Once you master it, you can apply it to a multitude of other projects. Imagine creating scrappy coasters for your holiday table, a small placemat, or even a decorative wall hanging. The basic principle remains the same: layer your backing, batting, and then sew strips of fabric onto it. This method is a fantastic way to add a personalized, handmade touch to various aspects of your home decor, not just during Christmas but all year round.
Conclusion: Embrace the Joy of Handmade Holidays
Creating these DIY Scrappy Christmas Tree Ornaments is more than just a sewing project; it’s an opportunity to slow down, get creative, and infuse your home with genuine holiday spirit. The satisfaction of transforming simple fabric scraps into beautiful, one-of-a-kind decorations is truly immense. They are a testament to resourcefulness, creativity, and the enduring charm of handmade goods. So, pull out your fabric stash, thread your machine, and get ready to add a personal, heartfelt touch to your holiday celebrations this year. Happy crafting!