
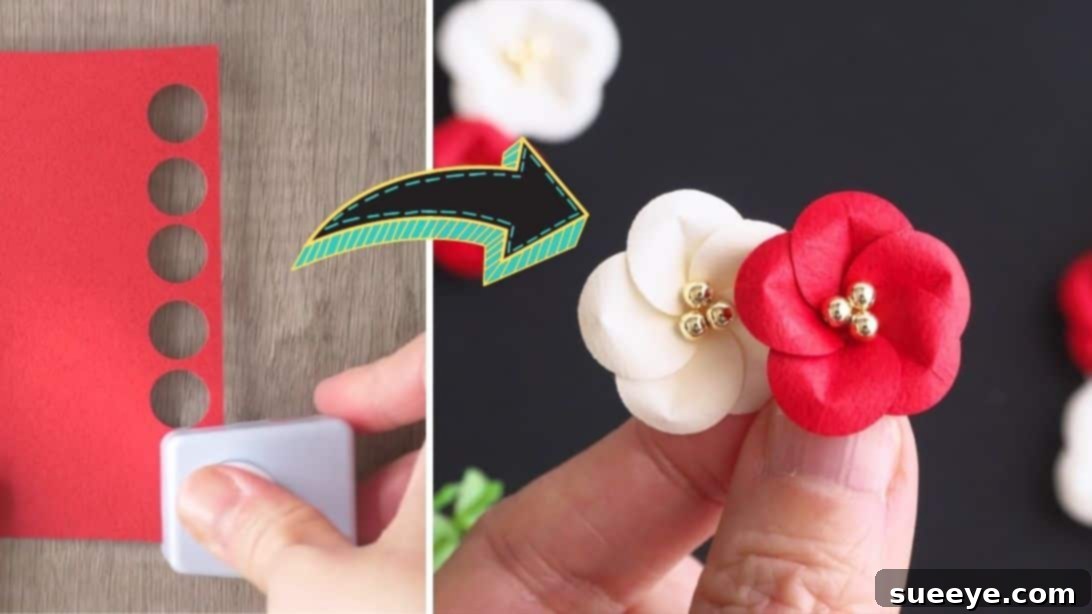
Mastering the Art of Paper Plum Blossoms: Your DIY Guide to Exquisite Floral Crafts
Dive into the delightful world of paper crafting with this engaging project, inspired by the creative talents of SimplePaperMade on YouTube. This comprehensive guide will walk you through the process of creating beautiful paper plum blossoms, perfect for adding a touch of elegance to any DIY project or gift. These charming flowers are not only easy and quick to make but also offer endless possibilities for customization, allowing you to infuse your personal style into each delicate petal. Whether you’re a seasoned crafter or just starting, you’ll find joy and satisfaction in bringing these lovely blossoms to life.
Why Craft Paper Plum Blossoms? Unlocking Creativity and Charm
Paper crafting is more than just a hobby; it’s a therapeutic and rewarding experience that offers numerous benefits. Creating paper plum blossoms, in particular, combines artistic expression with a sense of accomplishment. These delicate flowers symbolize resilience, hope, and beauty, making them a meaningful addition to any creation. Beyond their aesthetic appeal, making these blossoms helps refine fine motor skills, enhances patience, and provides a wonderful outlet for stress relief. Imagine the satisfaction of transforming simple sheets of paper into intricate floral masterpieces that can adorn your home, personalize gifts, or even become unique embellishments for special occasions. With just a few basic materials, you can unlock a world of creative possibilities and add a sophisticated touch to your handmade items.
Gather Your Essentials: Materials for Your Paper Plum Blossoms
Before you begin your crafting journey, gather these fundamental tools and materials. Choosing the right supplies can significantly impact the final look and feel of your plum blossoms.
-
Specialty Paper or Craft Paper: The heart of your project! Opt for high-quality craft paper in colors that mimic natural plum blossoms, such as various shades of pink, white, or even light purple. Consider paper with a slight texture or a subtle sheen for added realism. Standard cardstock (65-80 lb) works well, offering enough rigidity to hold its shape while still being pliable enough to fold and curve. Experiment with different paper types to discover unique effects.
-
School Glue: A reliable, fast-drying school glue or craft glue is essential for securely joining your paper pieces. Look for glues that dry clear to ensure an impeccable finish. Applying glue sparingly but evenly will prevent warping and excess residue, maintaining the delicate appearance of your blossoms. A glue pen or a fine-tip applicator can be particularly helpful for precise application.
-
Small Beads: These tiny embellishments will serve as the pistils and stamens, adding a realistic and decorative touch to the center of your plum blossoms. Choose beads in complementary colors like yellow, gold, white, or even a contrasting shade for a pop of color. Seed beads or micro beads are ideal due to their small size, perfectly fitting the delicate scale of the flowers.
-
Craft Tweezers: Precision is key in paper crafting, and craft tweezers are indispensable for handling small paper pieces, folding delicate edges, and placing beads accurately. A pair with fine, pointed tips will give you maximum control and prevent damage to your carefully shaped paper. They are particularly useful for making the intricate folds required for the flower’s center.
-
Single Puncher: A standard single hole puncher (typically 1/4 inch or 6mm) is perfect for creating the consistently sized circular pieces of paper that form the foundation of your plum blossoms. This ensures uniformity across all your flowers, contributing to a professional and polished final product. If you don’t have a puncher, you can meticulously cut small circles using a craft knife or scissors, but a puncher saves significant time and effort.
-
Skewer: A wooden skewer, bamboo stick, or even a thin paintbrush handle is an excellent tool for shaping the paper. Its rounded end allows you to gently curve the paper petals, giving them a natural, three-dimensional appearance. The pointed end can also be useful for creasing or gently pushing certain areas without tearing the paper.
Step-by-Step Crafting: How to Create Beautiful Paper Plum Blossoms
Follow these detailed instructions to transform simple craft paper into enchanting plum blossoms. Each step is designed to guide you smoothly through the process, ensuring a rewarding crafting experience.
Phase 1: Crafting the Heart of the Blossom (The Centerpiece)
The core of your plum blossom begins with a small, meticulously shaped paper cone that will provide the central structure and depth for your petals.
- Prepare Your Circles: Begin by taking your single puncher and creating six identical circular pieces of paper. Consistency in size is crucial here, as these circles will form the basis of both the flower’s center and its delicate petals. Set one circle aside for the center, and the remaining five will be used for the petals later.
- First Fold for the Center: Using your craft tweezers, carefully pick up one of the paper circles. Gently fold it precisely in half, aligning the edges perfectly. Press down firmly along the fold to create a crisp crease.
- Second Fold and Shaping: While the circle is still folded in half, perform a second fold across the first, essentially folding it into quarters. This creates a small, wedge-like shape.
- The Strategic Cut: Open the quarter-folded paper gently. You will notice clear crease lines. At the bottom, where the two folds meet, carefully cut a small, triangular notch. This cut is critical as it will allow the paper to form a cone when brought together.
- Forming the Cone: Apply a very thin, even strip of school glue along one of the straight edges of the triangle you just cut. Bring the opposing edge over to meet and overlap slightly with the glued edge. Press the edges together tightly using your tweezers or fingers, forming a small, stable cone shape. Hold it in place for a few moments to allow the glue to set, then let it dry completely. Patience at this stage ensures a strong bond.
- Refining the Center: Once the cone is fully dry and rigid, gently push the pointed center of the cone inwards from the outside. This will create a small indentation. Then, using the flat end of your skewer, press down firmly on this newly indented center from the inside. This action flattens the center, creating a small, slightly sunken base that is ideal for attaching petals and beads, forming the realistic core of your plum blossom.
This meticulously crafted center will serve as the foundation for your beautiful petals, ensuring your plum blossom has a realistic and sturdy core. The next phase focuses on bringing the petals to life and assembling the final flower.
Phase 2: Shaping the Delicate Petals and Final Assembly
With the flower’s center prepared, it’s time to create the graceful petals and bring your plum blossom to its full, elegant form.
- Preparing the Petals: Take one of the remaining five circular paper pieces. Fold it exactly in half, creating a crisp crease. Open it up again; this fold line will act as a guide.
- Curving the Petals: Using your skewer, gently roll the upper half of the folded paper circle around the skewer’s curve. As you roll, simultaneously pinch the bottom part of the paper with your fingers. This technique creates a delicate, natural curve in the petal while keeping its base flat for easy attachment. The contrasting flat base and curved top give the petal a lifelike quality.
- Repeat for All Petals: Repeat the folding, curving, and pinching process for each of the remaining four circular papers. Ensure all petals have a similar curve and shape for a consistent and harmonious blossom.
- Assembling the Blossom: Retrieve the paper piece you prepared as the flower’s center. Apply a thin, even layer of school glue into the inner curve of this central cone. Be careful not to use too much glue, as excess can seep through and make the paper soggy.
- Layering the Petals: One by one, take your curved petals and begin placing them around the glued inner edge of the center piece. Position each petal so it slightly overlaps with the previous one, creating a natural, layered effect. Ensure the curved part of the petal faces outwards, mimicking a blooming flower. Press each petal gently into the glue to secure it, holding for a few seconds if necessary. Continue until all five petals are evenly distributed around the center, forming a complete blossom.
- Adding the Final Touch (Beads): Once all the petals are securely attached, dab a tiny bit of glue directly into the very center of your assembled flower. Using your craft tweezers, carefully pick up three small beads. Place them delicately into the glue at the center, arranging them closely together to create the stamens of your plum blossom. Allow the entire flower to dry completely before handling extensively or using it in other crafts.
Congratulations! You have now created a beautiful paper plum blossom. With practice, you’ll find yourself making these adorable flowers with increasing speed and precision, ready to adorn your world.
Elevate Your Craft: Tips for Perfecting Your Paper Plum Blossoms
To ensure your paper plum blossoms turn out beautifully every time, consider these expert tips that can enhance your crafting experience and the final product.
- Precision is Paramount: While these flowers are simple, accuracy in cutting and folding makes a significant difference. Take your time with each step, especially when making the initial circles and cutting the triangle for the center.
- Less is More with Glue: Apply glue sparingly. Too much glue can saturate the paper, causing it to wrinkle, warp, or create unsightly residue. A thin, even layer is always best for a clean finish.
- Experiment with Paper: Don’t limit yourself to one type of craft paper. Try different weights, textures, and even patterned papers. A slightly heavier cardstock (65lb) offers more durability, while lighter papers can create a more delicate, ethereal look.
- Achieve Natural Curves: When shaping the petals with the skewer, use gentle, consistent pressure. Practice on a scrap piece of paper first to get a feel for how the paper reacts to the rolling motion. The goal is a soft, natural curve, not a sharp fold.
- Consider Color Palettes: Plum blossoms are traditionally pink, white, or red, but don’t hesitate to explore other color palettes. Soft pastels can create a dreamy effect, while vibrant hues can make a bold statement. Ombre paper or paper with subtle gradients can add extra dimension.
- Patience During Drying: Allow sufficient drying time for the glue at each stage, especially after forming the cone and after attaching the beads. Rushing the process can lead to pieces coming apart or shifting out of place.
- Storage for Longevity: Once completed, store your paper plum blossoms in a dry, dust-free environment, away from direct sunlight to prevent fading. A covered box or display case is ideal.
Beyond the Blossom: Creative Uses for Your Paper Plum Flowers
Your handmade paper plum blossoms are incredibly versatile and can enhance a wide array of projects. Here are just a few ideas to inspire your creativity:
-
Home Decor Enhancements: Arrange several blossoms in a small vase for a charming tabletop display, create a delicate garland to drape across a mantelpiece, or glue them onto a wreath base for a festive door decoration. They can also add an elegant touch to picture frames or decorative mirrors.
-
Personalized Gift Embellishments: Elevate your gift wrapping by attaching a plum blossom to the top of a present. Use them to adorn gift bags, create custom gift tags, or add a sophisticated touch to a handmade gift box. The recipient will surely appreciate the extra effort and personalized detail.
-
Unique Card Making and Scrapbooking: These blossoms are perfect for adding dimension and texture to greeting cards, invitations, and scrapbook layouts. Create stunning floral arrangements on your card fronts or use them to highlight special photos and memories in your scrapbooks.
-
Special Event Decorations: Whether for a wedding, baby shower, or garden party, paper plum blossoms can serve as beautiful, eco-friendly decorations. String them together for unique party backdrops, use them as table scatters, or incorporate them into centerpieces for a touch of handmade charm.
-
Fashionable Accents: With a little extra care and perhaps a dab of hot glue, you can transform these blossoms into charming hair clips, brooches, or even embellishments for headbands. Ensure they are securely attached and protected from moisture for wearable art.
Unleash Your Imagination: Customizing Your Paper Plum Blossoms
While the basic design is enchanting, don’t hesitate to customize your paper plum blossoms to reflect your unique vision. Experiment with varying the size of the initial paper circles to create blossoms of different diameters – a cluster of varying sizes looks incredibly natural. Introduce glitter glue or fine glitter to the petal edges or the center for a subtle sparkle. For a more elaborate effect, you could lightly ink the edges of the petals with a complementary color to add depth and definition. Consider attaching a small wire stem to the back of each flower if you plan to arrange them in a vase or bouquet. Adding tiny green paper leaves to the base of the blossom can also enhance its natural appearance. The possibilities are truly endless, limited only by your imagination.
The Joy of Making: Final Thoughts on Your Paper Craft Journey
Crafting paper plum blossoms is a wonderfully accessible and deeply satisfying project that yields beautiful results with minimal effort. From the initial punch of the paper to the final placement of the beads, each step is an opportunity for mindful creation. We hope this detailed guide has inspired you to try your hand at this charming craft and discover the joy of creating something beautiful with your own hands. Remember, there’s no right or wrong way to be creative, so feel free to experiment, adapt, and make these plum blossoms truly your own. Share your creations, inspire others, and continue to explore the vast and rewarding world of paper crafting!
*A special thank you to SimplePaperMade via YouTube for sharing these inspiring images and the foundational tutorial that sparked this guide. We highly encourage you to visit their channel for more wonderful craft ideas and to subscribe to support their incredible work!