
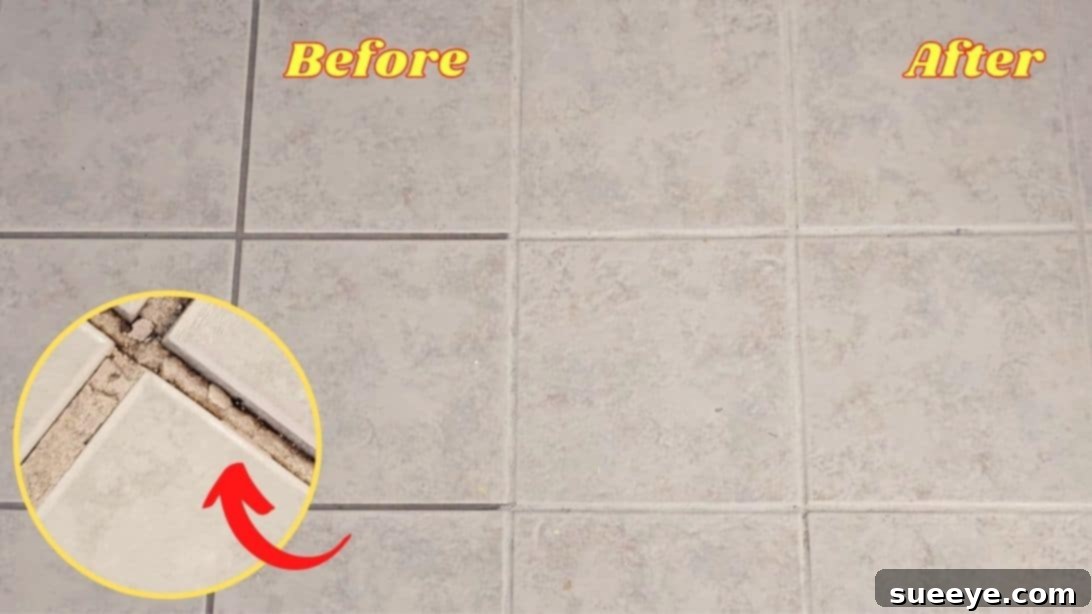
Are you looking at your tiled floors, noticing unsightly cracks in the grout, and dreading the potential cost of professional repairs? You’re not alone. Cracked or deteriorating grout is a common issue in many homes, often leading homeowners to believe a costly renovation is on the horizon. However, the good news is that repairing minor grout damage is a surprisingly simple and rewarding DIY project, even for absolute beginners. Not only will a fresh grout line enhance the aesthetic appeal of your floors, but it also plays a crucial role in protecting your tiles and subfloor from moisture damage. This comprehensive guide will walk you through every step of the process, ensuring a smooth, successful repair that saves you money and boosts your home’s appearance. We’ll cover everything from preparing your workspace to applying the perfect sealant, all designed to be easy to follow. For a visual walkthrough, don’t forget to watch the helpful video tutorial by How To with Kevin on YouTube. Let’s transform your tiled spaces together!
Why Timely Grout Repair is Essential for Your Tiled Floors
Ignoring cracked grout might seem harmless, but it can lead to more significant problems down the line for your tiled surfaces. Grout serves as a protective barrier, preventing water and dirt from seeping beneath your tiles and into the subfloor. When cracks appear, this crucial barrier is compromised, potentially causing a cascade of issues:
- Water Damage: Moisture can penetrate the subfloor, leading to serious consequences such as mold growth, wood rot, or damage to the tile setting material. Over time, this can severely compromise the structural integrity of your floor.
- Tile Instability: As the grout deteriorates and fails to hold tiles firmly in place, individual tiles may become loose, shift, or even pop out. This not only creates an uneven and unattractive surface but also poses tripping hazards and compromises the floor’s overall stability.
- Unsightly Appearance: Cracked, crumbling, or discolored grout significantly detracts from the aesthetic appeal of your tiled areas. It makes even the cleanest floors look old, neglected, and dirty, diminishing the beauty of your home.
- Difficulty in Cleaning: Open cracks and gaps in grout lines become perfect traps for dirt, grime, and bacteria. This accumulation makes your floors much harder to clean and maintain a hygienic environment, regardless of how often you mop.
By addressing these grout issues promptly with a simple DIY repair, you not only maintain and restore the aesthetic appeal of your home but also proactively prevent costly structural repairs and potential health hazards in the future. It’s a small effort with significant long-term benefits for your home’s value and longevity.
Essential Tools and Materials for Your DIY Grout Repair Project
Before you begin your grout repair, gathering all the necessary tools and materials is paramount. Having everything at hand will ensure a smoother, more efficient, and safer repair process. For this beginner-friendly guide, we’ll focus on easily accessible and effective items.
- Premixed Adhesive and Grout: This is a game-changer for DIYers. Opting for premixed grout saves you time, eliminates the guesswork of mixing ratios, and ensures consistent quality. When selecting, choose a color that as closely as possible matches your existing grout for a seamless and undetectable repair. If unsure, purchase a small test sample first.
- Grout Saw or Screwdriver (or similar tool): While a flathead screwdriver or utility knife can work for removing smaller, looser sections of grout, a dedicated grout saw (often found at hardware stores) is highly recommended for more precise and efficient removal of damaged grout without harming adjacent tiles.
- High-Quality Grout Sealer: This step is often overlooked but is absolutely crucial for protecting your newly repaired grout. A good sealer creates an invisible barrier against moisture, stains, and dirt, significantly extending the life of your repair and keeping your grout looking clean.
- Protective Gloves: Grout can be abrasive, and you’ll be handling tools. Durable work gloves will protect your hands from irritation and cuts.
- Clean Rags or Sponges: You’ll need several of these. They are essential for wiping away excess grout during application, cleaning up any residue, and ensuring a smooth finish. Have one for initial cleaning and several damp ones for shaping and final wiping.
- Bucket of Clean Water: This will be used for frequently rinsing your sponges and rags, preventing the spread of grout haze and keeping your cleaning tools effective.
- Small Trowel or Grout Float (Optional, but Recommended): For larger areas or if you desire a more professional finish, a small rubber grout float helps to press grout firmly into joints and smooth it evenly. For very small repairs, your gloved finger might suffice.
- Safety Glasses: Always wear safety glasses when removing old grout to protect your eyes from dust and flying debris.
- Dust Mask: Especially if you’re working in an enclosed or poorly ventilated area, a dust mask is recommended to avoid inhaling fine grout particles generated during the removal process.
Step-by-Step Directions for Easy Grout Repair
With all your materials ready, it’s time to tackle the repair. Follow these instructions carefully, taking your time at each stage, to ensure a durable and aesthetically pleasing result.
Step 1: Prepare and Clean the Area & Remove Old Grout
The success of your grout repair hinges on thorough preparation. Begin by clearing the repair area of any furniture, rugs, or other obstructions. Don’t forget to put on your safety glasses and protective gloves before proceeding.
Now, using your chosen tool – whether it’s a screwdriver, utility knife, or preferably a specialized grout saw – carefully begin to remove the cracked, crumbling, or loose pieces of old grout. Work slowly and methodically, applying gentle but firm pressure. The primary goal is to extract all compromised grout without causing any damage to the surrounding tiles. Focus on the areas where the grout is visibly failing, ensuring you create a clean, stable channel for the new grout. For deeper cracks, make sure to remove enough material so that the new grout can penetrate and adhere properly, forming a strong bond. Be meticulous; any old, loose debris left behind can undermine the integrity of your new repair.
Once you’ve successfully removed all the damaged grout, the next critical step is to thoroughly clean the entire workspace. Use a stiff brush, a vacuum cleaner with a narrow nozzle attachment, or a shop vac to meticulously remove all dust, debris, and fine grout particles from the newly opened joints and the tile surface. Even tiny specks of dust can prevent the new grout from adhering properly. After vacuuming, wipe the area down with a lightly damp (not soaking wet) rag or sponge to pick up any residual fine dust. It is absolutely crucial that the area is completely dry before you apply the new grout. Allow ample time for drying, especially in humid environments, as moisture can hinder proper curing.
Step 2: Apply New Grout Correctly and Clean Excess
With your area impeccably clean and dry, it’s time for the most satisfying part: applying the new premixed grout. Remember, a steady hand and patience are your best allies here.
Scoop out a small amount of grout onto your gloved forefinger, a small trowel, or a grout float. Carefully but firmly press the grout into the clean, empty spaces between the tiles. Ensure that the grout completely fills the void, working it deeply into the joint to eliminate any potential air pockets. Work in small, manageable sections to maintain control and prevent the grout from drying out prematurely before you’ve had a chance to shape and clean it.
Apply a thin, even layer initially. Your primary goal is to match the existing grout line’s depth and level, creating a flush and uniform surface. Avoid the temptation to overfill, as this will only make the subsequent cleanup much more challenging and can lead to an uneven finish. If the crack or void is particularly deep, it’s highly advisable to apply the grout in thin, successive layers. Allow each layer to partially dry or set (often just a few hours) before applying the next. This multi-layer approach helps prevent future shrinkage and ensures a stronger, more robust, and durable fill that will last. Always refer to your specific grout product’s packaging for precise drying times between layers.
As soon as you’ve applied grout to a section, immediately begin to wipe off any excess from the tile surface. Use a damp (not soaking wet) rag or sponge for this. Gently drag the rag or sponge diagonally across the tile surface relative to the grout lines. This diagonal motion is crucial as it helps to remove grout from the tile face without inadvertently pulling the fresh grout out of the joints. Rinse your rag or sponge frequently in your bucket of clean water to avoid spreading grout haze across the tiles. Continue this wiping process until the tile surface is clean and the grout lines are smooth, uniform, and consistent in height with the surrounding existing grout. Carefully shape the grout lines as you go, ensuring a professional and consistent appearance.
Once the application and initial cleanup are complete, allow the newly applied grout to dry completely and cure. The drying time can vary significantly based on the specific grout product you’ve used, local humidity levels, and the ambient room temperature. It is absolutely imperative that you consult the manufacturer’s instructions on your grout packaging for accurate drying and curing times, which can range anywhere from 24 to 72 hours, or even longer. Rushing this crucial step can severely compromise the grout’s durability, leading to future cracking, crumbling, or premature failure of your repair.
Step 3: Seal the Grout for Long-Lasting Protection
After your newly applied grout has thoroughly dried and completely cured according to the manufacturer’s precise instructions (this is non-negotiable for durability), the final and equally crucial step is to apply a high-quality grout sealer. This step is frequently overlooked by DIYers but is absolutely vital for protecting your repair and extending the lifespan of all your grout from future damage.
It’s important to understand that grout is naturally porous. This means it has tiny openings that can readily absorb liquids, oils, and stains, making it highly susceptible to discoloration, mold growth, and degradation over time, especially in high-moisture areas like bathrooms and kitchens. A good quality grout sealer penetrates these pores, creating an invisible, protective barrier that effectively repels water, dirt, grease, and common household spills. This protective layer makes your tiled floors significantly easier to clean and maintain, and dramatically extends the life and pristine appearance of your grout.
To apply the grout sealer, follow the specific instructions on the product label. Generally, you will apply the sealer directly to the grout lines using a small brush, a sponge applicator, or a spray bottle, depending on the type of sealer you’ve chosen. Ensure you apply an even, consistent coat, being meticulous to avoid getting too much sealer on the tiles themselves. If you accidentally get sealer on the tile surface, immediately wipe it off with a clean, dry rag to prevent a hazy residue from forming. Allow the sealer to penetrate the grout for the time specified on the product label, then wipe away any excess that remains on the surface.
Some high-performance sealers may recommend or even require a second coat for optimal protection. Always adhere strictly to the specific instructions provided by the manufacturer for your chosen grout sealer. Once applied, allow the sealer to cure completely before exposing the floor to any moisture, such as from mopping, spills, or foot traffic. This curing period can range from a few hours to several days. Regularly sealing your grout (typically every 1-2 years, depending on traffic, cleaning frequency, and the specific sealer product) is a highly recommended maintenance practice to ensure its protective qualities are sustained over time.
Pro Tips for a Perfect Grout Repair Every Time
To ensure your DIY grout repair looks professional and lasts for years, consider these expert tips:
- Match Colors Carefully: Achieving a perfect color match can be challenging but is crucial for a seamless repair. If possible, take a small, clean piece of your existing grout to the store to compare against samples. If you’re unsure, it’s often better to go slightly lighter than darker, as lighter shades tend to blend more subtly.
- Work in Manageable Sections: Especially for larger repair areas, avoid applying grout to too many joints at once. Working on small sections (e.g., a few square feet) allows you to properly apply, shape, and clean the grout before it begins to set, preventing a rushed and messy job.
- Ensure Adequate Ventilation: When removing old grout (which can create dust) and especially when applying sealers (which often contain strong fumes), ensure your workspace is well-ventilated. Open windows and doors, or use fans to circulate fresh air.
- Patience Pays Off: Do not rush the drying and curing times for either the grout or the sealer. Adhering strictly to the manufacturer’s guidelines is the single most important factor for ensuring the longevity and durability of your repair. Premature use of the floor can lead to cracks or weakened grout.
- Clean Tools Immediately: Grout can harden quickly and become extremely difficult to remove from tools. Clean your grout float, trowel, bucket, and any other tools immediately after use with soap and water to keep them in good working condition for future projects.
- Test in an Inconspicuous Area: If you’re experimenting with a new grout product or technique, try it in a hidden corner or spare tile first to get a feel for the material and ensure the color matches before working on prominent areas.
When to Call a Professional for Grout Repair
While most minor cracked grout repairs are perfect for a confident DIY enthusiast, there are certain situations where calling a professional tile contractor or renovation specialist is not only advisable but necessary. Knowing when to call in the experts can save you from bigger problems down the line:
- Extensive and Widespread Damage: If a very large area of your tiled floor has widespread crumbling grout, numerous loose tiles, or if tiles are popping up across the room, this might indicate a deeper, more systemic subfloor issue or an improper original installation. This level of damage often requires professional assessment and repair.
- Suspected Water Leaks or Subfloor Damage: If you suspect that water has been seeping beneath your tiles for an extended period, potentially causing structural damage to the subfloor (like wood rot) or severe mold growth, a professional can properly diagnose the extent of the problem and safely address it. This often involves removing tiles and repairing the underlying structure.
- Cracked or Broken Tiles: Grout repair solely addresses the grout lines. If the tiles themselves are cracked, chipped, or broken, they will need to be replaced. Replacing individual tiles, especially without spares, can be a more involved and intricate process that often benefits from professional expertise.
- Persistent Cracking or Recurring Issues: If you’ve previously repaired grout, but the cracks reappear quickly (within weeks or a few months), it could be a sign of underlying structural movement in your home. This could be due to house settling, foundation issues, or significant deflection in the subfloor, all of which require expert evaluation and specialized solutions beyond simple grout repair.
- Lack of Time or Confidence: If you simply don’t have the time, tools, or confidence to undertake the repair yourself, or if the project feels too overwhelming, hiring a professional ensures the job is done correctly and efficiently, giving you peace of mind.
Conclusion: Empowering Your DIY Journey and Enjoying Your Revitalized Floors
Congratulations! You’ve successfully navigated the essential steps to repair cracked grout on your tiled floors. This comprehensive guide has equipped you with the knowledge and confidence to tackle what might have seemed like a daunting task. Embracing this DIY project is not only incredibly cost-effective, saving you from expensive professional services, but it’s also immensely satisfying, allowing you to take genuine pride in maintaining and enhancing your home.
By diligently following these straightforward instructions – from meticulous preparation and careful grout application to the crucial final step of sealing – you can effectively restore the beauty and integrity of your tiled surfaces. This proactive maintenance prevents further damage, protects your investment, and significantly enhances the overall aesthetic appeal of your living space. Remember, a well-maintained tiled floor adds substantial value and charm to any home. Don’t let unsightly cracked grout detract from your home’s appeal any longer – grab your tools, embrace your inner DIYer, and get ready to revitalize your floors today! Enjoy the renewed beauty and extended lifespan of your perfectly grouted tiles.
*Special thanks to How To with Kevin via YouTube for the insightful video tutorial and all images used in this guide. His channel offers a wealth of practical DIY advice and helpful visual demonstrations; consider giving his channel a visit and subscribing for more expert tips and project inspiration!