
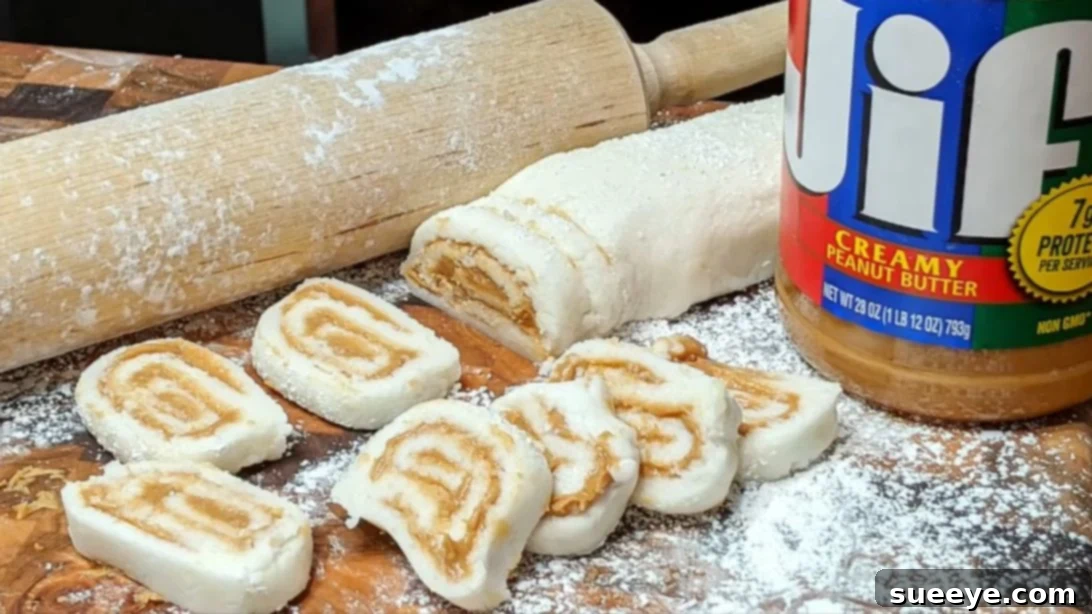
Are you a fan of classic confections, especially those that combine the creamy richness of peanut butter with a delightful sweetness? If so, you’re in for an incredible treat with this timeless old-fashioned potato candy recipe, inspired by the cherished traditions of Collard Valley Cooks. This charming candy might sound unusual with “potato” in its name, but don’t let that deter you! It’s a beloved vintage delicacy that has captivated taste buds for decades, renowned for its simplicity, affordability, and the fact that it requires absolutely no baking. Indeed, who doesn’t appreciate a quick, homemade candy recipe that delivers on flavor and nostalgia?
This unique confection holds a special place in the hearts of many, often passed down through generations. Its creamy, melt-in-your-mouth texture, generously filled with luscious peanut butter, makes it an irresistible delight. Perfect for holiday gatherings, a thoughtful homemade gift, or simply a comforting sweet indulgence, potato candy is surprisingly easy to create in your own kitchen.
The Enduring Charm of Old-Fashioned Potato Candy
Potato candy isn’t just a recipe; it’s a piece of culinary history. Its popularity soared decades ago, particularly during times when ingredients were scarce or budgets were tight. The genius of this candy lies in its ability to transform humble, inexpensive staples into something truly magical. The potato, often seen as a savory ingredient, acts as an incredible binder and adds an unnoticeable creaminess to the candy base, allowing the sweet flavors to shine without imparting any potato taste whatsoever. It’s a clever culinary trick that results in a surprisingly smooth and pliable dough.
Many people express skepticism when they first hear about potato candy. “Potatoes in candy?” is a common reaction. However, a single bite is usually enough to convert even the most hesitant tasters. The potato’s role is purely textural, creating a uniquely soft and chewy base that perfectly complements the rich, nutty peanut butter filling. This candy embodies the spirit of resourcefulness and simple pleasures, reminding us that some of the best treats come from the most unexpected places.
Why You’ll Love This No-Bake Treat
Beyond its intriguing name, old-fashioned potato candy offers a multitude of reasons to fall in love with it:
- Effortless Preparation: This recipe is incredibly straightforward, making it perfect for novice candy makers or those looking for a quick dessert solution.
- Budget-Friendly Ingredients: You’ll only need a handful of common pantry staples, making this an economical choice for satisfying your sweet tooth.
- No Baking Required: Perfect for hot days, busy holidays, or when you just don’t want to turn on the oven. The entire process takes place on your stovetop and countertop.
- Nostalgic Flavor: For many, potato candy evokes memories of childhood, grandmothers’ kitchens, and simpler times. It’s a taste of sweet nostalgia.
- Customizable: While classic peanut butter is traditional, the base can be adapted with different fillings and flavors.
- Crowd-Pleaser: Its unique story and delightful taste make it a fantastic conversation starter and a hit at parties, potlucks, and holiday gatherings.
Whether you’re looking for a unique addition to your holiday dessert table or simply a delightful snack to enjoy, this old-fashioned peanut butter potato candy recipe is sure to become a cherished favorite.
Essential Ingredients for Your Potato Candy
The beauty of this recipe lies in its simplicity. With just five core ingredients, you can conjure up a batch of this delightful treat. Each component plays a crucial role in creating the perfect texture and flavor profile.
- 1 large baked potato: Ensure it’s cooled completely, peeled, and any brown spots are carefully removed. The potato provides the unique creamy base. A Russet or Idaho potato works best for its starchy texture.
- 1 teaspoon vanilla extract: A classic flavor enhancer that adds warmth and depth to the candy base, complementing the sweetness.
- A dash of salt: Just a pinch helps to balance the sweetness and brings out the flavors of the other ingredients, particularly the peanut butter.
- 2 cups of powdered sugar (confectioners’ sugar): You’ll likely need a bit more for dusting and adjusting consistency. This forms the bulk of the candy’s sweetness and structure.
- 1 cup creamy peanut butter: The star of the filling! Creamy peanut butter spreads easily and provides that irresistible nutty flavor. Avoid natural peanut butter that separates easily, as it can make the candy harder to roll.
Having your ingredients measured and ready before you start will make the process even smoother. Remember, the quality of your ingredients, especially the peanut butter, will significantly impact the final taste.
Crafting Your Homemade Peanut Butter Potato Candy: A Step-by-Step Guide
Making this old-fashioned treat is a surprisingly enjoyable process. Follow these detailed steps to create your perfect batch of peanut butter potato candy.
Step 1: Preparing the Potato Base
The foundation of your potato candy begins with a perfectly prepared potato. Ensure your large baked potato is completely cool to the touch. This is a critical step; if the potato is even slightly warm, it will melt the powdered sugar, resulting in a sticky, unworkable mess. Once cooled, carefully peel the potato, discarding the skin. Using your fingers or a small knife, thoroughly remove any brown spots or imperfections. Place the clean, cooled potato into a medium-sized mixing bowl. Add a teaspoon of vanilla extract and a generous dash of salt. Using a fork or a potato masher, thoroughly mash the potato until it’s completely smooth, with no lumps remaining. Then, mix all ingredients together until well combined and the potato has a uniform consistency with the vanilla and salt.
Step 2: Creating the Silky Candy Dough
Now it’s time to transform your mashed potato mixture into a pliable candy dough. Begin adding the powdered sugar, one cup at a time, to the potato mixture. As you add each cup, mix thoroughly using a sturdy spoon or a stand mixer with a paddle attachment on low speed. The mixture will initially be soft, but as you incorporate more sugar, it will begin to thicken and become creamy. Continue mixing until the dough is smooth, thick, and no longer sticky, reaching a consistency similar to playdough or a very thick cookie dough. It should be firm enough to handle without sticking excessively to your hands. You may need to add a little more powdered sugar, a tablespoon at a time, if the dough remains too sticky, but be careful not to make it too stiff.
Step 3: Rolling Out Perfection
Prepare your work surface by generously dusting it with powdered sugar. This prevents the candy dough from sticking. Take a handful of the potato candy mixture and form it into a smooth ball. Place the ball on the dusted surface and, using a rolling pin, begin to roll it out. Aim for a rectangular shape, approximately 1/8 to 1/4 inch thick. The precise dimensions aren’t crucial, but try to keep the thickness as even as possible across the entire rectangle to ensure uniform rolls. Lift and re-dust the surface occasionally if you notice any sticking. The goal is a smooth, even sheet of candy dough, ready for its delicious filling.
Step 4: Spreading the Creamy Peanut Butter
Once your potato candy sheet is rolled out, it’s time for the star filling: peanut butter! Evenly spread a generous layer of creamy peanut butter over the entire surface of the rolled-out dough, leaving a small border (about half an inch) around the edges. This border will help prevent the peanut butter from squeezing out when you roll the candy. Use an offset spatula or the back of a spoon to ensure a smooth, consistent layer of peanut butter from one end to the other. The thickness of the peanut butter layer is a matter of personal preference, but a thin, even coating works best for rolling.
Step 5: The Grand Roll, Stretch, and Slice
Now for the fun part! Gently begin to roll the candy dough from one of the longer sides, creating a tight log. Roll it slowly and evenly, applying gentle pressure to ensure a compact and uniform roll. Once fully rolled, you can gently stretch the log slightly to even it out or make it a bit longer if desired, dusting your work surface with more powdered sugar as needed to prevent sticking. Let the rolled candy log cool down for a minute or two; this brief rest helps it firm up slightly, making slicing easier. Finally, using a sharp knife, gently slice the roll into uniform pieces, about 1/2 to 3/4 inch thick. For clean, beautiful cuts, wipe your knife with a damp cloth or paper towel after every slice. This prevents the peanut butter from smearing and helps maintain the candy’s perfect shape. Place the finished potato candy pieces on a plate and serve immediately or prepare for storage.
Expert Tips for Potato Candy Success
To ensure your potato candy turns out perfectly every time, keep these expert tips in mind:
- Cool Potato is Key: This cannot be stressed enough. A warm potato will melt the powdered sugar, creating a runny, unmanageable mess. Bake your potato ahead of time and allow it to cool completely, preferably chilling it in the refrigerator for an hour or two.
- Mash Thoroughly: Any lumps in your mashed potato will result in a grainy candy texture. Use a potato ricer or mash very well for the smoothest base.
- Adjust Powdered Sugar: The exact amount of powdered sugar can vary slightly based on the size and moisture content of your potato. Add it gradually until your dough is firm, pliable, and no longer sticky. It should feel like firm playdough.
- Don’t Skimp on Dusting: Powdered sugar on your work surface and rolling pin is your best friend. Re-dust as needed to prevent sticking, which can frustrate the rolling process.
- Even Peanut Butter Layer: Spread the peanut butter thinly and evenly. Too thick, and it might squish out; too thin, and you won’t get enough flavor.
- Roll Tightly: A tight roll ensures that the peanut butter filling is evenly distributed and prevents air pockets, giving your candy a beautiful spiral appearance when sliced.
- Clean Knife for Clean Cuts: Wiping your knife after each slice is crucial for maintaining the candy’s shape and preventing peanut butter from smearing across the potato dough.
- Patience is a Virtue: Don’t rush the cooling or setting process. A few minutes of rest can make a big difference in how easily the candy handles and slices.
Creative Twists: Variations to Explore
While the classic peanut butter filling is undeniably delicious, feel free to experiment with these variations:
- Nutella Dream: Swap the peanut butter for Nutella for a rich chocolate-hazelnut flavor.
- Almond Butter Bliss: For a different nutty profile, try almond butter instead of peanut butter.
- Chocolate Drizzle: After slicing, melt some semi-sweet or milk chocolate and drizzle it over the cooled candy for an extra layer of decadence.
- Coconut Sprinkles: Lightly sprinkle shredded coconut on the peanut butter layer before rolling for added texture and tropical flavor.
- Mini Chocolate Chips: Mix mini chocolate chips into the peanut butter before spreading, or even into the potato dough itself for a double chocolate effect.
- Spice it Up: Add a tiny pinch of cinnamon or nutmeg to the potato mixture along with the vanilla for a warm, spiced twist, especially fitting for holiday seasons.
The versatility of this potato candy recipe makes it a fantastic canvas for your culinary creativity. Don’t hesitate to experiment and discover your own favorite combinations!
Serving and Storage: Keeping Your Candy Fresh
Once your old-fashioned potato candy is sliced, it’s ready to be enjoyed! Arrange the pieces attractively on a platter for a beautiful presentation. They make a fantastic addition to cookie trays, dessert tables, or as a thoughtful homemade gift.
If you’re not planning to eat all of it right away, proper storage is essential to maintain its freshness and delightful texture. Place the sliced potato candy in an airtight container. You can layer the pieces, separating layers with parchment paper to prevent them from sticking together. Store the container in the refrigerator for up to 1-2 weeks. Chilling the candy can make it slightly firmer, enhancing its chewiness. For longer storage, you can also freeze potato candy for up to 1 month. Thaw in the refrigerator before serving.
Your New Favorite No-Bake Treat Awaits!
Embrace the charm of this old-fashioned peanut butter potato candy recipe. It’s a delightful reminder that sometimes the most unique and beloved treats come from the simplest ingredients and clever culinary traditions. Easy to make, incredibly delicious, and steeped in nostalgia, this no-bake candy is perfect for any occasion, from festive holiday gatherings to a simple afternoon indulgence. So, gather your ingredients, follow these steps, and prepare to be amazed by the magic of potato candy. Happy candy making!