
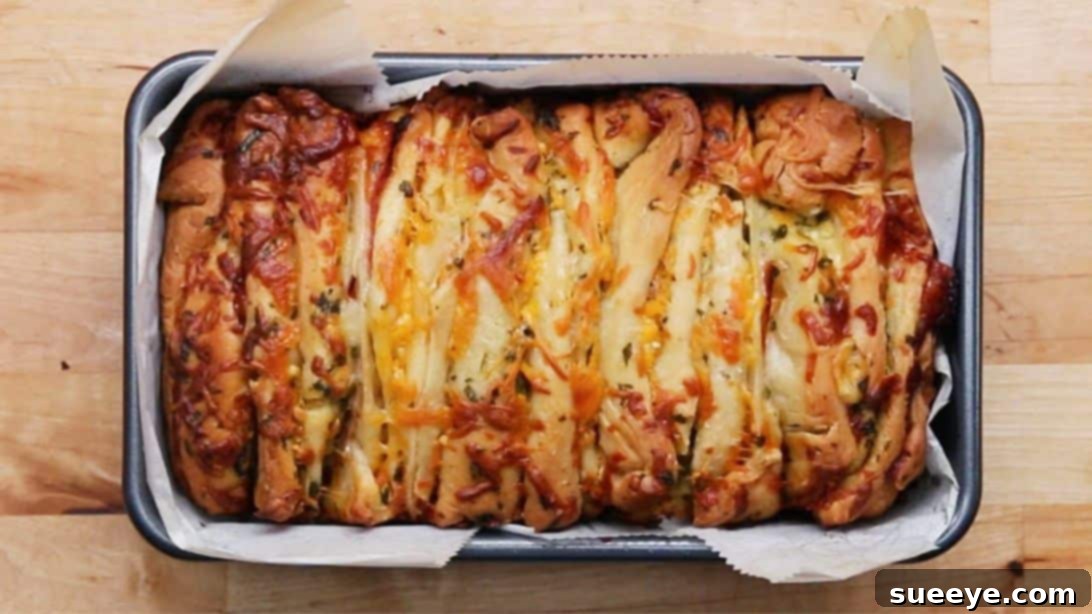
Prepare to delight your taste buds and impress your guests with this incredible Ham and Cheese Pull-Apart Garlic Bread. This recipe transforms simple store-bought pizza dough into a sensational, flavorful masterpiece that’s perfect for any occasion. Imagine golden-brown bread, fragrant with fresh garlic butter, generously layered with savory deli ham and a gooey blend of melted mozzarella and cheddar cheese. Each individual piece is designed to be easily pulled apart, creating a fun and interactive eating experience that everyone, from kids to adults, will absolutely love. Whether you’re looking for a hearty breakfast, a satisfying brunch item, a crowd-pleasing appetizer, or a delicious snack, this versatile dish is a guaranteed hit. Forget complicated baking; with this simple approach, you’ll have a restaurant-quality treat ready in no time. Let’s dive into creating this irresistible, cheesy, garlicky, and utterly delightful pull-apart bread.
Why This Ham and Cheese Pull-Apart Garlic Bread Will Become Your New Favorite
There are countless reasons why this particular recipe stands out and is destined to become a staple in your kitchen. First and foremost, its simplicity is unmatched. Utilizing readily available store-bought pizza dough dramatically cuts down on prep time, making it an ideal choice for busy weekdays, spontaneous cravings, or last-minute gatherings. You don’t need to be an experienced baker to achieve fantastic results – just follow our clear, step-by-step instructions, and you’ll be amazed at how easily you can create such a showstopper.
Beyond its ease, the flavor profile is simply divine. The rich, aromatic garlic butter, made with fresh minced garlic, infuses every inch of the bread, creating an incredibly fragrant and savory base. This perfectly complements the salty notes of the high-quality deli ham and the creamy, satisfying sharp combination of mozzarella and cheddar cheeses. When baked, the cheeses melt into a gooey, irresistible layer, binding the ham and dough together beautifully, creating pockets of pure deliciousness. The “pull-apart” format adds a playful and communal element, making it perfect for sharing. It encourages conversation and creates a delightful dining experience, whether you’re serving it for a casual family meal or a festive party with friends. It’s truly comfort food at its best.
Furthermore, this dish is incredibly versatile. It works wonderfully as a standalone breakfast item to kickstart your day, a satisfying lunch alongside a fresh salad, or a fantastic appetizer that disappears almost as soon as it hits the table. It’s also surprisingly economical, allowing you to create a substantial and delicious meal without breaking the bank. The ingredients are readily available at any grocery store, ensuring you can whip this up whenever a craving strikes. It’s a no-fail recipe that delivers maximum flavor with minimal effort, making it a valuable addition to your recipe repertoire. Get ready to experience a new level of comfort food that’s both effortless and spectacularly tasty!
Essential Ingredients for Your Ultimate Pull-Apart Garlic Bread
Gathering the right ingredients is the first and most crucial step to creating this mouthwatering dish. Each component plays a vital role in achieving the perfect balance of flavor, texture, and the desired pull-apart consistency. We’ve carefully selected ingredients that are easy to find and consistently deliver maximum deliciousness, ensuring your bread turns out perfectly every time.
- 24 ounces of Pizza Dough: For convenience and speed, we recommend a good quality store-bought pizza dough. This typically comes in a refrigerated roll or ball. If you’re an avid baker, feel free to use your favorite homemade pizza dough recipe. Fresh dough generally yields a softer, more flavorful bread with a superior rise. This specific amount is ideal for one standard loaf pan, ensuring ample portions for sharing.
- 1 cup of Butter (Melted): Unsalted butter is highly recommended here, as it allows you to control the overall saltiness of the dish, especially given that deli ham can vary in its sodium content. Gently melt the butter until it’s smooth and liquid, as this forms the rich and luscious base of our irresistible garlic spread.
- 6 large Garlic Cloves (Minced): This is where the magic happens! Freshly minced garlic is absolutely essential for that authentic, pungent, and aromatic garlic bread flavor. Avoid pre-minced garlic in a jar if possible, as it often lacks the same vibrant taste and potency that fresh cloves provide. The aroma alone will make your kitchen smell incredible.
- 1/4 cup of Fresh Parsley (Chopped): Adds a wonderful fresh herbaceous note, a subtle hint of earthiness, and a beautiful pop of vibrant green color to the garlic butter. Flat-leaf (Italian) parsley is generally preferred for its more robust flavor compared to curly parsley. Be sure to chop it finely for even distribution.
- 1 teaspoon of Salt: This crucial seasoning balances and enhances all the other flavors in the dish. Start with one teaspoon, but be prepared to adjust to your personal preference, especially if your deli ham is particularly salty. A good quality fine sea salt works beautifully.
- 3 cups of Mozzarella Cheese (Shredded): The classic choice for its incredible meltiness, mild flavor, and signature stretch. For the best results, we highly recommend purchasing a block of mozzarella and shredding it yourself. Freshly shredded cheese melts significantly better than pre-packaged shredded varieties, which often contain anti-caking agents that can hinder smooth melting.
- 3 cups of Cheddar Cheese (Shredded): This addition provides a sharper, richer, and more complex flavor profile, complementing the mild mozzarella, and contributes a beautiful golden color when melted. A medium or sharp cheddar works best here, offering a pleasant tang. The combination of mozzarella and cheddar ensures both excellent melt and a delightful depth of flavor in every bite.
- 10 pieces of Deli Ham Slices: Choose a good quality deli ham that you genuinely enjoy the taste of. Thinly sliced ham is paramount for even layering and for ensuring it blends seamlessly into the pull-apart structure. Honey ham, smoked ham, or black forest ham are all excellent and popular choices that will bring savory goodness to your bread.
Equipment You’ll Need for Seamless Preparation
To ensure your cooking process is as smooth and enjoyable as possible, gather these basic kitchen tools before you begin. Having everything at hand will make assembling your pull-apart bread a breeze:
- Large Work Surface or Pastry Mat: Essential for rolling out the pizza dough without it sticking. A clean countertop works too, but a mat offers better grip.
- Rolling Pin: To flatten the dough evenly into the required rectangular shape.
- Small Mixing Bowl: For combining your garlic butter mixture.
- Spatula or Pastry Brush: To evenly spread the garlic butter over the dough. A brush gives excellent coverage.
- Sharp Knife or Pizza Cutter: Crucial for cutting the dough into precise, evenly sized squares, which is key for the pull-apart effect.
- Measuring Cups and Spoons: For accurate measurement of all ingredients.
- 8-1/2″ x 4-1/2″ Bread Pan (Loaf Pan): The specific pan size required to achieve the classic loaf shape and maintain the stacked structure.
- Parchment Paper: Absolutely vital for lining the loaf pan, ensuring the bread doesn’t stick and is easily removed after baking.
Step-by-Step Instructions: Crafting Your Pull-Apart Masterpiece
Follow these detailed steps to create a show-stopping Ham and Cheese Pull-Apart Garlic Bread that will impress everyone with its appearance and flavor. Precision in these steps will ensure a perfect pull-apart texture and even distribution of ingredients.
Step 1: Prepare Your Oven for Optimal Baking
Before you begin assembling your delicious bread, it is crucial to preheat your oven. Set your oven to a precise 400 degrees F (200 degrees C). This initial step is vital because it ensures that your bread bakes evenly from the moment it enters the oven. A properly preheated oven provides an immediate burst of heat, which helps the dough rise quickly and evenly, resulting in a perfectly golden-brown exterior and a thoroughly cooked, gloriously gooey interior. Skipping this step can lead to an unevenly baked or dense final product.
Step 2: Flatten and Shape Your Pizza Dough with Precision
Begin by lightly sprinkling a clean work surface or a dedicated pastry mat with a thin layer of flour. This prevents the pizza dough from sticking. Carefully unwrap your pizza dough and place it onto the floured surface. Using a rolling pin, gently but firmly flatten the dough into an even 18 x 10-inch rectangle. The goal here is to achieve a consistent thickness across the entire surface; this is paramount for ensuring that all parts of the bread bake evenly. If the dough seems to spring back or resist rolling, allow it to rest for a few minutes to relax the gluten, then continue rolling. This precise rectangular shape is essential for the subsequent cutting and layering steps, so take your time to get it right.
Step 3: Create and Generously Apply the Flavorful Garlic Butter Spread
In a small mixing bowl, combine your melted butter, freshly minced garlic, finely chopped parsley, and the measured salt. Stir these ingredients until they are thoroughly combined and release their intoxicating aroma. This garlic butter mixture is truly the heart of the bread’s flavor profile, so ensure all components are well incorporated, creating a harmonious blend. Once mixed, generously spoon this aromatic butter spread over the entire surface of your flattened pizza dough. Use a spatula or a pastry brush to spread it evenly from one edge to the other, making sure every inch of the dough is infused with this delicious garlic flavor. Don’t leave any dry spots!
Step 4: Layer the Cheeses in an Inviting Checkerboard Pattern
Now, it’s time for the glorious cheesy goodness! Take a generous amount of your shredded mozzarella and cheddar cheese blend. Distribute it over the buttered dough in a distinct square checkerboard pattern. Visualize your dough as a grid, and aim to create 20 roughly equal squares of cheese across its surface. Do not be shy with the cheese; a liberal amount will ensure every single pull-apart piece is delightfully gooey, stringy, and bursting with flavor. This systematic layering is not just for aesthetics; it significantly aids in the next cutting step and ensures an even distribution of cheese throughout the final baked loaf.
Step 5: Artfully Add the Savory Deli Ham Slices
Carefully take your deli ham slices and cut each one into halves. Once cut, meticulously place one half of a ham slice on top of each of the cheese sections you’ve just created. This meticulous placement ensures that every single square of dough, once separated, will have a delicious and savory layer of ham. Distribute the ham evenly, making sure it’s centered on each cheese square. The timeless combination of ham and cheese is a classic for a reason, and this precise layering technique guarantees that delightful flavor pairing in every single bite you pull apart.
Step 6: Precisely Cut and Thoughtfully Stack the Dough Squares
Using a sharp knife or a pizza cutter, carefully and confidently cut the entire dough rectangle, now layered with butter, cheese, and ham, into 20 evenly sized squares. Precision here is paramount for creating uniform pull-apart pieces that look attractive and bake consistently. Once cut, begin the stacking process. Take four of these individual squares and stack them directly on top of each other. As you stack, ensure you alternate the direction of the cheese and ham layers slightly, or simply stack them neatly to create distinct layers. Repeat this process until you have successfully created 5 distinct stacks of four dough squares each. These carefully constructed stacks are what will form the signature pull-apart structure once baked, allowing for those delightful individual servings.
Step 7: Arrange the Stacks Methodically in Your Prepared Bread Pan
Line an 8-1/2″ x 4-1/2″ bread pan (often referred to as a loaf pan) with parchment paper. This simple yet vital step is crucial for easy removal of the baked bread and prevents any sticking to the pan. Make sure to allow some parchment paper to overhang the sides of the pan; these will serve as convenient “handles” for lifting the baked loaf out later. Carefully place your 5 stacks of dough squares into the prepared bread pan, arranging them sidewards. They should fit snugly within the pan, standing upright against each other. This specific upright arrangement is what allows the bread to bake into its characteristic pull-apart shape, with distinct, easily separable layers that guests can enjoy.
Step 8: Bake to Golden Perfection and Serve Warm
Carefully place the bread pan, with its neatly arranged dough stacks, into your preheated oven. Bake for approximately 35 minutes. During this time, keep a watchful eye on your bread; it’s done when the top is beautifully golden brown, and the cheese is visibly melted, bubbly, and oozing enticingly. The aroma filling your kitchen will be a strong indicator! Towards the end of the baking time, if the top appears to be browning too quickly, you can loosely tent it with a piece of aluminum foil to prevent over-browning. Once perfectly baked, remove the pan from the oven and let it cool in the pan for a few minutes. Then, using the parchment paper overhangs, carefully lift the entire loaf out of the mold and transfer it to a serving plate or cutting board. Serve warm and encourage everyone to pull apart their individual cheesy, garlicky pieces. It’s best enjoyed fresh, hot, and shared with friends and family!
Expert Tips for Pull-Apart Bread Perfection
Achieving the best possible ham and cheese pull-apart garlic bread is easy with a few expert tips. These suggestions will help you overcome common challenges and elevate your baking game, ensuring your bread is consistently delicious and visually appealing:
- Don’t Overwork the Dough: While rolling out the pizza dough, aim for efficiency and gentleness. Excessive handling or kneading can develop the gluten too much, potentially making the final bread tough or chewy. Work quickly and with a light touch to keep the dough tender.
- Prioritize Fresh Ingredients: The quality of your ingredients significantly impacts the final flavor. Freshly minced garlic and freshly chopped parsley make a profound difference compared to dried herbs or pre-minced garlic in a jar. These fresh components deliver a brighter, more vibrant, and authentic taste profile.
- Mind the Saltiness: Deli ham can vary considerably in its sodium content. If you’re using a particularly salty variety of ham, consider slightly reducing the amount of added salt in your garlic butter mixture. This attention to detail will help you maintain a perfect balance of flavors and prevent the dish from becoming overly salty.
- Ensure Even Spreading and Distribution: For a truly consistent and satisfying experience in every bite, it’s crucial that the garlic butter is spread uniformly over the entire surface of the dough. Similarly, the cheese and ham should be distributed evenly within their designated sections. This meticulous layering ensures that each pull-apart piece boasts the same delicious combination of flavors and textures.
- Parchment Paper is Your Best Friend: This seemingly minor detail is actually critical. Do not skip lining the loaf pan with parchment paper. It acts as a non-stick barrier, ensuring the bread comes out of the pan easily and cleanly without any sticking or tearing. This preserves its beautiful shape and makes cleanup a breeze.
- Adjust Baking Time Based on Your Oven: Remember that oven temperatures can vary significantly, even within the same model. Keep a watchful eye on your bread, especially towards the end of the specified baking time. The bread is perfectly done when its top is a beautiful golden brown and the cheese is thoroughly melted, bubbling, and perhaps slightly caramelized. If the top appears to be browning too quickly before the center is cooked, you can loosely tent the pan with aluminum foil to protect it.
Delicious Variations and Customizations: Make It Your Own!
This ham and cheese pull-apart garlic bread is incredibly versatile, making it a fantastic canvas for your culinary creativity. Feel free to experiment with these suggestions to tailor the recipe to your personal preferences or to simply try something new:
- Explore Different Cheese Combinations: While mozzarella and cheddar are classic, don’t hesitate to experiment! Provolone offers a mild, slightly nutty flavor and excellent melt. Swiss or Gruyère can introduce a more robust, earthy note. For a sharper profile, consider Pepper Jack or even a bit of smoked Gouda. A sprinkle of grated Parmesan cheese on top before baking can also add a delightful savory crust.
- Incorporate More Veggies: Boost the nutritional value and add new textures and flavors with finely diced bell peppers (red, yellow, or green), sautéed onions for sweetness, sun-dried tomatoes (chopped) for a tangy bite, or even a few pickled jalapeño slices for a kick. Remember to properly drain any excess moisture from vegetables before adding them to prevent a soggy dough.
- Elevate with More Herbs: Beyond fresh parsley, consider adding other fragrant herbs to your garlic butter mixture. Fresh chives offer a mild oniony flavor, oregano brings a classic Italian note, or a hint of finely chopped fresh rosemary can provide a wonderfully aromatic, slightly piney essence.
- Introduce a Spicy Kick: For those who enjoy a bit of heat, a pinch of red pepper flakes mixed into the garlic butter, a dash of hot sauce brushed onto the ham, or even using a spicy deli ham can elevate the flavor profile with a delightful zing.
- Experiment with Different Meats: While ham is a traditional favorite, you could easily substitute it with other thinly sliced deli meats. Consider thinly sliced turkey for a lighter option, savory pepperoni for a pizza-like twist, pre-cooked bacon bits for smoky crunch, or even shredded cooked chicken for a different protein base.
- Craft a Vegetarian Option: Making this dish vegetarian is incredibly simple – just omit the ham! You can replace it with more vegetables, sautéed mushrooms, sliced olives, or simply focus on the cheesy garlic bread aspect, allowing the rich garlic butter and cheese to shine.
- Consider a Sweet Version (for another recipe!): While this recipe is savory, the pull-apart concept lends itself to sweet variations. Imagine skipping the garlic butter and savory fillings, and instead using a cinnamon-sugar mixture, cream cheese, and a sweet glaze for a dessert-like treat. (This would be a completely different recipe, of course!)
Delightful Serving Suggestions for Your Amazing Pull-Apart Bread
This versatile pull-apart bread is truly fantastic on its own, offering a complete and satisfying experience. However, it also pairs wonderfully with a variety of other dishes, making it suitable for almost any mealtime or gathering:
- The Star of Breakfast or Brunch: Elevate your morning meal by serving this bread alongside classic breakfast staples. Imagine it with fluffy scrambled eggs, a vibrant bowl of fresh fruit, crispy bacon or sausage, and a hot cup of coffee or tea. It’s a delightful and filling way to start the day.
- Appetizer Perfection for Any Gathering: This bread is an ideal finger food for parties, potlucks, game nights, or casual get-togethers. Simply place the entire pull-apart loaf on a large platter or cutting board, and let guests enjoy the fun of pulling off their individual, cheesy, garlicky pieces. It’s a guaranteed crowd-pleaser that encourages interaction.
- A Comforting Companion to Soup or Salad: Enjoy a substantial piece (or two!) of this bread as a delicious accompaniment to a warm bowl of your favorite soup, such as classic tomato soup, hearty minestrone, or a creamy potato soup. It also pairs beautifully with a crisp green salad, turning a light meal into a more fulfilling and comforting experience.
- Enhance with Dipping Delight: For an extra layer of flavor and interactive fun, offer various dipping sauces on the side. A classic marinara sauce, creamy ranch dressing, a zesty pesto, or a simple olive oil and balsamic vinegar dip can all complement the savory notes of the bread wonderfully.
- A Fantastic Main Course Accent: This bread makes an excellent side dish for a variety of main courses. Serve it alongside roasted chicken, juicy pork chops, grilled steak, or even a simple pasta dish. It adds a delicious garlicky, cheesy element that enhances the entire meal and offers a satisfying textural contrast.
Storage and Reheating Instructions for Leftovers
While this delectable pull-apart bread is often devoured quickly, it’s always good to know how to properly store and reheat any rare leftovers to maintain its deliciousness. Enjoying it again can be almost as good as the first time!
- Proper Storage: First, allow the baked bread to cool completely to room temperature. Storing it while warm can trap moisture and make it soggy. Once cooled, store the bread in an airtight container or wrap it tightly in aluminum foil or plastic wrap. It will keep well at room temperature for up to 2 days. For extended freshness, you can store it in the refrigerator for up to 4 days.
- Best Reheating Methods: For the best results and to restore that lovely crispy exterior and gooey interior, reheating the bread in an oven or toaster oven is recommended. Preheat your oven to 300°F (150°C). Place the bread (either whole or individual pieces) on a baking sheet and heat for about 10-15 minutes, or until it’s warmed through and the cheese is melted and bubbling again. If you’re in a hurry, you can microwave individual pieces for 20-30 seconds, but be aware that this might make the bread slightly softer and less crispy.
Your Go-To Ham and Cheese Pull-Apart Garlic Bread Recipe
You’ve now got all the insights, detailed instructions, and expert tips to create a truly unforgettable Ham and Cheese Pull-Apart Garlic Bread. This recipe is more than just a meal; it’s an experience waiting to happen – a testament to how simple, accessible ingredients can come together with a straightforward method to create something truly extraordinary. Its irresistible combination of warm, fragrant garlicky dough, savory ham, and bubbling melted cheese makes it an instant classic that caters to all tastes and occasions. Don’t hesitate to make it your own with creative variations, and enjoy the process of bringing this delightful, fun-to-eat bread to life in your own kitchen. We guarantee it will disappear quickly, leaving everyone craving more. Happy baking, and happy pulling!