
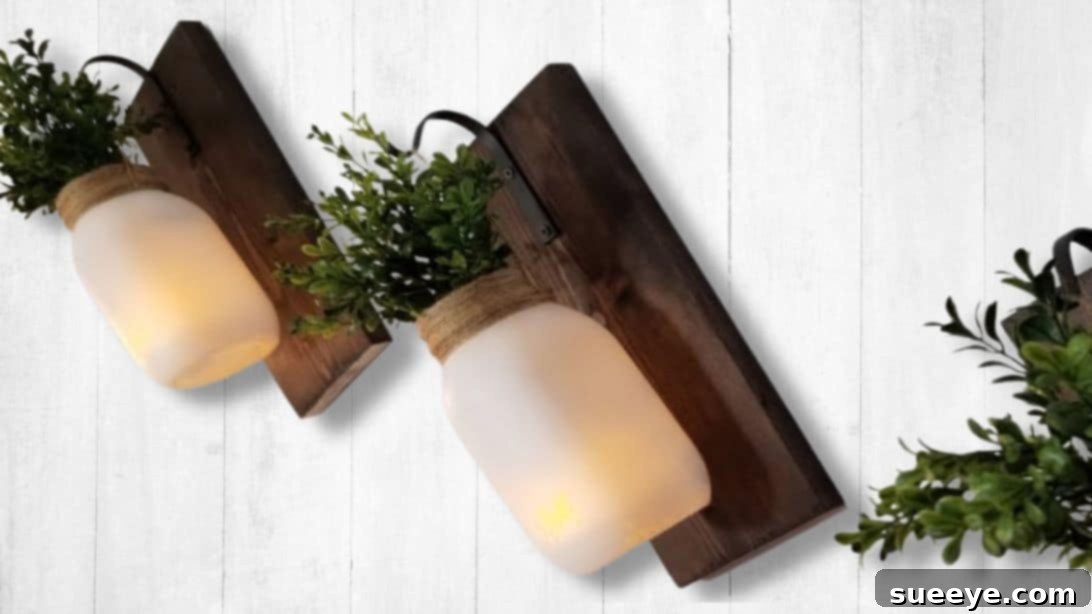
Illuminate Your Home: Create Stunning DIY Mason Jar Lanterns
Transform your living space with the warm, inviting glow of handcrafted DIY illuminated mason jar lanterns! These charming pieces are the epitome of farmhouse decor, blending rustic elegance with practical charm. Whether you choose to adorn them with vibrant fresh flowers for a lively touch or opt for long-lasting artificial blooms, these lanterns are incredibly versatile. Imagine updating their look effortlessly with each passing season or festive holiday – from spring pastels and summer brights to autumnal hues and cozy winter greens. This delightful project, inspired by the creative minds at DIY Made Easy on YouTube, offers a straightforward path to adding personalized warmth and character to any room. Get ready to embark on a fulfilling crafting journey that promises beautiful results and a touch of bespoke style for your home.
There’s a unique satisfaction that comes with creating something beautiful with your own hands, and these mason jar lanterns perfectly encapsulate that feeling. Not only do they serve as eye-catching decorative elements, but they also provide a soft, ambient light, ideal for creating a cozy atmosphere in your living room, bedroom, or even on a covered porch. Their adaptability makes them a fantastic choice for those who love to refresh their home decor frequently without major overhauls. Let’s gather our supplies and delve into making these enchanting lanterns that are sure to draw compliments and admiration from all who see them.
Why Choose This DIY Project?
Opting for a DIY project like these mason jar lanterns offers a multitude of benefits beyond just acquiring a new decor item. Here’s why this particular craft is a fantastic choice for beginners and seasoned DIY enthusiasts alike:
- Cost-Effective Decor: Using readily available and affordable materials, you can create stunning decor that looks far more expensive than it actually is.
- Personalized Touch: Customize every aspect – from the wood stain and jar paint to the choice of flowers and embellishments – ensuring your lanterns perfectly match your existing home aesthetic.
- Versatile & Adaptable: Easily change out the floral arrangements and internal decor to suit different seasons, holidays, or even your mood, offering endless possibilities for refreshment.
- Beginner-Friendly: The steps are straightforward and require basic crafting skills and tools, making it an accessible project for almost anyone.
- Warm & Inviting Ambiance: The gentle glow from the LED tea lights combined with natural elements creates a cozy, inviting atmosphere that enhances any room.
- Thoughtful Gift Idea: Handcrafted lanterns make incredibly thoughtful and personal gifts for housewarmings, birthdays, or any special occasion.
- Sense of Accomplishment: There’s immense joy and pride in displaying something beautiful you’ve created yourself.
Materials You’ll Need for Your Rustic Lanterns:
Before diving into the creation process, ensure you have all the necessary materials at hand. A little preparation goes a long way in making your DIY experience smooth and enjoyable. Here’s a comprehensive list of what you’ll need:
- 1 x 6 x 6 Wood Board: This will serve as the sturdy base for your lantern. Choose a good quality, knot-free board for the best results.
- Mason Jars: The star of the show! Select jars of appropriate size; a standard 7-inch mason jar works well for this design.
- White Matte Spray Paint: For giving your mason jars that classic, diffused farmhouse look. Ensure it’s suitable for glass.
- Hooks: To securely hang your mason jars from the wooden base. Opt for decorative hooks that complement the rustic aesthetic.
- Sandpaper: Essential for smoothing the wood, ensuring a professional and splinter-free finish. Keep various grits handy (e.g., 120-grit for initial sanding, 220-grit for fine finishing).
- Cloth: For applying wood stain and wiping away excess. Lint-free cloths are ideal.
- Gloves: Protect your hands from paint, stain, and hot glue.
- Drill: A power drill will be needed for pre-drilling holes and securing the hooks.
- Wood Stain: To enhance the natural beauty of the wood and achieve a rustic, weathered look. Choose a color that complements your home decor.
- Hot Glue Gun & Glue Sticks: For securely attaching the burlap yarn and other embellishments.
- Burlap Yarn or Jute Twine: To create the decorative and functional hanger for your mason jars.
- Garland or Fresh Flowers: For decorating the inside of your jars. Consider faux flowers for longevity or fresh blooms for special occasions.
- LED Tea Lights: Safe, battery-operated lights to illuminate your lanterns. Avoid real candles for safety.
- Screws: To firmly attach the hooks to the wooden board.
Step-by-Step Guide: Crafting Your Mason Jar Lanterns
Step 1: Preparing the Rustic Wooden Base
The foundation of your lantern begins with a sturdy wooden base. First, carefully measure your mason jars. Since mason jars come in various sizes, it’s crucial to ensure your chosen jars (for this project, we’ll assume a 7-inch jar) will fit proportionally with the wooden board and the hanging hooks. Once you have your jar’s dimensions, measure 14 inches long on your 1x6x6 board. Using a saw, carefully cut the board to this length. Always prioritize safety when using power tools, ensuring you wear appropriate protective gear. After cutting, the board will likely have rough edges. Take your sandpaper and, working with the grain of the wood, thoroughly sand all surfaces and edges. This process not only smooths the wood, preventing splinters, but also prepares it for a better stain absorption, leading to a more refined, professional finish. Wipe away any dust with a clean cloth before moving on.
Step 2: Achieving the Perfect Mason Jar Finish
Now, let’s give your mason jars that classic farmhouse aesthetic. Take your clean mason jars and apply white matte spray paint. For best results, work in a well-ventilated area and apply several thin, even coats rather than one thick coat. This technique helps prevent drips and ensures a smooth, opaque finish. Hold the spray can about 6-8 inches away from the jar and use sweeping motions. After the first coat, allow it to dry for a few minutes before applying subsequent coats until you achieve the desired coverage. Once painted, it’s crucial to let the jars dry completely for at least 3 hours. This extended drying time ensures the paint is fully cured and will not transfer onto other parts of your project or your hands during subsequent steps, guaranteeing a durable and clean finish.
Step 3: Staining for a Beautiful Farmhouse Look
With your wooden board sanded and clean, it’s time to apply the wood stain, which will give it that rich, rustic character. Wearing gloves, dip a clean, lint-free cloth into your chosen wood stain. Apply the stain evenly to all sides of the wooden board, working with the grain. This method allows the wood to absorb the stain uniformly, enhancing its natural patterns. For a deeper color, you can apply additional coats, allowing sufficient drying time between each. Once you’ve achieved your desired shade, wipe off any excess stain with a fresh cloth to prevent tackiness. It’s particularly important to allow the front part of the board to dry for at least 2 hours before turning it over to stain the back. Adequate drying time is key for a non-sticky, beautiful finish that truly highlights the wood’s texture.
Step 4: Crafting the Burlap Hanger for Your Jars
The burlap yarn will provide both a decorative accent and a functional hanger for your mason jars. Begin by measuring the burlap yarn around the body of your painted mason jar to determine the appropriate length for a secure wrap. Identify the center area of each side of the mason jar where the hanging loops will be positioned. Create two sturdy loops from the burlap yarn, ensuring they are symmetrical. Then, starting from the base of the jar’s neck, continuously wrap the burlap yarn snugly around the neck of the jar, working your way upwards until you reach the top rim. As you wrap, carefully integrate the two loops you created earlier into the winding, positioning them on opposite sides of the jar. Use a hot glue gun to secure the starting and ending points of the yarn, as well as intermittently along the wrapped section to prevent unraveling. Finally, fashion a robust piece of rope or a thicker section of burlap yarn to serve as the main hanger. Thread this through the two loops you’ve created and double-knot it securely on both sides. This ensures the jar hangs safely and steadily from the hook.
Step 5: Adding Light and Floral Beauty
Now comes the fun part: bringing your lanterns to life! Carefully place your chosen garland or fresh flowers inside the mason jar. Arrange them artfully to fill the space and create a visually appealing display. You can experiment with different types of flowers, greenery, or even seasonal elements like pinecones or small ornaments. Once your decorative elements are in place, gently insert an LED tea light into the jar. Position it so its soft glow will illuminate the flowers and create a magical effect. Remember, LED tea lights are recommended for safety, as they don’t produce heat and eliminate the risk of fire, allowing you to enjoy your beautiful lanterns worry-free.
Step 6: Final Assembly and Hanging Your Lanterns
The last step is to bring all the components together to create your finished lantern. First, measure and mark the precise center point on your stained wooden board where you intend to place the hook. This ensures your mason jar will hang evenly and centrally. Using your drill and appropriate screws, carefully attach the hook firmly to the marked spot on the board. Make sure it’s tight and secure enough to hold the weight of the filled mason jar. Once the hook is in place, gently lift your decorated mason jar by its burlap hanger and hook it onto the newly installed hook on the wooden board. Take a step back and admire your beautifully crafted, illuminated mason jar lantern! You can now proudly display your creation, adding a touch of rustic charm and warm light to any corner of your home.
Personalize Your Lanterns: Creative Customization Ideas
One of the greatest joys of DIY is the ability to infuse your personal style into every creation. These mason jar lanterns are incredibly versatile, offering countless ways to customize them to perfectly match your home decor or reflect your unique taste. Here are some ideas to spark your creativity:
- Vary the Jar Finish: Instead of white matte, try frosted spray paint for a softer glow, or tint the jars with transparent glass paint for a pop of color. You could also leave some jars clear and add decorative elements to the outside, like stenciled designs or patterned fabric wraps.
- Experiment with Wood Stains & Paints: Achieve a different look by choosing a darker wood stain for a more traditional rustic feel, or paint the wooden base a vibrant color to match a modern farmhouse aesthetic. Distressing the painted wood can also add an aged, shabby-chic charm.
- Seasonal & Holiday Themes: This is where the lanterns truly shine!
- Spring: Pastel flowers, faux bird nests, small decorative eggs.
- Summer: Bright sunflowers, small seashells, sand at the bottom.
- Autumn: Miniature pumpkins, pinecones, fall leaves, berry sprigs.
- Winter/Holidays: Faux snow, mini ornaments, evergreen sprigs, cranberries, fairy lights instead of tea lights.
- Alternative Hanger Materials: Swap burlap yarn for elegant lace, colorful ribbons, nautical rope, or even decorative metal chains for a different look.
- Add Personal Embellishments: Attach small charms, wooden tags with personalized messages, or decorative beads to the burlap hanger. You can also tie small bows with contrasting ribbons.
- Indoor vs. Outdoor Use: While these are primarily indoor decorations, you could adapt them for covered outdoor spaces. Ensure all materials are weather-resistant and use outdoor-rated LED lights if exposing them to any moisture.
- Different Light Sources: Explore using mini string fairy lights (battery-operated) inside the jars for a more twinkling effect, instead of single tea lights.
Important Tips for a Successful DIY Experience
To ensure your crafting experience is as smooth and enjoyable as possible, keep these practical tips in mind:
- Work in a Ventilated Area: Especially when using spray paint and wood stain, good ventilation is crucial for your health and to help products dry properly.
- Allow Ample Drying Time: Patience is key! Rushing the drying process for paint or stain can lead to sticky finishes, smudges, or uneven results.
- Read Product Instructions: Always check the specific instructions on your paint, stain, and glue products for optimal application and drying times.
- Safety First: When using tools like saws or drills, wear appropriate safety goggles and gloves. If you’re new to using power tools, consider getting assistance from someone experienced.
- Cleanliness is Key: Ensure your mason jars are thoroughly clean and dry before painting to ensure proper paint adhesion. Wipe away sanding dust from the wood before staining.
- Test First: If unsure about a technique or color, test it on a scrap piece of wood or an inconspicuous part of the jar before applying it to your main project.
- Keep it Level: Use a level when marking for your hook placement on the wooden board to ensure your jar hangs straight.
Conclusion: Enjoy Your Handcrafted Farmhouse Decor!
Congratulations! You’ve successfully created your very own illuminated mason jar lanterns, adding a touch of rustic charm and personalized warmth to your home. These versatile pieces are more than just decor; they are a testament to your creativity and a source of gentle light that can transform any space into a cozy haven. Whether gracing your mantelpiece, illuminating a bedside table, or adding character to a shelf, these lanterns are sure to be a beloved addition. Don’t hesitate to experiment with different flowers, colors, and embellishments to truly make them your own. Share your beautiful creations and inspire others to embrace the joy of DIY! Enjoy the beautiful glow of your handmade farmhouse decor.