
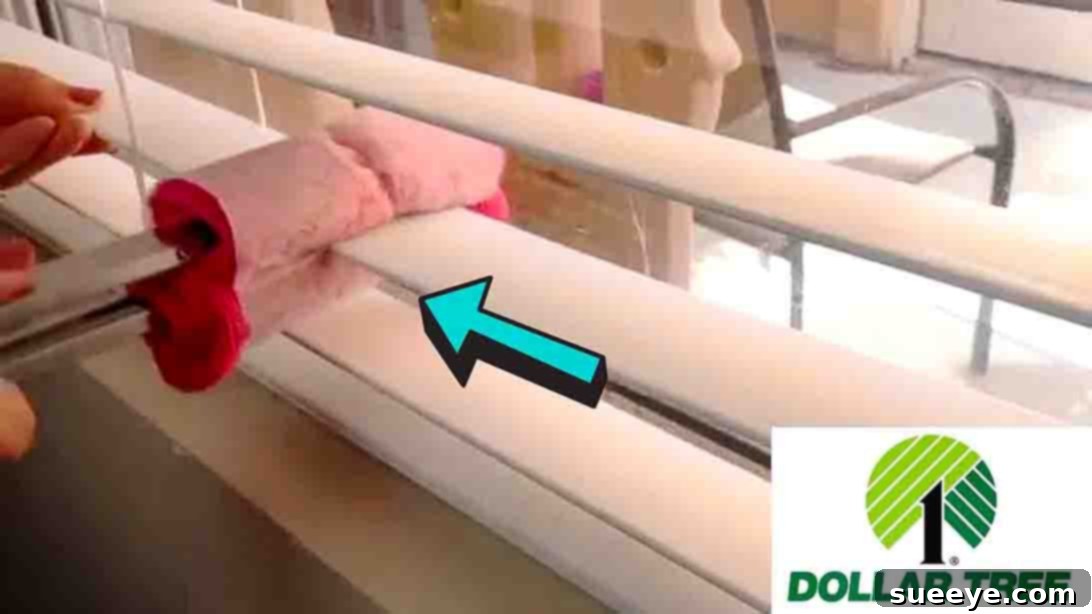
Keeping your home pristine can often feel like an endless battle against dust and grime, and among the most challenging adversaries are window blinds. These household fixtures, while essential for privacy and light control, are notorious for collecting dust, allergens, and various forms of dirt, often becoming an overlooked chore in our regular cleaning routines. But what if there was a simple, budget-friendly, and remarkably effective solution to transform blind cleaning from a dreaded task into a quick and satisfying one? This comprehensive guide reveals an ingenious DIY method that promises to revolutionize the way you tackle dusty and dirty blinds, making the process straightforward and hassle-free.
Inspired by a brilliant tutorial from Katie Jo Sottile on YouTube, this versatile cleaning approach features both dry dusting and wet mopping options, allowing you to customize your attack on dust and stubborn grime. Ever since discovering this method, many have found it to be the only way they clean their blinds. It’s incredibly easy, remarkably budget-friendly, and surprisingly effective, requiring only a few simple items primarily sourced from a Dollar Tree or similar discount store. Say goodbye to expensive specialized tools and complicated procedures, and prepare to welcome sparkling clean blinds with minimal effort and expense.
The Undeniable Importance of Clean Blinds in Your Home
While often overlooked, clean blinds contribute significantly to both the aesthetics and health of your living environment. Over time, blinds accumulate a surprising amount of dust, pet dander, pollen, and other airborne allergens. These particles don’t just sit there; they can be released back into the air with every opening and closing of your blinds, potentially impacting indoor air quality and exacerbating allergies or respiratory issues for household members. Regular blind cleaning is therefore not just about visual appeal; it’s a vital component of maintaining a healthy home.
From an aesthetic perspective, dusty or grimy blinds can instantly make a room feel less clean, even if the rest of the space is spotless. They can dull the natural light filtering into your home and detract from the overall crispness and freshness of your decor. Moreover, persistent grime, especially in kitchens, can become deeply embedded, making future cleaning even more challenging and potentially shortening the lifespan of your blinds. Investing a little time in their upkeep ensures they continue to look great and function effectively for years to come.
Common Challenges of Traditional Blind Cleaning Methods
Many homeowners dread cleaning blinds because traditional methods can be cumbersome, time-consuming, and often yield less-than-satisfactory results. Wiping each slat individually with a cloth can be tedious and difficult, particularly with horizontal blinds where dust loves to settle. Vertical blinds pose their own challenges with their elongated surfaces and tendency to twist. Specialized blind cleaning tools can be expensive and may not always fit all types or sizes of blinds effectively. Furthermore, attempting to clean with just a wet cloth can sometimes smear dust into a muddy paste, leaving streaks and requiring additional effort to achieve a truly clean finish.
The intricate design of blinds, with their numerous slats and narrow gaps, makes them perfect traps for dust and dirt. Reaching into these tight spaces can be frustrating, and for those with multiple windows, the sheer volume of blinds to clean can feel overwhelming. These common frustrations often lead to blinds being neglected, allowing dust and allergens to build up, which in turn makes the eventual deep clean even harder. This is precisely why a simple, efficient, and cost-effective solution like the DIY Dollar Tree method is such a game-changer for homeowners everywhere.
Introducing the “Dollar Tree Magic Blinds Cleaner”: Your Ultimate DIY Solution
This ingenious blind cleaning hack, affectionately dubbed the “Dollar Tree Magic Blinds Cleaner,” offers a refreshing alternative to traditional, often frustrating, cleaning methods. It stands out for its sheer simplicity, minimal cost, and remarkable effectiveness across various types of blinds. The core of this method lies in transforming everyday household items, readily available at any dollar store, into a highly functional and ergonomic blind cleaning tool.
The beauty of this DIY cleaner is its dual functionality, providing both a dry dusting option for regular maintenance and a wet cleaning option for tackling more stubborn dirt and grime. This versatility ensures that you’re equipped for any cleaning challenge your blinds might present, from a light layer of daily dust to accumulated kitchen grease. By leveraging affordable materials and a clever design, this method empowers you to achieve professional-level clean blinds without breaking the bank or dedicating hours to the task. It’s truly a testament to how creative thinking can solve common household dilemmas with ease.
RELATED: How To Clean Your Blinds Like A Pro
Whether you’re dealing with a light layer of dust that needs a quick wipe or tackling years of stubborn grime that demands a deeper clean, this ingenious cleaning method is poised to simplify your household chores. It promises to make your home shine with minimal effort, transforming neglected blinds into sparkling fixtures. Learn exactly how to craft and use this revolutionary tool by following the detailed step-by-step instructions below. A special thanks to Katie Jo Sottile for sharing this incredible cleaning tutorial and making spotless blinds accessible to everyone.
Materials You’ll Need for Your DIY Blind Cleaner
One of the most appealing aspects of this blind cleaning method is its affordability. All the necessary items can be easily found at a Dollar Tree or a similar budget-friendly store, ensuring that you can create this powerful cleaning tool without a significant investment. Here’s what you’ll need to gather:
- Suavitel Dryer Sheets (or Wet Sweeper Cloths Refill): These are key for both options. Dryer sheets are excellent for dry dusting as they attract and trap dust due to their static properties, and often leave a fresh scent. For the wet cleaning option, wet sweeper cloths are pre-moistened and designed to pick up dirt and grime effectively, without saturating your blinds.
- Microfiber Towel: A small microfiber towel is essential for creating the base of your cleaning tool. Microfiber is highly absorbent and excellent at trapping dust, dirt, and moisture, making it ideal for cleaning various surfaces without scratching them.
- Kitchen Tongs: A pair of standard kitchen tongs forms the core structure of your DIY cleaner. Their pincer design allows you to grasp and clean both sides of a blind slat simultaneously, drastically speeding up the process.
- Rubber Bands: You’ll need a few rubber bands to secure the cleaning cloths firmly to the tongs, ensuring they stay in place during use.
- Scissors: A pair of scissors will be used to cut the microfiber towel and dryer sheets to the appropriate size.
Gathering these simple supplies is the first step towards transforming your blind cleaning routine. Each item plays a crucial role in the effectiveness and ease of use of your homemade tool, proving that effective cleaning doesn’t require expensive gadgets.
Step-by-Step Directions: Crafting and Using Your Magic Blind Cleaner
Follow these straightforward instructions to assemble your DIY blind cleaner and tackle both light dusting and deep cleaning tasks with remarkable ease. This method is designed to make cleaning efficient and mess-free.
Preparation: Setting Up Your Cleaning Tool
Before diving into the two cleaning options, you’ll first need to prepare the base of your cleaning tool using the microfiber towel and tongs. This setup forms the foundation for both the dry and wet cleaning methods.
- Cut the Microfiber Towel: Take your microfiber towel and cut it in half. This creates two smaller, more manageable pieces that will wrap neatly around the tongs. The goal is to have enough material to cover the ends of the tongs without being overly bulky.
- Wrap the Tongs: Take one half of the microfiber towel and wrap it securely around the end of one side of the tongs. Ensure the microfiber covers the tips and edges of the tong arm.
- Secure with a Rubber Band: Use a rubber band to firmly secure the wrapped microfiber towel in place. Wrap the rubber band multiple times to ensure a snug fit that won’t slip off during cleaning. Repeat this process for the other half of the microfiber towel and the other arm of the tongs. You should now have both arms of your tongs covered with microfiber, creating a soft, effective cleaning surface.
Option 1: The Dry Dusting Method for Quick Maintenance
This method is perfect for routine cleaning and preventing dust buildup. The dryer sheets are excellent at attracting and trapping dust particles thanks to their static properties, leaving your blinds cleaner and often with a fresh scent.
- Prepare the Dryer Sheets: Take one Suavitel dryer sheet and cut it in half. You’ll use one half for each side of your tong cleaner.
- Wrap and Secure: Place one half of the dryer sheet over the microfiber-covered end of one tong arm. Wrap it around so it covers the microfiber, ensuring that the dryer sheet surface is what will come into contact with the blinds. Secure it firmly with another rubber band. Repeat this process for the other half of the dryer sheet and the second tong arm.
- Begin Dusting: With your DIY dry mop ready, gently close your blinds to flatten the slats. Start from the top of the blinds and work your way down. Simply grasp each individual slat between the dryer sheet-covered tongs and slide them across. The tongs allow you to clean both the top and bottom of each slat simultaneously, making the process incredibly fast and efficient. For horizontal blinds, you can also gently move the tongs horizontally along the slats.
- Shake Off and Replace: As you dust, you’ll see the dryer sheets collect dust. Periodically shake off any excess dust. Once the dryer sheets appear too dirty or lose their effectiveness, simply replace them with fresh halves.
Option 2: The Wet Cleaning Method for Deeper Clean and Grime Removal
For blinds that have accumulated more stubborn dirt, grime, or light stains, the wet cleaning option is your best bet. This method utilizes wet sweeper cloths to provide a deeper, more thorough clean.
- Follow Initial Setup: Begin by repeating all the steps from the “Preparation: Setting Up Your Cleaning Tool” section. You’ll need your tongs securely wrapped with the microfiber towel.
- Attach Wet Sweeper Cloths: Instead of dryer sheets, take a wet sweeper cloth refill. If they are large, you might want to cut them in half to manage them better. Wrap one wet sweeper cloth around each microfiber-covered arm of the tongs, just as you did with the dryer sheets. Secure each cloth with a rubber band, ensuring a tight fit.
- Start Wet Cleaning: With your DIY wet mop assembled, gently close your blinds to flatten the slats. Start from the top and work downwards. Grasp each blind slat between the wet sweeper cloth-covered tongs and slide them along. The moisture and cleaning solution in the wet cloths will help lift away dirt, grease, and grime. Ensure you don’t over-saturate the blinds, especially if they are made of wood or a material sensitive to excessive moisture.
- Wipe and Replace: As you clean, the wet cloths will pick up dirt. Observe the cloths and replace them with fresh ones as they become soiled to avoid spreading dirt. For very dirty blinds, you may need several cloths. After wet cleaning, you might want to give the blinds a final pass with a dry microfiber cloth (without tongs) to ensure no moisture is left behind, especially on wooden or faux wood blinds, to prevent warping or water spots.
Expert Tips for Optimal Blind Cleaning Results
To maximize the effectiveness of your DIY Dollar Tree blind cleaner and ensure a sparkling, streak-free finish, consider these additional tips:
- Regular Maintenance is Key: Don’t wait for a thick layer of dust to accumulate. Incorporate dry dusting into your weekly or bi-weekly cleaning routine. This prevents heavy buildup and makes deeper cleaning much less frequent and easier.
- Pre-Vacuum for Heavy Dust: If your blinds are exceptionally dusty, consider using a vacuum cleaner with a brush attachment to lightly vacuum them before using your DIY tool. This removes the bulk of loose dust, preventing your cloths from getting saturated too quickly.
- Clean Blinds in Position: For most types of blinds, it’s best to clean them while they are in place on the window. This keeps them stable and prevents bending or damage.
- Close Blinds for Horizontal Cleaning: When cleaning horizontal blinds, fully close the slats in one direction (either up or down). This creates a flatter, more stable surface to clean with your tongs. After cleaning one side, you can flip the slats to close them in the opposite direction and clean the other side.
- Work from Top to Bottom: Always start cleaning from the uppermost slats and work your way down. This ensures that any dust or grime that falls during the cleaning process doesn’t settle on already clean lower slats.
- Gentle Pressure: Apply gentle, consistent pressure with your tongs. Excessive force isn’t necessary and can potentially damage the blind slats. Let the microfiber and cleaning cloths do the work.
- Address Different Blind Materials:
- Wood Blinds: Use the dry dusting method regularly. For wet cleaning, use a barely damp cloth and dry immediately to prevent warping or water damage.
- Faux Wood & Vinyl Blinds: These are very durable and can handle both dry and wet cleaning without much concern for moisture.
- Aluminum Blinds: Be gentle as aluminum can bend easily. Both dry and wet methods work well.
- Keep Cloths Clean: For the wet cleaning option, frequently rinse or replace your wet sweeper cloths as they become dirty. Using soiled cloths will only redistribute dirt and leave streaks.
- Finish with a Dry Buff (Optional): After wet cleaning, especially on glossy or darker blinds, a quick buff with a clean, dry microfiber cloth can remove any lingering moisture or streaks, leaving a perfectly polished finish.
Beyond Blinds: Other Uses for Your Versatile DIY Tool
The beauty of this simple tong-based cleaning tool extends far beyond just blinds. Its design makes it incredibly effective for reaching and cleaning other awkward or hard-to-reach areas around your home, adding even more value to your budget-friendly creation:
- Ceiling Fan Blades: Dust loves to accumulate on ceiling fan blades. The tongs can easily grasp and clean both sides of a fan blade simultaneously, making a dusty job quick and mess-free.
- Air Vents and Registers: The narrow slats of air vents, both on walls and ceilings, are perfect targets for this tool. The tongs can fit between the grates to capture dust.
- Behind Furniture and Appliances: Need to dust behind a refrigerator or between a wall and a heavy piece of furniture? Attach a dryer sheet to your tongs, and you have an extended reach duster for those forgotten spots.
- Window Tracks: While not blinds, window tracks are another dust magnet. A wet cloth on the tongs can help dislodge grime from these tight spaces.
- Under Cabinets or Low Furniture: For quick touch-ups in areas that are hard to reach with a regular cloth, this tool offers an excellent solution.
This versatility means your Dollar Tree investment provides multiple cleaning solutions, further enhancing its appeal as a must-have household hack.
Why This Method Stands Out from the Rest
In a market flooded with specialized cleaning gadgets and expensive solutions, the DIY Dollar Tree Magic Blinds Cleaner truly stands out. Its key advantages include:
- Unbeatable Cost-Effectiveness: For just a few dollars, you can assemble a tool that performs as well as, if not better than, many pricier alternatives.
- Simplicity and Accessibility: The materials are common, and the assembly is intuitive, requiring no special skills or complex instructions.
- Dual Functionality: The ability to easily switch between dry dusting and wet cleaning means you have a comprehensive solution for all levels of blind dirt.
- Ergonomic Design: The tongs naturally fit around blind slats, making the cleaning process less physically demanding and much faster than wiping individual surfaces by hand.
- Environmentally Friendly Options: By using reusable microfiber towels, you reduce waste compared to disposable single-use dusters. The cloths can be washed and reused repeatedly.
This method isn’t just a hack; it’s a smart, practical approach to a common household chore that delivers exceptional results without unnecessary expense or effort.
Conclusion: Embrace Effortless Blind Cleaning Today
Cleaning blinds no longer needs to be a daunting task that you continually postpone. Thanks to this ingenious, budget-friendly DIY method, achieving spotless blinds is now simpler and more efficient than ever before. By repurposing common Dollar Tree items, you can create a powerful cleaning tool that tackles both everyday dust and stubborn grime with remarkable ease and effectiveness.
From improving your indoor air quality by removing allergens to enhancing the overall aesthetic appeal of your home, regularly cleaning your blinds offers numerous benefits. This guide, inspired by Katie Jo Sottile’s clever approach, provides you with all the knowledge and steps needed to transform your cleaning routine. So, gather your simple supplies, follow the easy directions, and prepare to be amazed by the sparkling results. Say goodbye to dusty blinds and hello to a cleaner, brighter home – all with a touch of Dollar Tree magic!