
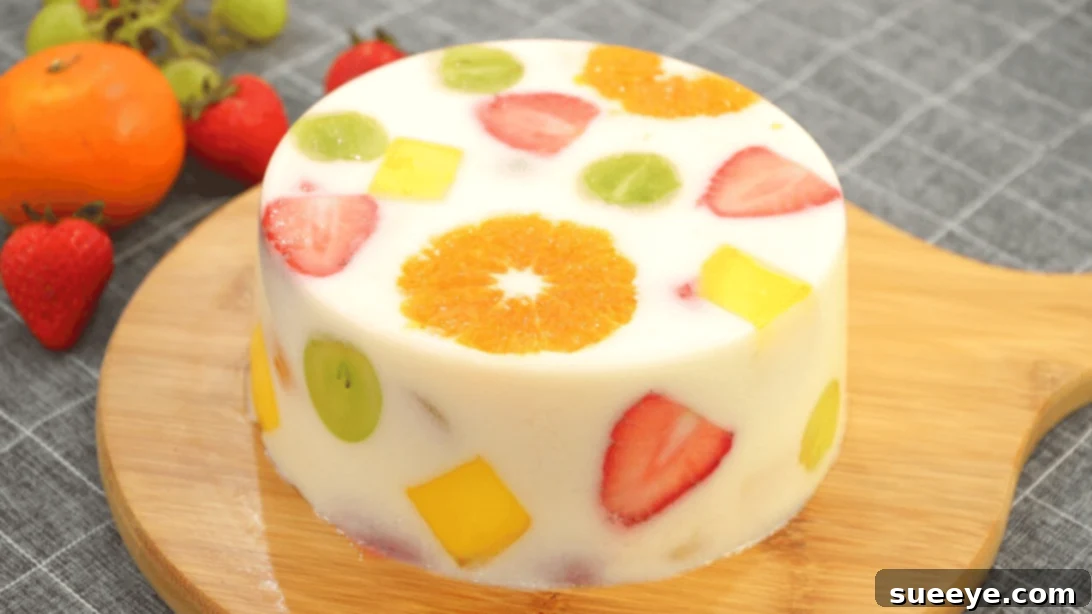
Are you searching for an exquisite yet incredibly simple dessert recipe that will impress without hours of effort? Look no further! This comprehensive guide will walk you through creating a beautiful and refreshing Fruit Yogurt Jelly Cake, a delightful creation inspired by the culinary artistry of Nino’s Home. This cake is a true feast for the eyes and the palate, boasting vibrant colors and a light, creamy texture that makes it the perfect antidote to a scorching summer day. You might even find yourself hesitating to slice into this stunning masterpiece!
Fruit Yogurt Jelly Cake: Your Go-To Recipe for Refreshing Summer Delights
Imagine a dessert that’s not only visually captivating but also light, healthy, and incredibly easy to prepare. The Fruit Yogurt Jelly Cake ticks all these boxes, making it an ideal choice for family gatherings, special occasions, or simply a treat to brighten your day. Its unique combination of fresh fruits suspended in a smooth yogurt jelly creates a symphony of flavors and textures, promising a delightful experience with every bite. Let’s dive into the world of this wonderful dessert and discover how to bring it to life in your kitchen.
Why This Fruit Yogurt Jelly Cake Will Be Your New Favorite
- Perfectly Refreshing: With its cool, jelly-like consistency and fresh fruit, this cake is a dream come true on hot summer days. It’s light and won’t leave you feeling heavy, making it an excellent post-meal treat.
- Visually Stunning: The vibrant colors of fresh fruits artfully arranged within the translucent jelly make this cake an absolute showstopper. It’s guaranteed to draw admiring glances and compliments from your guests.
- Effortlessly Elegant: Despite its sophisticated appearance, the preparation process is surprisingly straightforward, making it accessible even for novice bakers. The “no-bake” aspect further simplifies the process.
- Healthy and Wholesome: Packed with fresh fruits and creamy yogurt, this dessert offers a healthier alternative to many traditional cakes, providing vitamins and probiotics.
- Versatile and Customizable: While we’ll focus on a delicious combination of mango, grapes, and strawberries, the recipe is incredibly flexible, allowing you to experiment with your favorite seasonal fruits.
Ingredients for Your Exquisite Fruit Yogurt Jelly Cake
Gathering the right ingredients is the first step towards creating this magnificent dessert. Quality and freshness are key, especially when it comes to the fruits. Below is a detailed list of what you’ll need, along with some important considerations.
- 1 Ripe Mango: Choose a mango that is sweet and firm, but yielding slightly to pressure. It will provide a rich, tropical flavor and beautiful color.
- Seedless Grapes (approx. 1 cup): Green or red, seedless grapes add a lovely tartness and a satisfying crunch. Ensure they are fresh and firm.
- Fresh Strawberries (approx. 1 cup): Sweet and juicy, strawberries offer a classic berry flavor and striking red hue.
- 2 Oranges: Oranges contribute a zesty citrus note and a beautiful contrasting color. Navel oranges work well for their easy segmentation.
- 1 ½ Cups of Plain Yogurt: Opt for full-fat, unsweetened plain yogurt for the best creamy texture and tang. Greek yogurt can also be used for a denser consistency.
- 1 Cup of Granulated Sugar: This provides the perfect level of sweetness, balancing the tang of the yogurt and the natural sweetness of the fruits. Adjust to your preference.
- 0.25 Ounces (approx. 7g) of Agar Agar Powder or Gelatin Powder: This is the crucial setting agent. Agar-agar is a plant-based alternative, making the cake vegetarian and vegan-friendly when paired with plant-based yogurt and milk. Gelatin is derived from animal collagen. Choose based on your dietary preferences.
- 1.7 Ounces (approx. 50ml) of Water: Used to dissolve the agar-agar or gelatin.
- 5 Ounces (approx. 150ml) of Milk: Any milk (dairy or non-dairy like almond or soy) can be used to create the base for the jelly mixture.
Note on Mold Size: The recommended mold size for these quantities is 6-7 inches (15-18 cm) in diameter. Using a mold significantly larger or smaller may alter the thickness and setting time of your cake. A springform pan or a silicone mold works exceptionally well for easy unmolding.
Step-by-Step Instructions: Crafting Your Beautiful Jelly Cake
Step 1: Meticulous Fruit Preparation
The beauty of this cake lies in its fruit arrangement, so careful preparation is essential. Begin by peeling your ripe mango. Slice a portion of it into small, uniform cubes, which will be mixed into the yogurt jelly. From the remaining mango, create thin, elegant slices. These thin slices are perfect for decorating the mold walls. Next, thoroughly wash your strawberries and grapes. Hull the strawberries, then slice some in half for larger decorative pieces and others into thin slices for the mold’s edges. For the grapes, slice some in half, leaving others whole if you prefer. Finally, peel the oranges. Cut one orange in half and meticulously remove any seeds, then slice into thin, semi-circular pieces. For the other orange, separate each segment, or slice them into thin rounds as well. The variety of cuts ensures both aesthetic appeal and textural diversity in the cake.
Step 2: Artful Mold Decoration
This is where your artistic flair comes into play! Carefully arrange the thin slices of your prepared fruits – mango, strawberries, oranges, and grapes – along the interior walls of your chosen mold. The goal is to create a vibrant, appealing pattern that will be visible once the cake is unmolded. The thin slices are crucial here, as they adhere better to the mold’s surface than thicker pieces or halves. Place some fruits on the bottom of the mold as well, forming the top layer of your finished cake. Remember not to use all your fruits; a significant portion will be folded into the yogurt mixture later. Take your time with this step, as it greatly contributes to the final presentation.
Step 3: Preparing the Creamy Yogurt Jelly Mixture
In a small saucepan, combine the agar-agar or gelatin powder with the granulated sugar. Whisk them together thoroughly to ensure even distribution and prevent lumps. This dry mixing step is important for proper dissolution. Next, pour in the measured water and milk. Continue stirring with a spatula until the powders are fully dissolved into the liquids. Place the saucepan over medium heat and bring the mixture to a gentle boil, stirring constantly. Once boiling, reduce the heat to low, add the plain yogurt, and mix well until completely incorporated and smooth. Cook this mixture for another 2 minutes on low heat, ensuring the yogurt is heated through but not curdled. After this, remove the pan from the heat. Gently fold in the remaining prepared fruits (the mango cubes, grape halves, and strawberry halves) into the warm yogurt mixture. Stir carefully to distribute the fruits evenly without crushing them. Allow the mixture to cool slightly for a few minutes before proceeding to the next step.
Step 4: Assembling, Chilling, and Enjoying Your Cake
With your mold beautifully decorated and your yogurt mixture ready, it’s time for assembly. Using a ladle, carefully scoop the yogurt and fruit mixture into the prepared mold. It’s crucial to use a ladle rather than pouring directly from the pot. This technique helps to prevent the fruits you painstakingly arranged on the mold’s walls from dislodging or falling. Fill the mold evenly. Once filled, gently tap the mold a few times on your counter to release any trapped air bubbles and ensure the mixture settles smoothly around the fruits. Place the mold in the refrigerator and allow it to chill for a minimum of 3 to 4 hours, or until completely firm. For best results, overnight chilling is often recommended. Once fully set, carefully remove the cake from its mold. A warm towel wrapped around the mold for a few seconds, or running a thin knife around the edges, can assist with easy unmolding. Slice your beautiful Fruit Yogurt Jelly Cake and serve immediately. Enjoy this refreshing, vibrant, and delicious treat!
Expert Tips for a Flawless Fruit Yogurt Jelly Cake
- Choose Ripe, Firm Fruits: While ripe fruits offer the best flavor, ensure they are firm enough to hold their shape when sliced and mixed into the jelly. Overly ripe or mushy fruits can disintegrate.
- Agar Agar vs. Gelatin: If using agar-agar, remember it sets at room temperature and is firmer than gelatin. Gelatin requires colder temperatures to set and has a more “jiggly” texture. Agar-agar also requires boiling for proper activation, while gelatin typically dissolves in hot liquid and doesn’t need to boil.
- Dissolve Agents Properly: Ensure your agar-agar or gelatin powder is completely dissolved in the liquid before adding yogurt. Undissolved particles can lead to a grainy texture or prevent proper setting.
- Gentle Mixing: When folding fruits into the yogurt mixture, be gentle to prevent them from breaking apart. This preserves their integrity and aesthetic appeal.
- Patience is Key for Chilling: Do not rush the chilling process. A minimum of 3-4 hours is essential for the cake to set completely and achieve its desired firm texture. If unmolded too early, it might collapse.
- Unmolding Techniques: For easy release, try placing a warm, damp towel around the outside of your mold for about 30 seconds. Alternatively, run a thin, sharp knife carefully around the edge of the cake before inverting it onto a serving plate.
Creative Variations & Customization Ideas
This Fruit Yogurt Jelly Cake recipe is incredibly versatile. Feel free to unleash your creativity and tailor it to your personal preferences or seasonal availability:
- Seasonal Fruit Swaps: Experiment with different fruits! Peaches, kiwi, blueberries, raspberries, and even thinly sliced melon can make fantastic additions or substitutions. Just be mindful that certain fruits, like fresh pineapple or kiwi, contain enzymes that can prevent gelatin from setting (agar-agar is generally immune to this).
- Flavor Enhancements: A splash of vanilla extract or a hint of citrus zest (lemon or lime) can elevate the flavor profile of the yogurt mixture.
- Layered Effect: For an even more spectacular presentation, consider creating different colored layers. You could make one layer with plain yogurt jelly and another with a fruit puree mixed in, allowing each layer to set partially before adding the next.
- Dairy-Free Delight: For those with dietary restrictions, substitute dairy milk with almond milk, oat milk, or coconut milk, and use a plant-based yogurt (e.g., coconut yogurt, soy yogurt). Ensure you use agar-agar for a truly vegan option.
- Sweetener Alternatives: Instead of granulated sugar, you can use honey, maple syrup, or a sugar substitute, adjusting quantities to taste.
Serving Suggestions for Your Fruit Yogurt Jelly Cake
Once your beautiful cake is unmolded, it’s ready to shine! Here are some ideas for serving:
- As a Light Dessert: It’s perfect on its own after a meal, especially during warmer months.
- Brunch or Party Centerpiece: Its stunning appearance makes it an excellent centerpiece for brunches, potlucks, or any celebratory gathering.
- Garnish for Extra Flair: A few fresh mint leaves, a scattering of extra berries, or a light drizzle of honey can add a final touch of elegance.
Frequently Asked Questions About Fruit Yogurt Jelly Cake
- Can I use any type of fruit?
- Most fruits work wonderfully. However, if using gelatin, be cautious with fresh pineapple, kiwi, papaya, and figs, as their enzymes can prevent gelatin from setting. Cooking these fruits briefly can deactivate the enzymes. Agar-agar is not affected by these enzymes.
- Can I make this cake ahead of time?
- Absolutely! This cake is perfect for making in advance. It needs ample chilling time, so preparing it the day before you plan to serve it is ideal. It stores well in the refrigerator.
- How long does the Fruit Yogurt Jelly Cake last?
- When stored properly in an airtight container in the refrigerator, this cake will typically last for 3-5 days. The freshness of the fruits will determine its longevity.
- What if my cake doesn’t set?
- If your cake doesn’t set, it’s usually due to incorrect measurement of the setting agent (agar-agar/gelatin) or insufficient cooking/chilling time. Ensure you measure precisely and allow enough time for it to firm up. Agar-agar needs to be boiled to activate, while gelatin needs to dissolve in hot liquid. If using gelatin, fruits like pineapple or kiwi could also be the culprit.
- Can I use a different mold shape?
- Yes, you can use various mold shapes! Bundt pans, loaf pans, or individual ramekins can all work. Adjust the chilling time slightly for smaller molds. Silicone molds are particularly easy for unmolding.
Conclusion: A Refreshing Masterpiece Awaits!
The Fruit Yogurt Jelly Cake is more than just a dessert; it’s a celebration of fresh flavors, vibrant colors, and effortless elegance. It’s the ideal treat for those seeking a light, healthy, and incredibly beautiful confection, especially when the weather calls for something cool and refreshing. With this detailed guide, you now have all the knowledge and tips to create your own stunning version of this Nino’s Home-inspired masterpiece. So, gather your ingredients, follow these simple steps, and prepare to delight your senses and impress your guests. Happy baking (or rather, no-baking)!