
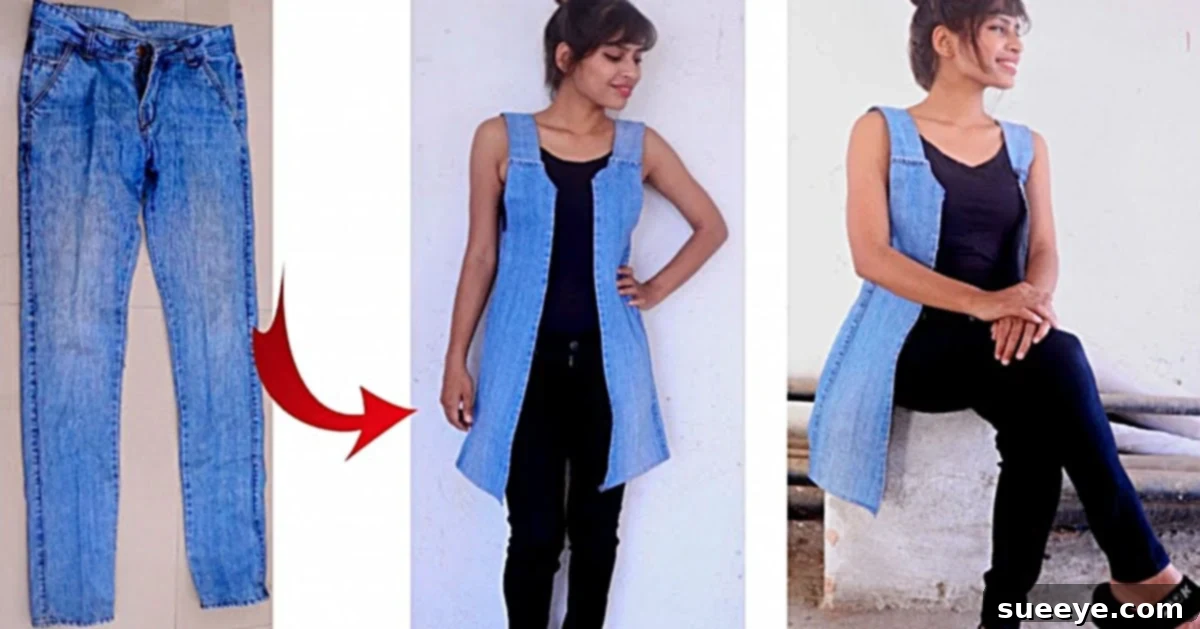
DIY Upcycled Denim Vest: Transform Old Jeans into a Stylish Fashion Statement
Are you searching for an innovative and sustainable way to refresh your wardrobe without breaking the bank? Look no further! This comprehensive DIY tutorial will guide you through the exciting process of crafting a unique, stylish denim vest from an old pair of jeans. It’s an incredibly rewarding project that not only gives new life to forgotten clothing but also allows you to express your personal style in an eco-friendly way. Forget about those worn-out denim bottoms gathering dust in your closet; it’s time to transform them into a trendy, custom-fit vest that will turn heads and garner compliments.
Last week, I embarked on this very project, and the results were astonishingly simple and incredibly chic. I desired a vest with a longer, more relaxed fit, so I opted for a large pair of men’s jeans I snagged from a local thrift store for a mere two dollars. The beauty of this project lies in its accessibility: the materials are straightforward, readily available, and many enthusiasts may already have them at hand. Imagine creating a bespoke fashion piece for less than the cost of your morning coffee!
Why Upcycle Denim? Embrace Sustainable Fashion
In an age where fast fashion often contributes to environmental concerns, embracing upcycling is more important than ever. Denim production, in particular, is resource-intensive, requiring vast amounts of water and energy. By transforming old jeans into a new garment, you’re not just creating something fashionable; you’re actively participating in the circular economy, reducing textile waste, and lowering your carbon footprint. An upcycled denim vest is a testament to sustainable living, proving that style and environmental responsibility can go hand-in-hand. Plus, there’s an undeniable charm and character in a piece of clothing that carries a history, reimagined for a new purpose.
Choosing Your Jeans: The Foundation of Your Vest
The success of your DIY denim vest begins with selecting the right pair of jeans. Don’t just grab any old pair; consider these factors to ensure the best outcome:
- Size Matters: For a ladies’ large vest, a large men’s pair of jeans works wonderfully, offering ample fabric for a comfortable, slightly oversized fit. If you prefer a smaller, more fitted vest, a smaller pair of men’s jeans or even your own old jeans might be perfect. The key is to have enough fabric to work with, especially for the back panel and straps.
- Denim Wash and Style: Think about the look you want to achieve. A dark wash can appear more sophisticated, while a lighter wash offers a casual, vintage vibe. Distressed jeans can add an edgy element, but ensure the distressing won’t compromise the structural integrity of your new vest.
- Stretch or Rigid: Traditional rigid denim is often easier to work with for structured garments like vests, holding its shape well. Stretch denim, while comfortable for wearing as jeans, can sometimes be trickier to sew and might not hold the vest’s form as crisply. However, if comfort is paramount, a slight stretch could be desirable.
- Condition: While you’re upcycling, ensure the denim is in good condition, free from major tears or irreparable stains in critical areas. Small imperfections can be part of the charm or covered with patches.
Scouring thrift stores, checking your family’s donation pile, or even asking friends for their old denim are excellent ways to source your raw material. This process is part of the adventure and adds to the unique story of your finished vest.
Materials: Gathering Your Creative Toolkit
Before you dive into cutting and sewing, gather all your necessary tools. Having everything ready will make the process smoother and more enjoyable.
- An Old Pair of Men’s Jeans: (As discussed above, choose size based on desired vest fit.)
- A Pair of Sharp Fabric Scissors: Invest in a good pair of scissors specifically for fabric. Denim is tough, and sharp scissors will ensure clean, precise cuts, which are crucial for a professional finish.
- A Sewing Machine: While some steps could be adapted for hand-sewing, a sewing machine will significantly speed up the process and provide stronger, more durable seams, especially when working with denim. Make sure you have a heavy-duty needle suitable for denim.
- A Seam Ripper: This small but mighty tool is indispensable for carefully taking apart seams without damaging the fabric. Precision is key when disassembling your jeans.
- Tailor’s Chalk or a Fabric Pen: Essential for marking your cut lines and sewing guides directly onto the denim. These marks are easily removed or disappear after washing, ensuring your vest looks pristine.
- Matching Thread: Choose a strong polyester thread that matches or complements the color of your denim.
- Measuring Tape or Ruler: For accurate measurements of your fabric pieces and strap widths.
- Pins or Fabric Clips: To hold fabric pieces together before sewing, ensuring they don’t shift.
- (Optional) Iron and Ironing Board: Pressing seams open or flat as you go will give your vest a much more professional and crisp finish.
Directions: Crafting Your Custom Denim Vest
Follow these detailed steps to transform your old jeans into a fabulous new vest. Remember to take your time and enjoy the creative process!
Step 1: Prepare Your Jeans and Undo the Inseam
Start by washing and drying your jeans thoroughly. This helps pre-shrink the fabric and ensures a clean working surface. Lay your jeans flat and smooth them out. Using your seam ripper, carefully undo the inseam of both pant legs, starting from the cuff all the way up to the crotch seam. This will open up the legs into flat pieces of fabric. Take care not to accidentally cut the denim itself.
Step 2: Cut the Jean Legs at the Hip Level
Once the inseams are unpicked, lay the jeans flat again. Measure from the top of the waistband down to where you want the bottom of your vest to hit. A common starting point is around the hip level, just below the pockets. Use tailor’s chalk or a fabric pen and a ruler to draw a straight horizontal line across both legs at this chosen length. This cut will separate the upper part of the jeans (which includes the waist and pockets – great for shorts or another project!) from the lower leg sections you’ll use for the vest body. Ensure your cut is clean and even.
Step 3: Completely Halve the Leg Pieces for Front Panels
Now, take the two leg pieces you just cut. Each leg piece should be open from the inseam, forming a wider, flat rectangle of fabric. Carefully cut each of these leg pieces completely in half along the original outer seam (the selvedge or side seam). This will yield four rectangular panels of denim. These four pieces will form the main body of your vest – typically, two for the front and two to construct the back.
Step 4: Construct the Back Panel of Your Vest
Select two of the four denim panels you created in the previous step. These will form the back of your vest. Lay them side-by-side, aligning their long edges. You will likely need to overlap them slightly or sew them together with a seam allowance to create a wider single piece. The original instruction suggests “two (4-inch wide) pieces,” implying you might need to trim them to a consistent width or join two full panels. For a standard vest back, you’ll want a width that comfortably spans your upper back. Pin the two panels together along one long edge and sew them with a straight stitch. Press the seam open for a neater finish. This combined piece will now serve as the back panel of your vest.
Step 5: Trace and Cut Armhole Shapes
Now for the creative part of shaping your vest. Take a well-fitting tank top or an existing vest that you like the armhole shape of. Lay it on top of your denim back panel (and two separate front panels, ensuring they align correctly). Use tailor’s chalk to trace the armhole curves onto the denim. Remember to add a small seam allowance (about 1/2 inch or 1.5 cm) outside your traced line if you plan to hem or finish the armholes. Carefully cut along these lines to create the armhole openings. Make sure the front and back armholes match symmetrically for a balanced look. Repeat this for the front panels, ensuring the neck opening and front edges are also shaped to your liking.
Step 6: Create the Shoulder Straps
From the remaining denim scraps, cut four long, rectangular sections. These will become your shoulder straps. The width of these strips will determine the width of your finished straps; aim for about 2-3 inches wide initially. To create sturdy straps, fold each strip lengthwise, right sides together, and sew along the raw edge to form a tube. Turn these tubes right side out and press them flat. Alternatively, for a raw-edge look, simply fold the edges inwards and topstitch, or leave them raw if you prefer a frayed aesthetic. You will have two straps for the front and two for the back (one pair for each shoulder). Ensure they are long enough to connect the front and back panels comfortably over your shoulders.
Step 7: Assemble Your Vest – Sew on the Straps and Finish Edges
With all your pieces cut and straps prepared, it’s time to bring your vest to life! Pin the ends of your denim straps to the top edges of your front and back vest panels, ensuring proper alignment and desired fit. Try the vest on before sewing to confirm the strap length and placement. Adjust as needed. Once satisfied, securely sew the straps in place with your sewing machine. Reinforce these seams as they will bear the weight of the vest. Finally, finish all raw edges – armholes, bottom hem, and front opening – to prevent fraying and give your vest a professional look. You can use a zigzag stitch, a serger, or a simple fold-over hem. And just like that, you are ready to hit the town in your fabulous new, custom-made denim vest!
Tips for Success and Customization
- Perfecting the Fit: Don’t be afraid to try on your vest pieces as you go. Pinning and checking the fit before final stitches can save you from having to undo seams later. A vest should be comfortable and allow for a full range of motion.
- No-Sew Alternative: If you don’t own a sewing machine or prefer a simpler approach, you can create a “no-sew” denim vest! High-quality fabric glue or iron-on adhesive can be used to bond seams and attach straps. While potentially less durable than sewing, it’s a great option for beginners.
- Embellish and Personalize: This is where your vest truly becomes unique!
- Patches and Pins: Adorn your vest with embroidered patches, band logos, or collectible pins to showcase your interests.
- Embroidery: Hand-stitch intricate designs or simple motifs directly onto the denim.
- Distressing and Fraying: Use sandpaper, a seam ripper, or a sharp knife to create controlled distressing, rips, and frayed edges for a worn-in, edgy look.
- Fabric Paint or Bleach: Experiment with fabric paints to create unique patterns, or strategically apply bleach for a tie-dye or faded effect.
- Studs and Spikes: For a punk or rock-inspired aesthetic, add metal studs or spikes to the collar, shoulders, or pockets.
- Care for Your Creation: Denim is durable, but proper care will extend the life of your upcycled vest. Wash it inside out in cold water on a gentle cycle and air dry to preserve its shape and any embellishments.
Your New Favorite Wardrobe Staple
The satisfaction of wearing something you’ve made with your own hands is truly unparalleled. This isn’t just a piece of clothing; it’s a statement about creativity, sustainability, and personal style. My own vest quickly became a staple; I wore it shopping, then to my local coffee shop with friends, and I’m not exaggerating about the continuous compliments I received! People genuinely couldn’t believe it was a DIY project from old jeans. In fact, I’ve already received orders for five more from my friends. So, be warned: tell people you made it at your own risk – you might just need to open a denim vest factory!
Embrace the joy of upcycling and the endless possibilities of denim. Your next favorite fashion accessory is just a few cuts and stitches away.