
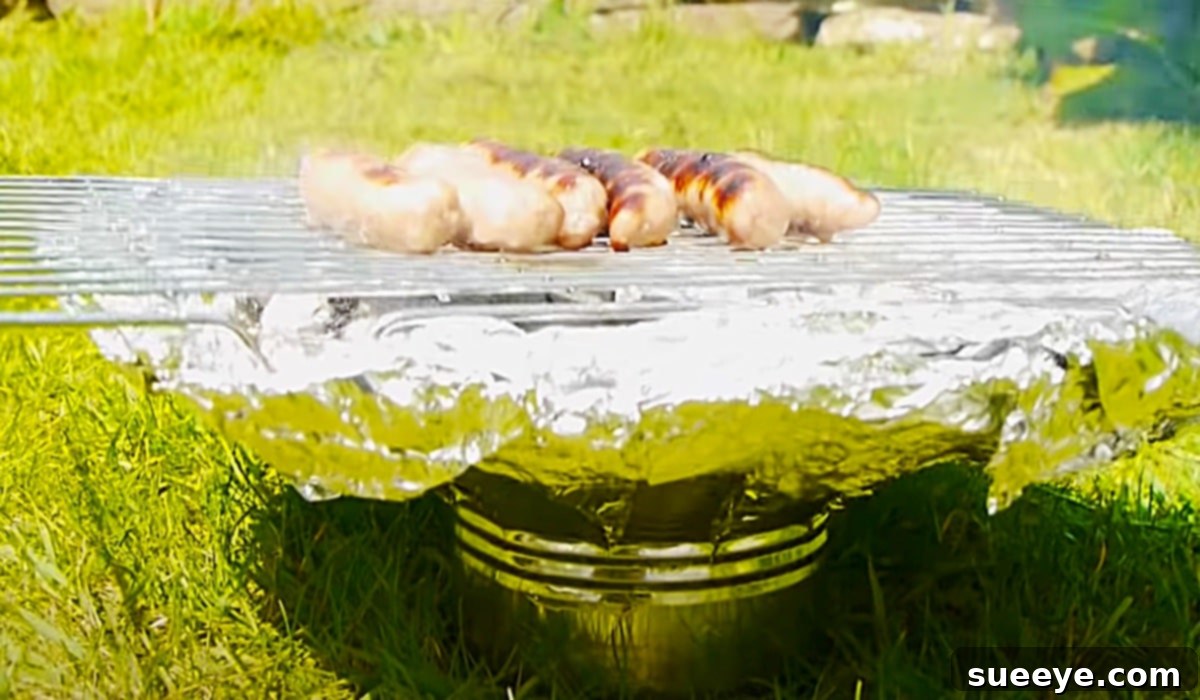
There’s an undeniable joy in savoring the smoky flavors of perfectly grilled meats and char-kissed vegetables, especially when crafted outdoors. As a passionate enthusiast of both delicious BBQ and hands-on DIY projects, I was immediately captivated when I first encountered the ingenious DIY tin can grill demonstrated by Dave Hax on YouTube. It struck me as a truly inspired creation – a perfect fusion of practicality, resourcefulness, and culinary delight. The beauty of this project lies in its remarkable simplicity and accessibility. Chances are, you already have most of the necessary components lying around your home, or they can be easily acquired from any local hardware store or even a well-stocked kitchen. This isn’t just another DIY idea; it’s a game-changer for anyone looking to enjoy the experience of grilling without the need for expensive equipment or a large backyard setup. It’s incredibly cheap to make, surprisingly effective, and incredibly fun to build.
Turn a Large Tin Can into a Grill: Your Ultimate DIY Portable BBQ Solution
Imagine the freedom of enjoying a spontaneous barbecue anytime, anywhere. Whether you’re planning a last-minute picnic, heading out for a day of camping, or simply lack the space for a traditional grill, this DIY tin can grill offers an innovative and highly effective solution. It transforms an ordinary household item into a versatile cooking apparatus, proving that you don’t need elaborate gear to create memorable outdoor meals. This guide will walk you through everything you need to know, from gathering your materials to the simple steps of assembly, ensuring you can quickly and safely create your own functional, portable grill.
Why Build a DIY Tin Can Grill? Unveiling the Benefits
The appeal of constructing your own tin can grill extends far beyond the novelty of a DIY project. It offers a multitude of practical advantages that make it an attractive option for various outdoor cooking scenarios:
-
Cost-Effectiveness at Its Best
One of the most compelling reasons to build this grill is the incredibly low cost. Traditional grills can range from moderately priced to significantly expensive, but this DIY alternative utilizes materials that are either recycled or very inexpensive to purchase. You’re effectively building a functional cooking device for pennies on the dollar, making gourmet grilling accessible to everyone regardless of budget constraints.
-
Unmatched Portability and Compact Design
A key feature of the tin can grill is its remarkable portability. Its compact size makes it incredibly easy to transport, whether you’re tossing it into a backpack for a hike, packing it in your car for a road trip, or simply moving it from your patio to your balcony. It’s the perfect companion for adventurers, urban dwellers with limited space, or anyone who values convenience.
-
Quick and Easy Assembly
Unlike complex DIY projects that require specialized tools or extensive experience, this tin can grill can be assembled in a relatively short amount of time, often within an hour or two. The straightforward steps are perfect for beginners and seasoned DIYers alike, allowing you to go from concept to cooked meal in a single afternoon.
-
Sustainable and Eco-Friendly
By repurposing a large tin can, you’re engaging in an act of creative recycling. Instead of contributing to landfill waste, you’re giving a second life to an item that would otherwise be discarded. This eco-conscious approach to grilling not only saves money but also reduces your environmental footprint, making your barbecue experience a little greener.
-
Versatility for Various Occasions
This little grill is surprisingly versatile. It’s ideal for a quick hot dog or burger on a camping trip, perfect for grilling veggies at a park, or even suitable for an impromptu backyard gathering when you don’t want to fire up a larger, more cumbersome grill. Its simplicity allows for a wide range of grilling possibilities.
Materials For The DIY Tin Can Into A Grill: Everything You Need
Gathering your materials is the first and often easiest step in this project. The beauty of this DIY grill is that the components are common and readily available. Here’s a detailed look at what you’ll need:
-
A Large Tin Can
The foundation of your grill. Look for a sturdy, large tin can, such as those used for institutional-sized tomatoes, coffee, or even pet food. Ensure it’s thoroughly cleaned, with all labels removed and no residue inside. The larger the can, the more grilling surface you’ll have, but ensure it’s still manageable for portability. Consider cans with a diameter of at least 6-8 inches for optimal grilling.
-
Aluminum Foil (Heavy-Duty Recommended)
This will serve multiple purposes: lining the inside of the can to reflect heat, protecting the can from direct flame, and making cleanup significantly easier. Heavy-duty foil is preferred as it’s more durable and less likely to tear under heat and the weight of charcoal.
-
Charcoal Bricks (or Briquettes)
Your fuel source. Standard charcoal briquettes are perfect for this. The quantity will depend on the size of your can and how long you plan to cook, but a small handful is usually sufficient for a tin can grill. Ensure they are suitable for grilling and food preparation.
-
Charcoal Lighter Fluid or Fire Starters
Essential for igniting your charcoal. Lighter fluid is a common choice, but eco-friendly fire starters or even natural tinder (like cotton balls soaked in petroleum jelly) can also work. Always use these products safely and sparingly, following manufacturer instructions.
-
A Lighter or Matches
For igniting the charcoal lighter fluid or fire starters. Keep a reliable lighter or a box of matches handy, and ensure they are kept away from flammable materials when not in use.
-
An Oven Rack (or a Small Grill Grate)
This will be your cooking surface. A small, clean oven rack from a toaster oven or a spare rack from a larger oven is ideal. Alternatively, you can use a small, sturdy wire mesh or a compact grill grate designed for camping. Ensure the rack fits inside the can with some clearance for air circulation and the charcoal below.
Directions: Step-by-Step Guide to Crafting Your Tin Can Grill
This simple yet effective DIY tin can grill, brilliantly demonstrated by Dave Hax on YouTube, can be constructed in just a few straightforward steps. Follow these instructions carefully to ensure a safe and functional grill.
Step 1: Preparing Your Tin Can – The Foundation
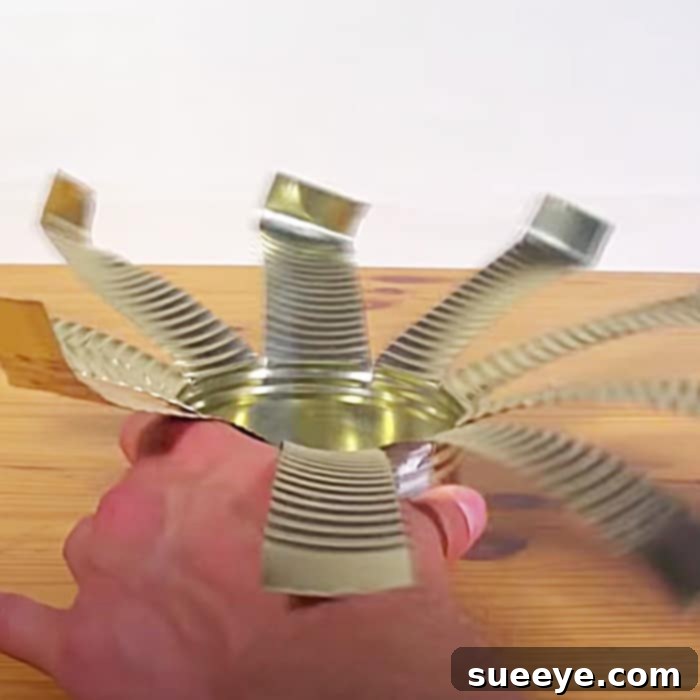
Begin by ensuring your large tin can is impeccably clean. Remove any lingering labels, adhesive residue, and thoroughly wash and dry the interior to eliminate food particles or contaminants. Once clean, you’ll need to make strategic cuts to create airflow and a sturdy base. Using tin snips or a sturdy pair of kitchen shears (exercise extreme caution, as edges can be sharp), make several vertical cuts from the open rim of the can downwards, about 2-3 inches. These cuts should be evenly spaced around the circumference. After making the cuts, gently bend these strips outwards, creating a flared, petal-like structure. This reshaped design serves a dual purpose: it provides crucial stability to prevent tipping and creates vents for essential airflow, allowing your charcoal to burn effectively.
Step 2: Lining the Can with Aluminum Foil – For Heat and Cleanliness
Once your can is prepared, carefully line the interior with a layer of heavy-duty aluminum foil. Press the foil firmly against the inside walls and bottom of the can, ensuring it covers all surfaces where charcoal will rest. The foil acts as a protective barrier for the tin can itself, preventing direct heat damage and making cleanup incredibly easy. It also helps to reflect heat inwards, improving the grilling efficiency of your mini BBQ.
Step 3: Adding the Charcoal – The Fuel
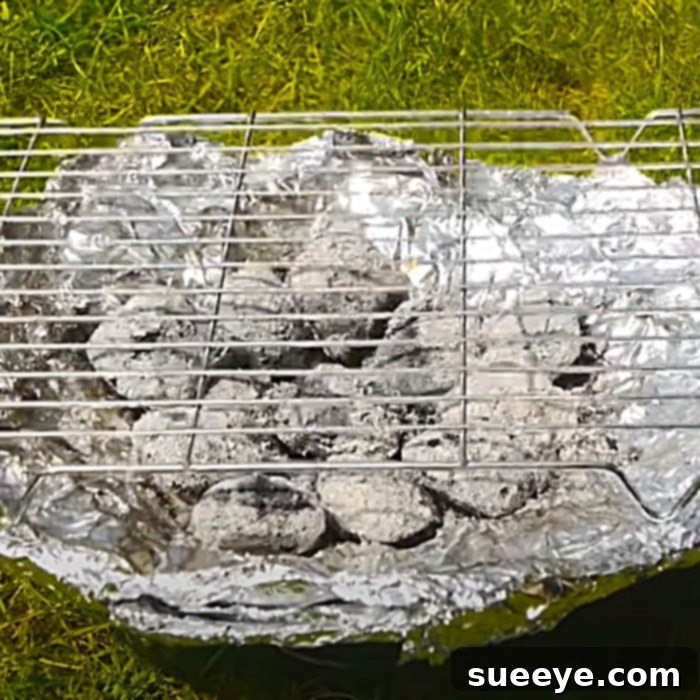
With the foil lining in place, it’s time to add your charcoal briquettes. Place a single layer of charcoal on the bottom of the foil-lined can. Avoid overfilling; a small amount is sufficient for this compact grill. Ensure there’s still ample space above the charcoal for the grill rack and your food. Proper spacing is key to maintaining good airflow and consistent heat.
Step 4: Lighting Your Grill – Ignition and Safety
Carefully apply a small amount of charcoal lighter fluid evenly over the briquettes, or place your fire starters among them. Allow the fluid to soak in for a minute or two. Using your lighter or matches, carefully ignite the charcoal. Be patient; it might take a few minutes for the charcoal to fully catch and begin to glow red. Never add lighter fluid to already lit charcoal. Once the briquettes are glowing and covered with a light ash, they are ready for cooking.
Step 5: Positioning the Grill Rack – Your Cooking Surface
Once your charcoal is hot and ready, carefully place your oven rack or small grill grate on top of the can. The flared strips you created in Step 1 will act as supports, holding the rack securely above the burning charcoal. Ensure the rack is stable and level before adding any food. There should be enough distance between the charcoal and the rack to prevent direct scorching of your food while allowing for even cooking.
Step 6: Ready to Cook! Enjoy Your Homemade BBQ!
With your grill assembled and the charcoal hot, you are now ready to unleash your culinary creativity! This grill is incredibly versatile and works perfectly for smaller items like hot dogs, sausages, individual burgers, chicken skewers, or even slices of vegetables. It’s ideal for those moments when a full-sized grill is overkill, or simply unavailable. This compact grill truly works wonderfully in a pinch, delivering delicious results every time.
Safety First: Crucial Considerations for Your DIY Tin Can Grill
While this DIY tin can grill is a fantastic and convenient solution, safety should always be your top priority. Handling open flames and hot materials requires careful attention to prevent accidents and ensure an enjoyable experience. Always be mindful of your surroundings and take appropriate precautions.
-
Outdoor Use Only
Never use this grill indoors, in enclosed spaces, or under any overhead structures. Charcoal produces carbon monoxide, an odorless and colorless gas that can be deadly. Always ensure ample ventilation by using the grill exclusively in open outdoor areas.
-
Stable Surface and Clear Area
Place your grill on a stable, non-flammable surface, such as concrete, pavement, or dirt. Keep it far away from anything that could catch fire, including dry leaves, grass, wooden decks, tents, or any combustible materials. Maintain a clear perimeter around the grill at all times.
-
Manage Heat and Hot Surfaces
The entire tin can will become extremely hot during use. Never touch the can or the grill rack with bare hands. Use heat-resistant gloves, tongs, or other appropriate tools for handling food and adjusting the grill. Keep children and pets at a safe distance from the hot grill.
-
Fire Extinguishing Preparedness
Always have a means of extinguishing a fire readily available. A bucket of water, sand, or a fire extinguisher should be within arm’s reach. Never use water to extinguish hot charcoal quickly inside the can, as it can create steam and splatter. Let the charcoal burn out naturally or use sand to smother it.
-
Proper Charcoal Disposal
After you’re finished grilling, allow the charcoal to cool completely for several hours or even overnight. Once the ashes are cold to the touch, wrap them in aluminum foil and dispose of them in a non-combustible waste container. Never dispose of hot ashes or coals, as they can reignite and cause fires.
-
Food Safety Practices
Just like with any grill, practice proper food safety. Ensure meats are cooked to the appropriate internal temperatures to prevent foodborne illnesses. Use separate utensils for raw and cooked foods, and keep perishable items refrigerated until ready to grill.
Tips for an Optimal Grilling Experience with Your Tin Can BBQ
To get the most out of your homemade tin can grill, consider these additional tips that will enhance your cooking experience and ensure delicious results every time:
-
Pre-heating is Key
Just like with larger grills, allowing your tin can grill to pre-heat is crucial. Let the charcoal burn down until it’s covered in a light gray ash. This indicates that the coals are consistently hot and ready for cooking, providing even heat and preventing food from sticking.
-
Manage Your Heat
Since this is a small grill, heat management is straightforward. If the heat is too intense, you can carefully remove a briquette or two with tongs. For sustained heat, you can add a new briquette as needed, ensuring it has time to ash over before placing food above it.
-
Don’t Overcrowd the Grill
Due to its compact size, resist the urge to pile too much food onto the rack. Grilling a few items at a time allows for better heat distribution, more even cooking, and easier flipping. Overcrowding can lower the grill temperature and lead to unevenly cooked food.
-
Creative Food Choices
Experiment with different foods! While great for burgers and hot dogs, this grill is also fantastic for grilling skewers of vegetables, small pieces of chicken, shrimp, or even fruit like pineapple slices. Marinated foods will add extra flavor and moisture.
-
Cleaning and Maintenance
After the grill has completely cooled, remove the ashes and the used aluminum foil. The oven rack can be cleaned with soap and water or a grill brush. Storing your can grill clean and dry will extend its lifespan and keep it ready for your next adventure.
Beyond the Basics: Customizing Your Tin Can Grill
Once you’ve mastered the basic construction, you might find yourself wanting to personalize or enhance your tin can grill. Here are a couple of ideas to take your portable BBQ to the next level:
-
Adding Extra Ventilation Holes
If you find your charcoal isn’t burning as efficiently as you’d like, you can carefully punch a few additional small holes around the lower sides of the can using a nail and hammer. These extra vents will further improve airflow, ensuring your coals get enough oxygen for a hotter, more consistent burn. Just be mindful not to compromise the structural integrity of the can.
-
Creating a Simple Handle
For easier transportation when the grill is cold, you could attach a simple handle. This might involve drilling two small holes near the top rim of the can (after it’s been reshaped) and threading a sturdy piece of wire or a small chain through them. Ensure any handle material is heat-resistant if there’s any chance it could be exposed to residual heat.
Conclusion: Your Journey to Portable Grilling Starts Here
The DIY tin can grill is a testament to the power of simple innovation. It’s a remarkably effective, budget-friendly, and highly portable solution for anyone who loves the taste of grilled food but needs a compact setup. From camping trips and spontaneous picnics to small patios and emergency preparedness, this homemade grill proves that great culinary experiences don’t require expensive equipment. By following this detailed guide, you can quickly transform an ordinary tin can into a fantastic, functional grill that will serve you well for many delicious outdoor meals. So, gather your materials, embrace your inner DIY spirit, and get ready to enjoy the unparalleled satisfaction of grilling on your very own tin can BBQ!