
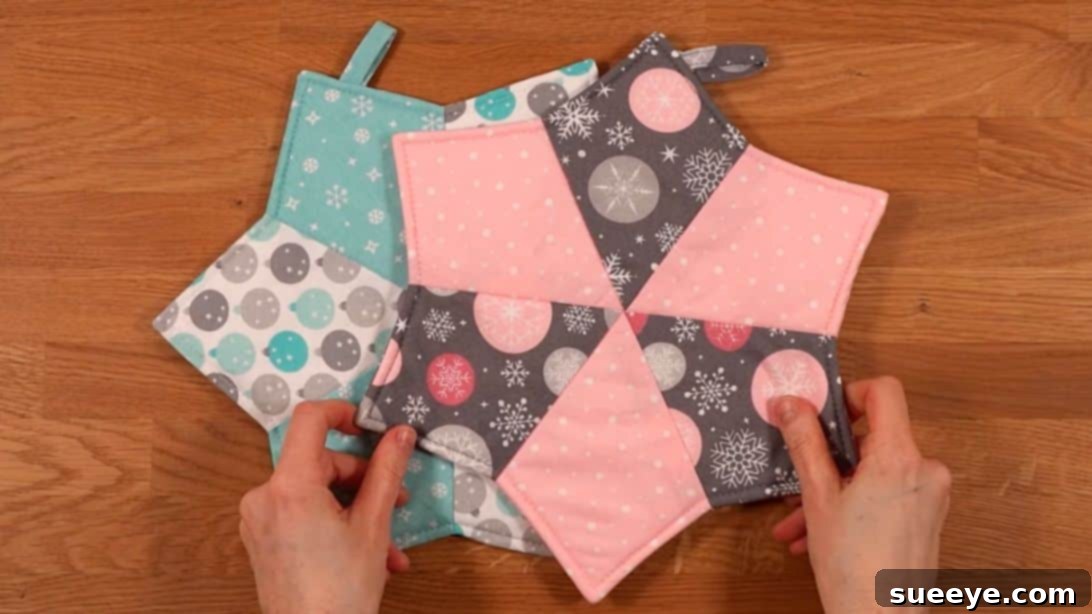
Discover the joy of creating a functional and beautiful kitchen accessory with this guide to sewing a stunning star pot holder. Perfect for adding a festive touch to your home or gifting to culinary enthusiasts, this project is made incredibly easy thanks to a free downloadable pattern from GettingLoosey. Forget tedious measurements; this pattern simplifies the process, saving you valuable time and ensuring a professional finish. Whether you’re a seasoned sewist or just starting your crafting journey, this comprehensive tutorial will walk you through each step, helping you create a practical and charming star-shaped pot holder that’s both durable and delightful.
Sew a Star Pot Holder: Free Pattern & Easy DIY Kitchen Project
Elevate your kitchen decor or surprise a loved one with a unique, handmade gift by crafting your very own star pot holder. This engaging sewing project, brought to life by the talented GettingLoosey, is designed to be accessible and fun, providing a rewarding experience with a fantastic end product. A well-made pot holder is an indispensable tool in any kitchen, protecting hands and surfaces from hot dishes, pans, and baking trays. Beyond its utility, a star-shaped pot holder introduces a whimsical or festive element, making everyday tasks a little brighter. Dive into this tutorial to learn how to stitch up a batch of these charming kitchen essentials, perfect for holidays, housewarmings, or simply to treat yourself to something handmade.
Why Choose This DIY Star Pot Holder Project?
- Perfect for Gifting: Handmade star pot holders make thoughtful, personalized gifts for friends and family who love to cook, bake, or simply appreciate unique kitchen accessories.
- Enhance Your Kitchen Decor: Choose fabrics that match your kitchen’s aesthetic or add a pop of color and personality. The star shape is universally appealing and adds a touch of charm.
- Cost-Effective Crafting: Utilize fabric scraps or purchase affordable fabric to create practical items that would cost more to buy ready-made.
- Skill-Building Opportunity: This project is excellent for practicing fundamental sewing techniques like cutting accurately, sewing curves, pressing seams, and topstitching.
- Quick and Rewarding: With a free pattern eliminating the need for complex measuring, you can complete this project relatively quickly, enjoying immediate satisfaction from your creation.
- Highly Functional: Designed with heat-resistant inlay, these pot holders offer superior protection, making them genuinely useful in a busy kitchen.
Materials You’ll Need for Your Star Pot Holder:
Gathering all your materials before you begin will ensure a smooth and enjoyable sewing experience. The specified dimensions are generous, allowing for flexibility and precision cutting.
- Main Fabric (12″ x 24″): Choose a durable, heat-safe fabric like 100% cotton. This will form the primary design of your star. Consider a festive print or a solid color that complements your kitchen.
- Contrast Fabric (12″ x 24″): Another piece of 100% cotton fabric to create visual interest and define the star’s points. A contrasting color or a complementary pattern works best.
- Heat-Resistant Inlay (12″ x 22″): Essential for protecting your hands from heat. Options include Insul-Bright or other heat-resistant batting. Ensure it’s suitable for hot temperatures.
- Star Pot Holder Pattern: Download the free pattern here from GettingLoosey. Printing this pattern accurately is crucial for the star’s shape.
- Matching Thread: High-quality polyester or cotton thread that matches your main fabric or blends well with both fabrics.
Essential Tools for This Project:
Having the right tools at hand makes all the difference in achieving professional-looking results and making the sewing process more efficient.
- Sewing Machine: A standard sewing machine capable of sewing a straight stitch.
- Iron and Ironing Board: Absolutely vital for pressing seams flat and crisp, which is key to a polished finish.
- Fabric Scissors or Rotary Cutter and Mat: For precise cutting of your fabric pieces. A rotary cutter with a self-healing mat offers speed and accuracy, especially for repetitive cuts.
- Pins or Fabric Clips: To hold fabric layers together securely while sewing.
- Seam Ripper: Always handy for correcting any mistakes.
- Fabric Marker or Chalk: For transferring pattern markings onto your fabric.
- Ruler or Measuring Tape: For checking measurements and marking seam allowances.
Step-by-Step Instructions: Crafting Your Star Pot Holder
Follow these detailed instructions carefully to bring your star pot holder to life. Each step builds upon the last, ensuring a sturdy and beautiful finished product.
Step 1: Preparing Your Pattern and Fabrics
Begin by accessing and printing your free star pot holder pattern. Ensure your printer settings are correct (e.g., “actual size” or 100% scale) to avoid distortion. Once printed, carefully cut out the pattern pieces. Lay your main and contrast fabrics flat and smooth them out. Refer to the pattern for the exact number of pieces required from each fabric type. Typically, you’ll be cutting diamond or triangle shapes that will form the points of your star. Use sharp fabric scissors or a rotary cutter for clean, precise edges. Accuracy in this stage will significantly impact the final shape of your star.
Step 2: Arranging Your Star Pieces
This is where your star begins to take shape. Take all the fabric pieces you’ve cut and arrange them on a flat surface, alternating between your main fabric and the contrast fabric. The pattern will guide you on how these pieces fit together to form one half of the star. It’s often helpful to lay them out exactly as they will be sewn, ensuring you’re happy with the color and pattern distribution. The remaining six pieces, once sewn together, will form the second side (or back) of your pot holder, creating a reversible design or simply a clean finish for the reverse.
Step 3: Assembling the Star Points
Now, let’s start sewing the individual star points. Take one piece of your main fabric and one piece of your contrast fabric. Place them right sides together, aligning the edges precisely. The pattern typically indicates where the seam lines should be. To make sewing easier and more accurate, use a fabric marker or chalk to draw a straight line along the seam where you intend to sew, especially at the intersection where your stitching should stop. You’ll be sewing along one side of the longer diagonal edge of these diamond shapes. Stitch carefully, starting and stopping exactly at your marked points. Continue this process, attaching diamond to diamond, until you have sewn all the pieces for one half of the star, creating a complete star shape from the individual diamonds.
Step 4: The Art of Pressing
Pressing is arguably as important as sewing for a polished finish. After sewing all the diamond pieces together for one side of the star, take your creation to the ironing board. Press all the seams in the same direction. This helps to reduce bulk and creates a smooth surface. For the very center of the star, you might find it beneficial to open the seams and press them flat. This can help the center lay flatter, creating a more defined star point. If any areas don’t lay flat, gently adjust the seams with your fingers and re-press until the entire star half is perfectly flat and smooth. This attention to detail will greatly enhance the final appearance of your pot holder.
Step 5: Incorporating the Heat-Resistant Inlay
Now it’s time to add the crucial heat-resistant layer. Place the completed first star half (the top layer of your pot holder) on top of your heat-resistant inlay. Ensure the inlay is centered underneath the fabric star. To secure the inlay and prevent shifting, you’ll perform a “stitch in the ditch” technique. This involves stitching directly into the seam lines of your pieced star top. This method helps to quilt the layers together without visible stitches on the front. Take your time with this step, sewing slowly and carefully to stay precisely within the ditch. Avoid drifting to the left or right, as this will make your stitching visible. Once stitched, carefully trim off any excess inlay material so that it perfectly matches the shape of your fabric star. Repeat steps 3 to 4 for the back part of your pot holder, preparing the second fabric star that will form the reverse side.
Step 6: Creating the Handy Hanging Loop
Every good pot holder needs a loop for easy storage and accessibility. Take a strip of fabric (the pattern usually includes dimensions for this) and fold it in half lengthwise. Press firmly with an iron to create a sharp crease. Next, open the fold and bring both raw edges up to meet the center crease you just made, then press again. This creates a neat, finished edge. Now, fold the entire strip in half once more, encasing the raw edges within the folds. Press one final time. Topstitch along both long edges of the folded strip, close to the edge, to secure the layers and give it a professional finish. Finally, fold the completed loop in half and place the raw ends onto one of the diagonal edges of one of your star halves (ensure the loop’s fold is facing inwards towards the center of the star). Pin it in place and sew it securely within the seam allowance, ensuring it’s firmly attached and won’t pull out with use.
Step 7: Final Assembly and Finishing Touches
You’re almost there! Place the backside of your pot holder (the second star you assembled in Step 5) on top of the front side (the first star with the inlay and loop attached), with right sides together. Align all the edges precisely. Using a fabric marker, mark a 2-3 inch opening along one of the straight edges of the star – this is where you’ll turn the pot holder right side out later. Pin around the entire perimeter of the star, leaving the marked opening unpinned. Sew around the star with your chosen seam allowance (usually 1/4 inch), starting and stopping firmly at the beginning and end of your marked opening. Before turning, trim off the tips of the star points just below the stitches to reduce bulk. For the inner corners (the “valleys” of the star), cut small triangles or notches into the seam allowance, being careful not to snip through your stitches. These steps help the points and curves turn out smoothly. Carefully flip the pot holder right side out through the opening. Use a blunt tool (like a point turner or knitting needle) to gently push out all the star points, ensuring they are crisp and well-defined. Press the entire pot holder flat, making sure the seam allowance at the opening is folded neatly inwards. Finally, topstitch all around the outer edge of the star, about 1/8 inch from the edge. This not only closes the opening securely but also gives your pot holder a crisp, professional finish and adds durability.
Expert Tips for a Flawless Finish:
- Precision is Key: Especially when cutting and sewing the diamond pieces, accuracy directly impacts how well your star points will align. Take your time!
- Press, Press, Press: Never underestimate the power of an iron. Pressing after each seam ensures crisp lines and a professional look.
- Use Good Quality Thread: A strong, good-quality thread will prevent breakage and ensure your pot holder withstands repeated use and washing.
- Test Your Stitch: Always test your stitch length and tension on a scrap piece of fabric before sewing your actual project.
- Pin Extensively: Don’t be shy with pins or fabric clips, especially when sewing layers together or around curves. This prevents fabric shifting.
- Consider Decorative Stitching: After topstitching the edges, you might add some free-motion quilting or decorative stitches to the star’s center for added flair and to further secure the layers.
Caring for Your Handmade Pot Holder:
To ensure your star pot holder lasts for years to come, proper care is essential. Since it will be exposed to heat and potential spills, regular cleaning is important. Most cotton pot holders can be machine washed on a gentle cycle with cold or warm water. Use a mild detergent. Avoid bleach, as it can damage the fabric and cause colors to fade. Tumble dry on low heat or air dry to prevent shrinkage and maintain the integrity of the heat-resistant inlay. If needed, a warm iron can be used to smooth out any wrinkles after drying. With good care, your beautifully handmade pot holder will continue to protect your hands and add charm to your kitchen for many uses.
Customization Ideas & Variations:
This star pot holder project offers a fantastic canvas for creativity. Here are a few ideas to personalize your next one:
- Fabric Play: Experiment with different fabric patterns and textures. Use holiday-themed fabrics for seasonal gifts, or select bold, graphic prints for a modern kitchen.
- Quilting Patterns: Instead of just “stitch in the ditch,” consider adding a simple grid, diagonal lines, or even free-motion quilting to the star sections for added texture and durability.
- Embellishments: Attach a small fabric tag, a personalized embroidered initial, or even a small decorative button (ensuring it’s not in a contact zone with heat) to the loop for extra charm.
- Size Adjustments: Once comfortable with the pattern, you could slightly scale it up or down to create larger trivets or smaller coasters, always remembering to adjust the heat-resistant inlay accordingly.
- Double-Sided Design: Use two different sets of coordinating fabrics for the front and back stars to create a truly reversible pot holder, offering two looks in one.
Frequently Asked Questions About Sewing Pot Holders:
- Q: Can I use any fabric for a pot holder?
- A: It’s highly recommended to use 100% cotton fabric for pot holders, as it can withstand high temperatures without melting. Avoid synthetic fabrics like polyester blends for the outer layers, as they can melt when exposed to heat, posing a safety risk.
- Q: What is the best heat-resistant material for pot holders?
- A: Insul-Bright is a very popular choice as it contains metalized polyester film that reflects heat. Other options include specific heat-resistant batting or multiple layers of cotton batting, though Insul-Bright generally offers superior protection.
- Q: How many layers of batting should I use?
- A: For good heat protection, typically one layer of heat-resistant batting like Insul-Bright is sufficient when combined with two layers of cotton fabric. If using only cotton batting, consider two to three layers for adequate insulation.
- Q: Can I hand sew this pot holder?
- A: While possible, hand sewing this project would be very time-consuming and might not offer the same durability and tight stitches as a sewing machine, especially for the heat-resistant layer and topstitching. A sewing machine is highly recommended.
- Q: What if my star points don’t match up perfectly?
- A: Don’t worry! Sewing curves and points accurately takes practice. Minor imperfections add to the handmade charm. Focus on careful pressing and trimming seams to minimize bulk, and the topstitching can often help to neaten the edges.
Ready to Start Your Star Pot Holder Project?
Embark on this delightful sewing journey and create a beautiful, functional star pot holder for your kitchen or as a thoughtful gift. With the free downloadable pattern and these detailed instructions, you have everything you need to succeed. Enjoy the process of bringing fabric to life and adding a touch of handmade charm to your home. Happy sewing!
For a complete visual guide, be sure to watch the full video tutorial by GettingLoosey. This video offers invaluable insights and demonstrations to accompany these written steps, ensuring you have all the support you need to craft your perfect star pot holder. Don’t forget to grab your free Star Pot Holder pattern here to begin this rewarding sewing adventure!