
Mastering the Hexagon Pinwheels Quilt: An Easy Jelly Roll Project with a Free Pattern
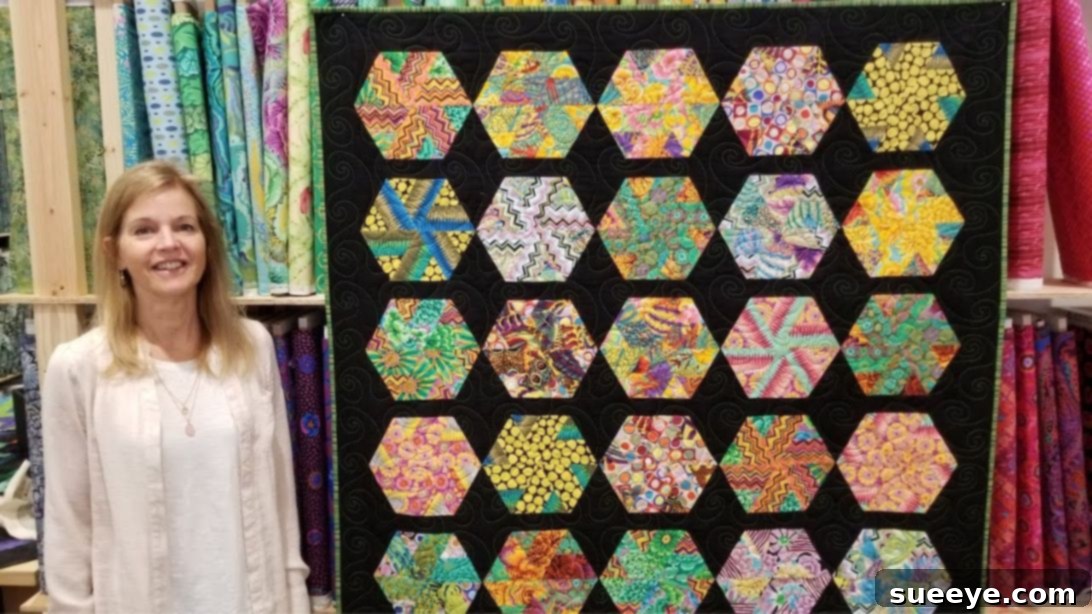
Embark on a delightful quilting journey with this stunning Hexagon Pinwheels Quilt project, brought to you by the expert crafters at Jordan Fabrics. Designed with both beauty and simplicity in mind, this tutorial leverages the vibrant versatility of jelly roll strips, contrasted with a foundational fabric that elegantly ties together the background, sashing, and border. Whether you’re a seasoned quilter looking for a quick and satisfying make or a complete beginner eager to dive into the world of fabric artistry, this project is perfectly suited for you. The comprehensive tutorial includes a free, downloadable pattern and templates, streamlining the cutting process and ensuring a smooth, enjoyable crafting experience from start to finish. Prepare to create a captivating quilt that adds a touch of handmade charm to any space.
Why Choose the Hexagon Pinwheels Quilt?
The Hexagon Pinwheels Quilt stands out as an exceptional choice for various reasons. Its striking geometric design, formed by rotating pinwheel motifs within a hexagon shape, creates a dynamic visual appeal that is both classic and contemporary. This project is particularly renowned for its beginner-friendly approach, making it an ideal entry point for those new to quilting. The use of pre-cut jelly roll strips significantly reduces the time spent on initial fabric preparation, allowing you to jump straight into the fun of piecing. Furthermore, the inclusion of a free, easy-to-follow pattern ensures that every step is clear, removing guesswork and building confidence. Beyond its simplicity, this quilt offers endless creative possibilities through fabric selection, allowing you to personalize your project to match any decor or recipient’s taste. Imagine the satisfaction of crafting a beautiful, functional piece of art with your own hands, suitable for a cozy throw, a decorative wall hanging, or a cherished gift.
Essential Materials for Your Hexagon Pinwheels Quilt
Gathering your materials is the first exciting step in any quilting project. For this charming Hexagon Pinwheels Quilt, the following items are essential. Each material plays a crucial role in bringing your vision to life, from the vibrant fabric strips to the precise cutting tools.
- Jelly Roll Strips or Fabric Equivalent: You’ll need either pre-cut jelly roll strips (typically 2½ inches wide) or 12 fat quarters, which you will then cut into 36 individual 2½-inch strips. These strips will form the colorful pinwheel designs within your hexagons, so choose prints that complement each other and offer good contrast.
- Background, Sashing, and Border Fabric: A total of 2¼ yards of a contrasting fabric is required for these elements. This fabric will provide the structure and frame for your vibrant pinwheels, helping them stand out beautifully. Consider a solid color or a subtle print that doesn’t distract from your main design.
- Binding Fabric: 5/8 yard of fabric is needed for the binding. The binding is the final edge finish that frames your quilt, adds durability, and can either blend seamlessly with your border or provide a pop of contrasting color.
- Backing Fabric: You’ll need 4 1/3 yards of fabric for the quilt backing. This is the fabric that covers the back of your quilt, providing a soft finish. It’s an opportunity to use a complementary large-scale print or a cozy flannel for added warmth.
- Marking Pen, Pencil, or Chalk: Essential for transferring template lines or marking stitching points accurately onto your fabric.
- Ruler: A clear, sturdy quilting ruler is indispensable for precise measurements and straight cuts.
- Scissors or Rotary Cutter and a Cutting Mat: A rotary cutter and mat are highly recommended for faster, more accurate cutting of fabric strips and template shapes, especially for those straight lines and curves. Sharp fabric scissors are also useful for smaller cuts.
- Needle and Thread: High-quality thread that matches your fabric or is a neutral color is vital for durable seams. A sewing machine needle appropriate for quilting is also important.
- Iron and Ironing Board: Crucial for pressing seams open or to one side, ensuring your quilt lies flat and true. Pressing is just as important as sewing in quilting!
- Sewing Machine: A reliable sewing machine will be your best friend for stitching together all the fabric pieces with consistent seam allowances.
- Free Hexagon Pinwheels Pattern: Don’t forget to download the free pattern from Jordan Fabrics. This pattern includes essential templates (A and B) that are vital for accurate cutting and assembly, especially for creating the unique hexagon shapes.
Step-by-Step Directions: Crafting Your Hexagon Pinwheels Quilt
Follow these detailed instructions to transform your chosen fabrics into a magnificent Hexagon Pinwheels Quilt. Precision and careful pressing are key to a beautiful finish.
Step 1: Preparing and Stitching Your Jelly Roll Strips
Begin by selecting pairs of your jelly roll strips or 2½-inch fabric strips. The magic of the pinwheel design comes from the contrast, so choose two different prints or colors that stand out against each other. Continue pairing until all your strips are matched. Once paired, take one set and place the two strips together with their right sides facing inward and all edges perfectly aligned. Using a ¼-inch seam allowance, stitch them together carefully along one long side. As you sew, pay close attention to avoid stretching either the top or bottom fabric strip, which can lead to wavy seams. After stitching, gently finger press the seam allowance to one side, then smooth out the fabric with your hands. Take your paired strip set to the ironing board and iron the seam flat. Consistent pressing throughout the project ensures your quilt top will lay flat and true.
Step 2: Cutting Hexagon Units with the Template
With your strip sets ready, it’s time to bring the hexagon pinwheel design to life. First, print and accurately cut out the provided template A from the free pattern. Position template A on top of one of your stitched strip sets, ensuring that you align it precisely as demonstrated in the Jordan Fabrics video tutorial. Using your rotary cutter or scissors, carefully cut around the template. This will yield distinctive triangular units that will form your pinwheels. Stack the matching triangular units together. Following the detailed instructions within the pattern, arrange these cut pieces to form a complete hexagon block. During this layout phase, you’ll separate the pieces into designated “top” and “bottom” units for easier assembly in the next step.
Step 3: Assembling Hexagon Blocks and Adding Background Pieces
Now, begin the actual sewing of your hexagon units. Start by stitching together the individual pieces of the “top unit” of a hexagon block. After each seam, press it carefully to ensure the unit remains flat and precise. Repeat this process for the “bottom unit.” Once both units are complete, stitch the top and bottom units together to form a full hexagon block, again remembering to press your seams open and flat for a smooth finish. Continue this process until all your hexagon blocks are assembled. Next, prepare your background fabric. Cut it into 4½-inch strips. From these strips, sub-cut them into 3½-inch wide pieces. Then, using template B from the pattern, cut these pieces to the specified shape. These uniquely shaped background pieces will seamlessly integrate with your hexagon blocks.
Step 4: Quilt Assembly with Sashing, Borders, and Finishing Touches
With your hexagon blocks and background pieces ready, you’re now ready to assemble the quilt top. Take the background pieces cut with template B and carefully place them on both sides of each hexagon block. Stitch these pieces in place with a ¼-inch seam allowance, then press the seams open for a clean finish. Once all background pieces are attached, lay out and assemble your hexagon blocks into rows, following your desired pattern or the layout suggested in the tutorial. Introduce sashing strips (cut from your background fabric) in between each row of hexagon blocks. Sashing not only separates the blocks visually but also adds structure and makes quilt top assembly easier. Stitch these rows together, ensuring your seams match up for a professional appearance. Once the main quilt top is pieced, add a generous 3-inch border all around the edge. This border frames your quilt, adds to its overall size, and provides a clean finishing edge. Finally, complete your quilt with your preferred method of quilting (machine or hand quilting) and binding. You can also add a hanging sleeve if it’s intended as a wall hanging.
Tips for a Perfect Hexagon Pinwheels Quilt
Achieving a beautiful, professional-looking quilt involves a few key practices that can elevate your project. Here are some invaluable tips:
- Accuracy is Key: In quilting, precision is paramount. A ¼-inch seam allowance might seem small, but consistency throughout your project will ensure your blocks fit together perfectly and your quilt top lies flat. Consider using a ¼-inch presser foot on your sewing machine.
- Pressing vs. Ironing: Understand the difference. “Pressing” involves lifting and placing the iron down, which helps set seams without distorting the fabric. “Ironing” involves sliding the iron, which can stretch fabric and create wavy seams. Always press after each seam.
- Sharp Tools: Use a sharp rotary blade for clean, precise cuts. A dull blade can fray fabric and lead to inaccurate shapes. Regularly change your blade.
- Quality Fabric Matters: Investing in good quality 100% cotton quilting fabric will make a significant difference in the look, feel, and longevity of your quilt. It also cuts and sews more consistently.
- Pre-wash or Not?: This is a personal preference. Pre-washing fabrics can prevent color bleeding and account for shrinkage before you start sewing. However, some quilters prefer not to pre-wash to maintain the crispness of new fabric. If you don’t pre-wash, be prepared for potential slight shrinkage or color changes during the first wash of the finished quilt.
- Chain Piecing: For efficiency, especially when sewing many similar units (like your paired strips or hexagon pieces), try chain piecing. Stitch one unit, then feed the next unit directly under the needle without cutting your thread in between. This saves time and thread.
- Squaring Up Blocks: After assembling each hexagon block, use your ruler and rotary cutter to square it up to the specified size (if applicable in the pattern). This ensures all blocks are uniform and will fit together seamlessly.
- Enjoy the Process: Quilting is a journey, not just a destination. Take your time, enjoy the creative process, and don’t be afraid to learn from any mistakes. Every stitch contributes to a unique piece of art!
Caring for Your Handmade Hexagon Pinwheels Quilt
Once your beautiful Hexagon Pinwheels Quilt is complete, proper care will ensure it remains a cherished item for years to come. Here are some general guidelines for washing and maintaining your quilt:
- First Wash: For the first wash, especially if you didn’t pre-wash your fabrics, use a color catcher sheet in the washing machine to absorb any potential dye bleeding. Use cold water and a gentle cycle.
- Gentle Detergent: Use a mild, pH-neutral detergent. Avoid harsh chemicals or bleach, which can damage fabric fibers and colors.
- Machine Washing: For most cotton quilts, machine washing on a gentle cycle with cold water is suitable. If your quilt is very large or delicate, consider a front-loading machine or even hand washing in a large tub.
- Drying: Tumble dry on a low heat setting or air dry by laying the quilt flat on a clean surface or hanging it over several lines (to distribute weight evenly). Avoid hanging it by just one edge, as this can stretch and distort the quilt.
- Storage: Store your quilt folded in a breathable container, such as a cotton bag or pillowcase. Avoid plastic containers, which can trap moisture and lead to mildew. Store it in a cool, dry place away from direct sunlight.
- Repairs: If you notice any loose threads or small tears over time, address them promptly to prevent further damage. Small repairs can significantly extend the life of your quilt.
Conclusion: Your Handcrafted Hexagon Pinwheels Masterpiece
Congratulations on embarking on or completing your Hexagon Pinwheels Quilt! This project, guided by the clear instructions from Jordan Fabrics, is more than just a sewing endeavor; it’s an opportunity to create a timeless piece of art that blends traditional techniques with modern design. The satisfaction of transforming simple fabric strips into such a captivating and functional quilt is immense. Whether it graces your living room, warms a bedroom, or becomes a heartfelt gift, your handcrafted quilt carries a story and a personal touch that machine-made items simply cannot replicate. We encourage you to download the free pattern, watch the comprehensive tutorial video by Jordan Fabrics, and dive into this wonderfully rewarding project. Remember, every stitch adds to the beauty and character of your quilt. Share your progress and final masterpiece with the quilting community – you’ll inspire others just as you’ve been inspired!
*All image credit belongs to Jordan Fabrics via YouTube. Follow and subscribe to her channel for more inspiring tutorials and projects!