
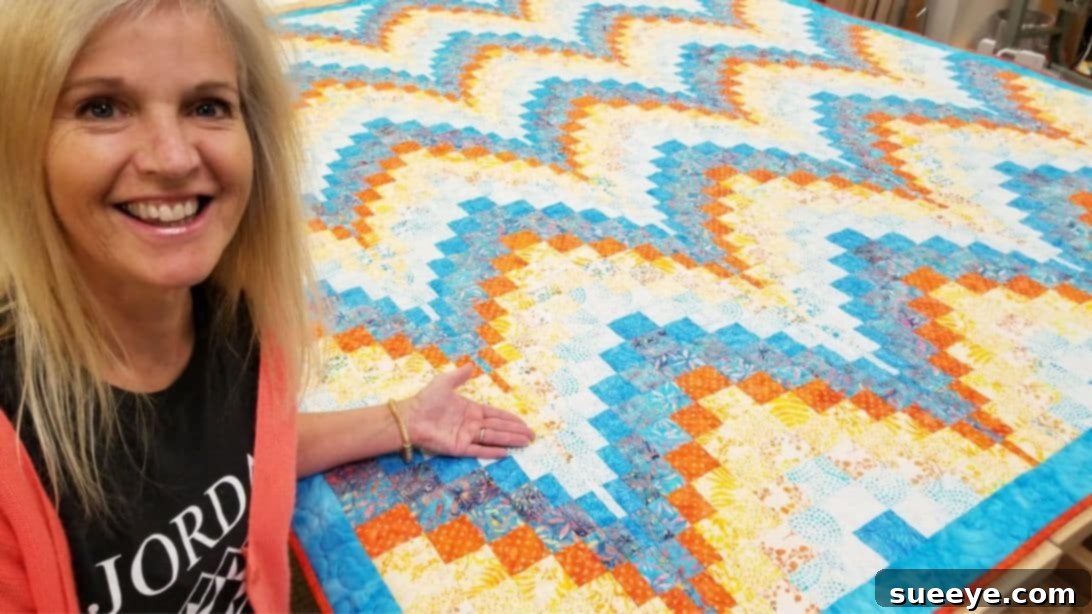
Master the Mesmerizing Donna’s Super Simple Bargello Quilt: A Comprehensive Tutorial
There’s an undeniable joy in the art of quilting – the rhythmic hum of the sewing machine, the tactile pleasure of vibrant fabrics, and the sheer satisfaction of transforming simple strips into a masterpiece. For many passionate crafters, myself included, quilting is more than a hobby; it’s a creative journey, a constant pursuit of new challenges and beautiful creations. Recently, I’ve found immense pleasure in tackling patterns that stretch my skills, and one particular project has truly captured my imagination: the captivating Bargello quilt. This intricate design, renowned for its dynamic, wave-like patterns and optical illusions, might seem daunting at first glance, but with the right guidance, it’s surprisingly accessible and incredibly rewarding.
My go-to resource for inspiring and well-explained quilting projects is often Jordan Fabrics on YouTube. Their tutorials are consistently clear, detailed, and brimming with practical tips. The Bargello quilt project I’m excited to share with you, affectionately known as “Donna’s Super Simple Bargello Quilt,” is a testament to their excellent instruction. What makes this specific Bargello quilt so appealing is the wonderful opportunity it provides to experiment with a spectrum of fun colors and fabric patterns, allowing each quilter to infuse their unique personality into the finished piece. Furthermore, the construction process itself is a delightful balance of challenge and profound satisfaction. Watching the design emerge as strips come together is truly magical. If you’ve been yearning to create a stunning Bargello quilt and elevate your quilting skills, now is the perfect time to embark on this journey. Dive into this detailed tutorial, grab your supplies, and let’s bring this beautiful quilt to life!
Understanding the Bargello Quilt: A Brief Overview
Before we dive into the creation process, let’s briefly touch upon what makes a Bargello quilt so special. Originating from Bargello embroidery, these quilts are characterized by their distinctive flowing, wave-like, or flame-like patterns. This mesmerizing effect is achieved through the careful arrangement of numerous fabric strips, which are cut and then strategically rotated and reassembled. The beauty of the Bargello technique lies in its ability to create complex visual depth using relatively simple strip-piecing methods. It’s a fantastic project for quilters who want to achieve a sophisticated look without needing highly complex blocks or intricate appliqué. The precise color placement, as outlined in the pattern, is crucial for developing the vibrant, undulating design that defines this style. Donna’s Super Simple Bargello Quilt is an excellent entry point into this fascinating technique, offering a streamlined approach that’s perfect for both confident beginners and experienced quilters looking for a fun, engaging project.
Materials for Your Bargello Masterpiece
Gathering your materials is the first exciting step in any quilting adventure. For Donna’s Super Simple Bargello Quilt, a thoughtful selection of fabrics is key to achieving the desired visual impact. The pattern specifies a particular color scheme to ensure the stunning wave effect truly shines. Here’s a detailed list of what you’ll need:
- 9 Fabrics (1 yard each): Choosing your fabrics is where the magic truly begins! The pattern suggests a specific color palette to achieve its iconic look: 3 different shades of blue fabrics for depth and coolness, 5 light print fabrics to provide contrast and allow the blues and accent color to pop, and 1 vibrant orange accent fabric to add a striking burst of warmth and definition to your waves. Selecting high-quality, quilter’s cotton is always recommended for durability and ease of sewing, ensuring your finished quilt will stand the test of time.
- 1 Yard of Fabric, for the Outside Border: This fabric will frame your beautiful Bargello design, providing a polished and cohesive finish. Consider a color that complements your chosen palette, perhaps a neutral or a deeper shade of one of your main colors to anchor the quilt and give it a professional appearance.
- ¾ Yard of Binding Fabric: The binding is the final edge of your quilt, protecting the raw edges and adding another layer of decorative detail. A contrasting or coordinating fabric can beautifully frame your work, drawing the eye to the stunning Bargello pattern.
- 7 Yards of Backing Fabric: The backing is the underside of your quilt, providing warmth and stability. While it’s mostly out of sight, choosing a comfortable and appealing fabric enhances the overall feel of your finished piece. Often, wider quilt backings are available to minimize seams and provide a seamless look.
- Marking Pen, Pencil, or Chalk: Essential for transferring pattern markings, making cutting lines, or indicating stitching lines. Choose one that is easily removable or designed to disappear over time to avoid permanent marks on your beautiful fabric.
- Scissors or Rotary Cutter and a Cutting Mat: A rotary cutter and mat are highly recommended for precision cutting of long strips, which is fundamental to Bargello quilting. The accuracy of your cuts will directly impact the fluidity of your wave pattern. Sharp scissors are also useful for trimming and smaller cuts.
- Quilting Ruler: A clear acrylic ruler, preferably a long one (e.g., 6″ x 24″), is indispensable for accurate strip cutting and squaring up your blocks. Look for rulers with clear markings to ensure precise measurements.
- Iron, for Pressing: A good iron is a quilter’s best friend. Proper pressing at each stage ensures flat seams, accurate piecing, and a professional finish. A steam iron can be particularly helpful for setting seams and removing wrinkles.
- Sewing Machine: A reliable sewing machine with a consistent ¼-inch seam allowance foot is crucial for successful strip piecing. Ensure your machine is well-maintained and threaded correctly before you begin.
- Pattern: (Click here to download the free pattern) Having the official pattern is vital. It contains the detailed diagrams and specific instructions for strip arrangement and rotation, which are critical for achieving the Bargello effect. Make sure to download and print this before you begin!
Step-by-Step Directions: Crafting Your Bargello Quilt
Now that you have all your materials ready, let’s begin the exciting process of constructing your Bargello quilt. Precision and patience are your best allies here, especially when working with numerous fabric strips. Follow these detailed steps carefully, and watch your quilt design come to life.
Step 1: Preparing Your Fabric Strips and Creating Strip Tubes
This initial phase is all about meticulous cutting and assembly to form the foundational strip units for your Bargello design. Accuracy in these early steps will pay off tremendously in the final appearance of your quilt.
- Cut Your Fabrics with Precision: Take each of your nine chosen fabrics (the 3 blues, 5 light prints, and 1 orange accent) and carefully cut them into 13 individual strips, each precisely 2½ inches wide. Utilize your rotary cutter, a sharp blade, and a long quilting ruler for the utmost accuracy. Consistency in strip width is absolutely critical for the success of your Bargello pattern, as even slight variations can distort the wave effect.
- Lay Out Your First Strip Unit According to the Diagram: Select one strip from each of the nine fabrics. Referring closely to the diagram provided in the Jordan Fabrics pattern, lay them out side-by-side in the specified order. This arrangement dictates the initial color flow and the foundational wave pattern of your quilt. Take your time to ensure the sequence is correct.
- Sew the Strips Together with Consistent Seam Allowances: With careful attention to a consistent ¼-inch seam allowance, sew these nine strips together along their long edges. Stitch them one by one, ensuring your seams are straight and even. A ¼-inch foot on your sewing machine can be incredibly helpful here.
- Finger Press Seam Allowances for Neatness: As you sew each strip, immediately finger press the seam allowance towards the right. This initial pressing helps to keep your work neat, reduce bulk, and make subsequent steps more manageable. Continue adding strips until all nine are sewn together to form a single, long strip unit. Double-check your layout against the diagram periodically to prevent errors.
- Pressing for Flatness and Reduced Bulk: Once all nine strips are sewn into a unit, give them a good, thorough press with your iron. Importantly, alternate the direction of your seam allowances with each subsequent strip. For example, press the first seam to the right, the second to the left, the third to the right, and so on. This technique helps to reduce bulk where seams meet later on when blocks are joined, leading to a flatter, more professional finish.
- Steam Press and Create a Continuous Strip Tube: After pressing, lay the entire strip unit flat and steam press it thoroughly to ensure it is perfectly flat and wrinkle-free. Then, fold this long strip unit in half, bringing the two raw long edges together. Stitch these edges together to create a continuous, long strip tube. This tube is the magical element that will be manipulated to form your Bargello pattern.
- Repeat to Create All Strip Tubes: Repeat this entire process (from step 2 to step 6) until you have a total of 13 identical strip tubes. These tubes form the core of your quilt’s design and will be transformed in the next step.
- Sub-cut and Prepare for Rotation: Once all 13 strip tubes are created, you will begin the process of sub-cutting them according to the pattern’s precise specifications. The pattern will indicate where to make these cuts, often at varying widths. After sub-cutting, carefully remove the stitching of the 1-inch strip unit (or as specified by the pattern) at specific points to open up the tubes into individual, flat, and offset strips. This precise opening and shifting is what allows for the characteristic “shift” and fluid motion of the Bargello design.
Step 2: Assembling Your Bargello Blocks and Quilt Top
This stage is where the Bargello magic truly unfolds as you manipulate and assemble your strip units into the iconic wavy pattern. This requires careful attention to detail and consistent seam allowances.
- Rotate and Open Strips for the Bargello Effect: Taking your sub-cut strip units (for example, the 1½-inch strips mentioned in the original text, though the pattern provides exact measurements for each cut), you will now strategically rotate them. The goal is to move the accent print (your vibrant orange fabric) up by one position in each subsequent strip unit. This incremental shift is crucial for creating the fluid, undulating Bargello design. After rotating, carefully take out the specific stitching (as indicated in the pattern) to open the strip tubes into individual flat strips again. Repeat this process meticulously for all the required strips as detailed in your diagram, ensuring each rotation is accurate.
- Stitch the Individual Strips into New Units: Once your strips are rotated and opened, you will begin stitching them back together into new, larger units. Maintain your consistent ¼-inch seam allowance throughout this process. As you join these strips, finger-press all seams towards the right. Consistency in pressing direction here will contribute significantly to a smooth, flat finish and will help the wave pattern flow uninterrupted.
- Create Your Quilt Blocks: Continue this precise process of rotating, opening, and re-stitching until you have created 12 complete blocks according to the pattern’s specifications. These blocks are the fundamental units of your quilt top and will begin to reveal the Bargello design.
- Varying Seam Pressing for Additional Blocks: For the next set of blocks, you’ll need to make 8 more. However, this time, press the seam allowances toward the left. This deliberate change in seam direction helps reduce bulk when blocks are joined together, making the overall quilt lie flatter and preventing unsightly bumps. Once all 20 blocks (12 with seams pressed right, 8 with seams pressed left) are complete, steam press them all flatly to ensure they are crisp, stable, and ready for final assembly.
- Layout Your Quilt Top: Following the diagram closely, arrange your newly created blocks into 5 rows, with 4 units in each row. Pay very close attention to the orientation and placement of each block to ensure your Bargello design flows correctly and creates the intended visual effect. This is a critical step for the overall aesthetic of your quilt; take a step back to view the full layout before sewing.
- Add Side Strips and Sew Rows: To the right side of each of these 5 rows, add one 3-inch strip unit (as per the pattern’s specific dimensions). These strips can help extend the design, provide a visual break, or create a buffer before the outer border. Once all rows are assembled with their respective side strips, carefully sew them together, maintaining even seam allowances, to form your complete quilt center.
- Attach the Outer Border: With your main quilt top now pieced together, it’s time to add the outer border. Measure your quilt top accurately, then cut your border fabric to size. Typically, you’ll cut two side borders first, attach them, then measure the new width and cut the top and bottom borders to ensure a perfect fit. Sew the border onto all four sides of your quilt. This border provides a lovely frame, adds stability, and gives your quilt a finished, professional look.
- Quilt and Bind Your Creation: The final steps involve layering, quilting, and binding. Create a quilt sandwich by layering your finished quilt top, a layer of batting, and your chosen backing fabric. Secure these layers with basting. Then, quilt it using your preferred method – whether it’s free-motion quilting to enhance the wavy design, straight-line quilting for a modern touch, or a simple stitch-in-the-ditch to highlight the piecing. Finally, bind the edges with your chosen binding fabric, completing your stunning Bargello masterpiece.
Tips for Bargello Quilting Success
To ensure your Bargello quilt turns out as magnificent as you envision, here are a few additional tips from seasoned quilters that can help you navigate the process with ease and confidence:
- Precision is Paramount: In Bargello quilting, accurate cutting and a consistent ¼-inch seam allowance are non-negotiable. Even a slight deviation can throw off the entire wave pattern and make alignment difficult. Take your time, measure twice, and cut once. Invest in a good quality rotary cutter and fresh blades.
- Pressing Matters Greatly: Don’t underestimate the power of proper pressing. Pressing your seams flat, and alternating directions as instructed, will result in a much flatter quilt top, reduce bulk, and make subsequent steps significantly easier. Remember to “press” your fabric, not “iron” it – lift and lower the iron rather than sliding it, to avoid stretching or distorting your fabric.
- Read the Pattern Thoroughly: Before making any cuts or stitches, read the entire Jordan Fabrics pattern from beginning to end. Familiarize yourself with all the steps, especially the diagrams for strip layout and block rotation. Visualizing the entire process beforehand can prevent mistakes.
- Use Good Quality Thread: A strong, good-quality cotton thread (such as 50wt cotton) will prevent breakage, ensure durable seams, and blend seamlessly with your fabric, ensuring your quilt lasts for years to come.
- Take Frequent Breaks: If you feel frustrated, tired, or overwhelmed, step away from your machine. Quilting should be an enjoyable and relaxing process. Coming back with fresh eyes can help you spot potential errors you might have missed and maintain your enthusiasm for the project.
- Color Confidence: While the pattern suggests specific colors, don’t be afraid to experiment with your own palette once you understand the basic principles of light, dark, and accent fabrics. Just ensure you have enough contrast between your chosen fabrics to achieve the desired flowing effect.
- Pre-Wash Your Fabrics (Optional but Recommended): Pre-washing your fabrics can help prevent fabric shrinkage after your quilt is finished and helps remove excess dyes, preventing potential color bleeding onto lighter fabrics. If you choose to pre-wash, remember to press your fabrics thoroughly before cutting to remove any wrinkles or distortions.
- Chain Piecing for Efficiency: To speed up the process of sewing numerous strips, consider using chain piecing. This technique involves feeding fabric pieces through your machine one after another without lifting the presser foot or clipping threads between them, saving time and thread.
Your Finished Donna’s Super Simple Bargello Quilt!
Congratulations! You’ve successfully navigated the intricate yet immensely rewarding process of creating Donna’s Super Simple Bargello Quilt. This project, while challenging, yields a truly spectacular result – a quilt that showcases stunning visual movement and your dedication to the craft. Whether you’re draping it over a sofa, displaying it as a magnificent wall hanging, or gifting it to a loved one, your Bargello quilt will undoubtedly be a cherished item and a conversation starter.
Remember, every stitch tells a story, and this quilt tells a tale of patience, precision, and passion. We extend our sincerest gratitude to Jordan Fabrics for providing such a fantastic and clear tutorial. Their commitment to inspiring quilters shines through in every project, empowering countless individuals to create beautiful fabric art. We encourage you to follow and subscribe to their channel for more incredible quilting ideas and future tutorials!
Now, go ahead and admire your beautiful creation. Take pride in your accomplishment, share your work with fellow quilters, and let this stunning Bargello quilt be a testament to your growing skills. You’ve earned it!