
Indulge Guilt-Free: The Ultimate Decadent Gluten-Free Chocolate Layer Cake Recipe
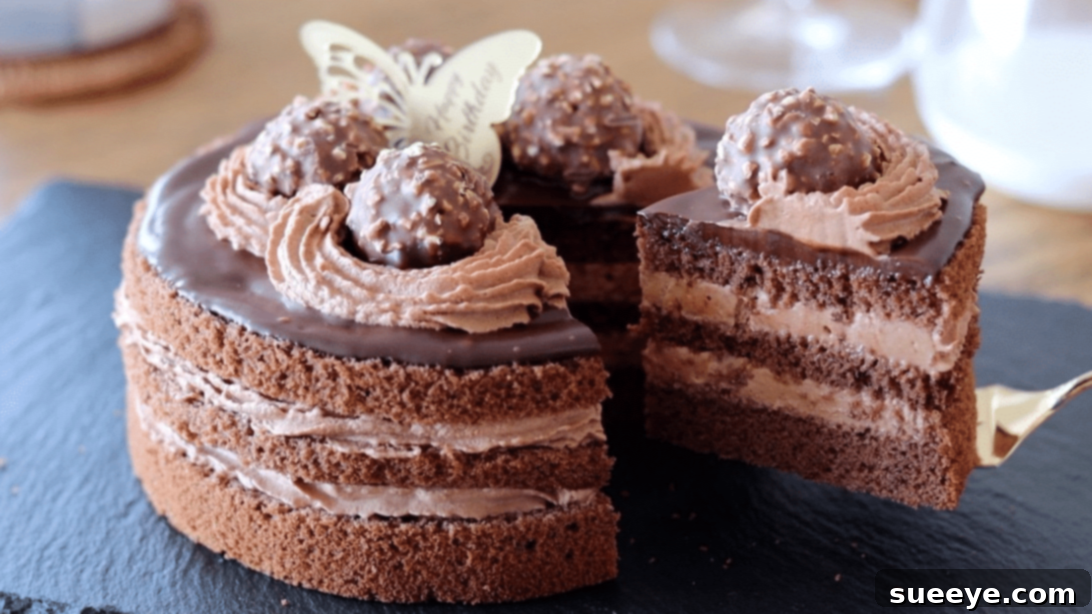
Prepare to be captivated by this show-stopping Gluten-Free Chocolate Layer Cake, a recipe that promises an explosion of rich chocolate flavor and an incredibly moist, tender crumb. Inspired by the masterful creations of HidaMari Cooking on YouTube, this three-layered marvel transforms simple ingredients into an elegant dessert that’s perfect for any occasion. From the first glimpse, we knew we had to try our hand at this delightful confection, and the results were nothing short of spectacular. This cake is not just a treat for the taste buds but also a feast for the eyes, proving that gluten-free baking can be just as luxurious and satisfying as traditional methods.
Gone are the days when gluten-free meant compromising on taste or texture. This recipe champions the use of rice flour to create a wonderfully light and airy sponge cake, perfectly complemented by a luscious chocolate cream filling and a glossy chocolate glaze. It’s a testament to how thoughtfully crafted gluten-free recipes can rival their wheat-based counterparts, offering a truly indulgent experience for everyone, including those with dietary restrictions.
Why This Gluten-Free Chocolate Cake Is A Must-Try
This isn’t just another chocolate cake; it’s an experience waiting to happen. Here’s why this particular gluten-free recipe will become your go-to:
- Unbelievably Moist & Tender: Despite being gluten-free, the sponge cake remains incredibly moist and boasts a delightful, tender crumb that practically melts in your mouth.
- Rich Chocolate Indulgence: With a decadent chocolate cream filling and a glossy chocolate glaze, every bite is a celebration of deep, luxurious chocolate flavor.
- Visually Stunning Layers: The three beautifully stacked layers, generously filled with cream and topped with Ferrero Rocher, create an impressive presentation ideal for any celebration.
- Dietary Friendly: Perfect for those avoiding gluten, this cake ensures no one misses out on a delicious dessert.
- Surprisingly Simple: While it looks elaborate, the steps are straightforward and accessible for home bakers of all skill levels.
Perfect for Every Celebration and Everyday Indulgence
Whether you’re planning a grand birthday bash, a festive holiday gathering, or simply craving a sophisticated dessert to elevate an ordinary day, this Gluten-Free Chocolate Layer Cake is your answer. Its elegant appearance makes it a centerpiece-worthy treat for special occasions, while its delightful taste ensures it’s equally enjoyed as a quiet indulgence with a cup of coffee or tea. Bake a batch, store it in the refrigerator, and enjoy a slice whenever the craving for something truly special strikes.
Essential Ingredients for Your Gluten-Free Chocolate Masterpiece
Crafting this incredible cake starts with selecting the right ingredients. Pay attention to quality, especially for your chocolate, as it will significantly impact the final flavor.
For the Light and Fluffy Gluten-Free Sponge Cake:
- 2 large whole eggs: These provide structure and richness, and when properly beaten, create the cake’s airy texture.
- ¼ cup (50g) granulated sugar: Sweetens the sponge and aids in aerating the eggs.
- ½ cup (60g) rice flour: The star gluten-free flour, delivering a delicate and tender crumb. Ensure it’s finely milled.
- 1 tbsp (5g) cocoa powder: Infuses the sponge with a subtle chocolate flavor and a beautiful dark hue.
- 2 tbsp (30ml) heavy cream: Adds moisture and richness, contributing to the sponge’s tenderness.
For the Rich Chocolate Cream Filling:
This velvety cream will be generously layered between your sponge cake, providing a delightful contrast in texture and a burst of chocolate flavor.
- ¾ cup (130g) sweet chocolate chips: Choose high-quality chips for the best flavor. Milk chocolate or a semi-sweet variety works wonderfully.
- 4 tbsp (60ml) milk: Helps create a smooth, pourable consistency when melting the chocolate.
- ¾ cup (180ml) heavy cream: Whipped to perfection, it forms the light and airy base for your chocolate cream.
- 2½ tsp (10g) granulated sugar: Sweetens the cream to balance the chocolate’s bitterness.
For the Decadent Chocolate Glaze and Garnish:
This simple glaze provides a beautiful, glossy finish, and the Ferrero Rocher add an irresistible crunch and hazelnut flavor.
- ¼ cup (45g) sweet chocolate chips (additional): For the pourable glaze that coats the cake.
- 2 tbsp (30ml) milk (additional): To achieve the perfect consistency for the glaze.
- 1 tbsp (15ml) heavy cream (additional): Adds richness and shine to the glaze.
- 1 tsp (4g) granulated sugar (additional): To ensure the glaze is perfectly sweet.
- 5 Ferrero Rocher: For an elegant and delicious decoration, adding a touch of hazelnut and crunch.
Step-by-Step Guide to Baking Your Gluten-Free Chocolate Layer Cake
Part 1: Crafting the Perfect Gluten-Free Sponge Cake
Step 1: Prepare Your Oven and Pan, Then Aerate the Eggs.
Begin by preheating your oven to 170°C (338°F). This consistent temperature is crucial for an even bake. Next, prepare a round cake pan by lining both its sides and bottom with parchment paper. This simple step ensures your delicate gluten-free sponge cake will release easily after baking. Set the prepared pan aside. In a large, clean mixing bowl, begin beating the two whole eggs until they become frothy. Gradually add the granulated sugar in two separate batches, continuing to beat vigorously after each addition. The goal is to achieve a mixture that is light in color, significantly increased in volume, and wonderfully fluffy. This aeration step is vital for the cake’s light texture.
Step 2: Gently Fold in Dry Ingredients and Incorporate Cream.
Carefully sift the rice flour and cocoa powder directly over the egg mixture. Sifting prevents lumps and ensures even distribution. Using a spatula, gently fold the dry ingredients into the egg mixture. Use a motion that scoops from the bottom and folds over the top, taking care not to deflate the air you’ve beaten into the eggs. Once just combined, take a small portion of this batter and mix it into a separate small bowl containing the heavy cream. This technique, called tempering, helps to lighten the heavy cream and prevents it from sinking to the bottom when reintroduced to the main batter. Pour the cream mixture back into the large bowl and gently fold until everything is evenly combined, ensuring no streaks of flour remain. Finally, pour the smooth batter into your prepared cake pan.
Step 3: Bake, Cool, and Layer Your Sponge Cake.
Once the batter is in the pan, gently tap the pan on your counter surface a few times. This helps to release any large trapped air bubbles, preventing unsightly holes in your cake. Place the pan in your preheated oven and bake for approximately 20 to 25 minutes. The cake is done when a wooden skewer inserted into the center comes out clean, and the top springs back lightly when touched. Immediately upon removing from the oven, unmold the cake onto a wire rack. Allow it to cool completely before attempting to remove the parchment paper. Once fully cooled, carefully slice the cake horizontally into three even layers using a serrated knife. If desired, gently flatten any slightly curved tops to create perfectly level layers, which makes stacking much easier. Set these beautiful sponge layers aside.
Part 2: Whipping Up the Luxurious Chocolate Cream
Step 4: Melt Chocolate and Prepare Whipped Cream Base.
For the chocolate cream, first, melt your chocolate chips. Place a heat-proof bowl containing the ¾ cup of chocolate chips over a saucepan of simmering hot water (creating a double boiler setup). Stir continuously until the chocolate is completely melted and smooth. Be careful not to let any water get into the chocolate. Once melted, remove the chocolate bowl from the hot water. Gradually add the 4 tablespoons of milk, incorporating it in two batches and mixing well after each addition until the chocolate mixture is smooth, shiny, and fully emulsified. Set this melted chocolate aside to cool down slightly, ensuring it’s not hot when mixed with the cream. Meanwhile, prepare your whipped cream. Place a separate clean mixing bowl over a larger bowl filled with ice water. Pour the ¾ cup of heavy cream and 2½ teaspoons of sugar into the chilled bowl. Begin beating gently until the sugar dissolves and the cream just starts to thicken.
Step 5: Achieve Stiff Peaks and Assemble Cake Layers.
Remove the bowl of heavy cream from the ice water. Now, pour the slightly cooled chocolate mixture into the cream. Using an electric mixer or whisk, continue beating the chocolate and cream together. Whip until stiff peaks form, indicating that your chocolate cream is perfectly stable and ready for piping. Transfer this luxurious chocolate cream into a piping bag fitted with your preferred nozzle (or simply snip off the corner of the bag). Place one cake layer on your serving plate or cake stand. Pipe an even layer of chocolate cream over the top, spreading it smoothly to the edges. Carefully place the second cake layer on top, press gently, and repeat the piping and spreading process. Finally, top with the third and final cake layer, creating your magnificent three-tiered masterpiece.
Part 3: The Grand Finale – Glazing and Decorating
Step 6: The Decadent Chocolate Glaze and Final Touches.
Now, let’s create the final glossy finish. In a small bowl, combine the additional ¼ cup of melted chocolate chips (melted using the same double boiler method as before), the 2 tablespoons of milk, 1 tablespoon of heavy cream, and 1 teaspoon of sugar. Mix these ingredients thoroughly until you have a smooth, pourable glaze. Carefully pour this decadent chocolate glaze over the very top of your stacked cake. Using an offset spatula or the back of a spoon, gently spread the glaze evenly, allowing some to drip artfully down the sides. For a truly elegant finish, strategically place the Ferrero Rocher chocolates on top of the glazed cake. Use any remaining chocolate cream in your piping bag to add decorative swirls, borders, or personalized designs around the Ferrero Rocher or along the base of the cake. Once decorated, your cake is ready to be served and enjoyed! For best results, allow it to chill in the refrigerator for at least 30 minutes to set the glaze and cream.
Pro Tips for Gluten-Free Baking Success
- Room Temperature Eggs: Ensure your eggs are at room temperature as they whip up to a greater volume, leading to a lighter sponge.
- Sift Dry Ingredients: Always sift your rice flour and cocoa powder to prevent lumps and ensure a smooth batter.
- Don’t Overmix: Gentle folding is key after adding dry ingredients. Overmixing can deflate the batter, resulting in a dense cake.
- Cool Completely: Do not attempt to slice or frost your cake layers until they are completely cooled, or they will crumble and melt your frosting.
- High-Quality Chocolate: The flavor of your chocolate cream and glaze will only be as good as the chocolate you use. Invest in good quality chocolate chips or baking bars.
- Chilling is Your Friend: A brief chill in the refrigerator helps set the cream and glaze, making the cake easier to slice and serve cleanly.
Storage and Serving Suggestions
To keep your Gluten-Free Chocolate Layer Cake fresh and delicious, store it in an airtight container in the refrigerator for up to 3-4 days. For optimal flavor and texture, allow the cake to come to room temperature for about 15-20 minutes before serving. This allows the sponge to soften and the chocolate flavors to fully develop. This cake pairs beautifully with a fresh cup of coffee, a glass of milk, or even a scoop of vanilla bean ice cream for an extra indulgent treat.
Variations to Personalize Your Cake
Feel free to get creative and customize this recipe to your liking:
- Nutty Twist: Incorporate finely chopped hazelnuts or almonds into the chocolate cream for added texture.
- Berry Fresh: Add a layer of fresh raspberries or sliced strawberries between the cake layers for a burst of fruity freshness that complements the chocolate.
- Espresso Kick: A teaspoon of instant espresso powder added to the cocoa powder in the sponge or the chocolate cream can deepen the chocolate flavor beautifully.
- Orange Zest: A hint of orange zest in the chocolate cream or glaze offers a classic and refreshing flavor pairing.
Frequently Asked Questions (FAQs)
Q: Can I use a different gluten-free flour blend?
A: While rice flour provides a unique lightness, you might be able to substitute with a commercial gluten-free all-purpose flour blend (ensure it contains xanthan gum or add ¼ tsp per cup). Results may vary slightly in texture.
Q: Can I make this cake dairy-free?
A: Yes, with a few substitutions! Use a dairy-free milk alternative (like almond or oat milk) and a high-quality dairy-free heavy cream alternative for whipping. Ensure your chocolate chips are also dairy-free.
Q: How far in advance can I make this cake?
A: You can bake the sponge layers a day in advance and store them, wrapped, at room temperature. The assembled and frosted cake is best enjoyed within 2-3 days but can be stored in the fridge for up to 4 days.
Q: Can I freeze this gluten-free chocolate cake?
A: Yes! You can freeze individual unfrosted cake layers wrapped tightly in plastic wrap for up to 1 month. For the assembled cake, freeze it unwrapped until firm, then wrap tightly in plastic wrap and then foil. Thaw in the refrigerator overnight before serving.
*All image credit belongs to HidaMari Cooking via YouTube. Follow and subscribe to her channel for more inspiring recipes and culinary delights!
This Gluten-Free Chocolate Layer Cake is more than just a recipe; it’s an invitation to create something truly special in your kitchen. With its flawless texture, rich flavor, and stunning presentation, it’s destined to become a beloved staple for all your celebrations and cravings. Don’t hesitate to embark on this delightful baking adventure!