
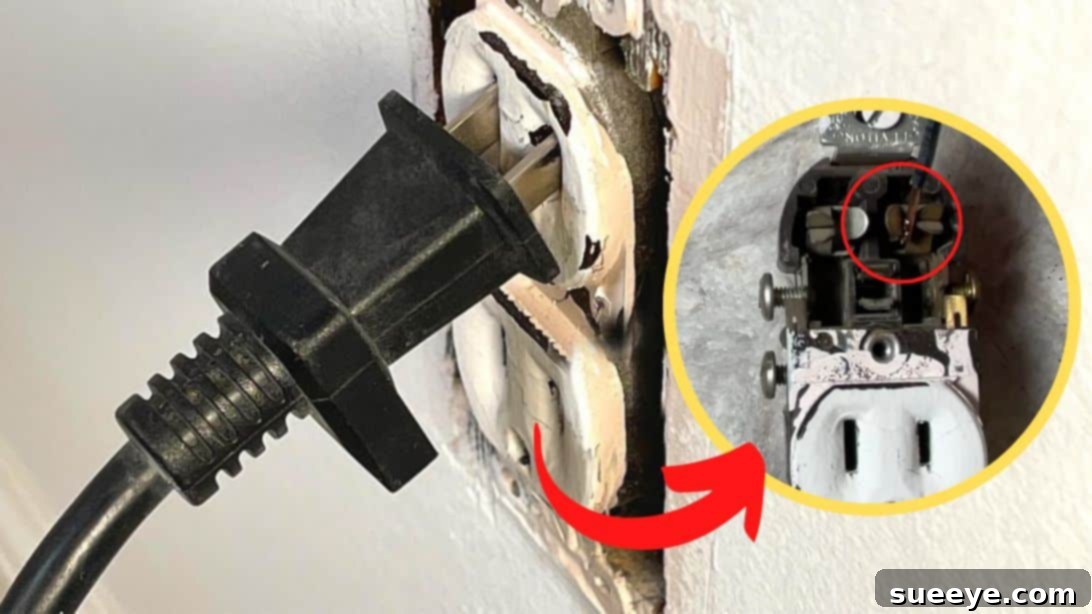
Do you have an electrical outlet in your home that frustratingly refuses to hold a plug, no matter how many times you try? This common household annoyance, where plugs effortlessly slip out or barely make contact, is often a sign of a loose or worn-out receptacle. Over time, consistent use, especially with heavy or frequently inserted plugs, can cause the internal contacts within an outlet to widen or lose their spring tension. While it might seem like a minor inconvenience, a loose outlet can actually pose significant safety risks, including overheating, electrical arcing, and even fire hazards.
Fixing a Loose Electrical Outlet: A Comprehensive DIY Guide
The good news is that replacing a loose electrical outlet is a straightforward task that most homeowners can tackle with basic tools and a careful approach. Not only does it restore functionality, but it also significantly enhances the safety of your home. This detailed guide will walk you through the entire process, from diagnosing the problem to installing a brand-new, tamper-resistant outlet, ensuring a secure and reliable power connection. We’ll draw inspiration from the clear instructions provided by Everyday Home Repairs on YouTube, expanding on each step to ensure you have all the knowledge needed for a successful DIY project.
Why Electrical Outlets Become Loose
Before diving into the repair, understanding why outlets loosen can help you appreciate the importance of proper installation and maintenance. The primary culprits are typically:
- Worn-Out Contacts: Inside every outlet are metal contacts designed to grip the prongs of a plug. With repeated insertion and removal of plugs, these contacts can lose their spring tension and widen, leading to a poor connection.
- Loose Wiring Connections: Over time, the screws holding the electrical wires to the outlet terminals can loosen due to vibrations, temperature changes, or improper tightening during the initial installation. Loose connections create resistance, which can lead to heat buildup and arcing.
- Damaged Receptacle Body: The plastic or bakelite housing of the outlet itself can crack or become brittle, especially in older homes, making it difficult for the outlet to hold its shape and grip plugs securely.
- Improper Installation: Sometimes, outlets are not properly secured to the electrical box in the wall, causing the entire unit to move and feel “loose” when a plug is inserted or removed. While this is less about the internal contacts, it still requires attention.
Identifying that your outlet is loose is the first step towards a safer and more functional home electrical system.
Prioritizing Safety: Essential Precautions for Electrical Work
Working with electricity demands the utmost respect and caution. Ignoring safety protocols can lead to serious injury or even fatalities. Always keep the following in mind:
- Always Turn Off Power: This is the golden rule. Locate your home’s main electrical panel (breaker box) and switch off the circuit breaker that supplies power to the outlet you’ll be working on. Labeling your breakers clearly is a great way to avoid confusion. If you’re unsure which breaker it is, turn off the main breaker to the entire house.
- Verify Power is Off: Never assume the power is off. Use a non-contact voltage tester to confirm that no current is flowing through the outlet before touching any wires. Test all slots of the outlet, as well as the mounting screws.
- Use Insulated Tools: Ensure your screwdrivers, pliers, and wire cutters have insulated handles to provide an extra layer of protection against accidental shocks.
- Wear Personal Protective Equipment (PPE): Safety glasses can protect your eyes from dust or debris, and work gloves can offer some protection, though they are not a substitute for proper power disconnection.
- Work in a Well-Lit Area: Good visibility is crucial for seeing wires clearly and avoiding mistakes.
- Keep Your Work Area Dry: Never perform electrical work in damp or wet conditions. Water conducts electricity, dramatically increasing the risk of shock.
- Don’t Rush: Take your time with each step. Rushing can lead to errors and overlooked safety measures.
Tools and Materials You’ll Need:
Gathering all necessary items before you begin will streamline the process and ensure a safe, efficient repair. Here’s what you’ll need:
- Non-contact voltage tester: An absolute must-have for verifying power is off.
- Screwdriver set: You’ll likely need both Phillips-head and flat-head screwdrivers.
- Pliers: Needle-nose pliers are excellent for bending wires, while lineman’s pliers can be useful for cutting and gripping.
- Wire stripper/cutter: Essential for cleanly stripping the insulation from wires to the correct length.
- New tamper-resistant outlet (TR): A modern safety upgrade, especially recommended for homes with children. We’ll discuss these more below.
- Optional: Electrical tape, a flashlight for dark areas, work gloves, and safety glasses.
Step-by-Step Directions for Replacing a Loose Outlet:
Step 1: Preparation and Power Disconnection
Your first and most critical action is to ensure the area is safe. Head to your electrical service panel, usually located in a basement, garage, or utility closet. Locate the circuit breaker corresponding to the room or area where the loose outlet is situated. If your breakers aren’t clearly labeled, you may need to flip breakers one by one until the outlet’s power is cut, or simply turn off the main breaker for the entire house. Once you believe the power is off, return to the outlet. Use your non-contact voltage tester by placing it near the outlet slots and the mounting screws. The tester should remain silent and dark, indicating no active current. If it lights up or beeps, the power is still on, and you must return to the breaker box and ensure the correct breaker is switched off. Double-check again for absolute certainty. Safety first, always.
Step 2: Safely Remove the Old Outlet
With power confirmed off, you can now begin disassembly. Start by carefully removing the faceplate, which is typically held by one or two screws in the center. Once the faceplate is off, you’ll see the outlet itself, usually secured to the electrical box with two screws – one at the top and one at the bottom. Loosen these screws, but do not remove them entirely yet. Gently pull the entire outlet assembly out from the wall. Be prepared for a bundle of wires behind it. You’ll typically find three types of wires connected to the outlet: bare or green ground wires, white neutral wires, and black or colored hot wires. Using your screwdriver, carefully loosen the screws on the side of the outlet that hold these wires in place. Once loosened, use your pliers to gently unhook each wire, making sure to avoid direct skin contact with the copper, even though the power is off, as a best practice. Take note of which color wire was connected to which color screw terminal (gold for hot, silver for neutral, green for ground).
Step 3: Understanding Your Wiring and Choosing the Right Outlet
Before installing the new outlet, a brief understanding of household wiring is helpful. Standard residential wiring uses three types of wires:
- Hot Wire (Black, Red, or other color besides white/green): Carries the electrical current from the circuit breaker to the outlet. Connects to the brass/gold terminal screws.
- Neutral Wire (White): Carries the current back to the breaker panel, completing the circuit. Connects to the silver terminal screws.
- Ground Wire (Bare Copper or Green): A safety wire that provides a path for fault current to safely return to ground in case of a short circuit, preventing electrical shock. Connects to the green terminal screw.
When selecting your new outlet, consider upgrading to a tamper-resistant (TR) outlet. These outlets have spring-loaded shutters that cover the contact openings, preventing the insertion of foreign objects (like paper clips or keys) into a single slot. Both slots must be pressed simultaneously for a plug to enter, significantly enhancing child safety. They are now required by the National Electrical Code in most new constructions and renovations, and are highly recommended for replacements.
Step 4: Preparing Wires for the New Outlet
Inspect the ends of the wires that were connected to the old outlet. If they are bent, frayed, or discolored, it’s best to snip off the old ends using your wire cutters, creating a fresh, clean end. Then, using your wire strippers, carefully remove about 3/4 inch of insulation from the end of each wire, exposing the bare copper. Be careful not to nick the copper wire itself, as this can weaken it. Once stripped, use your needle-nose pliers to bend each bare wire end into a small, tight “C” or “U” shape loop. This loop will wrap securely around the terminal screws of the new outlet, ensuring maximum surface contact for a safe and efficient electrical connection. Always ensure the wire gauge you are working with (typically 14-gauge or 12-gauge in homes) matches the rating of your new outlet.
Step 5: Connecting the New Tamper-Resistant Outlet
Now, it’s time to connect the prepared wires to your new tamper-resistant outlet. Work systematically:
- Ground Wire First: Start with the bare copper or green insulated ground wire. Hook its “C” loop around the green ground screw terminal. The loop should wrap clockwise around the screw, so that when you tighten the screw, it pulls the wire tighter into contact. Tighten the screw securely with your screwdriver.
- Neutral Wires (White): Next, connect the white neutral wire(s). If there are two white wires, they may be joined together with a pigtail connection to a single wire that goes to the outlet, or your new outlet may have two silver terminals for separate connections. Carefully hook the white wire’s “C” loop around one of the silver terminal screws (again, clockwise). Tighten the screw firmly.
- Hot Wires (Black): Finally, connect the black hot wire(s). Hook the black wire’s “C” loop around one of the brass/gold terminal screws, wrapping it clockwise. Tighten this screw securely.
Important: Ensure that all connections are tight and secure. Loose connections are a primary cause of electrical hazards. There should be no stray copper strands outside of the terminal screw heads. Give each wire a gentle tug to confirm it’s firmly attached.
Step 6: Secure the New Outlet and Restore Power
Once all wires are connected, carefully fold them back into the electrical box in the wall, creating enough space for the new outlet to sit flush. Gently push the outlet back into the box until its mounting tabs align with the screw holes in the box. Reinstall the two mounting screws (top and bottom) and tighten them until the outlet is firmly seated and flush with the wall surface. Be careful not to overtighten, which could crack the outlet housing. Finally, reattach the faceplate. With everything reassembled, return to your electrical panel and flip the circuit breaker back to the “ON” position. Use your non-contact voltage tester one last time to confirm that power has been restored to the newly installed outlet. Plug in a small appliance or a night light to verify it’s working correctly.
Troubleshooting Common Issues
If your new outlet doesn’t work after restoring power, don’t panic. Here are a few common issues and solutions:
- No Power: Double-check that the circuit breaker is fully engaged. It might have tripped again or not been pushed all the way to “ON.” Also, ensure all wires are securely fastened to their correct terminals.
- Loose Connection: If a device plugged in feels loose, it might indicate that the internal contacts in the new outlet are faulty (rare for new outlets) or a wire isn’t quite tight enough. Power down the circuit and re-check all connections.
- Burning Smell or Buzzing: Immediately turn off the power at the breaker if you notice any burning smells, buzzing, or flickering lights. This indicates a serious wiring issue or a short circuit. Do not attempt further repairs; call a qualified electrician.
When to Call a Professional Electrician
While replacing a standard outlet is a manageable DIY task, there are situations where calling a licensed electrician is not just recommended, but essential:
- Uncertainty or Discomfort: If at any point you feel unsure, uncomfortable, or out of your depth, stop and call a professional. Your safety is paramount.
- Older or Complex Wiring: Homes with very old wiring (e.g., knob and tube, aluminum wiring) or complex multi-wire circuits (like those controlling switches and outlets from multiple locations) should be handled by an expert.
- Repeated Tripping Breakers: If the circuit breaker frequently trips even after replacing the outlet, it indicates a larger issue within the circuit that needs professional diagnosis.
- No Ground Wire Present: If your electrical box lacks a ground wire, you cannot simply install a grounded outlet. This requires further electrical work (like running a new ground wire or installing a GFCI outlet) that an electrician should handle.
- Damage to the Electrical Box: If the electrical box itself is damaged, cracked, or loose within the wall, an electrician can safely replace or secure it.
Preventing Future Loose Outlets: Maintenance Tips
To prolong the life of your newly installed outlet and prevent future issues:
- Avoid Overloading: Do not plug too many high-power appliances into a single outlet using power strips or extension cords. This can strain the outlet and the circuit.
- Gentle Plug Removal: When unplugging devices, pull directly on the plug itself, not the cord. Yanking cords can damage both the cord and the outlet.
- Regular Checks: Periodically check outlets in high-use areas for signs of looseness, discoloration, or heat.
- Upgrade Old Outlets: Consider systematically upgrading older, non-tamper-resistant outlets, especially in areas with high usage or where children are present.
Conclusion: Empowering Your Home Maintenance Skills
Successfully replacing a loose electrical outlet is a rewarding home improvement project that enhances both the safety and functionality of your living space. By carefully following these steps, prioritizing electrical safety, and knowing when to call a professional, you can confidently tackle this common household repair. Not only will you resolve the frustrating issue of a plug that won’t stay put, but you’ll also gain valuable experience and a deeper understanding of your home’s electrical system, empowering you to handle future minor repairs with confidence.
All image credit belongs to Everyday Home Repairs via YouTube. Follow and subscribe to their channel for more home repair guides!