
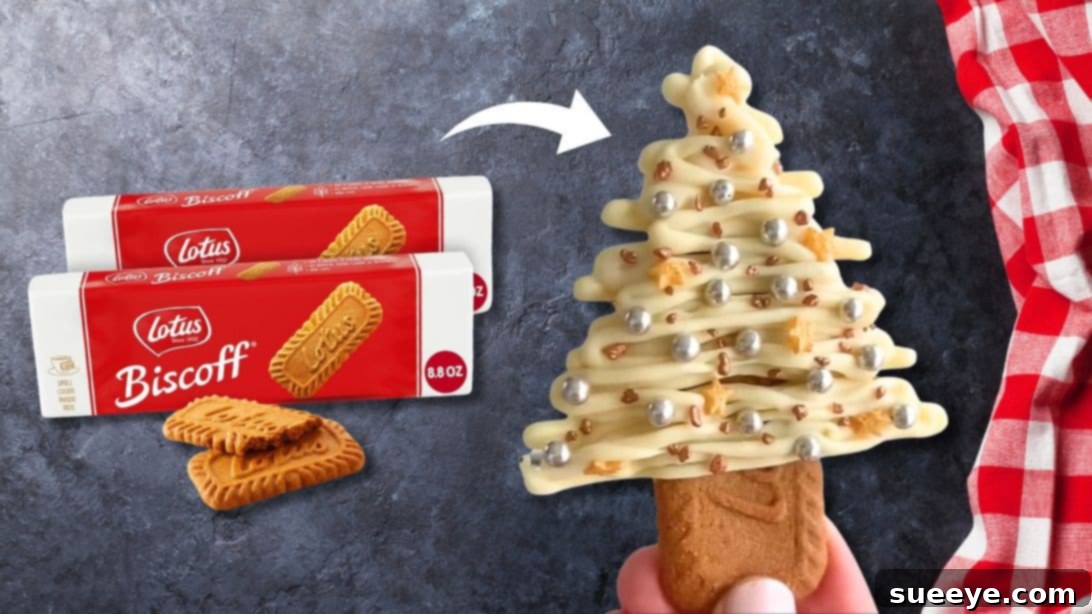
As the holiday season draws near, the quest for delightful, easy-to-make treats becomes a joyful pursuit. This year, we’ve stumbled upon a true gem that promises to bring cheer and deliciousness to your festive spread: the No-Bake Biscoff Christmas Tree Cookies. Inspired by the brilliant creation of Fitwaffle Kitchen, these cookies are not just incredibly cute; they’re also wonderfully simple to make, requiring absolutely no baking or complex culinary skills. They embody everything a perfect holiday treat should be: festive, flavorful, and fantastically fun for the whole family, especially for crafting with little hands.
Imagine the warm, spiced notes of Biscoff cookies harmoniously paired with smooth white chocolate, all adorned with sparkling festive decorations, forming a miniature Christmas tree. This recipe is a game-changer for anyone looking to create impressive holiday sweets without the stress of an oven. Whether you’re planning a holiday party, preparing thoughtful homemade gifts, or simply seeking a delightful activity to enjoy with your children, these Biscoff Christmas Tree Cookies are your go-to solution. Get ready to embark on a sweet adventure that’s as enchanting to make as it is to eat!
RELATED: Craving more Biscoff? Try this Easy No-Bake Biscoff and Cream Dessert
Why You’ll Adore These No-Bake Biscoff Christmas Tree Cookies
Beyond their undeniable charm, these cookies offer a multitude of reasons to make them your signature holiday treat this year:
- Effortlessly Simple & Quick: The “no-bake” aspect is a true blessing during the busy holidays. With just a few ingredients and straightforward steps, you can have a batch of these festive cookies ready in under an hour, freeing up your precious time for other holiday preparations.
- Perfectly Kid-Friendly: Involving children in holiday baking is a cherished tradition, and this recipe makes it easier than ever. From piping the chocolate to sprinkling on the decorations, every step is safe and enjoyable for kids of all ages, fostering creativity and a sense of accomplishment.
- Visually Stunning & Festive: These cookies are an instant showstopper. Their adorable Christmas tree shape, coupled with the glistening sprinkles, makes them a centerpiece-worthy addition to any dessert table or cookie platter.
- Irresistibly Delicious Flavor: Biscoff cookies, known for their unique caramelized, spiced flavor, provide a delightful contrast to the sweet creaminess of white chocolate. It’s a flavor profile that evokes warmth and holiday comfort with every bite.
- Highly Customizable: While white chocolate creates a classic winter wonderland look, you have endless possibilities for personalization. Use food coloring to tint your chocolate green or red, experiment with different types of sprinkles, or even drizzle with contrasting chocolate for an extra artistic touch.
- Ideal for Gifting: Packaged in cute boxes or cellophane bags, these homemade Christmas trees make heartfelt and impressive gifts for neighbors, teachers, friends, and family.
Essential Ingredients for Your Biscoff Christmas Tree Cookies
Creating these festive delights requires only a handful of readily available ingredients. The beauty of this recipe lies in its simplicity and the distinct flavors these components bring together.
- Biscoff Cookies: The star of our show! Opt for original Lotus Biscoff cookies, known for their unique crunchy texture and signature caramelized, spiced flavor. These flat, rectangular biscuits provide the perfect sturdy base for our chocolate trees. Ensure you have enough, as they’re notoriously addictive!
- White Chocolate: This forms the “tree” structure and acts as the canvas for your decorations. High-quality white chocolate chips, baking bars, or even candy melts will work well. If you find white chocolate overly sweet, a high-quality dark chocolate can be a sophisticated alternative, though it will change the visual aesthetic significantly. White chocolate also offers the flexibility to be colored with food-grade oil-based or gel food coloring if you desire green Christmas trees.
- Edible Silver Sparkling Balls: These small, shimmering spheres add a touch of elegance and mimic glistening ornaments on a tree. They provide a lovely texture contrast to the smooth chocolate.
- Mini Star Candies: Crucial for that quintessential Christmas tree topper! These tiny edible stars instantly transform your chocolate creation into a recognizable festive tree. Gold or yellow stars often work best to stand out.
- Edible Copper Sprinkles: Adding a touch of rustic charm and additional sparkle, copper sprinkles complement the silver balls beautifully. Feel free to explore other festive sprinkle mixes – anything from red and green jimmies to snowflake shapes can enhance your design.
Here’s another fun holiday treat to make at home: Check out this Easy Grinch Cookies Recipe
How to Make Biscoff Christmas Tree Cookies: A Step-by-Step Guide
Let’s dive into the simple, enjoyable process of transforming humble Biscoff cookies into enchanting Christmas trees. This guide will walk you through each step, ensuring perfect results every time.
Step 1: Preparing Your White Chocolate
The foundation of our Christmas trees is perfectly melted chocolate. Begin by breaking your white chocolate (chips or bar) into small, uniform pieces. Place these pieces into a microwave-safe bowl. Heat the chocolate in the microwave in short bursts – typically 30 seconds at a time – stirring vigorously after each interval. This method helps prevent scorching and ensures an even melt. Continue until the chocolate is smooth, creamy, and free of lumps. Alternatively, for a more controlled melting process, you can use a double boiler. Place a heat-proof bowl over a saucepan of simmering water, ensuring the bottom of the bowl does not touch the water. Stir gently until the chocolate is fully melted. Once melted, remove the chocolate from the heat and allow it to cool for a few minutes. It needs to be warm enough to be liquid and pipeable, but cool enough that it won’t melt the Biscoff cookies or immediately run off the sides. A slightly thicker consistency is ideal for piping.
Step 2: Gearing Up for Piping
Once your melted white chocolate has cooled slightly and achieved a pipeable consistency – not too hot and runny, but still fluid – it’s time to transfer it to a piping bag. For precision and ease, a standard piping bag fitted with a small round tip (or simply snipped end) works best. If you don’t have a dedicated piping bag, a sturdy resealable plastic bag makes an excellent substitute. Simply spoon the melted chocolate into one corner of the bag, push it down, and then snip off a small corner with scissors. The size of the snip will determine the thickness of your chocolate lines, so start small and you can always make it slightly larger if needed. Ensure your piping bag is ready before you start placing cookies.
Step 3: Constructing Your Chocolate Christmas Trees
Prepare your workspace by lining a large baking sheet with parchment paper. This non-stick surface is crucial to prevent the chocolate trees from sticking once they’ve set. Carefully place your Lotus Biscoff cookies onto the parchment paper, arranging them in a single layer with enough space between each to prevent them from touching. With your piping bag ready, hold it steady and begin piping the melted chocolate onto each cookie. Start approximately three-quarters of the way down from the bottom of the cookie, creating a horizontal line. Then, using a left-to-right and right-to-left zigzag motion, gradually pipe upwards, narrowing your lines as you go, to form the distinct triangular shape of a Christmas tree. Ensure you fill in all spaces as you move up, creating a solid chocolate tree. Refer to the provided photo for a clear visual guide on achieving the perfect shape. The goal is to make sure the chocolate covers enough of the cookie to create a stable and visually appealing tree.
Step 4: Decorating Your Festive Masterpieces
This is where the magic truly happens! The key to successful decoration is timing. While the chocolate is still wet and unset, immediately begin adorning your chocolate Christmas trees. This ensures that all your beautiful sprinkles and candies adhere firmly to the chocolate. Carefully place a mini star candy at the very top of each chocolate tree. Then, artfully scatter the silver sparkling balls and edible copper sprinkles over the entire chocolate surface. Don’t be shy; more sparkle equals more festive cheer! Feel free to get creative here – experiment with different colors, shapes, or even edible glitter to make each tree unique. The quicker you decorate after piping, the better everything will stick.
Step 5: Setting and Serving Your Sweet Creations
Once all your Christmas trees are decorated, it’s time to let the chocolate set completely. You can leave them at room temperature for several minutes, or for faster setting, carefully transfer the baking sheet to the refrigerator for about 10-15 minutes. The chocolate should be firm to the touch before handling. Once set, gently peel them off the parchment paper. Your stunning No-Bake Biscoff Christmas Tree Cookies are now ready to be enjoyed! Arrange them on a festive platter for your holiday gathering, package them as thoughtful gifts, or simply savor them with a warm cup of coffee or hot cocoa. Enjoy the delightful crunch of Biscoff combined with the creamy chocolate and festive sprinkles!
Tips for Perfect Biscoff Christmas Tree Cookies Every Time
- Quality Chocolate Matters: Using good quality white chocolate will result in a smoother melt and better flavor. Compound chocolate (candy melts) can be easier to work with for piping.
- Don’t Overheat Chocolate: Overheated white chocolate can seize and become grainy. Always melt slowly and stir frequently.
- Work Efficiently: Once you pipe the chocolate, it starts to set. Have all your sprinkles and decorations ready and handy so you can decorate immediately.
- Experiment with Colors: Add a drop or two of oil-based or gel food coloring (designed for chocolate) to your white chocolate to create green Christmas trees for an even more traditional look.
- Storage: Store the finished cookies in an airtight container at room temperature for up to a week, or in the refrigerator for extended freshness. Layer them with parchment paper to prevent sticking.
- Presentation: For gifting, place them in small cellophane bags tied with festive ribbons, or arrange them neatly in a decorative cookie tin.
These No-Bake Biscoff Christmas Tree Cookies are more than just a recipe; they are an invitation to create lasting holiday memories, share laughter, and spread joy through the simple act of making something sweet. Their ease of preparation, combined with their undeniable charm and delicious flavor, makes them an absolute must-try this festive season. So, gather your ingredients, call your little helpers, and get ready to craft some truly magical holiday treats that will delight everyone who sees and tastes them. Happy holidays and happy no-baking!
No-Bake Biscoff Christmas Tree Cookies