
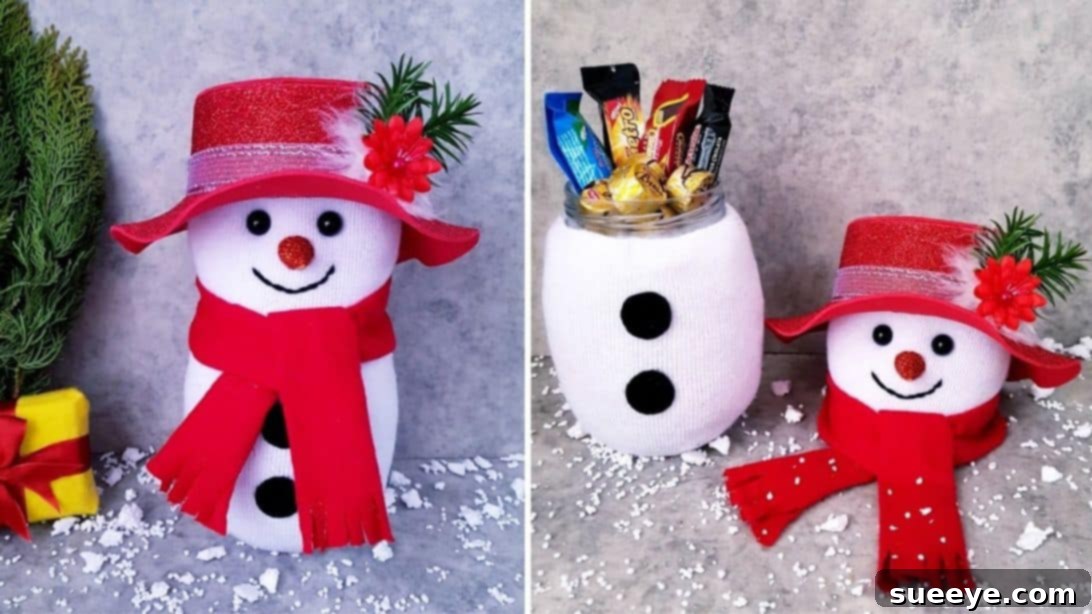
Craft a Charming DIY Snowman Candy Jar: Your Ultimate Guide
Embrace the spirit of the season with a delightful crafting project perfect for all ages! This comprehensive guide will walk you through creating an adorable DIY snowman candy jar using simple materials like an old mason jar and a pair of cozy socks. Imagine the smiles when loved ones discover sweet treats nestled inside this festive creation! More than just a candy holder, this charming snowman can serve as a whimsical decorative accent for your home, adding a touch of handmade warmth to any room during the holidays and beyond. It’s a fantastic way to personalize gifts, engage in a fun family activity, or simply enjoy the satisfaction of crafting something beautiful and functional. Get ready to transform everyday items into a cherished seasonal masterpiece. The process is incredibly straightforward, making it an accessible and rewarding project for both seasoned crafters and beginners alike.
This DIY snowman candy jar isn’t just a craft; it’s an opportunity to create lasting memories. Whether you’re making it as a thoughtful present for a child’s birthday, a unique Christmas gift, or a delightful party favor, its handmade charm is sure to impress. The element of surprise when opening the jar to find chocolates, candies, or small trinkets adds an extra layer of joy. Plus, it’s a wonderful way to upcycle materials, giving new life to items you might already have around the house. So, gather your supplies, prepare your workspace, and let’s dive into bringing this enchanting snowman to life!
Essential Materials for Your Snowman Candy Jar
Before you begin your crafting adventure, ensure you have all the necessary materials. Most of these items can be found readily at home, a local craft store, or a dollar store, making this an economical and convenient project. High-quality materials will contribute to a more durable and aesthetically pleasing final product, but feel free to substitute where appropriate based on what you have on hand.
- Mason Jar: A standard-sized glass mason jar with a lid (pint or quart size works well) will form the sturdy base of your snowman. Ensure it’s clean and dry.
- White Socks: You’ll need at least two white socks, preferably new or very clean ones without holes. Crew socks or ankle socks are ideal, as they provide sufficient fabric.
- Red Glitter: Fine red glitter will add a festive sparkle to your snowman’s hat, giving it that extra holiday flair.
- EVA Paper (Craft Foam): This versatile craft foam in orange (for the nose) and black (for hat details or body buttons) is easy to cut and shape, providing a durable finish.
- Black Buttons: Small black buttons will serve as the snowman’s eyes and body buttons, adding classic character.
- Fiber Filler (Polyester Fiberfill): This soft, fluffy material is essential for giving your snowman its plump, huggable shape. Cotton balls or fabric scraps can be used as an alternative.
- Silicone or Fabric Glue: A strong adhesive like silicone glue or a good quality fabric glue is crucial for securely attaching fabric to glass and other components.
- Hot Glue Gun and Glue Sticks: A hot glue gun offers quick and strong adhesion, perfect for assembling various parts of your snowman efficiently. Adult supervision is recommended when using a hot glue gun.
- Needle and Thread: A sewing needle and sturdy black thread will be used for attaching the button eyes and forming the snowman’s mouth.
- Thick Paper (Cardstock): Sturdy cardstock or thin cardboard is needed to create the structure for the snowman’s hat, ensuring it holds its shape.
- Red Cloth (Fabric Scraps): A small piece of red fabric, such as felt, fleece, or an old red t-shirt, will be transformed into the snowman’s cozy scarf.
Step-by-Step Instructions: Crafting Your Adorable Snowman Candy Jar
Follow these detailed steps carefully to create your beautiful snowman candy jar. Take your time with each stage, and don’t be afraid to add your own creative touches!
Step 1: Preparing the Mason Jar and Sock Body
Begin by taking one of your white socks. Carefully cut the sock just below the heel, ensuring a clean, even line. This larger portion of the sock will form the main body covering for your mason jar. Now, gently slide the cut sock over your mason jar, pulling it up until it covers the entire glass body. The elastic cuff of the sock should be positioned at the top of the jar, near the rim. Make sure the sock is stretched evenly and smoothly over the jar, with no significant wrinkles or bunched areas. A snug fit is ideal to give your snowman a smooth, uniform appearance.
Step 2: Giving Your Snowman its Shape and Securing the Fabric
Once the sock covers the jar, it’s time to add a bit of plumpness. Carefully fill the space between the sock and the glass jar with a thin, even layer of fiber filler. Use a needle or a thin stick to gently push and distribute the filler all around the jar, ensuring a smooth and consistent shape for your snowman’s body. The goal is to give it a soft, rounded contour without making it too bulky. Once you’re satisfied with the shape, apply a thin bead of silicone or fabric glue along the top edge of the sock, just under the rim of the glass jar. Press the sock firmly against the glass to secure it in place. This will prevent the sock from slipping and keep your snowman’s body neat and tidy.
Step 3: Creating the Snowman’s Head and Lid Attachment
Now, take the second white sock. Cut it in the middle, separating the toe portion from the cuff and heel section. You’ll primarily use the cuff/heel part for the head. Stuff this section generously with fiber filler, shaping it into a nice, round head for your snowman. Next, take the mason jar lid (the flat disk part, and possibly the ring if you want a more secure attachment). Apply hot glue around the edge of the lid and firmly press the stuffed sock portion onto it, wrapping the fabric around the lid. Trim off any excess fabric, leaving enough to secure the sock snugly to the lid. This creates a soft, plush head that will fit perfectly onto your candy jar.
Step 4: Bringing the Snowman’s Face to Life
With the head now formed, it’s time to add the snowman’s charming facial features. Using your needle and black thread, sew two black beads onto the stuffed sock for the snowman’s eyes. Position them appropriately to give your snowman a friendly expression. Next, draw a curved line just below the eyes to define the mouth. You can use black thread to stitch this curve or a black permanent marker for a simpler approach. For the nose, take your orange EVA paper and cut a small cone shape. Roll it tightly and secure it with a tiny dot of hot glue. Attach this mini-cone to the center of the snowman’s face, between the eyes and above the mouth, to complete its iconic carrot nose. Ensure all features are securely attached and symmetrical.
Step 5: Constructing the Base of the Snowman’s Hat
A snowman isn’t complete without a stylish hat! To create the base, cut a rectangle from your thick paper or cardstock measuring approximately 1.8 inches in height and 11.8 inches in length. This size is typically suitable for a standard mason jar lid, but you may adjust it slightly depending on your jar’s circumference. Apply hot glue along one of the shorter edges and carefully bring the two shorter edges together, overlapping slightly, to form a sturdy cylinder. This will be the main upright part of the hat. Next, cut a rectangle of the same dimensions from your black EVA paper. Wrap this EVA paper around the thick paper cylinder, securing it with hot glue. This gives the hat a neat, professional finish and adds durability.
Step 6: Crafting the Hat’s Brim
For the brim of the hat, place a piece of black EVA paper right side down. Trace a circle with a diameter of approximately 3.5 inches. Then, center your rounded paper cylinder from Step 5 on this circle and trace around its base. This will create a smaller inner circle. Carefully cut out both the larger circle and the smaller inner circle, creating a ring shape for the brim of the hat. To add a decorative touch, cut a small triangle from the outer rim of this ring (this can be for a subtle design feature or to help shape it if needed, though typically it refers to making a small notch). Apply a small amount of hot glue to the ends of the triangle cut (if applicable) or simply prepare the ring for assembly.
Step 7: Assembling and Decorating the Snowman’s Hat
Now, let’s put the hat together. Take the smaller circle you cut in Step 6 (the one you would have discarded from the center of the brim). Glue this small circle onto the top edge of the rounded EVA paper cylinder from Step 5. This forms the top of the hat. Next, carefully glue the ring-shaped brim (from Step 6) onto the bottom edge of the EVA paper cylinder, ensuring it’s centered and level. Once the basic hat structure is assembled, it’s time to decorate! Wrap a festive ribbon around the base of the hat, securing it with a small dot of hot glue. For an extra touch of holiday cheer, you can decorate the ribbon with a tiny sprig of artificial greenery, a small berry, or a sprinkle of red glitter. Finally, place the completed hat gently on top of the snowman’s head, positioning it charmingly. You can use a tiny amount of hot glue to secure it if desired, but often it will sit nicely.
Step 8: Adding the Scarf and Finishing Touches
To give your snowman a cozy and colorful touch, cut a rectangle from your red cloth measuring approximately 22.7 inches in length and 3.5 inches in width. This length allows for a nice tie, but you can adjust it based on preference. Add a thin line of hot glue along one of the long edges of the fabric rectangle, then carefully fold it in half lengthwise, pressing the edges together to create a neat strip. Once the glue is dry, flip it right side out if needed to hide the seam. Now, gently wrap this red fabric strip around the bottom of the snowman’s head, just above where the jar meets the head. Tie it into a simple knot or a small bow to create a charming scarf. For a classic look, cut small fringes into the ends of the scarf. Finally, cut two small black circles from your EVA paper or use two small black buttons. Glue these onto the front of the snowman’s body (the sock-covered jar) to represent the snowman’s coal buttons. And there you have it – your adorable and fully personalized snowman candy jar is complete!
Why Choose a DIY Snowman Candy Jar?
Creating your own snowman candy jar offers a myriad of benefits beyond just having a cute decoration. Firstly, it’s an incredibly **cost-effective** project. By repurposing old mason jars and socks, you’re giving new life to items that might otherwise be discarded, making it an eco-friendly choice. Secondly, it’s a fantastic **family activity**. Kids and adults alike can participate in different stages of the craft, fostering creativity, fine motor skills, and precious bonding time. Imagine the pride in a child’s eyes as they see their handmade snowman proudly displayed! Thirdly, these jars make for incredibly **personal and thoughtful gifts**. A store-bought gift, while nice, often lacks the personal touch of a handmade item. Filling your snowman jar with homemade cookies, a favorite candy, or even a small, personalized note transforms it into a truly memorable present for teachers, friends, neighbors, or grandparents.
Furthermore, a DIY snowman candy jar is wonderfully **versatile**. It’s not limited to holding just candy. You can fill it with small craft supplies for a creative friend, hot cocoa mix and mini marshmallows for a cozy gift, bath bombs for a self-care package, or even small holiday trinkets. As a **decorative piece**, it brings warmth and cheer to any part of your home – a centerpiece on the dining table, a whimsical accent on a mantelpiece, or a festive touch in a child’s bedroom. Its timeless appeal ensures it can be enjoyed season after season, becoming a beloved part of your holiday traditions.
Creative Customization Ideas for Your Snowman Jar
While the basic instructions provide a classic snowman look, don’t hesitate to let your creativity shine through! Here are a few ideas to customize your DIY snowman candy jar:
- **Hat Variations:** Instead of a traditional top hat, consider a knitted beanie made from a colorful glove finger, a Santa hat from felt, or a whimsical jester hat. Decorate with pom-poms, jingle bells, or different ribbons.
- **Scarf Styles:** Experiment with different fabric patterns and textures for the scarf. Plaid, polka dots, or a fuzzy fleece can add unique charm. You could also knit or crochet a mini scarf for an extra special touch.
- **Facial Expressions:** Give your snowman personality! Use buttons of different sizes or shapes for eyes, or embroider eyelashes. Change the mouth to a wide smile, a surprised “O,” or even a cheeky wink. Add rosy cheeks with a dab of pink blush or paint.
- **Body Embellishments:** Instead of simple black buttons, use colorful buttons, beads, or even small fabric cutouts for the body. You could also add tiny felt arms with pipe cleaner fingers or small twig arms for a rustic look.
- **Themed Snowmen:** Create a themed snowman! A “baker snowman” could have tiny cookie cutters as buttons, a chef’s hat, and a miniature rolling pin. A “gardener snowman” could have a tiny flowerpot hat and a little trowel.
- **Glitter & Sparkle:** Beyond the red glitter on the hat, you can lightly dust the entire snowman with iridescent glitter for a magical, snow-like shimmer.
- **Color Palettes:** While white is traditional, don’t shy away from using light blue, cream, or even subtle pastel-colored socks for the body. Coordinate the hat and scarf colors accordingly.
Beyond Candy: Other Wonderful Uses for Your Snowman Jar
Once your charming snowman candy jar is complete, its utility extends far beyond just holding sweets. Its adorable design makes it a versatile container for a variety of items, perfect for gifting, organizing, or decorating:
- **Hot Cocoa Kit:** Fill the jar with layers of hot cocoa mix, mini marshmallows, chocolate chips, and perhaps a candy cane. It’s a delightful gift for a cold winter’s night.
- **Craft Supply Holder:** Use it to store small craft items like buttons, beads, glitter, or sewing notions. It adds a touch of whimsy to any craft room.
- **Stationery Organizer:** Perfect for holding pens, pencils, markers, or even paperclips on a desk. It makes working a little more cheerful.
- **Small Toy Storage:** A fun place for kids to keep their tiny toys, small building blocks, or other treasures.
- **Spa Day in a Jar:** Fill it with small soaps, bath salts, a face mask packet, and a luxurious hand cream for a relaxing gift.
- **Coin Bank:** It can double as a festive coin bank, encouraging saving with a cheerful helper.
- **Cookie Mix in a Jar:** Layer the dry ingredients for your favorite cookie recipe, attach the wet ingredient instructions, and you have a delicious and convenient gift.
- **Pet Treat Dispenser:** For pet lovers, fill it with small, individually wrapped pet treats.
The possibilities are truly endless, limited only by your imagination. This DIY snowman candy jar is more than just a craft; it’s a blank canvas for your creativity and a charming addition to your home or a heartfelt gift for someone special.
Final Thoughts: Enjoy Your Handmade Masterpiece!
Congratulations! You’ve successfully crafted your very own adorable snowman candy jar. This project is a testament to the joy of handmade creations and the warmth they bring to any home. Whether your snowman is filled with delicious treats, acting as a festive centerpiece, or given as a heartfelt gift, it’s sure to bring smiles and holiday cheer. Each time you look at it, you’ll be reminded of the fun and creativity you poured into making it. We hope you enjoyed every step of this simple yet rewarding DIY journey. Share your creations with friends and family, and inspire others to embark on their own crafting adventures. Happy crafting and happy holidays!