
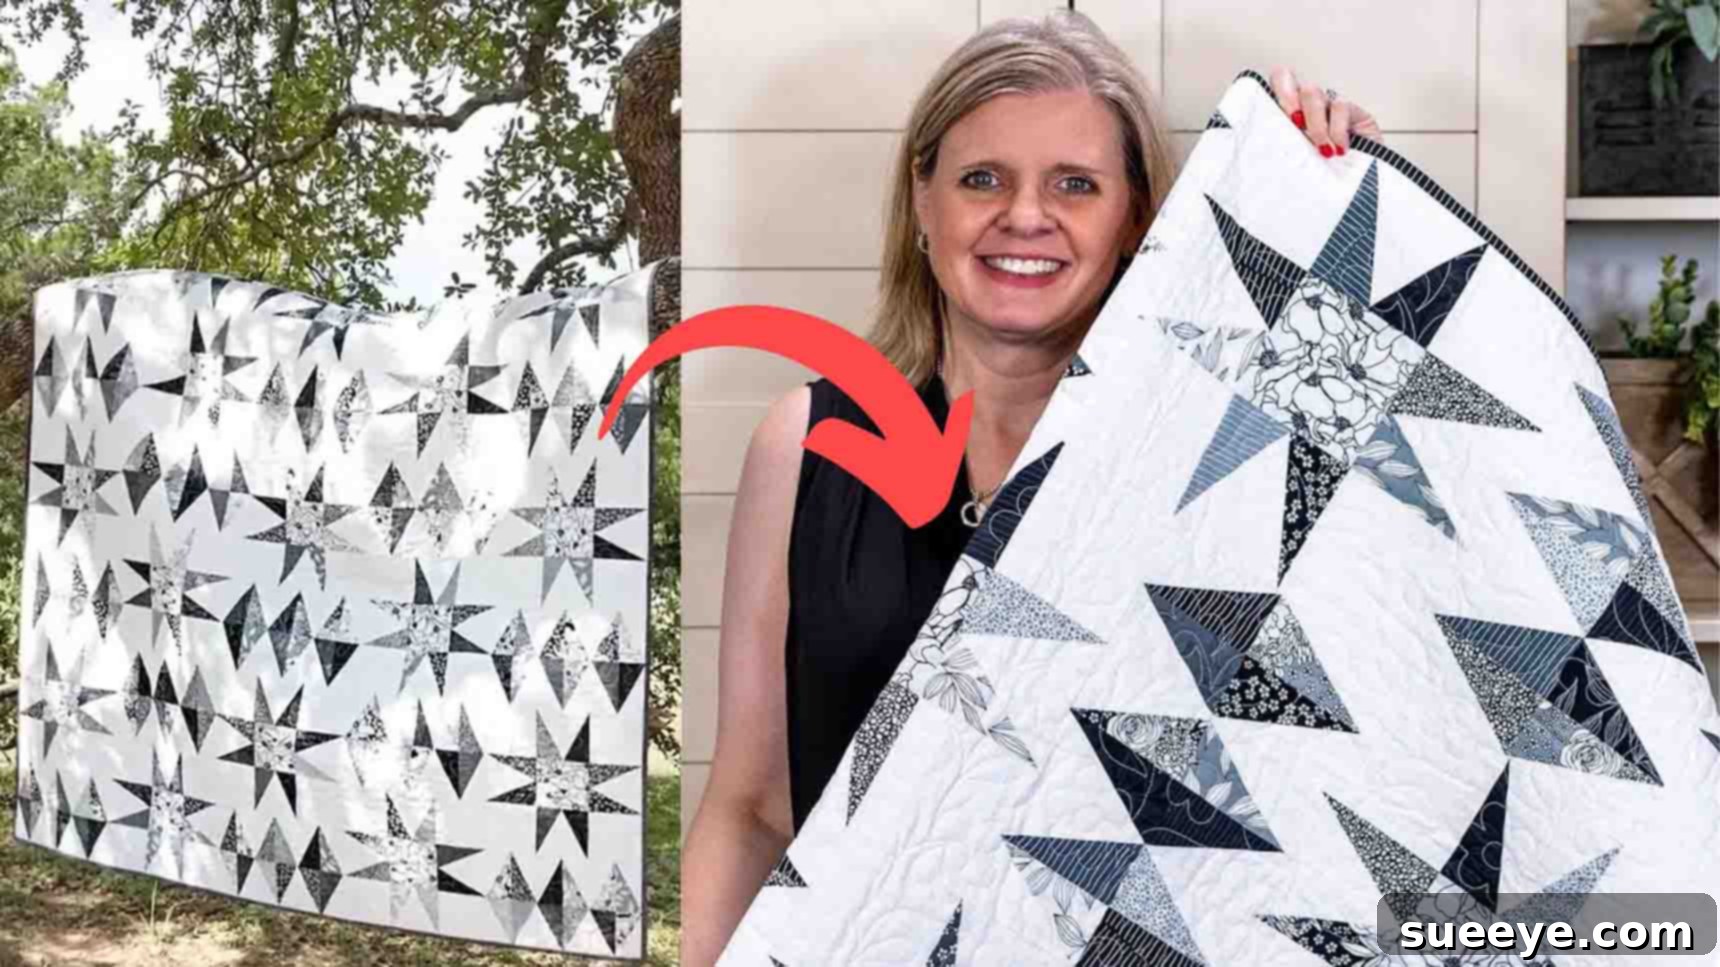
Are you searching for a quilt pattern that combines a sophisticated, professional appearance with remarkable ease of construction, making it perfect for quilters of all skill levels, especially beginners? Look no further! The stunning Black Diamond Quilt, brought to you by the experts at Fat Quarter Shop on YouTube, is an exquisite project that promises to transform your quilting journey. While diamonds might traditionally be a symbol of luxury, crafting them in fabric is a surprisingly straightforward and incredibly rewarding experience. This magnificent quilt, featuring an intricate diamond design, is far simpler to create than its impressive finished look suggests. Dive into this comprehensive guide, which expands upon the original tutorial, to discover the step-by-step instructions and master the art of making this beautiful quilt.
Master the Black Diamond Quilt: A Beginner-Friendly Guide to Stunning Half Rectangle Triangles
The allure of a beautifully crafted quilt often lies in its seemingly complex patterns. However, the secret to many show-stopping designs, like the Black Diamond Quilt, is often found in simplified techniques and clear guidance. This particular pattern ingeniously utilizes Half Rectangle Triangles (HRTs) to construct striking diamond shapes that create a dazzling visual effect. Whether you’re a seasoned quilter looking for a quick yet elegant project or a beginner eager to tackle something that looks advanced but is genuinely achievable, this pattern is your perfect match. Prepare to impress your friends and family with a handmade quilt that radiates professionalism and charm.
Why The Black Diamond Quilt Is Your Next Must-Make Project
Many quilters shy away from patterns involving intricate shapes, assuming they require advanced skills. The Black Diamond Quilt challenges this notion by providing a clear, step-by-step method to create dynamic diamond motifs using accessible Half Rectangle Triangle units. This project is ideal for honing your precision piecing skills without feeling overwhelmed. Its visual impact comes from the clever arrangement of contrasting fabrics, making your chosen prints truly pop. Beyond its aesthetic appeal, crafting this quilt is an incredibly satisfying experience, culminating in a durable, beautiful heirloom that can be cherished for years to come. Imagine the joy of snuggling under a quilt you’ve made yourself, one that looks like it came from a high-end boutique but carries the personal touch of your own hands.
Moreover, the Half Rectangle Triangle (HRT) technique is a versatile tool in any quilter’s arsenal. By mastering it with this pattern, you unlock potential for countless other designs. The Black Diamond Quilt allows for immense creativity in fabric selection; choose bold, modern prints for a contemporary look, or opt for softer, traditional florals for a classic aesthetic. This flexibility ensures that your finished quilt will not only be a testament to your skills but also a unique reflection of your personal style. It’s an ideal project for using up those beloved fat quarters you’ve been stashing, giving them a purpose in a stunning display.
Essential Materials for Your Black Diamond Quilt
Gathering the right materials is the first crucial step towards a successful quilting project. For the Black Diamond Quilt, you’ll need a carefully selected palette of fabrics that will bring your diamond design to life. The original pattern uses a striking contrast between a background fabric and a variety of fat quarters, creating a dynamic visual interplay. Remember, quality materials not only make the quilting process smoother but also ensure the longevity and beauty of your finished quilt.
- 4 yards of Background Fabric: This fabric provides the canvas against which your vibrant diamond blocks will truly stand out. Choose a solid or a subtle tone-on-tone print that complements your chosen fat quarters without competing with them. A light, neutral color often works best to enhance the ‘pop’ of the diamonds.
- 17 Fat Quarters (Block Prints): Fat quarters are perfect for this project as they offer a wide variety of prints and colors without requiring large cuts of each. This allows for a diverse and engaging visual texture across your quilt blocks. They provide an economical way to incorporate many different patterns.
- 1/2 yard Block Accent Fabric: This accent fabric will add a touch of definition or a subtle pop within your blocks, tying the design together. It can be a contrasting solid or a complementary print.
- 5/8 yard Binding Fabric: The binding provides a clean, durable edge to your quilt and is an opportunity to introduce a final coordinating or contrasting color. Consider a fabric that frames the quilt beautifully.
- 4 yards of Backing Fabric: The backing forms the underside of your quilt, providing warmth and stability. This can be a continuation of your background fabric or a complementary print that adds another layer of interest and softness.
Precise Cutting Instructions
Accuracy in cutting is paramount in quilting, as it directly impacts how well your pieces fit together. Take your time with this step, using a sharp rotary cutter, a reliable quilting ruler, and a self-healing mat. Following these dimensions precisely will set you up for success in assembling your Black Diamond Quilt blocks. For a visual guide and a printable pattern, be sure to utilize the free PDF linked below. Always double-check your measurements before making a cut.
- Fabric A (using background fabric) – 60 – 4 & 1/2″ squares
- Fabric B (using background fabric) – 150 – 4″ x 6″ rectangles
- Fabric C (using each fat quarter) – 9 – 4″ x 6″ rectangles (153 total, allowing for a few extras)
- Fabric D (using block accent) – 15 – 4 & 1/2″ squares
- Fabric E (using binding) – 7 – 2 & 1/2″ x WOF (Width Of Fabric, typically 42″)
- Don’t forget to grab your free Black Diamonds Quilt pattern PDF here for detailed visuals and instructions, which will be an invaluable resource.
Step-by-Step Guide to Crafting Your Black Diamond Quilt
Now that your materials are prepared and cut with precision, it’s time to embark on the exciting journey of piecing your Black Diamond Quilt. Each step builds upon the last, so taking your time and understanding the purpose behind each action will lead to a beautifully finished project. The key to successful Half Rectangle Triangles (HRTs) lies in careful marking, accurate stitching, and precise trimming. Remember that a scant 1/4-inch seam allowance is crucial throughout this project.
Preparation: The Foundation of Success
Before you even make your first stitch, ensure your workspace is organized and your tools are ready. Pre-wash and press your fabrics to prevent future shrinkage and remove any sizing, making them easier to work with. Make sure your rotary cutter has a sharp blade, as dull blades can lead to imprecise cuts and frayed edges. This project relies heavily on a scant quarter-inch seam allowance, so it’s advisable to test your machine’s seam allowance settings on scrap fabric before beginning. A good quality pressing iron and a flat ironing surface will also be your best friends throughout this process, ensuring crisp, flat seams and ultimately, a professional-looking quilt.
Step 1: Mastering the Half Rectangle Triangles (HRTs) – The Building Blocks
The Half Rectangle Triangle (HRT) units are the heart of the Black Diamond Quilt, forming the pointy elements that create the diamond illusion. You will be making two types of HRT units: “left” and “right,” which mirror each other. This step is repeated multiple times, so getting the technique down pat is essential for consistency.
Begin by taking 75 of your Fabric B rectangles (background fabric), measuring 4″ x 6″. On each of these, draw a diagonal line from the top-left corner to the bottom-right corner using a fabric-safe marking tool. This line will serve as your guide for alignment and eventual cutting. Next, take a Fabric C rectangle (block print), also 4″ x 6″, and align it on top of a marked Fabric B rectangle. Ensure the top-left point of Fabric C aligns precisely with the top-left point of Fabric B, and the bottom-right point of Fabric C aligns with the bottom-right point of Fabric B. Pin them securely in place along the edges and through the center to prevent any shifting during stitching.
Now, using your quilting ruler, draw two additional lines: one a scant 1/4 inch away from your initial drawn line towards the top-left corner, and another scant 1/4 inch away towards the bottom-right corner. These lines are your stitching guides. It’s often beneficial to slightly reduce your stitch length by one setting from your normal piecing stitch length (e.g., from 2.5 to 2.0); this helps prevent seams from coming undone when the fabric is trimmed. Stitch precisely along these two outer lines you just drew. It is crucial NOT to stitch on the original center line.
Once stitched, take your ruler and place it directly on the original center line you drew. Carefully cut along this center line with your rotary cutter. This action will yield two distinct units. Gently press the seams open for both pieces. Pressing seams open helps to reduce bulk, prevents shadowing of darker fabrics through lighter ones, and creates flatter blocks, contributing to a more precise finished quilt. After pressing, grab your specialized half-rectangle trimmer (or a regular ruler if you’re confident) and your rotary cutter. Align your trimmer with the diagonal seam and trim your units to the specified size (check your free pattern for exact dimensions, typically 3.5″ x 5.5″ unfinished). This trimming step is critical for achieving perfectly sized and shaped HRT units. You will need to make 150 of these “right” HRT units, often referred to as ‘mirror image’ units.
Step 2: Uniting Your Half Rectangle Triangles
Now, it’s time to create the “left” HRT units, following a similar method but with an opposite orientation to ensure a mirror image. Take the remaining 75 Fabric B rectangles. On these, draw a diagonal line from the bottom-left corner to the top-right corner. Place a Fabric C rectangle on top, aligning the bottom-left point of Fabric C with the bottom-left point of Fabric B, and the top-right point of Fabric C with the top-right point of Fabric B. Pin securely in place.
As before, draw lines a scant 1/4 inch away from your center marked line on both sides. Stitch along these two outer lines. Position your ruler precisely on the center line and cut. Press the seams open and trim these units to the correct size using your half-rectangle trimmer, just as you did with the first set. You will also make 150 of these “left” HRT units. This methodical approach ensures consistency across all your components.
With both “right” and “left” HRT units ready, you will now join them to form larger, more intricate components of your quilt block. These combined units are what truly form the “pointy” part of your diamond design. Take one “right” unit and one “left” unit. Carefully align them, paying close attention to matching the seams where the two units meet along the diagonal. It’s critical for these points to meet perfectly to achieve sharp diamond edges. Pin them at the top and bottom, and often in the middle, to ensure the seams remain perfectly aligned during stitching. Stitch these two units together with a precise scant 1/4-inch seam allowance. This step is crucial for the diamond points to meet perfectly. After stitching, press the new seam open to reduce bulk. You will need to create 60 of these combined units for your quilt blocks, so repetition and attention to detail will be key.
Step 3: Assembling the Striking Quilt Block
With your combined HRT units ready, it’s time to assemble the complete Black Diamond quilt block. Each block will showcase a central Fabric D square surrounded by your dynamic HRT units and framed by Fabric A squares. Visualizing the layout before stitching is key to success; a design board or simply a flat surface helps immensely.
Begin by laying out the components for one block on a flat surface. In the center, place one Fabric D square (your block accent), which should be 4 & 1/2″ square. Around this central square, arrange four of your previously created combined HRT units, orienting them so their “pointy” ends face outwards, creating the diamond effect. Then, place four Fabric A squares (background fabric), also 4 & 1/2″ squares, on the outside corners of this arrangement, filling in the remaining spaces. This layout will form a 3×3 grid of units, creating the iconic Black Diamond pattern.
Once you are satisfied with your layout, begin stitching the units together, row by row. Start by sewing the three units in the top row together with a scant 1/4-inch seam allowance. Press the seams open or to one side, alternating directions for each row to help with nesting seams later. For example, press the top row’s seams to the left. Repeat this for the middle row (pressing seams to the right) and the bottom row (pressing seams to the left). After each row is sewn and pressed, you will have three separate strips.
Finally, sew these three rows together, carefully aligning the seams between the rows. Pin generously, especially where seams meet, to ensure your points align perfectly. Stitch with a scant 1/4-inch seam, and then press the entire block flat. Pressing after each seam and after completing the block is vital for achieving a professional, crisp finish and ensuring your blocks lie flat. Congratulations, you’ve completed your first Black Diamond Quilt block! You will need to create a total of 15 blocks for the quilt top, repeating Steps 1-3 for each one.
Step 4: Creating Multiple Blocks for Your Quilt Top
With the technique for a single block mastered, the next phase involves creating all the necessary blocks for your entire quilt top. The Black Diamond Quilt, as designed by Fat Quarter Shop, typically utilizes 15 of these striking blocks arranged in a 3×5 grid. Consistency is key here. As you repeat the process of making HRTs, joining them, and assembling blocks, strive for uniform sizing and accurate seam allowances. This dedication to precision in each individual block will pay dividends when you assemble the full quilt top, ensuring all your blocks fit together seamlessly without puckering or misalignment. Consider chain piecing identical units to speed up the process and maintain consistency. For example, prepare all your “right” HRTs, then all your “left” HRTs, and then join them in batches before assembling the full blocks. This method not only saves time but also helps to establish a rhythm, leading to more consistent results.
As you accumulate blocks, lay them out periodically on a design wall or a clean floor space. This allows you to visualize your progress, check for any color distribution issues, and ensure that all your blocks are roughly the same size. Minor discrepancies can often be fixed with careful pressing or a tiny trim, but catching them early prevents larger problems down the line.
Step 5: Assembling the Quilt Top
Once you have all 15 of your beautifully crafted Black Diamond blocks, it’s time to bring them together to form the complete quilt top. Lay out your blocks on the floor or a large design wall in a 3×5 arrangement. Take a moment to experiment with the placement of your blocks, especially if you have used a variety of fat quarters. You might want to distribute colors and patterns evenly, create specific focal points, or ensure there isn’t an unintentional clustering of similar fabrics. Once you are happy with the arrangement, take a picture for reference before moving any blocks.
Begin by sewing the blocks together into rows. For a 3×5 layout, you will create five rows, each containing three blocks. Sew the blocks within each row using a scant 1/4-inch seam allowance. As always, press your seams carefully. For joining rows, it’s often helpful to press seams in alternating directions for adjacent blocks within a row. For example, if you press the seams of the first row to the right, press the seams of the second row to the left. This technique, known as “nesting seams,” allows the seams to interlock perfectly when you join the rows, reducing bulk and helping your points align precisely. After all rows are assembled and pressed, it’s time to join them. Pin the rows together, paying extra attention to aligning the horizontal seams where the blocks meet. Stitch with a scant 1/4-inch seam, and then press the final seams open or in a consistent direction across the back of your quilt top to maintain flatness.
Step 6: Layering, Quilting, and Finishing Your Masterpiece
With your stunning Black Diamond quilt top complete, the final stages involve transforming it into a functional and cozy quilt. This process includes basting, quilting, and binding, each essential for a durable and beautiful finish.
- Basting: This critical step involves creating the “quilt sandwich” by layering your quilt backing (wrong side up), then your batting (the fluffy middle layer), and finally your quilt top (right side up). Ensure all three layers are smooth and free of wrinkles or puckers. Secure these layers together using your preferred basting method: spray basting (using temporary adhesive spray), pin basting (with safety pins placed every few inches), or hand basting with long stitches. The goal is to keep all three layers from shifting during the quilting process, preventing puckers and folds.
- Quilting: Now for the fun part – adding texture and stability! Quilting stitches hold the three layers of the quilt sandwich together. You can choose to quilt by hand for a traditional, soft look or by machine for speed and durability. Machine quilting can involve simple straight lines following your seam lines (often called “stitch-in-the-ditch”), free-motion quilting with intricate designs, or using a walking foot for wavy or meandering patterns. Consider the overall design of your Black Diamond Quilt; sometimes, simple quilting patterns can highlight the piecing rather than distract from it. If you’re new to quilting, straight lines or a simple grid pattern are excellent starting points to build confidence.
- Binding: The binding is the final edge that encases the raw edges of your quilt, providing durability and a polished, professional finish. Using your Fabric E (binding fabric), prepare your binding strips by sewing them end-to-end (usually on the diagonal to reduce bulk) to create one long continuous strip. Press this strip in half lengthwise, wrong sides together. Attach the raw edge of the binding to the front raw edge of your quilt, aligning carefully, and stitch with a scant 1/4-inch seam, mitering the corners as you go. Turn the folded edge of the binding to the back of the quilt, press, and hand-stitch or machine-stitch it in place, ensuring neat corners.
Once the binding is complete, give your quilt one final press. Your Black Diamond Quilt is now ready to be enjoyed, displayed, or gifted, a true testament to your creativity and hard work!
Tips for a Flawless Black Diamond Quilt
Achieving a professional-looking quilt often comes down to a few key techniques and habits that elevate your work. Keep these tips in mind as you work on your Black Diamond Quilt to ensure a flawless finish:
- Scant 1/4″ Seam Allowance: This is the golden rule in quilting. A “scant” quarter-inch means your seam is just a thread’s width less than a true 1/4 inch. This small adjustment accounts for the fabric taken up when pressing seams open or to the side, ensuring your block dimensions remain accurate. Practice on scraps to find your machine’s perfect scant 1/4″.
- Pressing vs. Ironing: In quilting, we “press” seams, which means lifting and placing the iron down, rather than sliding it across the fabric. Sliding can stretch and distort your fabric, especially bias edges. Pressing creates crisp, flat seams and accurate blocks that lie perfectly flat.
- Chain Piecing: To save time and thread, especially when making many identical units like HRTs, use chain piecing. Stitch your first unit, then without lifting the presser foot or cutting the thread, feed the next unit directly under the needle. Continue this for all identical units. Once all units are stitched, you can snip them apart, creating a chain.
- Test Blocks: If you’re unsure about a new technique or pattern, or want to verify your seam allowance, make a test block or unit using scrap fabrics. This allows you to identify and correct any issues before cutting into your precious project fabrics, saving time and potential frustration.
- Stay Organized: With many small pieces, it’s easy to get confused. Keep your cut pieces organized by fabric type and step using labeled bins, plastic baggies, or a design board. This streamlines your workflow and reduces errors.
- Watch the Video Tutorial: While this guide provides extensive detail, the original Fat Quarter Shop video tutorial offers a visual demonstration that can clarify any steps. Seeing the process in action often provides insights that text alone cannot, especially for intricate steps like HRT construction.
- Embrace Patience: Quilting is a meditative art. Don’t rush the process. Take breaks when you feel fatigued, and enjoy each step of the creation. Patience will lead to higher quality results and a more enjoyable experience.
Conclusion: Enjoying Your Handcrafted Masterpiece
Creating the Black Diamond Quilt is more than just following a pattern; it’s a journey of skill development, creativity, and patience. From the initial precise cuts to the final binding stitch, each step contributes to a stunning finished product that you can be immensely proud of. The Half Rectangle Triangle technique, once mastered, opens up a world of design possibilities, and this quilt serves as an excellent foundation for future projects. You’ve not only made a beautiful quilt but also gained valuable experience that will empower your next quilting adventures.
Whether you choose to drape it over a sofa, spread it on a bed, or gift it to a loved one, your Black Diamond Quilt will be a testament to your dedication and growing expertise. Its elegant design and your personal touch will make it a cherished item for years to come. So, gather your fabrics, sharpen your rotary cutter, and embark on this rewarding quilting adventure. The beautiful result will be a handmade treasure that brings warmth, comfort, and a touch of professional elegance to any home. Happy quilting!