
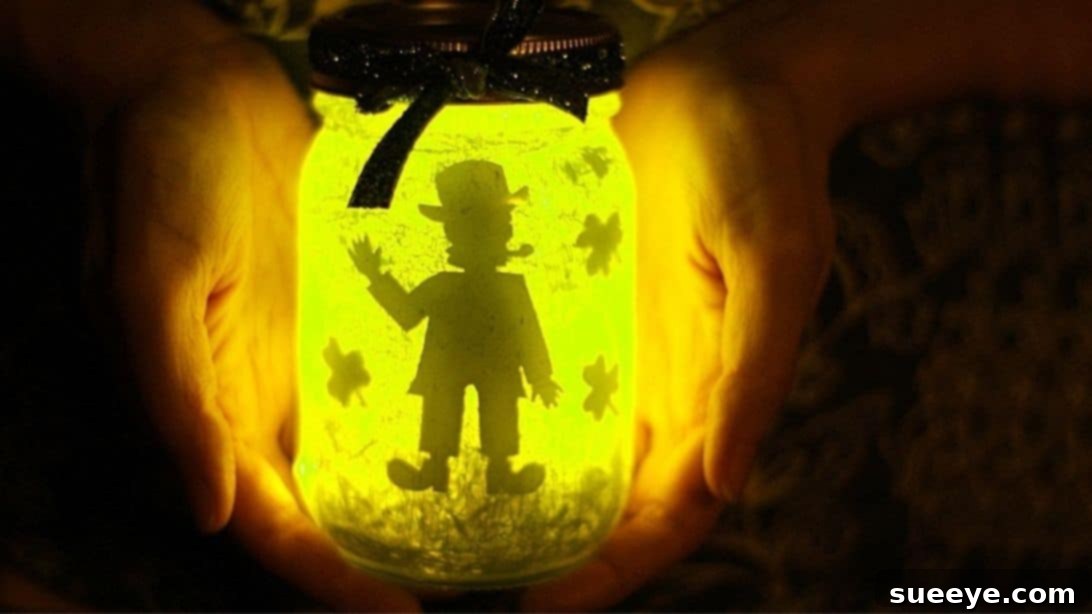
As St. Patrick’s Day approaches, the air fills with anticipation for festive green decorations, lucky shamrocks, and a touch of leprechaun magic. What better way to capture this whimsical spirit than by creating your very own glowing leprechaun mason jar? This enchanting DIY project is not only incredibly simple to make but also serves as a captivating centerpiece or a charming gift that will light up any space with a soft, ethereal glow. Imagine a tiny leprechaun silhouette, surrounded by a bed of artificial moss, bathed in the warm light of fairy lights, all contained within a humble mason jar. It’s a delightful spectacle that brings a piece of the Emerald Isle right into your home.
This tutorial will guide you through crafting this magical glowing jar with ease, ensuring you have a fantastic St. Patrick’s Day decoration that sparkles with charm. Whether you’re a seasoned crafter or just starting, the steps are straightforward, promising a rewarding experience. Get ready to transform ordinary materials into an extraordinary piece of holiday decor, inspired by the creative vision of Sarah Johnson – EssyJae, whose quick video tutorial on YouTube makes this craft accessible to everyone. Let’s gather our materials and embark on this enchanting journey!
Materials for Your Magical Leprechaun Jar
To bring your glowing leprechaun mason jar to life, you’ll need a few readily available craft supplies. Each item plays a crucial role in creating the desired magical effect. Here’s what you’ll need:
- Mason Jar: A clean, clear glass jar is your canvas. Any size works, but larger jars offer more space for your design and light.
- Acrylic Paint, Light Green (or Neon Green): This will create the base glow inside your jar, setting the mystical tone. Neon green can amplify the luminescence.
- Acrylic Paint, Black: Essential for crafting the sharp, striking silhouettes of your leprechaun and shamrocks.
- Paintbrush: Various sizes can be helpful – a larger one for the jar’s interior and a finer one for detail if you choose to hand-paint your patterns.
- Paper: Plain white paper is perfect for sketching or printing your leprechaun and shamrock designs.
- Pen: For drawing your patterns onto the paper before cutting.
- Fairy Lights (LED string lights): These are the heart of your glowing effect. Battery-operated ones are ideal for portability and ease of placement within the jar. Choose warm white or a soft green for the most magical ambiance.
- Artificial Moss or Grass: To create a whimsical, natural-looking base for your leprechaun’s tiny world inside the jar.
- Clear Tape: For securely attaching your painted patterns inside the jar without distracting from the silhouette.
- Green Glittered Ribbon: A decorative touch to tie around the lid, adding extra sparkle and festive flair.
- Scissors: For cutting out your paper patterns and the ribbon.
Crafting Your Glowing Leprechaun Mason Jar: Step-by-Step Guide
Step 1: Preparing Your Jar and Crafting Your Silhouettes
The first step in creating your magical leprechaun jar involves preparing your canvas and bringing your mystical figures to life. Begin by selecting a clear mason jar. Ensure it is thoroughly cleaned and completely dry, inside and out. Any residue or moisture can affect the paint application and overall finish. A sparkling clean jar allows for the best light transmission and paint adhesion.
Next, it’s time to infuse the jar with a touch of St. Patrick’s Day magic. Take your light green or neon acrylic paint and brush it evenly onto the entire interior surface of the jar. The key here is to achieve a consistent, opaque coating. You might need to apply two or even three thin coats, allowing each layer to dry completely before applying the next, to prevent streaks and ensure a vibrant, uniform glow. This inner layer of green paint will create a soft, luminous backdrop for your leprechaun’s silhouette when the fairy lights are added. Set the painted jar aside in a well-ventilated area to dry thoroughly. Patience during this drying phase is crucial for a professional-looking finish.
While your jar dries, turn your attention to creating the enchanting silhouettes. On plain white paper, use a pen to draw your desired leprechaun and shamrock patterns. Think about iconic leprechaun elements like a pointy hat, a buckled shoe, a pot of gold, or classic three-leaf and four-leaf clovers. If drawing isn’t your forte, don’t hesitate to print out templates from online resources to save time and ensure crisp designs. Once you’re satisfied with your patterns, carefully cut them out using scissors. Precision in cutting will result in sharper, more defined silhouettes. After cutting, lay your paper patterns flat on a protected surface (like an old newspaper or another sheet of paper). Now, take your black acrylic paint and a paintbrush and carefully paint over each cut-out pattern. Ensure the black paint fully covers the entire surface of each paper cut-out. The goal is to create solid, dark figures that will stand out sharply against the green-painted jar and the fairy lights. Once painted, leave these black patterns to dry completely. They should be completely dry to the touch to prevent smudging during assembly.
Step 2: Assembling Your Magical Glowing Mason Jar
With your painted jar and dried silhouettes ready, it’s time for the exciting assembly phase where everything comes together to create your glowing masterpiece. First, check that the light green paint inside your mason jar is absolutely dry. Any remaining dampness could cause issues later. Once confirmed dry, proceed to create the enchanting base of your leprechaun’s miniature world. Gently insert a layer of artificial moss or grass at the bottom of the jar. Press it down lightly to create a stable, natural-looking foundation. This greenery adds texture and depth, making the scene feel more authentic and magical. You can use various shades of green moss or even small pebbles for a different effect.
Next, carefully place your fairy lights inside the jar. If using battery-operated lights, ensure the battery pack is accessible near the opening or secured at the bottom where it won’t interfere with the design. Arrange the string of lights around the inside of the jar, trying to distribute them evenly to ensure a consistent glow. The goal is to have the light dispersed throughout the jar, creating an illuminated backdrop for your silhouettes.
Now, take your dried black leprechaun and shamrock cut-outs. Apply small pieces of clear tape to the back of each piece. Carefully attach these silhouettes to the inside wall of the jar. Experiment with placement to find where their silhouettes show up best when illuminated. You want them to be prominent against the green background and the fairy lights, creating a captivating visual effect. You might place the leprechaun near the bottom, peeking out from the moss, with shamrocks floating higher up, or scattered around for a whimsical feel. Adjust the wires of the fairy lights as needed to ensure they don’t obstruct your silhouettes and that they provide optimal lighting.
Once you are happy with the arrangement and the lights are positioned, securely close the lid of the jar. This helps contain the light and keeps your internal display pristine. For the perfect finishing touch, grab your green glittered ribbon. Tie it around the neck of the jar or the lid, forming a beautiful bow. The glitter will catch the light, adding an extra sparkle to your already glowing creation. You can also experiment with different types of ribbons, like a plain green satin or even a plaid St. Patrick’s Day themed ribbon.
Why You’ll Love This DIY St. Patrick’s Day Craft
Creating this glowing leprechaun mason jar is more than just a craft project; it’s an experience that offers numerous benefits. Firstly, it provides a wonderful opportunity for creative expression, allowing you to personalize your St. Patrick’s Day decor. Secondly, it’s a budget-friendly way to add festive cheer to your home, transforming simple materials into something truly special. DIY projects like this also offer a sense of accomplishment and can be incredibly therapeutic, providing a relaxing break from daily routines. Moreover, it’s an excellent activity for families, encouraging bonding and shared creativity as you work together to bring a touch of magic into your living space. The end result is a unique, handmade decoration that carries a personal touch, unlike anything you could buy in a store.
Tips for a Flawless Finish
To ensure your glowing leprechaun jar turns out as magical as possible, consider these helpful tips:
- Layering Paint: When painting the inside of the jar, apply several thin coats instead of one thick one. This prevents drips, ensures even coverage, and allows for quicker drying times between coats.
- Sharp Silhouettes: Use sharp scissors or a craft knife for cutting out your leprechaun and shamrock patterns. Clean edges make for crisp, defined silhouettes when illuminated.
- Adhesive Choice: While clear tape works well, you can also use a small dab of clear-drying craft glue for a more permanent attachment of your silhouettes.
- Light Distribution: Before taping your patterns, turn on the fairy lights and adjust their placement to ensure they illuminate the entire jar evenly and highlight your designs beautifully.
- Patience with Drying: Allow ample drying time for all painted elements. Rushing this step can lead to smudges or an uneven finish.
Customization and Variations
While the leprechaun theme is perfect for St. Patrick’s Day, this versatile craft concept can be adapted for other holidays and occasions:
- Other Holidays: Imagine ghost or pumpkin silhouettes for Halloween, snowflakes or reindeer for Christmas, or hearts for Valentine’s Day.
- Color Schemes: Experiment with different inner paint colors. A blue jar with white lights could create a wintry scene, or a warm yellow could evoke a summer evening.
- Embellishments: Add small decorative elements inside the jar, like tiny faux gold coins at the base for a leprechaun’s treasure, or small plastic jewels scattered amongst the moss.
- Jar Size and Shape: Use various sizes of mason jars or even different types of clear glass containers to create a collection of glowing scenes.
- External Decor: Instead of just ribbon, you could glue lace, twine, or other decorative elements to the outside of the jar for added charm.
Caring for Your Leprechaun Jar
To keep your glowing leprechaun mason jar looking its best, store it in a cool, dry place when not in use. If you used battery-operated fairy lights, remove the batteries during long periods of storage to prevent corrosion. Dust the exterior gently with a soft cloth. Avoid submerging the jar in water, especially if painted or if the fairy lights are not waterproof. With proper care, your magical creation can be enjoyed year after year.
Your Magical St. Patrick’s Day Glow Awaits!
And there you have it – a captivating, glowing leprechaun mason jar, ready to bring a dash of Irish enchantment into your home this St. Patrick’s Day! This simple yet imaginative craft is a testament to how everyday items can be transformed into something truly magical with a little creativity and effort. It’s not just a decoration; it’s a conversation starter, a symbol of good luck, and a beacon of festive cheer.
We hope this detailed guide inspires you to unleash your inner crafter and create a charming piece that brightens your celebration. Remember, the true magic lies in the joy of making it your own. So, gather your supplies, follow these easy steps, and prepare to be delighted by your very own handcrafted luminary.
A special thank you to Sarah Johnson – EssyJae via YouTube for inspiring this wonderful project and for the fantastic images used here. Her creativity makes DIY accessible and fun for everyone. If you enjoyed crafting this charming leprechaun jar, you’ll surely love her other creative videos too. We highly recommend visiting her YouTube channel and subscribing for more delightful crafting ideas!