
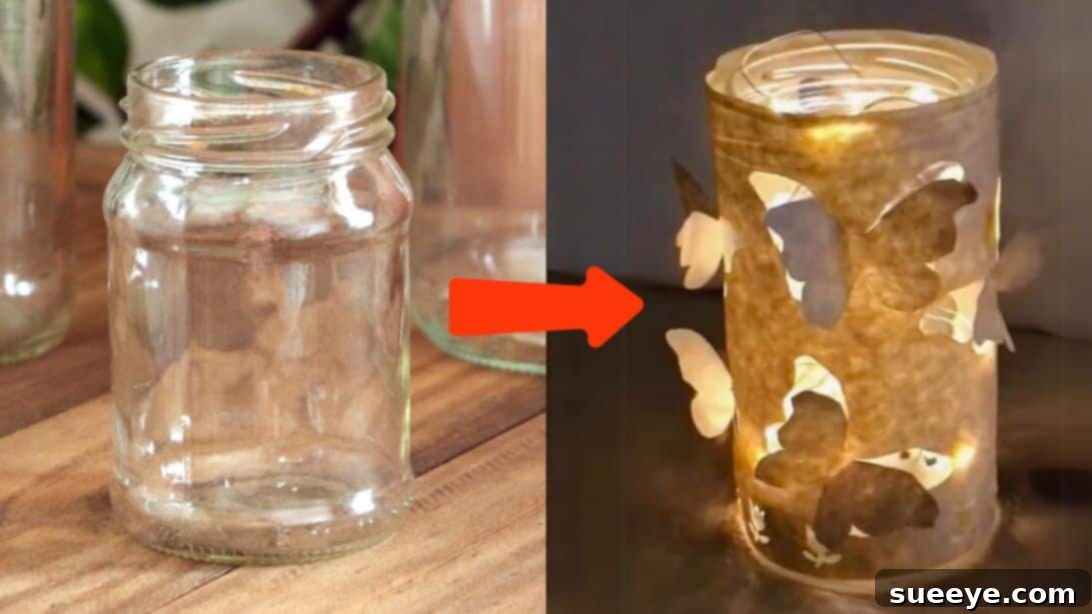
Do you often find yourself with empty glass jars or bottles after finishing their contents? Instead of discarding them, envision a world of creative possibilities! These humble containers are treasures waiting to be transformed into stunning pieces of home decor, practical storage solutions, or heartfelt gifts. Just like versatile mason jars, any glass jar can become a canvas for your imagination. The internet abounds with wonderful ideas – from elegant candle holders and stylish vases to unique pencil organizers and clever storage units. All it takes is a touch of creativity and a willingness to explore the art of upcycling.
RELATED: Looking for more inspiring projects? Discover how to create a magical DIY Flower Fairy Light Jar for another enchanting glow.
Create Your Own Magical DIY Butterfly Glass Jar Light
Today, we’re diving into a truly captivating project: crafting a DIY butterfly glass jar. Imagine the delicate silhouettes of butterflies, softly illuminated, casting a warm glow in your home. It’s a beautiful sight during the day, but truly comes alive with a mesmerizing sparkle as night falls. This brilliant idea, brought to life by @beautybird9 on TikTok, is not only visually stunning but also incredibly simple to recreate. Most of the items you’ll need are basic craft supplies you might already have on hand. If kraft paper isn’t readily available, don’t fret! Thin brown paper bags or even colored construction paper can serve as fantastic alternatives. This project promises to be super easy, enjoyable, and a wonderful way to add a personalized touch to your living space.
For more fantastic ways to repurpose glass jars and bottles, be sure to explore these inspiring collections: 35 DIY Ideas for Creative Glassware.
@beautybird9 Upcycled beauty: glass jar butterfly Diy! #diydecor #upcycledcrafts #handmadecraft #homeinspiration #creativelighting #diylights #fby
♬ original sound – StormJets
Why Choose DIY Glass Jar Crafts?
Engaging in DIY projects, especially those involving upcycling, offers a multitude of benefits beyond just creating something beautiful. Repurposing items like glass jars is a fantastic way to embrace sustainability, reducing waste and giving new life to materials that would otherwise end up in landfills. It’s an eco-friendly approach to home decoration that also helps you save money on store-bought items. Moreover, crafting is a wonderfully therapeutic activity. It allows for creative expression, provides a sense of accomplishment, and can be a fun solo endeavor or a delightful group activity for families and friends. Each finished piece, like this butterfly jar, reflects your unique style and effort, making your home truly one-of-a-kind.
Essential Materials for Your DIY Butterfly Glass Jar
Before embarking on this delightful crafting journey, ensure you have all the necessary components. The beauty of this project lies in its simplicity and the accessibility of its materials:
- Kraft Paper: This sturdy, textured paper is ideal for creating the butterfly silhouettes. Its natural brown hue provides a rustic yet elegant backdrop for the illuminated design. If kraft paper isn’t handy, thin brown paper bags or even construction paper in various colors can be excellent substitutes, offering different aesthetic possibilities.
- Glass Bottle or Jar: Any clean, empty glass bottle or jar will work. Mason jars, old jam jars, pickle jars, or even wine bottles can be repurposed. Ensure it’s thoroughly cleaned and dry before you begin. The size and shape will influence the overall look of your finished lantern.
- LED Fairy Lights: These tiny, battery-operated lights are key to creating the magical glow within your jar. Choose warm white lights for a cozy ambiance or colored lights for a more playful effect. Fairy lights are safe, low-heat, and come in various lengths, allowing you to fill your jar with twinkling brilliance.
- X-Acto Knife (or Craft Knife): Precision is important for cutting out the intricate butterfly wings. An X-acto knife with a sharp blade will make clean cuts and allow for fine details. Always use with caution and on a protected surface.
- Craft Glue: A good quality craft glue suitable for paper will be needed to secure the kraft paper wrap around your glass jar. A clear-drying glue is recommended to maintain a neat finish.
- Butterfly Patterns in Different Sizes: You’ll need templates for your butterflies. These can be printed from online resources, drawn freehand, or purchased as stencils. Having a variety of sizes will add depth and realism to your swarm of illuminated butterflies.
Step-by-Step Guide: How to Make a DIY Butterfly Glass Jar
Follow these detailed steps to create your enchanting butterfly lantern. Take your time, enjoy the process, and watch your vision come to life!
Step 1: Prepare Your Glass Jar and Measure the Kraft Paper
Begin by ensuring your glass bottle or jar is sparkling clean and completely dry. This provides a smooth surface for your paper. Next, lay your chosen kraft paper flat on a clean workspace. Place the glass bottle on its side at one edge of the paper. Gently roll the bottle across the paper, ensuring it’s fully covered from top to bottom and all the way around. Make a light pencil mark on the paper indicating where the paper overlaps. Now, remove the glass bottle and cut the kraft paper. It’s wise to cut it a few inches beyond your mark, creating a generous allowance. This extra paper will ensure a secure overlap when gluing and provides flexibility if you need to adjust the fit.
Step 2: Trace and Arrange Your Butterfly Patterns
Now comes the artistic part! Print out your selected butterfly patterns in various sizes. Carefully cut them out to use as stencils. Position these cut-out butterfly patterns onto your measured kraft paper, experimenting with different arrangements. Trace the patterns onto the kraft paper multiple times, making sure to vary their size, orientation, and placement. Tilting the butterflies at different angles and staggering their positions will create a dynamic, lifelike effect, as if they are gently fluttering around the jar. Aim for a balanced yet organic distribution across the entire paper surface.
Step 3: Carefully Cut the Butterfly Wings
Using your X-acto knife, delicately cut along the outlines of the butterfly wings. This step requires a steady hand and careful attention. The crucial detail here is to *not* cut the butterflies out completely. Instead, leave the middle part of the butterfly’s body intact and connected to the kraft paper. This creates a hinge, allowing the wings to be gently lifted and folded outwards later, giving your butterflies a three-dimensional effect and enabling light to escape and create stunning shadows. Always work on a cutting mat or a protected surface to prevent damage to your table.
Step 4: Wrap the Paper Around the Jar and Fold the Wings
Once all your butterflies are partially cut, it’s time to adhere the kraft paper to your glass jar. Carefully wrap the prepared kraft paper around the glass bottle, ensuring a snug fit and a smooth application. Apply your craft glue to one end of the paper and secure the overlap, pressing firmly until the glue sets. Work out any air bubbles or wrinkles for a clean finish. After the paper is securely wrapped, gently and delicately fold each butterfly’s wings outward. This step gives them depth and makes them appear as if they are poised in flight, ready to shimmer in the light.
Step 5: Illuminate Your Masterpiece
The final step is to bring your butterfly jar to life with light. Carefully insert the LED fairy lights into the glass jar. Arrange them artfully, ensuring the lights are distributed evenly to illuminate all the butterflies from within. You can let them coil at the bottom or gently spread them upwards. Once the lights are in place, turn them on and watch your enchanting DIY butterfly glass jar transform into a magical glowing lantern. Place it on a shelf, bedside table, or use it as a centerpiece to add a captivating glow to any room.
Tips for Elevating Your Butterfly Glass Jar
- Experiment with Paper: Don’t limit yourself to kraft paper! Try vellum for a softer glow, colored cardstock for a vibrant effect, or even patterned paper for added visual interest.
- Vary Butterfly Designs: Search for different species of butterflies to cut out. The more variety in shape and size, the more natural and enchanting your swarm will appear.
- Add More Elements: Consider cutting out small leaves, flowers, or stars to accompany your butterflies, creating a tiny illuminated garden or night sky scene within your jar.
- Customize the Jar Itself: Before wrapping, you could lightly frost the glass jar with spray paint for a diffused light effect, or add a ribbon or twine around the rim for extra charm.
- Safety First: When using an X-acto knife, always cut away from your body and keep fingers clear of the blade. Use a self-healing cutting mat to protect your surfaces. Ensure LED lights are battery-operated and do not generate heat for safe long-term use.
Creative Variations and Beyond Butterflies
The beauty of this project lies in its adaptability. While butterflies are enchanting, you can easily switch up the theme to suit any occasion or season:
- Seasonal Decor: For winter, cut out snowflakes or tiny fir trees. For autumn, consider leaves or pumpkins. Hearts are perfect for Valentine’s Day, and stars or planets for a celestial theme.
- Personalized Gifts: Customize a jar for a friend by cutting out their initials, a favorite animal, or a silhouette representing a hobby. These make thoughtful, handmade presents.
- Different Uses: While perfect as a light, a similarly decorated jar (without lights) can serve as a unique pencil holder, a decorative vase for dried flowers, or even a charming container for small treasures.
- Outdoor Ambiance: If using solar-powered LED lights, these jars can add a whimsical touch to your garden, patio, or balcony at night.
Maintaining Your Illuminated Creation
To ensure your DIY butterfly glass jar continues to enchant for a long time, a little care goes a long way. If the paper gets dusty, gently wipe it with a dry, soft cloth or use a soft brush. Avoid using wet cloths directly on the paper, as it could warp or damage the design. When the LED lights dim, simply replace the batteries. Store your jar in a stable place where it won’t be easily knocked over, and keep it away from direct sunlight for prolonged periods to prevent the paper from fading over time.
Conclusion: Embrace the Joy of Upcycling and Crafting
Crafting this DIY butterfly glass jar is more than just a project; it’s an invitation to rediscover the potential in everyday objects and infuse your home with personal charm. It’s a testament to the fact that beauty and magic can be created from simple, repurposed materials with a bit of imagination and effort. This project offers a delightful way to practice sustainable living, express your creativity, and add a soft, captivating glow to any corner of your space. We encourage you to try this wonderful upcycled craft and share your unique butterfly creations. Let your imagination take flight, one glowing jar at a time!
Frequently Asked Questions About DIY Glass Jar Crafts
Q: What kind of glass jars work best for this project?
A: Almost any clean, empty glass jar or bottle can be used. Jars with smooth, straight sides (like pickle jars, jam jars, or wide-mouth mason jars) are easiest to wrap with paper. However, bottles with interesting shapes can also create unique effects.
Q: Can I use different types of paper instead of kraft paper?
A: Absolutely! While kraft paper offers a lovely rustic look and good light diffusion, you can experiment with various papers. Vellum paper will create a softer, more translucent glow. Cardstock can be used for bolder silhouettes. Even thin, colorful tissue paper could work for a stained-glass effect, though it might be more delicate to cut.
Q: Are LED fairy lights safe to use inside a glass jar?
A: Yes, LED fairy lights are very safe for this project. They produce minimal to no heat, making them ideal for use inside enclosed spaces with paper. Always choose battery-operated LED lights specifically designed for decorative purposes.
Q: How can I make my butterfly cuts more precise?
A: A sharp X-acto knife is crucial. Ensure your blade is fresh and sharp. Using a self-healing cutting mat will give you a stable surface. For very intricate details, consider using smaller patterns or taking slow, controlled cuts. Practice on scrap paper first!
Q: How do I make the paper stick smoothly to the glass without wrinkles?
A: Apply glue evenly to one edge of the paper wrap, then carefully position it on the jar. As you wrap the rest of the paper, gently smooth it down with your hands, pressing out any air bubbles or wrinkles as you go. Using a glue stick or spray adhesive (applied to the paper before wrapping) can also help achieve a smoother finish.
Q: Can these butterfly jars be used outdoors?
A: These jars are primarily designed for indoor use. If you wish to use them outdoors, ensure the LED lights are rated for outdoor use (waterproof) and protect the paper from moisture and direct weather conditions. You might consider sealing the paper with a clear, waterproof sealant or using an outdoor-specific glass lantern if prolonged outdoor exposure is desired.