
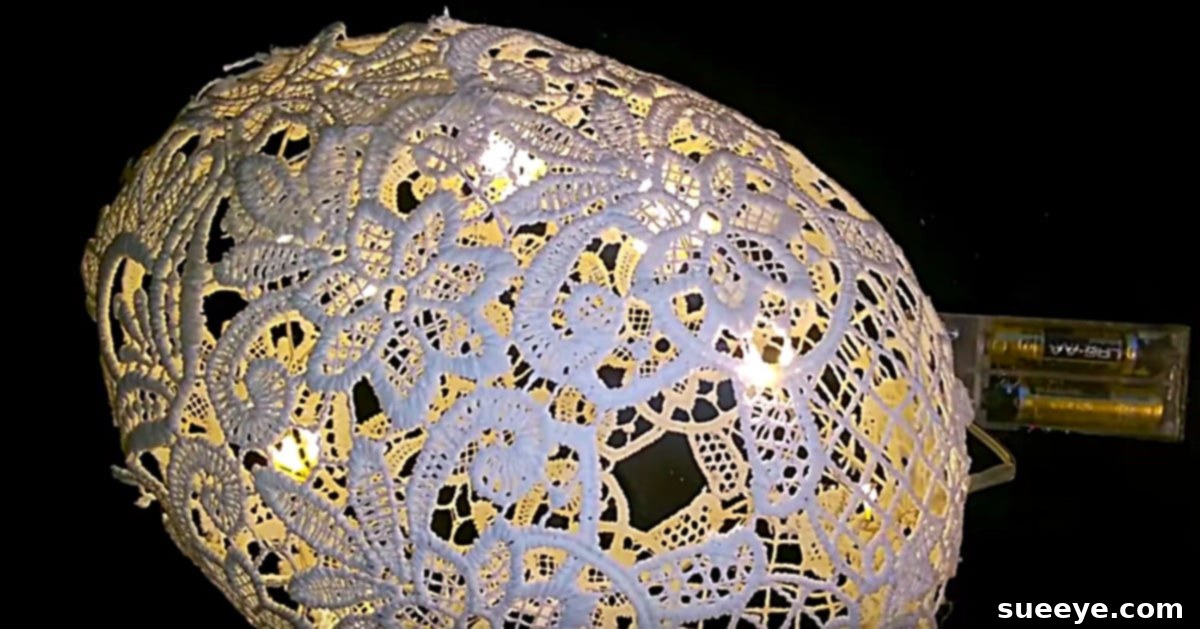
DIY Lace Eggs: Crafting Elegant Illuminated Easter Decorations
Easter, a season of renewal and vibrant festivities, often brings with it the joy of crafting and decorating. For many, the art of creating unique Easter eggs is a cherished tradition, a way to infuse personal charm into the holiday celebrations. While traditional egg dyeing is always fun, imagine elevating your decor with something truly enchanting: elegant, glowing lace eggs. These exquisite creations, fashioned from simple materials like lace remnants, balloons, and a touch of glue, are surprisingly easy to make and offer a sophisticated alternative to conventional decorations. They cast a warm, inviting glow, perfect for welcoming spring into your home or adding a magical touch to your annual Easter egg hunt.
The beauty of this DIY project lies in its simplicity and the opportunity for upcycling. Old lace curtains, a forgotten dress, or even scraps from a thrift store can be transformed into stunning decorative pieces. Not only is it an eco-friendly approach to crafting, but it also allows for a unique, vintage aesthetic that store-bought decorations often lack. Whether you’re crafting alongside your children for a memorable family activity or designing sophisticated decor for an adult gathering, these lace eggs promise to captivate and charm. Let’s dive into how you can create your very own collection of radiant lace eggs.
Materials You’ll Need for Your Lace Egg Creation
Gathering your materials is the first exciting step in any DIY project. For these lace eggs, you’ll find that the list is short, affordable, and easily accessible, making this an ideal craft for all skill levels. Remember, the charm often lies in the imperfections and unique character of your chosen lace.
- Assorted Pieces of Lace: Look for old lace from thrift stores, forgotten fabric stashes, or even old curtains and dresses. Cotton lace works particularly well as it absorbs glue nicely and holds its shape. The size and intricate patterns of the lace will dictate the final look of your eggs, so feel free to experiment with different types and textures.
- Craft Glue (PVA Glue or Fabric Stiffener): A good quality craft glue or PVA glue (like Elmer’s Glue) diluted slightly with water will work perfectly. Fabric stiffener is also an excellent option if you want an even more rigid finished product. The key is to find a glue that will dry clear and stiffen the lace.
- Balloons: Standard party balloons in various sizes will allow you to create lace eggs of different dimensions. Consider using oval-shaped balloons for a more authentic egg look, or round balloons for spherical decorative orbs. Ensure they are strong enough to hold their inflated shape throughout the drying process.
- Matching Thread (Optional but Recommended): A small amount of thread that matches the color of your lace will be useful for securing lace pieces together on the balloon, especially if you’re working with smaller scraps. This helps maintain the desired shape and prevents slippage before the glue sets.
- Small Battery-Operated LED String Lights: These are the magic ingredient that brings your lace eggs to life! Look for miniature LED lights, often called “fairy lights,” as they are lightweight and emit a soft, warm glow. Battery operation is crucial, as it allows for versatile placement of your finished decorations without needing an outlet nearby.
Step-by-Step Guide to Crafting Your Lace Eggs
Creating these beautiful lace eggs is a delightful process that unfolds in a few simple stages. Patience during the drying phase is key to achieving a robust and beautifully shaped final product. Follow these detailed steps to bring your glowing lace eggs to life.
1. Prepare Your Balloon and Apply the Glued Lace
Begin by inflating your balloon to the desired size and shape for your lace egg. Tie it off securely. Consider the space where your egg will eventually sit or hang; a larger balloon might be striking as a centerpiece, while smaller ones are perfect for garlands or individual accents. Next, prepare your lace. If using large pieces, you might want to cut them into more manageable strips or shapes. This allows for better coverage and layering. Submerge your lace remnants into a bowl of craft glue (or diluted PVA glue). The goal is to saturate the lace thoroughly but not to the point where it’s dripping excessively and difficult to handle. Gently squeeze out any major excess glue, leaving the lace moist and pliable – a “semi-moist sweet spot” where it’s sticky but still easy to manipulate.
Now, carefully start placing the glue-soaked lace pieces around your inflated balloon. Overlap the edges slightly to ensure a continuous, sturdy shell. If you’re working with smaller, delicate pieces, use your matching thread to lightly tie them in place as you go, securing them until the glue begins to set. This initial securing step is particularly helpful for maintaining the desired shape and pattern before the lace dries completely. Continue layering until the entire surface of the balloon (or as much as you wish to cover, leaving a small opening for the lights if preferred) is encased in lace. Once satisfied with the coverage and pattern, find a suitable place to hang or rest your balloon where it can dry undisturbed. This drying process is critical and may take 24-48 hours, depending on humidity and the thickness of your lace and glue. Ensure the lace is completely stiff and dry before proceeding to the next step.
2. Release the Balloon and Shape Your Lace Egg
Once your lace is thoroughly dry and has hardened into a rigid shell, it’s time for the magic moment of revealing your lace egg. Gently test the stiffness of the lace; it should feel firm and hold its shape perfectly. If there are any soft spots, allow more drying time. When ready, carefully loosen the dried lace from around the balloon. This usually involves gently peeling it away from the inner surface. If you find any spots where the lace is stuck, a very gentle twist or slight pull on the balloon might help separate it without damaging your creation.
With the lace shell slightly loosened, carefully cut the knot at the top of the balloon to release the air. As the balloon deflates, it should shrink away from the hardened lace, allowing you to easily remove it from the inside of your newly formed lace egg. You’ll be left with a beautiful, intricate lace structure, light as a feather and surprisingly durable. Handle it with care during this stage, but rest assured, the dried glue provides significant structural integrity.
3. Illuminate and Decorate Your Home with Lace Eggs
Now for the illuminating finale! Take your small, battery-operated LED light strand and carefully stuff it inside your hardened lace egg. Arrange the lights evenly within the orb to ensure a consistent glow. The opening where you removed the balloon or a small gap you intentionally left will serve as the perfect spot to tuck in the battery pack, keeping it discreetly hidden while still accessible for turning the lights on and off. Once illuminated, these lace eggs transform into captivating luminaries, casting delicate patterns of light and shadow.
The possibilities for decorating with these elegant lace eggs are endless. Hang them individually from branches in a vase to create a stunning spring centerpiece, or string several together to form a magical garland across a mantelpiece or doorway. They look exquisite nestled among other Easter decorations, scattered on a dining table, or suspended from the ceiling. Imagine them greeting your guests at the entrance for your annual Easter gathering, their gentle glow creating a warm and inviting ambiance. These handmade treasures are not just decorations; they are conversation starters, embodying the spirit of creativity and personal touch.
Tips for Success and Creative Variations
Choosing Your Lace: More Than Just White
While classic white lace creates a timeless and elegant look, don’t shy away from experimenting with different colors. Pastel-colored lace can add a playful touch, perfect for a child’s room or a more whimsical Easter theme. Black lace could create a dramatic, gothic-inspired decoration for other times of the year, showcasing the versatility of this craft beyond just Easter. Consider lace with intricate floral patterns or geometric designs to add more visual interest to your illuminated orb.
Perfecting the Glue Consistency
The “semi-moist sweet spot” for your lace is crucial. If your glue is too thick, the lace won’t fully saturate, leading to brittle spots. If it’s too thin, it might not stiffen sufficiently. A good ratio for PVA glue is about 3 parts glue to 1 part water, but always test a small piece of lace first. For a quicker dry and stronger hold, consider specialized fabric stiffeners available at craft stores.
Drying Environment Matters
For best results, allow your lace-covered balloons to dry in a well-ventilated area, away from direct sunlight or excessive heat, which can cause the glue to dry too quickly and crack. A consistent room temperature is ideal. Hanging the balloons rather than resting them on a surface ensures even drying and prevents flat spots.
Embrace Creativity with Variations
Glitter or Paint: Once dry, your lace eggs can be further embellished. A light dusting of fine glitter while the glue is still tacky, or a spray of metallic paint after drying, can add extra sparkle and sophistication.
Different Shapes: Don’t limit yourself to egg shapes. Experiment with round balloons for perfect spheres, or even create unique abstract shapes by partially deflating a balloon before applying lace.
Hanging Options: For easy hanging, you can embed a small loop of string or wire into the lace at the top while it’s still wet. This creates a built-in hanger for your LED lace eggs.
Displaying Your Radiant Lace Eggs
These magnificent lace eggs are more than just a craft; they are versatile decorative elements that can enhance any space. My children absolutely adored making these, each crafting their own unique egg for our annual Easter egg hunt. Beyond the hunt, we strung them around our main door, creating a truly magical and welcoming entrance for our guests on Easter Sunday. Their soft, diffused light adds an ethereal quality that transforms an ordinary space into something extraordinary. Imagine a collection of these eggs suspended at varying heights, creating a stunning visual display that captures the essence of spring and renewal.
Whether adorning a festive table, enhancing a mantelpiece, or gracing a window, these DIY Lace Eggs offer a personalized touch that store-bought decorations simply cannot replicate. They are a testament to the beauty of handmade items and the joy of creative expression. Embrace the opportunity to craft something truly unique and beautiful this Easter, and watch as these illuminated lace eggs become a cherished part of your holiday traditions for years to come.