
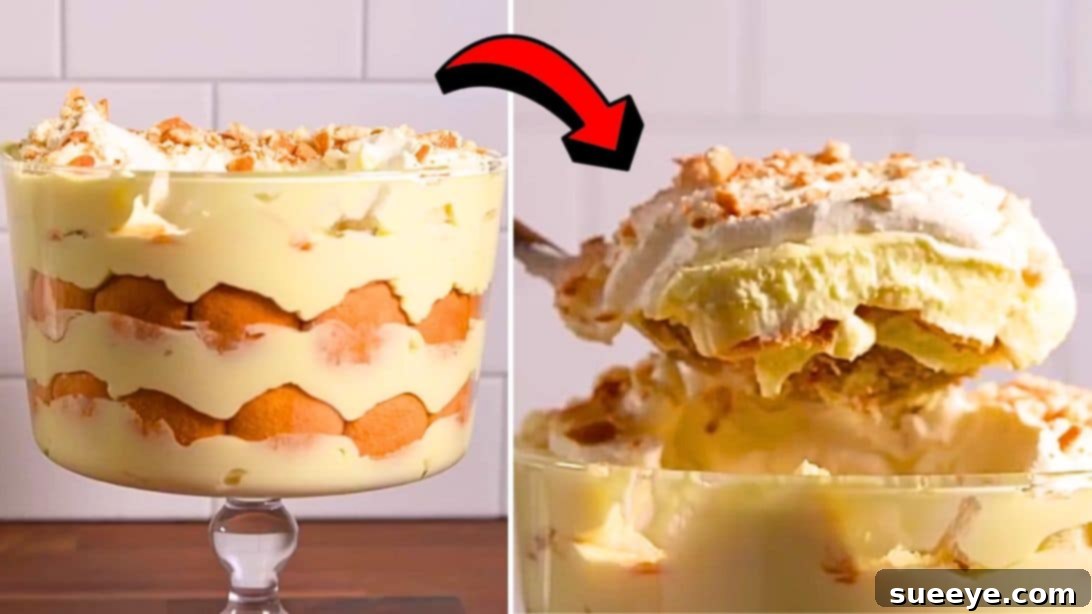
Prepare to delight your taste buds with what might just be the best dessert you’ll ever encounter: this incredibly easy and lusciously creamy banana pudding. Inspired by a fantastic recipe from Delish on YouTube, this no-bake wonder is a true lifesaver for hosts. Whether you need a quick last-minute treat for a spontaneous gathering or a show-stopping dessert for a planned party, this banana pudding recipe ticks all the boxes. Its rich flavor and satisfying texture ensure your guests will leave happy and completely satisfied. Dive into this simple tutorial and prepare to create a dessert masterpiece!
The Ultimate Easy & Creamy Banana Pudding: A No-Bake Dessert Delight
Banana pudding is more than just a dessert; it’s a beloved Southern classic, synonymous with comfort, celebration, and pure joy. This particular rendition elevates the traditional recipe, offering an unparalleled creaminess, incredible ease of preparation, and the perfect symphony of sweet, ripe bananas harmoniously blended with velvety pudding and crisp vanilla wafers. It’s a dessert that not only evokes warm nostalgia but also feels excitingly fresh, making it a standout choice for any occasion.
Forget the complexities of baking or an endless list of obscure ingredients. This recipe brings gourmet taste directly to your table with minimal effort, making it an ideal choice for both novice and experienced dessert makers alike. It’s the ultimate crowd-pleaser that requires no oven, just a few simple steps and a bit of chilling time to transform humble ingredients into a truly unforgettable treat.
Why This Easy Banana Pudding Will Be Your New Favorite Dessert
There are countless reasons to fall in love with this delightful banana pudding. Here’s why it deserves a permanent spot in your recipe collection:
- Effortlessly Delicious: This recipe is a no-bake marvel, meaning no oven required! Its simplicity belies a taste so rich and complex, your guests will think you spent hours crafting it.
- Perfect for Any Occasion: From casual family potlucks and summer barbecues to elegant holiday gatherings and celebratory events, banana pudding is universally adored and always a welcome addition.
- Irresistibly Rich and Creamy Texture: The magical combination of instant vanilla pudding, luscious sweetened condensed milk, and light, airy whipped cream creates a smooth, velvety base that melts in your mouth with every spoonful.
- Minimal Prep Time: Most of the “cooking” involves whisking and layering, followed by crucial chilling. This frees up your valuable time, allowing you to focus on other aspects of your event or simply relax.
- Classic Comfort with a Modern Twist: It captures the essence of traditional banana pudding while delivering a consistently perfect creamy texture that sets it apart.
- Customizable Potential: While absolutely perfect as is, this recipe also provides a fantastic canvas for creative variations and personal touches, allowing you to make it uniquely yours.
Gather Your Simple Ingredients: The Heart of Your Creamy Banana Pudding
The beauty of this banana pudding lies in its straightforward and accessible ingredient list. Each component plays a vital role in building the signature flavor and unparalleled texture of this beloved dessert. Quality ingredients, even simple ones, make a significant difference in the final outcome.
- 1⅓ cups of whole milk: This is the essential liquid base for our instant pudding, ensuring a smooth, rich, and perfectly creamy consistency for the primary pudding layer.
- 1 package of instant vanilla pudding mix (5.1 oz or larger box): The secret weapon for quick setting and infusing that classic vanilla flavor without any fuss. Be sure to select “instant” pudding, not the “cook-and-serve” variety, as they behave differently.
- 1 (14-ounce) can of sweetened condensed milk: This extraordinary ingredient is where much of the magic happens. It contributes incredible richness, intense sweetness, and a wonderfully thick, velvety texture that elevates the pudding beyond a basic dessert.
- 3 cups of heavy cream: When whipped, this creates an airy, light, and decadently smooth element, providing volume, a luxurious mouthfeel, and a delightful contrast to the dense pudding.
- 1 teaspoon of vanilla extract: A crucial aromatic, it enhances all the sweet notes in the whipped cream and adds a touch of warmth and sophisticated depth to the overall flavor profile.
- 1 (12-ounce) box of vanilla wafer cookies (e.g., Nilla Wafers): These iconic, crisp cookies are absolutely essential. They provide a delightful initial crunch that gradually softens beautifully as they absorb the pudding’s moisture, creating a cake-like, tender texture within the layers.
- 4 bananas, sliced into round pieces: The undeniable star of the show! For the best results, choose bananas that are perfectly ripe (yellow with a few small brown spots) but still firm enough to hold their shape when sliced. This ensures optimal natural sweetness and a pleasant texture.
- 2 teaspoons of granulated sugar: A subtle addition to the whipped cream topping, providing just the right amount of sweetness to balance the richness of the pudding and helping the cream maintain its structure.
Step-by-Step Guide to Creamy Banana Pudding Perfection: Assemble Your Masterpiece
Creating this easy creamy banana pudding is a straightforward and enjoyable process. Follow these detailed steps to assemble your unforgettable dessert. While the recipe is forgiving, a little care at each stage will ensure the best possible results.
Step 1: Craft the Velvety Pudding Base
Begin by taking a large, spacious mixing bowl. Into this bowl, add your measured whole milk, the entire package of instant vanilla pudding mix, and the full can of luscious sweetened condensed milk. Arm yourself with a sturdy whisk and thoroughly beat these ingredients together. Continue whisking vigorously until the mixture is completely smooth, ensuring no lumps of pudding mix remain. You’ll notice it beginning to thicken beautifully as you whisk, typically within 2-3 minutes. Once well combined and visibly thickening, transfer the bowl to your refrigerator. Allow it to chill for a minimum of 5 minutes, or until it has set into a pleasing, creamy pudding consistency. This initial chill time is crucial; it allows the pudding to begin setting and developing its delightful, rich texture.
Step 2: Whip the Dreamy Cream for Layers and Topping
While your pudding base is chilling to perfection, grab another large, impeccably clean mixing bowl. Pour in the cold heavy cream and add the vanilla extract. Using an electric mixer (either a hand-held mixer or a stand mixer fitted with a whisk attachment), beat the cream on medium-high speed. Continue beating for approximately 2 to 3 minutes, or until stiff peaks begin to form. You’ll know they’re “stiff” when you lift the beaters, and the whipped cream holds its shape firmly, without drooping. Once achieved, carefully take about half of this freshly whipped, airy cream and gently fold it into your chilled pudding mixture using a rubber spatula. Employ a gentle, lifting motion to incorporate it thoroughly without deflating the cream’s volume. Set aside the remaining half of the whipped cream; this will be for your exquisite topping later.
Step 3: Artfully Assemble the Luscious Layers
Now comes the most visually appealing part: layering your banana pudding! For the most impressive presentation, we highly recommend using a 3-quart trifle dish or a large, clear glass serving bowl. This allows your beautifully defined layers to be showcased, tantalizing everyone before the first bite. Begin by creating a solid foundation with a single layer of vanilla wafer cookies, meticulously arranged to cover the entire bottom surface of your chosen dish. These initial wafers will absorb the pudding’s moisture, transforming into a delightfully soft, cake-like texture. Next, gently spoon about one-third of your exquisite, creamy pudding mixture evenly over the wafer layer, spreading it with care. Follow this with another generous layer of vanilla wafers, then artfully arrange a layer of your freshly sliced bananas on top of these wafers. Continue this mesmerizing layering process with the remaining ingredients, alternating between vanilla wafers, pudding, and banana slices, until you reach the top of your dish. Aim to make your final layer a generous spread of pudding, leaving it perfectly smooth and ready for the grand finale.
Step 4: The Essential Chill and Crown Your Creation
Once all your delicious layers are assembled, cover the trifle dish tightly with plastic wrap to prevent any skin from forming and to keep your pudding fresh. Place it in the refrigerator. The chilling period is absolutely paramount for achieving banana pudding perfection. Allow it to chill for at least overnight, or for a minimum of 8 hours. This extended refrigeration time is vital; it allows all the beautiful flavors to meld together harmoniously, the vanilla wafers to soften to that ideal, tender, cake-like consistency, and the pudding to achieve its ultimate firm, yet creamy, texture. Just before you’re ready to serve, prepare your delightful topping. In a small bowl, gently fold the granulated sugar into the reserved whipped cream until it’s well combined. This subtle sweetness will perfectly complement the pudding without overwhelming it. Once mixed, dollop generous, inviting clouds of this ethereal topping all over the top of your perfectly chilled banana pudding. For an extra touch of elegance and a delightful crunch, sprinkle the top with a few crumbled vanilla wafers or even some additional fresh banana slices. Serve immediately and prepare to receive an abundance of compliments!
Expert Tips for Crafting the Perfect Banana Pudding
Achieving banana pudding nirvana is simple when you keep these expert tips in mind. They’ll help you troubleshoot potential issues and elevate your dessert to new heights:
- Choosing the Right Bananas: The quality of your bananas significantly impacts the pudding. Opt for bananas that are ripe (bright yellow with a few small brown speckles) but still firm to the touch. Avoid overly green (underripe) bananas, which lack sweetness, and very brown, mushy ones, which can disintegrate in the pudding.
- Preventing Banana Browning: To keep your banana slices looking fresh and vibrant, especially if serving within a day, you can toss them very gently in a tiny amount of lemon juice or pineapple juice before layering. However, the pudding mixture often provides sufficient protection. If serving immediately after assembly, browning is less of a concern.
- Chill Time is Absolutely Key: Do not rush the refrigeration process! The overnight chill (or at least 8 hours) is paramount. This extended time allows all the beautiful flavors to fully meld, creating a deeper, more cohesive taste. Crucially, it also gives the vanilla wafers ample time to soften to that delightful, tender, cake-like consistency that is characteristic of classic banana pudding.
- Don’t Overmix Whipped Cream: When beating heavy cream, aim for stiff peaks – the cream should hold its shape firmly when the beaters are lifted. Overmixing can quickly turn your beautiful whipped cream grainy or, worse, into butter! Stop as soon as stiff peaks are achieved.
- Gentle Folding Technique: When incorporating the whipped cream into the pudding mixture, use a gentle folding technique with a rubber spatula. This involves cutting down through the middle and gently lifting the mixture from the bottom, turning it over the top. This preserves the airiness of the whipped cream, contributing to the pudding’s light texture.
- The Ideal Serving Dish: A large, clear glass trifle bowl (typically 3-quart capacity) is highly recommended. It not only showcases the beautiful, distinct layers of your banana pudding but also makes serving both elegant and practical. Alternatively, a deep glass baking dish or individual clear glass cups work wonderfully for charming single servings.
Creative Variations & Delicious Customizations for Your Banana Pudding
While this classic recipe stands perfectly on its own, it also provides a wonderful foundation for culinary creativity. Feel free to experiment with these delicious twists to make your banana pudding uniquely yours:
- Cookie Alternatives: While vanilla wafers are the traditional choice and provide that classic texture, don’t be afraid to experiment! Consider using graham crackers for a subtly different flavor, shortbread cookies for a buttery richness, or even gingersnaps for a spiced kick that pairs wonderfully with banana.
- Indulgent Additions: Elevate your pudding by sprinkling in mini chocolate chips between layers for a hint of cocoa, adding toasted pecans or walnuts for a nutty crunch, or drizzling a luscious caramel sauce for an extra layer of sweetness and depth.
- Warm Spice Notes: For a comforting twist, a tiny pinch of ground cinnamon or nutmeg folded into the pudding mixture or even sprinkled over the bananas can add a delightful warmth and aromatic complexity.
- Individual Servings: Instead of assembling one large trifle dish, create charming individual portions. Layer the pudding in small clear glasses, mason jars, or ramekins. These are perfect for parties, offer easy portion control, and look incredibly appealing.
- Cream Cheese Layer: For an even richer, slightly tangier, and cheesecake-like pudding experience, beat 4 oz of softened cream cheese with 1/4 cup of powdered sugar until smooth. Gently fold this mixture into a portion of the whipped cream (or create a separate cream cheese layer) to introduce a delightful new dimension.
Storage and Make-Ahead Tips for Convenience
One of the many benefits of this banana pudding is its adaptability for make-ahead convenience. Here’s how to store it and plan ahead:
- Optimal Storage: Any leftover banana pudding should be covered tightly with plastic wrap or transferred to an airtight container and stored in the refrigerator. For the best flavor and texture, it’s ideal to enjoy it within 2-3 days. Beyond this timeframe, the bananas will continue to soften and may start to show more browning, and the wafers might become overly mushy.
- Excellent Make-Ahead Option: This dessert truly shines as a make-ahead recipe! As suggested in the directions, preparing the pudding the day before (up to the point of adding the final whipped topping) allows all the beautiful flavors to fully meld together. More importantly, it gives the vanilla wafers ample time to achieve that perfect, tender, cake-like consistency. For the freshest appearance, add the final whipped cream topping and any decorative crumbs or fresh banana slices just before serving.
- Freezing Not Recommended: Unfortunately, freezing banana pudding is generally not recommended. The delicate texture of both the bananas and the pudding mixture tends to become watery, grainy, or separate upon thawing, significantly compromising the quality of this delicious dessert.
Frequently Asked Questions (FAQ) About Easy Creamy Banana Pudding
- Can I use regular pudding mix instead of instant?
- This recipe is specifically designed for instant vanilla pudding mix because it sets quickly and achieves the desired creamy, smooth consistency with minimal effort. While you could technically use a cook-and-serve pudding, the preparation steps would differ significantly (requiring stovetop cooking), and the final texture might not be as rich or set as firmly as intended for this no-bake recipe.
- How do I prevent my banana slices from turning brown?
- The best way to minimize browning is to assemble the pudding relatively close to serving time, or to ensure it’s chilled overnight as recommended. The pudding mixture itself offers a good degree of protection. For extra assurance, a very light toss of your banana slices in a tiny amount of lemon juice (which won’t noticeably affect the flavor) can help slow down oxidation. However, avoid excess liquid, as it can make the pudding watery.
- Can I make this recipe sugar-free or low-sugar?
- Yes, with some modifications, you can adapt this recipe. Use a sugar-free instant vanilla pudding mix. For the whipped cream, you can use a granulated sugar substitute. Please note that replacing sweetened condensed milk is trickier; you might look for sugar-free condensed milk alternatives or combine evaporated milk with a sugar substitute, but this will likely alter the texture and sweetness profile.
- What kind of serving dish is best for banana pudding?
- A large, clear glass trifle dish (ideally 3-quart capacity) is excellent as it beautifully showcases the distinct layers of pudding, wafers, and bananas. Alternatively, a deep glass baking dish (like a 9×13 inch casserole dish) or even individual clear glass cups or mason jars work wonderfully, especially for parties or grab-and-go servings.
- My whipped cream isn’t getting stiff peaks. What could be the issue?
- The most common reasons for whipped cream not stiffening are warm cream or warm equipment. Ensure your heavy cream is very cold, straight from the refrigerator. For best results, you can even chill your mixing bowl and beaters in the freezer for 10-15 minutes before whipping. Also, ensure you’re using heavy cream, not half-and-half or light cream, as only heavy cream has enough fat content to whip properly.
This easy creamy banana pudding is truly more than just a dessert; it’s a celebration of simple, wholesome flavors that come together to create something truly magical. Its unparalleled ease of preparation combined with its irresistibly comforting taste makes it an essential recipe for anyone who loves delightful, no-fuss treats. So go ahead, gather your ingredients, follow these straightforward steps, and get ready to impress everyone with your culinary prowess and a dessert that tastes like a slice of heaven. Happy pudding making!
*All image credit for this recipe belongs to Delish via YouTube. Follow and subscribe to their channel for more inspiring recipes and culinary delights that are both easy and delicious!