
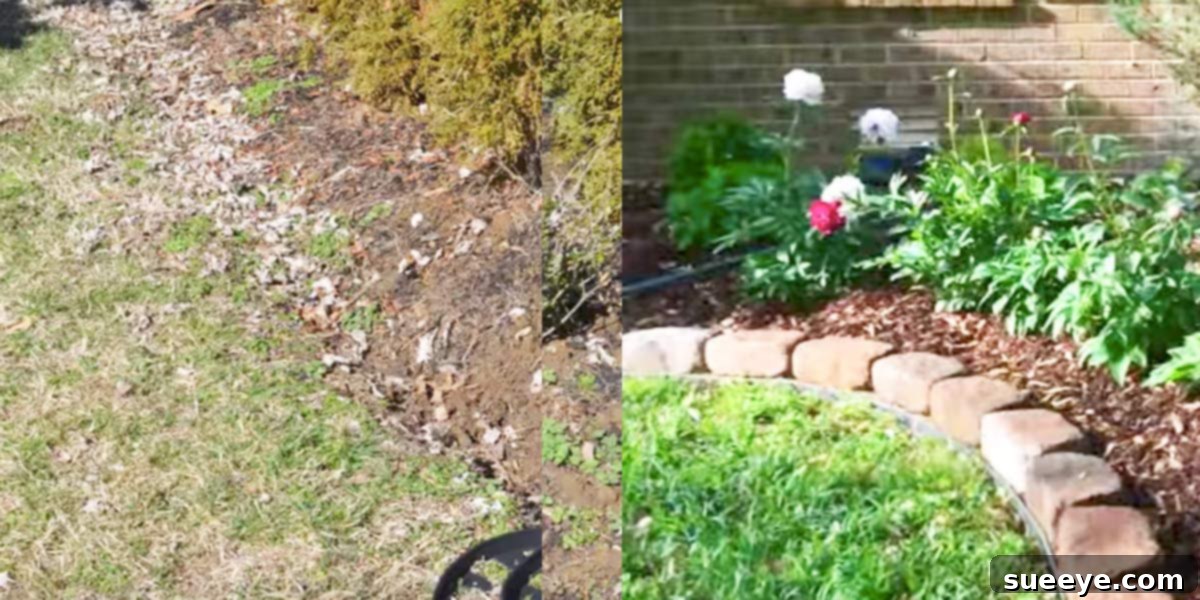
How to Create a Stunning No-Dig Garden Border: The Ultimate Guide to Easy Landscaping
The allure of a pristine, beautifully landscaped yard is undeniable, instantly boosting your home’s curb appeal and creating an inviting outdoor sanctuary. However, the thought of extensive digging, back-breaking labor, and endless hours spent on yard work often deters many aspiring gardeners – and rightfully so! If you dream of a picture-perfect garden border but dread the physical exertion, you’re in for a treat. This comprehensive guide introduces you to the revolutionary concept of a “no-dig” garden border, a game-changer for homeowners seeking both beauty and simplicity in their landscaping endeavors.
Imagine transforming your outdoor space with defined flower beds, neat pathways, and elegant plant enclosures, all without lifting a single shovel for deep trenching. This ingenious method offers an effortlessly achievable solution for creating crisp, professional-looking borders that enhance your garden’s aesthetic. It’s the ultimate lazy gardener’s secret, proving that stunning results don’t always require arduous effort. Prepare to be amazed by the simplicity and effectiveness of this approach, which can set the stage for an entirely new appreciation of your own backyard.
My own journey into landscaping began with this very technique. Faced with the challenge of defining my garden beds without the time or energy for traditional digging, I stumbled upon the no-dig method. It was an absolute revelation – the perfect starting point that not only solved my immediate landscaping dilemma but also ignited a passion for creating a vibrant outdoor haven. The ease of installation was unparalleled, and the immediate impact on my yard’s appearance was incredibly satisfying. I couldn’t be more thrilled with the transformation, and that’s precisely why I’m eager to share this accessible solution with you today, hoping it sparks a similar joy in your gardening projects.
The Appeal of Effortless Curb Appeal: Why No-Dig Borders Are a Game Changer
Every homeowner desires a yard that radiates charm and character, a space that welcomes guests and provides a serene escape. Yet, the traditional methods of installing garden borders often involve significant time commitments, physical strain, and sometimes even professional help. This can make the dream of a beautifully defined landscape feel out of reach for many. Common hurdles include hard, rocky soil, limited physical ability, lack of specialized tools, or simply a busy schedule that leaves little room for intensive yard work.
This is precisely where the no-dig garden border steps in as the ultimate solution. It bypasses the need for extensive excavation, offering a remarkably simple and efficient way to create clean lines and structure within your garden. This method is designed for everyone, from novice gardeners to seasoned landscapers looking for a less labor-intensive option. It’s about achieving sophisticated results with minimal fuss, transforming the daunting task of garden edging into an enjoyable and accessible project.
My personal experience stands as a testament to the power of no-dig landscaping. What began as a landscaping “problem” quickly turned into an exciting opportunity. The no-dig border provided the perfect foundation, a starting point that allowed me to visualize and build upon my garden’s design without being bogged down by the initial hard work. This simple step truly set the ball in motion, leading to a cascade of creative ideas and ultimately, the beautiful yard I now enjoy. It proves that even the simplest of changes can have a profound, lasting impact on your home’s outdoor aesthetics and your personal enjoyment of the space.
Understanding the No-Dig Border Concept
At its core, a no-dig garden border is exactly what it sounds like: a method of installing edging materials without the need for extensive digging or trenching. Unlike traditional borders that often require excavating a deep, continuous furrow to set materials like concrete or heavy pavers, the no-dig approach focuses on surface-level installation and anchoring. This revolutionary technique minimizes ground disturbance, preserves existing soil structure, and dramatically reduces the physical effort typically associated with garden edging.
The differences are stark and immediately beneficial. Traditional methods can be time-consuming, requiring specialized tools and a considerable amount of back-breaking labor. They also run the risk of disturbing tree roots, irrigation lines, or existing underground utilities. No-dig borders, however, are designed for speed and ease. They typically involve laying down edging material directly onto prepared soil and securing it with stakes, pins, or by simply backfilling with soil or mulch. This makes them an incredibly accessible option for individuals with varying levels of gardening experience or physical capabilities, making beautiful garden design achievable for everyone.
The key benefits of embracing the no-dig border technique extend far beyond just saving time and reducing physical strain. By avoiding deep trenches, you help preserve the delicate ecosystem of your garden soil, minimizing disruption to beneficial microorganisms and vital root systems. This method also proves to be highly cost-effective, often requiring fewer specialized tools and less expensive materials compared to more intensive installations. Furthermore, for those living in areas with challenging soil conditions – think heavy clay, rocky terrain, or dense roots – the no-dig solution bypasses these obstacles entirely, allowing you to achieve stunning results where traditional methods might prove impossible or prohibitively difficult. It’s truly a smarter, gentler way to sculpt your landscape.
Choosing Your No-Dig Edging Materials
The beauty of no-dig garden borders lies not only in their ease of installation but also in the diverse range of materials you can utilize to achieve a look that perfectly complements your home and garden style. The right material choice can significantly impact the durability, aesthetic, and overall success of your border. Consider your budget, desired look, and the specific needs of your garden when making your selection. Here are some popular no-dig edging materials:
Flexible Plastic/Rubber Edging
This is perhaps the most common and budget-friendly option for no-dig borders. Typically made from recycled plastics or rubber, these materials come in long rolls that are incredibly easy to manipulate into curves, straight lines, or complex shapes. Their flexibility allows for creative designs, and they are usually secured into the ground with specialized stakes or anchors. Plastic and rubber edgings are excellent for containing mulch, gravel, and preventing grass invasion into flower beds. While they are cost-effective and simple to install, some varieties might degrade over time due to UV exposure, and they may not offer the same high-end aesthetic as other materials.
Metal Edging (Steel, Aluminum)
For a sleek, modern, and highly durable border, metal edging is an outstanding choice. Available in materials like steel (including Corten steel for a rustic, rusted look) and aluminum, these edgings provide a very strong and long-lasting barrier. They are generally installed by pressing or hammering them into the ground, with some designs featuring integrated stakes or requiring separate anchoring pins. Metal edging creates a clean, sharp line that can elegantly define garden beds, pathways, and patios. While a more significant investment upfront, their longevity and sophisticated appearance often justify the cost, and they stand up exceptionally well to various weather conditions.
Composite/Recycled Materials
An eco-conscious and versatile option, composite edging is typically made from a blend of wood fibers and recycled plastics. This material often mimics the look of natural wood or stone but boasts enhanced durability and resistance to rot, pests, and weathering. Composite edgings are available in various lengths, textures, and colors, providing a wide range of design possibilities. They are usually installed similarly to plastic edging, utilizing stakes for secure placement. This option offers an attractive balance between aesthetic appeal, environmental responsibility, and ease of maintenance, making it a popular choice for sustainable landscaping projects.
Natural Stone/Pavers (No-Mortar Method)
For a classic, timeless, and natural aesthetic, individual stones, bricks, or pavers can be used to create a no-dig border. This method involves carefully placing the stones directly onto a shallow, prepared bed of sand or gravel for stability, without the need for mortar. Options range from river rocks and cobblestones to more formal paver designs. While slightly more labor-intensive than rolling out plastic edging, the visual impact of natural stone is unmatched, seamlessly integrating with existing landscape elements. It’s crucial to select stones with relatively flat bottoms for better stability and to ensure the base is well-compacted to prevent shifting over time. This approach works wonderfully for creating charming, organic-looking garden edges.
Wood (Logs, Boards)
Wood offers a rustic and warm appeal, making it a favorite for cottage gardens or naturalistic landscapes. Options include small logs, pressure-treated timber, or even reclaimed wooden planks. These can be laid horizontally, vertically as short posts, or stacked to create raised beds. For a no-dig application, wooden edging is typically secured with stakes driven into the ground behind or through the timber. While aesthetically pleasing and relatively inexpensive, wood requires consideration for its longevity. Untreated wood can be prone to rot and pests, so opting for naturally resistant woods or treated timber is advisable for longer-lasting results. Regular maintenance, such as sealing or staining, can also extend its life and preserve its beauty.
Planning Your No-Dig Garden Border: Design and Layout
Even with the simplicity of no-dig installation, thoughtful planning is the cornerstone of any successful landscaping project. Before you even think about purchasing materials, investing a little time in design and layout will save you headaches and ensure your finished border perfectly complements your garden. This initial phase is where your vision truly takes shape, allowing you to anticipate challenges and refine your aesthetic choices.
My own experience taught me the invaluable lesson of sketching. Before even conceptualizing my flower bed, I made a rough sketch of what I wanted it to look like, considering its shape, size, and the specific plants I envisioned. This simple step was incredibly helpful. It allowed me to get a clear, rough idea of the final outcome, visualize the flow of the garden, and even identify potential issues with plant spacing or border placement before any physical work began. Don’t underestimate the power of putting your ideas on paper, no matter how rudimentary the drawing may be.
Beyond sketching, consider the overall flow and existing elements of your garden. Will the border define a new flower bed, edge a pathway, or separate a lawn from a shrubbery? Think about the sun exposure in the area, as this will influence your plant selection. Choose shapes and curves that either mimic the natural contours of your yard or introduce a contrasting geometric elegance. Once your design is conceptualized, use garden hoses, string, or even flour to mark out the intended path of your border directly on the ground. This allows you to walk around it, view it from different angles, and make adjustments to the shape and size before any materials are laid. Finally, give thought to the plants you wish to include. Selecting plants that complement your chosen border material and thrive in your specific garden conditions will ensure a harmonious and vibrant display.
Step-by-Step Guide to Installing Your No-Dig Border (General Principles)
The beauty of a no-dig garden border lies in its straightforward installation process, making it accessible even for those with minimal DIY experience. While specific instructions might vary slightly depending on the type of edging material you choose, the general principles remain consistently simple and efficient. This guide outlines the fundamental steps that will empower you to create a professional-looking border with ease.
The first crucial step is preparing the area. Begin by clearing any existing debris, weeds, or loose rocks from the path where your border will be installed. If your chosen material requires a relatively flat surface, a light leveling of the ground might be beneficial, but remember, extensive digging is not necessary. A rake or a garden hoe can suffice for this light preparation, ensuring a relatively smooth and even surface for your edging. This initial clearing is vital for the stability and aesthetic appeal of your finished border, allowing your chosen material to sit flush and securely.
Next comes the actual laying of your chosen edging material. Whether you’re unrolling flexible plastic, tapping in metal strips, or carefully placing natural stones, follow the path you previously marked out. For flexible materials, gently unroll them along the desired line, making sure they hug any curves or corners smoothly. When using stiffer materials like metal or wood, you might need to apply a bit more force to set them into the ground, ensuring they are level and aligned. This is where the true “lazy man’s border” aspect comes to life – you’re building on the surface, not excavating beneath it.
Finally, securing the border is key to its longevity and effectiveness. Most no-dig edging materials come with or require specific stakes or anchors. These are typically driven into the ground directly behind or through the edging material at regular intervals, providing stability and preventing shifting. For materials like natural stones or pavers, backfilling with a layer of soil, gravel, or mulch on both sides of the border can help lock them into place, creating a firm and resilient edge. This final securing step is critical for ensuring your beautiful new border remains neat, functional, and in perfect position for years to come, effectively containing your garden beds and delineating your landscape.
Enhancing Your Landscape: Integrating Rock Gardens and Other Features
Once your elegant no-dig border is in place, you’ve laid the perfect foundation for further enhancing your garden’s appeal. This defined edge not only contains your planting areas but also sets the stage for introducing complementary features that elevate the overall aesthetic. One of the most attractive and increasingly popular garden designs to pair with a new border is the rock garden, offering a low-maintenance yet visually stunning element.
Rock gardens are not a new concept; their principles have been admired for centuries, mimicking natural alpine or arid landscapes. However, their popularity has surged recently due to their unique aesthetic and inherent sustainability. The concept is simple yet profoundly effective: integrate various sizes of rocks, pebbles, and boulders among drought-tolerant plants or alpine species. This creates a miniature piece of nature right in your own yard, adding texture, contrast, and a sense of permanence to your landscape. The benefits are numerous: excellent drainage, minimal watering requirements (especially with appropriate plant choices), and a striking visual appeal that draws the eye and complements almost any garden style.
After your no-dig border has been successfully installed, strategically adding rocks around your plants or within designated zones can transform your garden. Begin by placing larger accent boulders first, ensuring they are stable. Then, fill in with smaller rocks and pebbles to create a naturalistic flow. This layering not only enhances the visual depth but also provides excellent weed suppression and helps retain soil moisture. Beyond rock gardens, consider other elements to further enrich your space. A thick layer of organic mulch within your bordered beds will suppress weeds, regulate soil temperature, and add a finished look. Decorative stepping stones can create inviting paths, while a small bird bath or garden ornament can introduce a focal point, further personalizing your beautiful, low-maintenance landscape.
Beyond Borders: Maximizing Your Garden’s Beauty and Functionality
Installing a no-dig garden border is more than just a quick fix for messy edges; it’s often the catalyst for a much larger and more rewarding landscaping transformation. This simple, easy step can ignite your creativity and provide the structure needed to confidently tackle more ambitious garden projects. By defining your beds, you’ve already taken a significant stride towards a more organized and aesthetically pleasing outdoor space, opening up new possibilities for planting, design, and enjoyment.
The long-term benefits of well-defined borders extend far beyond immediate visual appeal. Firstly, they act as an effective barrier against invasive lawn grasses and aggressive weeds, significantly reducing the amount of time you’ll spend on weeding. This containment helps maintain the integrity of your garden beds, keeping soil and mulch exactly where they belong. Secondly, borders create clear delineation, separating different areas of your yard and giving your landscape a polished, intentional look. This not only enhances curb appeal but also improves the overall functionality of your garden, making pathways clearer and planting areas more manageable. Moreover, for those who enjoy mulching, a border prevents the material from scattering, ensuring its benefits are concentrated where they’re needed most.
Maintaining your no-dig border is just as simple as its installation. Periodically check for any sections that might have shifted and re-secure stakes or adjust materials as needed. Keeping the area around the border free of debris and trimming any encroaching grass will preserve its crisp lines. This minimal maintenance ensures your investment continues to pay dividends in terms of beauty and reduced garden chores. Embrace the power of the no-dig border; it’s not just an easy landscaping solution, but a strategic move that sets your entire garden up for long-term success and undeniable charm, truly transforming your backyard into the beautiful oasis you’ve always envisioned.