
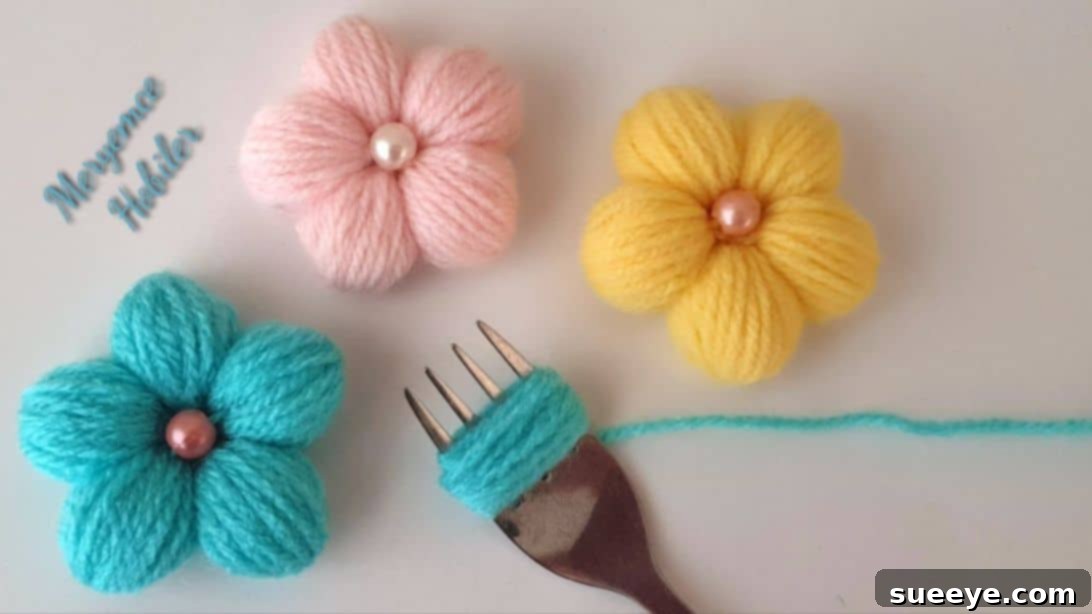
Craft Charming Wool Flowers: An Easy DIY Guide to Beautiful Yarn Blooms
Do you have a stash of beautiful yarns at home that are just waiting to be transformed into something wonderful? Instead of letting them gather dust, why not turn them into delightful, handcrafted woolen flowers? This super easy DIY project, inspired by the creative minds at Meryemce Hobiler on YouTube, offers a fantastic way to repurpose your yarn and add a touch of handmade charm to your life. Perfect for crafters of all ages, from enthusiastic children to seasoned adults, these yarn flowers are not only enjoyable to create but also incredibly versatile. Imagine adorning your favorite bag, embellishing a plain hat, or adding a cozy detail to pillow covers – the possibilities are endless! You can craft them in any color imaginable, matching your personal style or home decor. They also make thoughtful, unique gifts for friends who appreciate the art of handmade crafts or love sewing projects. Dive into this step-by-step guide and discover the joy of making your own beautiful wool flowers.
Making these charming yarn blooms is a rewarding experience that combines simplicity with creative expression. It’s an excellent way to introduce beginners to the world of yarn crafts, requiring minimal tools and no complex techniques. Beyond their aesthetic appeal, these DIY woolen flowers offer an eco-friendly approach to crafting by giving new life to leftover yarn scraps. Whether you’re looking for a relaxing afternoon activity, a fun project to do with kids, or a unique item to personalize your belongings, this tutorial has you covered. Let’s gather our materials and begin crafting these adorable, soft decorations!
Materials You’ll Need for Your Woolen Flower DIY
One of the best aspects of this easy woolen flower DIY project is that it requires only a few basic items, most of which you likely already have around your house. This makes it an accessible and budget-friendly craft for everyone. Here’s a list of what you’ll need to get started on your beautiful yarn blooms:
- A Fork: Any standard dining fork will work perfectly. It serves as your primary tool for creating the foundational loops of your flower petals.
- Yarn: This is the star of our project! You can use any type of yarn you prefer – acrylic, wool, cotton, or blends. Experiment with different weights and textures to see how they impact the look and feel of your finished flower. Consider using leftover scraps from other projects to add a sustainable touch.
- Scissors: A good pair of sharp scissors is essential for cleanly cutting your yarn.
- Yarn Needle: Also known as a tapestry needle, this blunt-tipped needle with a large eye is perfect for weaving in yarn ends and assembling your flower pieces without splitting the yarn.
- A Big Piece of a Bead: Choose a bead that complements your yarn color and flower size. This bead will become the beautiful center of your woolen flower, adding an extra touch of polish and charm.
Gathering these simple materials is the first step towards creating your unique, handmade yarn flowers. Once you have everything ready, you’ll be amazed at how quickly and easily these lovely decorations come to life!
Step-by-Step Guide to Crafting Your Easy Woolen Flowers
Now that you have all your materials assembled, let’s dive into the fun part: creating your very own charming woolen flowers. Follow these clear and detailed instructions, and you’ll have a beautiful bloom in no time. Remember, the key to success in any craft is patience and enjoying the process!
Step 1: Creating the Initial Yarn Loops on the Fork
Begin by taking the end of your chosen yarn. Hold it securely against the handle of the fork. Now, carefully start looping the yarn around the tines of the fork. You’ll want to wrap the yarn around the tines a total of 30 times. This specific number of wraps is crucial as it determines the fullness and size of your individual flower ‘petal’ or module. Wrapping it too few times might result in a sparse-looking bloom, while too many might make it overly dense and difficult to work with. Aim for even tension with each wrap, but don’t pull too tightly, as you’ll need to slide the yarn off later. Once you’ve completed 30 loops, cut the yarn, but make sure to leave a generous tail – at least 6-8 inches (15-20 cm) long. This ample allowance is vital for the subsequent steps, allowing you enough length to secure your loops and eventually tie your flower together.
Step 2: Securing the Yarn Loops with a Needle
With your yarn loops neatly wrapped around the fork, it’s time to secure them. Thread the long tail of yarn you left in Step 1 onto your yarn needle. Carefully insert the needle *underneath* the very first tine of the fork, going through the center of your wrapped loops. As you pull the yarn through, it will create a small, loose loop on one side. Now, guide your needle *into* this small loop and gently pull the yarn to tighten it. This action creates a secure knot or stitch that holds all the wrapped strands together at one end. Repeat this process once more, inserting the needle into the same small loop and tightening it again. This double knot ensures that your loops are firmly bound and won’t unravel when you remove them from the fork. Take your time with this step, making sure each loop is caught by the securing stitch.
Step 3: Finishing the First Petal and Repeating the Process
Once you’ve securely fastened one end of your yarn loops on the fork, it’s time to secure the other side. Take the same long yarn tail, still threaded through your needle, and pull it across to the opposite end of the wrapped loops. Just as you did before, insert the needle *underneath* the last tine of the fork, through the center of the loops, creating another small loop. Thread your needle through this new loop and tighten it twice, just like you did for the first end. This dual securing method is what gives your individual petal its distinct shape and keeps all the yarn strands in place. With both ends tied, carefully slide the entire yarn assembly off the tines of the fork. You should now have a small, somewhat rectangular or oval piece of gathered yarn. Trim any excessively long excess yarn tails, leaving about an inch or two (2-5 cm) on each side for later adjustments, but be careful not to cut too close to your knots. This single piece forms one ‘petal’ or segment of your woolen flower. To create a full, beautiful flower, you will need to repeat this entire process (Steps 1, 2, and 3) to make four more identical pieces, for a total of five individual yarn modules. Consistency in wrapping and tying will ensure your finished flower looks uniform and appealing.
Step 4: Assembling Your Woolen Flower
Now that you have five beautifully crafted yarn modules, it’s time to bring them all together to form your magnificent woolen flower. Take a fresh piece of yarn, about 12-18 inches (30-45 cm) long, and thread it through your yarn needle. Carefully pick up one of your yarn modules. Insert the needle through one of the secured ends of the module (where you tied it off in Step 2/3). Pull the yarn through, leaving a tail of about 3-4 inches (7-10 cm). Then, pick up your second yarn module and thread the needle through its secured end. Continue this process, stringing all five individual yarn modules onto the single piece of yarn. Once all five pieces are on the needle, remove the needle. You should now have all five modules threaded onto a single strand of yarn. Gently gather the modules into a circular shape, arranging them so they form a flower-like pattern. Take the two ends of the stringing yarn and tie them together tightly with a double knot. This knot will pull all the modules inwards, cinching them at the center and forming the characteristic shape of your flower. Adjust the modules as needed to ensure an even, full bloom. Trim any excess stringing yarn, leaving a short tail if you plan to use it for attaching the bead.
Step 5: Adding the Decorative Center Bead
The final touch to your beautiful woolen flower is adding a central bead, which will act as the flower’s pistil and complete its charming appearance. If you have a longer tail of yarn remaining from tying the flower together in Step 4, you can use that. Otherwise, take a fresh, short piece of yarn and thread it onto your yarn needle. Pass the yarn through the hole of your chosen bead. Now, carefully position the bead in the very center of your assembled woolen flower. Using the needle, poke the yarn through to the back of the flower, making sure to go through some of the looped yarn strands from one of the modules. This helps to secure the bead firmly in place. Once the bead is positioned and held, tie off the yarn securely at the back of the flower with a double knot, ensuring the bead remains snug in the center. Trim any excess yarn close to the knot. And just like that, your super easy woolen flower DIY is complete! Step back and admire your beautiful, handmade creation.
Congratulations! You’ve successfully created a gorgeous woolen flower. If you enjoyed this easy and fun DIY project, we highly recommend visiting and following Meryemce Hobiler on YouTube. Their channel is a treasure trove of amazing woolen craft ideas, including delightful keychains, elegant hairpins, and many other creative ways to use yarn. Happy crafting!
Why Make Woolen Flowers? Benefits and Endless Possibilities
Beyond the simple pleasure of crafting, making woolen flowers offers a multitude of benefits and opens up a world of creative possibilities. These charming yarn blooms are more than just a pretty decoration; they represent sustainable crafting, personal expression, and thoughtful gifting.
- Sustainable Crafting: One of the most compelling reasons to make these flowers is their potential for sustainability. They are an excellent way to use up leftover yarn scraps from larger knitting or crochet projects, preventing waste and giving new life to forgotten materials.
- Budget-Friendly Decor: With minimal materials required, these flowers are an incredibly inexpensive way to add custom decorations to your home or accessories. You can achieve a high-end, handmade look without breaking the bank.
- Creative Expression: The variety in yarn types, colors, and bead choices means that no two flowers have to be exactly alike. You can experiment with different color combinations, variegated yarns, or even multi-colored beads to create truly unique pieces that reflect your personal style.
- Relaxing and Therapeutic: Crafting, especially repetitive tasks like wrapping yarn, can be incredibly meditative and stress-relieving. It provides a mindful activity that helps clear your head and focus on the present moment.
- Skill Development: For beginners, this project is a fantastic introduction to yarn crafts. It teaches basic techniques like wrapping, tying knots, and assembling components, building confidence for more complex projects down the line.
- Personalized Gifting: Handmade gifts carry a special sentiment. A woolen flower, whether given as a standalone item or incorporated into another gift, shows thought, effort, and care.
Creative Uses and Inspiration for Your Handmade Wool Flowers
Once you’ve mastered the art of making these easy woolen flowers, you’ll find countless ways to incorporate them into your life and surroundings. Their soft texture and vibrant colors make them perfect for adding a touch of whimsy and warmth to almost anything. Here are some inspiring ideas for how to use your beautiful yarn blooms:
- Fashion Accessories:
- Bags and Purses: Sew or glue a few flowers onto a plain tote bag, canvas purse, or even a clutch for a personalized, bohemian touch.
- Hats and Beanies: Adorn winter beanies, sun hats, or even fascinators with a cluster of colorful flowers.
- Hair Accessories: Attach smaller flowers to hairpins, headbands, or elastic hair ties for a charming accessory.
- Brooches and Pins: Glue a safety pin or brooch back onto the reverse of a flower to create a unique pin for jackets, scarves, or sweaters.
- Jewelry: With smaller, more delicate flowers, you could even create pendants, earrings, or charm bracelets.
- Home Decor Enhancements:
- Pillow Covers: Stitch flowers onto throw pillows to add texture and a cozy, handmade feel to your living space.
- Curtain Tie-Backs: Embellish simple curtain tie-backs with a cluster of flowers for an elegant touch.
- Wreaths: Create a stunning, unique wreath by attaching numerous woolen flowers to a craft ring.
- Garlands: String multiple flowers together to create a festive garland for mantels, doorways, or nurseries.
- Vases and Centerpieces: Arrange your wool flowers in a small vase or incorporate them into a centerpiece for a permanent, no-maintenance floral display.
- Wall Art: Mount several flowers onto a canvas or frame them for a unique piece of textile art.
- Gift Embellishments and Stationery:
- Gift Wrapping: Instead of a traditional bow, use a woolen flower to decorate your gift packages, making them even more special.
- Greeting Cards: Glue a small flower onto a handmade or store-bought greeting card for an extra dimension and personalized touch.
- Scrapbooking: Use these flowers as embellishments in your scrapbooks or photo albums to highlight special memories.
- Bookmarks: Attach a small flower to the top of a ribbon bookmark for a lovely, unique reading accessory.
- Practical Items:
- Keychains: Securely attach a small flower to a keychain ring for a soft, tactile, and easy-to-find accessory.
- Zipper Pulls: Add a flower to a jacket or bag zipper for a decorative and functional pull.
Let your imagination run wild! These versatile woolen flowers are an excellent way to inject personality and handcrafted beauty into almost any item or space. Experiment with different sizes, colors, and arrangements to create truly unique creations.
Tips for Success and Troubleshooting Your Wool Flower Project
While this woolen flower DIY is designed to be super easy, a few tips can help ensure your project goes smoothly and yields the best results. Additionally, knowing how to troubleshoot common minor issues can save you time and frustration.
Tips for Success:
- Choose Your Yarn Wisely: Different yarn weights and fibers will give your flowers different looks. Thicker yarns (like chunky or bulky) will produce a fuller, more substantial flower, while thinner yarns (like sport or fingering) will result in a more delicate bloom. Smooth yarns will give a neater finish, while fuzzy yarns can add texture.
- Consistent Tension: When wrapping the yarn around the fork tines, try to maintain consistent tension. This helps ensure that all your individual “petals” are uniform in size and density, resulting in a more balanced and attractive final flower.
- Ample Yarn Tails: Do not skimp on the length of your yarn tails. Having enough allowance is crucial for comfortable tying and securing, preventing frustration from trying to work with short, fiddly ends.
- Experiment with Wraps: While the tutorial suggests 30 wraps, feel free to experiment! More wraps will create a denser, fuller petal, while fewer wraps will result in a lighter, more open flower. Play around to find your preferred aesthetic.
- Bead Selection: Choose a bead that complements your yarn color and the overall size of your flower. A larger bead will create a more prominent center, while a smaller bead will be more subtle. Ensure the bead’s hole is large enough for your yarn needle.
- Secure Knots: Always tie double knots when securing your yarn. This prevents unraveling and ensures your flower pieces stay firmly together.
- Sharp Scissors: Using sharp scissors will give you clean cuts, making your finished flowers look tidier and more professional.
Troubleshooting Common Issues:
- Uneven Petals: If your individual yarn modules look uneven, it’s likely due to inconsistent tension during wrapping or an uneven number of wraps. Don’t worry, slight variations add to the handmade charm! For future pieces, focus on maintaining an even wrap count and tension.
- Yarn Slipping Off the Fork: If the yarn keeps slipping off the tines, try holding the initial end more firmly against the handle. You can also use a small piece of tape to temporarily secure the starting end to the fork handle until you’ve done a few wraps.
- Difficulty Tying Knots: If the yarn tails feel too short or slippery for tying, gently pull the loops off the fork slightly to gain a bit more slack before tightening your knots. A yarn needle can also help guide the yarn through tight spots.
- Loose Bead: If your center bead feels loose, you might not have poked the yarn through enough of the flower’s fabric. Ensure the securing stitches for the bead go through multiple strands of the looped yarn at the center, then pull tightly and knot securely on the back. You can also add a tiny dab of fabric glue under the bead for extra security, though this usually isn’t necessary with a good knot.
- Flower Not Full Enough: If your finished flower looks sparse, consider making more individual modules (e.g., 6 or 7 instead of 5) or increasing the number of wraps per module (e.g., 35-40 wraps instead of 30).
Remember, crafting is a journey of learning and discovery. Don’t be afraid to experiment and adjust these instructions to fit your style and preferences. Enjoy the process of creating something beautiful with your own hands!
We hope this comprehensive guide has inspired you to pick up your yarn and create some delightful woolen flowers. They are a testament to how simple materials and a bit of creativity can transform into something truly charming. Happy crafting!