
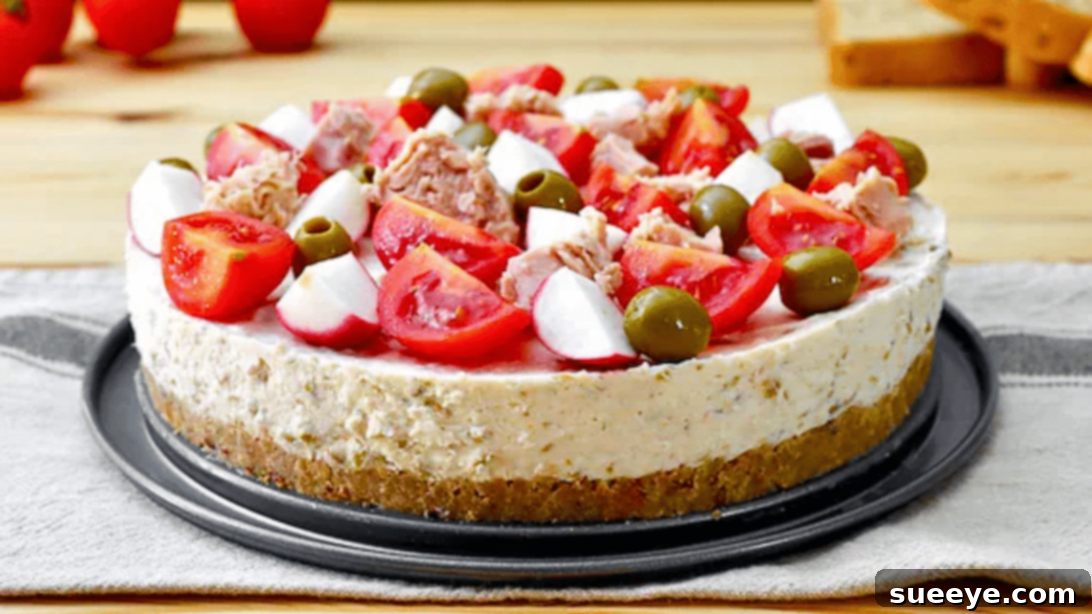
Easy Tuna & Olive Cheesecake Recipe: An Unexpected Savory Delight
Cheesecake – the very word typically conjures images of sweet, creamy indulgence, adorned with luscious fruits or rich chocolate. But what if we told you that this beloved dessert could take a surprisingly savory turn, transforming into an exquisite appetizer or a light, refreshing meal? Prepare to challenge your culinary perceptions with a truly unique creation: the Tuna and Olive Cheesecake. This isn’t just a deviation from the norm; it’s a delightful culinary adventure that promises to intrigue your palate and impress your guests. Forget everything you thought you knew about cheesecake, because this innovative recipe by the ingenious Cookist Wow on YouTube is about to redefine your idea of a perfect treat.
This savory cheesecake is exceptionally fresh, incredibly creamy, surprisingly healthy, and boasts a depth of flavor that will have you reaching for more long after the first bite. If you’re searching for an innovative dish that combines ease of preparation with gourmet appeal, look no further. This guide offers a comprehensive, step-by-step approach to mastering a show-stopping savory cheesecake that’s as simple to make as it is profoundly delicious. Get ready to embark on a flavorful journey that will leave you wondering why you haven’t tried this Mediterranean-inspired delicacy sooner.
Why a Savory Cheesecake? The Allure of Tuna and Olive
The concept of a savory cheesecake might sound unconventional, but it opens up a world of sophisticated flavors and culinary possibilities. Unlike its sweet counterparts, a savory cheesecake shines as an elegant appetizer, a unique brunch item, or a delightful addition to a picnic spread. The combination of tuna and olives is a classic Mediterranean pairing, celebrated for its robust, umami-rich, and briny notes. When expertly integrated into a creamy, luscious cheese base, these ingredients create a harmonious balance of salty, savory, and subtly tangy flavors, all resting upon a crisp, buttery breadcrumb crust. This particular recipe stands out not only for its exceptional taste but also for its no-bake simplicity, making it accessible to cooks of all skill levels.
It’s an excellent choice for entertaining, as it can be prepared well in advance, allowing you to spend more precious time with your guests and less time in the kitchen. The refreshing taste and light texture make it perfectly suited for warm weather gatherings, yet its rich and satisfying flavor profile ensures it’s a welcome treat any time of year. Whether you’re looking to surprise dinner guests with something unexpected or simply want to indulge in a unique and healthy snack, this tuna and olive cheesecake is a culinary revelation that promises to become a new favorite.
Ingredients for Tuna and Olive Cheesecake
Crafting this exceptional Tuna and Olive Cheesecake requires a careful selection of ingredients, each playing a crucial role in achieving its signature taste and wonderfully delicate texture. We’ll organize these into three essential components: the Crunchy Base, the Creamy Filling, and the Fresh Topping, ensuring you have everything you need for this delightful creation.
The Base: A Savory Foundation
The foundation of any great cheesecake is its crust, and for this savory version, we opt for a robust and flavorful breadcrumb base that perfectly complements the rich filling. Toasting the breadcrumbs beforehand adds an extra layer of nutty depth.
- 1¾ cups (approx. 200g) of Bread Crumbs: These provide a wonderfully textured and stable base. For the best flavor, consider using day-old bread, toasted and then processed into fine crumbs. The toasting step adds an extra layer of nutty depth and aroma.
- 1 cup (approx. 226g) of Butter, melted: The melted butter is crucial for binding the breadcrumbs together, creating a firm, rich crust that holds its shape beautifully and provides a delightful contrast to the creamy filling.
The Filling: The Heart of the Cheesecake
This is where the magic truly happens, as a blend of creamy cheeses merges with the distinctive, bold flavors of tuna and olives, all set with gelatin for that perfect no-bake consistency.
- 1¼ cups (approx. 250g) of Ricotta Cheese: Known for its light texture and mild, slightly sweet flavor, ricotta forms the bulk of our creamy filling, offering a refreshing counterpoint to the stronger savory elements.
- ½ cup (approx. 120g) of Cream Cheese: Essential for that classic cheesecake tang and rich, velvety smooth consistency. Opt for full-fat cream cheese for the best and creamiest results.
- ½ cup (approx. 120g) of Stracchino Cheese: A soft, fresh Italian cheese, stracchino contributes a unique milky, tangy flavor and a wonderfully spreadable texture, significantly enhancing the overall creaminess of the filling. If stracchino is unavailable, a high-quality mascarpone or even extra cream cheese can be a suitable substitute, though the flavor profile will subtly change.
- ½ cup (approx. 70g) of Pitted Olives, chopped: The star savory component, olives (such as Kalamata, black, or green) provide a briny, salty punch that perfectly balances the creamy cheese. Chopping them ensures even distribution and flavor in every bite.
- ½ cup (approx. 100g) of Tuna, drained: A versatile pantry staple, tuna (preferably oil-packed for a richer flavor, but water-packed works too, just ensure thorough draining) adds a substantial, savory element. Its flaky texture integrates beautifully with the smooth cheese mixture.
- Salt, to taste: Essential for seasoning and bringing out the best in all the ingredients, adjust to your preference based on the saltiness of your olives and tuna.
- 4 sheets of Gelatin: These are crucial for setting the cheesecake without baking, giving it that firm yet delicate texture that holds its shape beautifully when sliced.
- 40ml or 2¾ tbsp of Milk: Used to dissolve the gelatin sheets, ensuring a smooth and lump-free incorporation into the creamy filling.
The Topping: The Perfect Garnish
The topping adds a vibrant burst of freshness, color, and an extra layer of flavor, making the cheesecake visually appealing and even more delicious.
- Cherry Tomatoes: Halved or quartered, they add a burst of sweet acidity and a vibrant red color, providing a refreshing contrast.
- Radishes: Thinly sliced, radishes contribute a crisp texture and a pleasant peppery bite, beautifully cutting through the richness of the cheese.
- Pitted Olives: A few extra olives on top reinforce the main flavor profile and add a beautiful, classic garnish.
- Tuna: Flaked tuna for garnish visually reinforces the main ingredient, making it clear what delightful flavors await.
How to Make Tuna and Olive Cheesecake: A Step-by-Step Culinary Journey
This recipe is designed for simplicity and deliciousness, following Cookist Wow’s clear instructions to ensure a perfect result every time. Get ready to create a memorable savory treat!
Step 1: Crafting the Perfect Breadcrumb Base
Begin by preparing your cheesecake’s sturdy and flavorful foundation. Take your bread and cut it into small, uniform pieces. Transfer these pieces to a dry pan and toast them over medium heat, stirring continuously to ensure they brown evenly and don’t burn. This toasting step is vital as it significantly enhances the bread’s flavor, giving the base a richer, nuttier, and more aromatic profile than untoasted crumbs. Once golden and fragrant, remove the toasted bread from the pan and let it cool slightly. Then, transfer the toasted bread pieces to a food processor and pulse until they form fine, even crumbs. Be careful not to over-process, which can turn them into a paste. Next, add the melted butter to the breadcrumbs in the food processor. Process again until the butter is thoroughly incorporated and the mixture is smooth and evenly moistened. The crumbs should resemble wet sand and hold together when pressed firmly.
Step 2: Forming the Crust and Preparing the Gelatin and Cheese Mixture
Carefully transfer the buttered breadcrumb mixture into a springform cake pan, ideally 8-9 inches in diameter. For easier removal, line the bottom of the pan with parchment paper. Using the back of a spoon or your knuckles, press the mixture down firmly and evenly across the bottom of the pan, extending slightly up the sides if you prefer a higher crust. This firm compression is key to preventing the crust from crumbling when sliced. Once pressed, place the pan into the refrigerator to chill for approximately 15 minutes; this allows the butter to solidify, setting the crust. While the crust chills, prepare your gelatin. Submerge the gelatin sheets in a bowl of cold water and let them soften for about 5-10 minutes. In a separate, large mixing bowl, combine the ricotta cheese, stracchino cheese, cream cheese, and a pinch of salt. Using an electric mixer or a whisk, beat these cheeses together until the mixture is beautifully creamy, smooth, and well combined, ensuring no lumps remain.
Step 3: Integrating Savory Flavors and Dissolving Gelatin
Now it’s time to infuse the creamy cheese mixture with the delightful savory elements. Add the thoroughly drained tuna and the finely chopped pitted olives to the bowl with the creamy cheese mixture. Gently fold them in until all ingredients are well combined and distributed evenly throughout the cheese. Be careful not to overmix, as this can break down the tuna too much, affecting its texture. Set this flavorful mixture aside. Next, retrieve your softened gelatin sheets from the cold water. Squeeze out all excess water from the sheets until they are pliable but not dripping. Transfer the squeezed gelatin sheets to a small saucepan. Pour the milk into the saucepan with the gelatin. Heat this mixture over very low heat, stirring continuously, until the gelatin sheets are completely dissolved into the milk. Ensure there are no lumps, and the mixture is clear and smooth. Do not let it boil, as excessive heat can reduce gelatin’s setting power.
Step 4: Assembling and Chilling the Cheesecake for Perfection
Once the gelatin mixture is fully dissolved and warm, carefully add it to the prepared creamy cheese, tuna, and olive mixture. Stir continuously and thoroughly until the gelatin mixture is completely incorporated into the cream, ensuring it’s evenly distributed throughout the filling. This step is crucial for the cheesecake to set properly. Retrieve your chilled crust from the refrigerator. Pour the entire creamy filling mixture over the solidified crust in the cake pan. Use an offset spatula or the back of a spoon to spread the filling evenly across the pan, creating a smooth top surface. Once assembled, gently tap the pan on the counter a few times to release any trapped air bubbles. Place the cheesecake back into the refrigerator and let it chill for a minimum of 4 hours, or ideally, overnight. This extended chilling time is essential for the gelatin to fully set, resulting in a firm, sliceable cheesecake. Before serving, carefully remove the cheesecake from the springform pan. Finally, garnish the top with wedges of fresh cherry tomatoes, thinly sliced radishes, a few flakes of tuna, and whole pitted olives for a vibrant and appealing presentation. Slice, serve, and savor this unique savory delight!
Tips for a Flawless Savory Cheesecake
To ensure your Tuna and Olive Cheesecake turns out perfectly every time, from its firm crust to its creamy filling and delightful topping, consider these expert tips:
- Quality Ingredients Matter: The success of this dish heavily relies on the quality of its components. Use good quality tuna, preferably packed in olive oil for a richer flavor profile (remember to drain it exceptionally well!). Choose fresh, flavorful olives and high-quality cheeses like ricotta, cream cheese, and stracchino. Your taste buds will undoubtedly thank you.
- Thorough Draining of Tuna: Excess moisture from tuna can significantly affect the consistency and setting of your cheesecake filling, making it watery. Always drain the tuna thoroughly, even pressing it gently with a spoon or a paper towel to remove as much liquid as possible.
- Evenly Toasted Breadcrumbs: Do not skip the toasting step for the breadcrumbs. It adds a crucial depth of flavor, a pleasant aroma, and a satisfying crunch that a plain crumb base simply can’t replicate. Keep stirring them constantly to prevent burning and achieve an even golden brown.
- Firmly Press the Crust: A well-compressed crust is absolutely essential for structural integrity. Use the bottom of a flat-bottomed measuring cup, a small glass, or even your knuckles to press the crumbs firmly and evenly into the pan. This prevents the crust from crumbling when sliced.
- Gelatin Handling: When dissolving gelatin, ensure the milk is warm, not boiling. Boiling can diminish gelatin’s setting power. Stir continuously until fully dissolved, and add it to the cheese mixture while it’s still warm but not hot, to ensure smooth incorporation without any lumps.
- Patient Chilling is Key: This is arguably the most crucial step for any no-bake cheesecake. Allow the cheesecake to chill for at least 4 hours, but ideally overnight. This extended period ensures the gelatin fully sets, resulting in a firm, sliceable texture that holds its shape beautifully. Rushing this step will inevitably lead to a soft, unset, or wobbly cheesecake.
- Experiment with Olives: While black olives or Kalamata olives are classic choices and highly recommended, feel free to try green olives stuffed with pimentos for a different briny kick, or even a mix of varieties for a more complex and nuanced flavor profile.
- Room Temperature Cheeses: For the smoothest, lump-free filling, ensure your ricotta, cream cheese, and stracchino are all at room temperature before mixing. This helps them combine effortlessly and ensures a uniformly creamy consistency without any stubborn clumps.
Creative Variations and Serving Suggestions
While the classic Tuna and Olive Cheesecake is a triumph on its own, don’t hesitate to explore these creative variations to customize it to your taste, dietary preferences, or the specific occasion:
Crust Alternatives:
- Savory Crackers: Instead of breadcrumbs, consider a savory cracker crust made from crushed Ritz crackers, digestive biscuits, or even a gluten-free cracker option for those with dietary restrictions. These can add a different layer of saltiness and texture.
- Herb-Infused Base: Infuse your breadcrumbs with dried herbs like oregano, thyme, rosemary, or a blend of Italian herbs before mixing with butter for an aromatic boost.
Filling Enhancements:
- Fresh Herbs: Elevate the flavor profile with finely chopped fresh dill, parsley, chives, or a hint of fresh oregano. These herbs add brightness and a garden-fresh essence.
- Spices: A pinch of smoked paprika can add warmth and a subtle smoky undertone, while a dash of freshly ground black pepper can enhance the overall savory notes.
- Citrus Zest: A tiny amount of lemon zest can surprisingly brighten the entire dish, cutting through the richness and adding a refreshing tang.
- Additional Vegetables: Finely diced sun-dried tomatoes (oil-packed, thoroughly drained), capers, or roasted red peppers can add additional layers of flavor, vibrant color, and delightful texture.
- Cheese Blends: If stracchino is difficult to find, mascarpone cheese can offer a similar creamy richness. For a tangier and saltier profile, a small amount of crumbled feta cheese could be mixed into the filling.
- Tuna Options: Experiment with different types of tuna, such as albacore for a milder flavor or skipjack for a more robust and intense taste. Oil-packed tuna generally offers a richer texture.
Topping Ideas:
- Beyond the suggested cherry tomatoes and radishes, consider a generous drizzle of high-quality extra virgin olive oil, a sprinkle of additional fresh chopped herbs, thinly sliced red onion for a slight bite, or even a scattering of toasted pine nuts for added crunch and nutty flavor.
- A small amount of balsamic glaze can also provide a beautiful visual and flavor contrast, especially when drizzled artfully over the finished cheesecake.
- For an extra layer of elegance, consider thin slices of cucumber or finely diced bell peppers.
Serving Suggestions:
This savory cheesecake is incredibly versatile and can be served in various ways:
- Appetizer: Serve it chilled with a selection of crispy crackers, rustic crusty bread, or small crostini for a sophisticated and impressive appetizer.
- Light Lunch: Pair a generous slice with a simple green salad dressed with a light vinaigrette for an elegant and satisfying lunch.
- Canapé: Cut into small, bite-sized squares, it makes an excellent canapé for parties and gatherings, easy to handle and enjoy.
- Brunch Item: Offer it as part of a brunch spread alongside other savory and sweet dishes for a truly memorable meal.
Storage and Make-Ahead Convenience
One of the great advantages of this no-bake cheesecake is its excellent make-ahead potential, making it a perfect dish for entertaining or meal prep. Once prepared and thoroughly chilled, it can be stored in an airtight container in the refrigerator for up to 3-4 days. For optimal freshness, texture, and flavor, it’s generally best enjoyed within 2 days of preparation.
If you are making it ahead for an event or party, we highly recommend preparing the base and filling the day before, allowing it to chill overnight. This extended chilling period is crucial for ensuring the cheesecake is perfectly set and easy to slice. Then, add the fresh toppings just before serving to maintain their crispness, vibrant color, and overall freshness. This approach makes entertaining effortless and ensures a perfectly set and delicious cheesecake every time, reducing last-minute stress in the kitchen.
Conclusion: A Savory Masterpiece Awaits
The Tuna and Olive Cheesecake is more than just a recipe; it’s an invitation to explore the exciting possibilities of savory baking without the oven. It’s a dish that surprises, delights, and utterly satisfies, offering a refreshing departure from traditional cheesecakes. With its creamy texture, rich Mediterranean flavors, and vibrant, appealing presentation, this cheesecake is guaranteed to be a conversation starter and a highlight at any gathering.
Thanks to Cookist Wow for sharing such an innovative and accessible recipe that encourages culinary creativity. So, gather your ingredients, follow these simple and detailed steps, and prepare to create a culinary masterpiece that will leave a lasting impression on anyone who tastes it. Dive into the delightful world of savory cheesecakes, and discover your new favorite unique treat!
*All images are credited to Cookist Wow via YouTube. Be sure to visit their channel and subscribe for more amazing culinary creations and innovative recipes!