
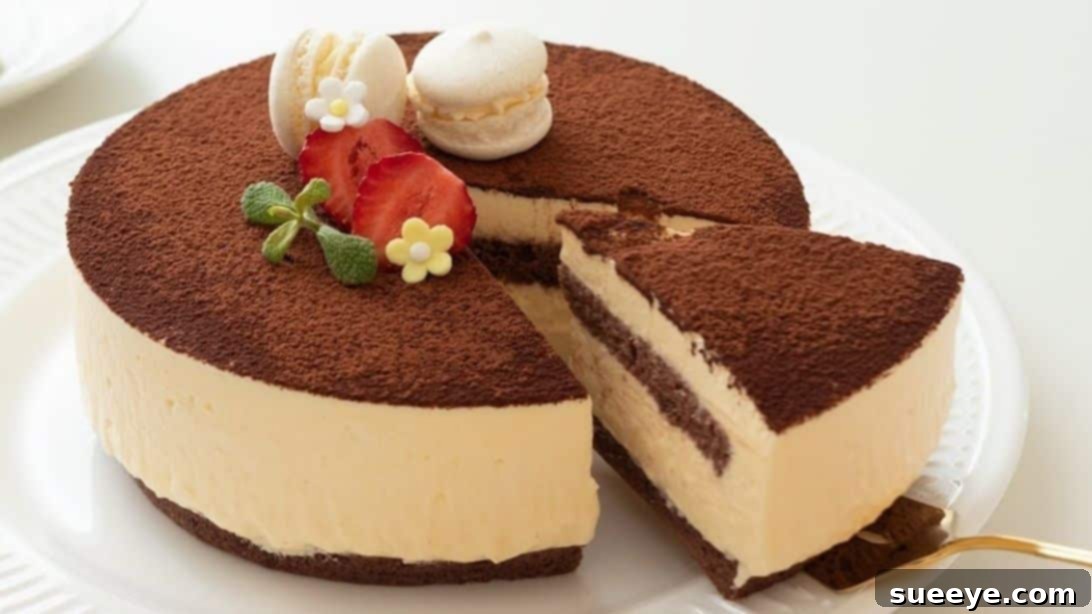
Welcome to the delightful world of homemade desserts! If the very mention of Tiramisu makes your heart sing, then prepare to elevate your baking game with this incredibly easy and absolutely fail-proof Tiramisu Cake recipe. Perfect for beginners and seasoned bakers alike, this tutorial will guide you through creating a show-stopping Italian classic in cake form. Forget complicated techniques; we’re breaking down every step to ensure your first (or hundredth!) Tiramisu cake is nothing short of spectacular. This simplified approach, inspired by the culinary wisdom of HidaMari Cooking, will have you confidently baking a dessert that’s rich, creamy, and utterly irresistible. Get ready to impress your friends and family with a dessert that tastes like it came straight from an Italian patisserie!
Unveiling the Perfect Tiramisu Cake: Your Beginner’s Guide to an Italian Classic
The traditional Tiramisu is a layered dessert often made with ladyfingers, but transforming it into a cake offers a new dimension of texture and presentation. This recipe focuses on creating a light, airy cocoa sponge that perfectly complements the rich, velvety mascarpone cream. It’s designed to be approachable, ensuring that even those new to baking can achieve professional-looking and tasting results. We’ll cover everything from whipping egg whites to achieve the ideal sponge texture to assembling your cake with layers of coffee-infused goodness and luscious cream. Prepare to embark on a culinary journey that promises a truly satisfying reward.
Essential Ingredients for Your Tiramisu Masterpiece
Crafting an authentic and delicious Tiramisu cake begins with selecting the right ingredients. Quality makes a difference, especially when it comes to the star components like mascarpone cheese and fresh eggs. Here’s a detailed breakdown of everything you’ll need, separated into the cocoa sponge and the decadent tiramisu cream, along with precise measurements to ensure your success.
For the Light and Airy Cocoa Sponge
The foundation of our Tiramisu cake is a tender, chocolate-kissed sponge. This recipe ensures a moist and flavorful base that will absorb the coffee perfectly without becoming soggy. Each ingredient plays a crucial role in achieving that sought-after delicate texture.
- 3 Large Egg Whites: Essential for creating structure and lightness.
- 50g (¼ cup) Granulated Sugar: Sweetens the sponge and stabilizes the egg whites.
- 2 Large Egg Yolks: Adds richness, color, and flavor to the batter.
- 50g (¼ cup) All-Purpose Flour: Provides the primary structure for the cake.
- 10g (1¼ tbsp) Unsweetened Cocoa Powder: Infuses the sponge with a subtle chocolate flavor and a beautiful dark hue.
- 30ml (1 ounce) Whole Milk: Adds moisture and tenderizes the crumb.
- 15ml (0.5 ounces) Neutral Salad Oil (e.g., vegetable, canola): Contributes to a soft, moist texture.
Crafting the Silky Tiramisu Cream
The heart of any Tiramisu is its rich, airy cream, and ours is no exception. This segment details the ingredients for a classic mascarpone cream, balanced with just the right amount of sweetness and lightness to complement the sponge.
- 200g (1 cup) Mascarpone Cheese: The star ingredient, providing the signature creamy, rich texture of Tiramisu. Ensure it’s at room temperature for easy blending.
- 20g (1½ tbsp) Granulated Sugar: Sweetens the mascarpone base.
- 2 Large Egg Yolks: Adds richness, color, and emulsifies the cream.
- 1 Large Egg White: Whipped separately to lighten the cream, giving it an airy consistency.
- 30g (2½ tbsp) Granulated Sugar: Used to stabilize and sweeten the whipped egg white.
- 100ml (3.3 ounces) Fresh Heavy Cream (35% fat or higher): Whipped to soft peaks, this further lightens and enriches the Tiramisu cream.
Step-by-Step Guide to Crafting Your Easy Tiramisu Cake
Now that you have all your ingredients ready, let’s dive into the exciting part: baking and assembling your magnificent Tiramisu cake! Each step is broken down with clear instructions to ensure a smooth and enjoyable baking process. Pay close attention to the folding techniques, as they are key to achieving a light and airy sponge and a perfectly textured cream.
Step 1: Baking the Perfect Cocoa Sponge Base
The foundation of your Tiramisu cake is a delicate yet sturdy cocoa sponge. Achieving the right texture is crucial for a cake that’s both flavorful and holds up beautifully under the cream. Follow these detailed instructions carefully for a sponge that’s light, fluffy, and infused with subtle chocolate notes.
Begin by preparing your mixing bowl. Ensure it’s meticulously clean and free of any grease to allow the egg whites to whip properly. Add the 3 egg whites into the bowl. Using an electric mixer, beat the egg whites on medium-high speed until they become frothy and soft peaks begin to form. This initial frothing helps incorporate air. Gradually, about a tablespoon at a time, sprinkle in the first portion of granulated sugar (50g). Continue beating the mixture until it transforms into glossy, stiff peaks. You’ll know it’s ready when the meringue holds its shape firmly when the beater is lifted, and the peaks don’t collapse.
Once your meringue is perfect, switch to a soft spatula. Gently fold in the 2 egg yolks into the meringue. Use a gentle, sweeping motion from the bottom to the top of the bowl, rotating the bowl as you go, ensuring you don’t deflate the air you’ve just incorporated. Mix just until the yolks are combined and the mixture is uniform.
Next, sift the flour and cocoa powder directly over the egg mixture. Sifting is vital here to prevent lumps and ensure a smooth, airy batter. Using your spatula, carefully fold the dry ingredients into the wet mixture. Again, employ the gentle folding technique, being mindful not to overmix. Overmixing will develop the gluten in the flour, resulting in a tough sponge, and will also deflate the precious air bubbles.
In a separate, small bowl, combine the milk and salad oil. Take a small portion of your main batter and fold it into the milk and oil mixture. This step, known as tempering, helps to lighten the heavier milk and oil mixture, making it easier to incorporate into the main batter without causing it to deflate. Once uniform, pour this tempered mixture back into your main batter. Continue to gently fold until all ingredients are thoroughly combined, yet the batter remains light and airy.
Pour the prepared batter evenly into a 15 cm (6 inches) square cake pan. You can line the bottom with parchment paper for easy removal. Gently tap the cake pan on your countertop a few times to release any large trapped air bubbles, which can cause large holes in your finished sponge. Bake in a preheated oven at 170°C (338°F) for approximately 30 minutes. Baking times can vary, so check for doneness by gently pressing the center of the cake – it should spring back. A wooden skewer inserted into the center should come out clean. Once baked, tap the pan on the counter again, then carefully invert it onto a cooling rack to cool completely. This prevents the cake from shrinking or becoming dense.
Step 2: Preparing the Irresistible Mascarpone Cream
The Tiramisu cream is what truly defines this dessert. It’s a luscious, airy, and rich blend of mascarpone, eggs, and whipped cream, providing a sublime contrast to the coffee-soaked sponge. Follow these steps to create a cream that is perfectly balanced in texture and flavor.
In a spacious mixing bowl, place the room-temperature mascarpone cheese and the first portion of granulated sugar (20g). Using a spatula or a whisk, gently fold and mix these two ingredients together until the mixture is smooth, creamy, and free of lumps. Mascarpone can become grainy if overmixed, so work gently. Next, add the 2 egg yolks to the mascarpone mixture. Whisk them in until they are fully incorporated and the mixture is uniform, boasting a beautiful pale yellow color.
In a separate, very clean bowl, begin to beat the single egg white lightly until it starts to foam. Gradually add the second portion of granulated sugar (30g) while continuing to beat. Whip until soft peaks form – these peaks should hold their shape but still be pliable and fold over slightly. Avoid over-whipping to stiff peaks, as this can make the cream less smooth. Gently transfer this whipped egg white into the mascarpone-yolk mixture. Use a whisk or spatula to carefully fold it in, lightening the mascarpone base without deflating the air.
Finally, in yet another clean bowl, beat the fresh heavy cream until it forms soft to medium peaks. It should be thick and hold its shape but still be pourable. Be careful not to over-whip it into butter. Once whipped, gently fold the heavy cream into the mascarpone mixture. Continue to mix until the entire cream is uniform in texture and consistency, embodying a light, airy, and truly decadent feel. This perfectly prepared mascarpone cream is now ready to be layered into your Tiramisu cake, promising an unforgettable taste experience.
Step 3: Assembling and Chilling Your Tiramisu Cake Perfection
With your beautiful cocoa sponge baked and your creamy mascarpone mixture ready, it’s time for the grand finale: assembling your Tiramisu cake! This layering process is where all the flavors come together, creating the iconic taste and texture of this beloved Italian dessert. Precision and gentle handling are key here.
First, take your cooled cocoa sponge cake. Using a sharp serrated knife, carefully slice the entire sponge horizontally in half, creating two even layers. From one of these layers, gently trim it into a perfect 15cm (6 inches) circle. This will be the base of your cake. From the remaining half of the sponge, trim another piece into a slightly smaller 12cm (4-5 inches) circle. This smaller layer will be nestled within the cream, adding another dimension to your cake’s structure and flavor profile.
Now, prepare your 15cm (6 inches) round cake pan for assembly. You can line it with acetate film or parchment paper strips around the sides if you wish for easier unmolding later, though it’s not strictly necessary. Place the larger 15cm cake circle securely at the bottom of the pan. This forms the solid base of your Tiramisu cake. Using a pastry brush, generously brush the surface of this sponge layer with freshly brewed, cooled coffee. Ensure the sponge is adequately moistened but not completely saturated – you want it to absorb the coffee’s flavor without becoming soggy. Once brushed, carefully pour approximately half of your prepared Tiramisu cream mixture over this coffee-soaked base, spreading it evenly to the edges.
Next, gently place the smaller 12cm cake circle directly on top of the cream layer, centering it within the pan. This creates a delightful hidden layer within your Tiramisu. Again, take your pastry brush and generously moisten the surface of this smaller cake layer with coffee. Finally, spoon the remaining Tiramisu cream mixture over the top, spreading it smoothly and evenly to cover the entire cake. Use an offset spatula to create a beautiful, level finish.
Once assembled, cover the cake pan loosely with plastic wrap and transfer it to the refrigerator. Allow the Tiramisu cake to chill and set completely for at least 4-6 hours, or ideally, overnight. This chilling period is crucial as it allows the flavors to meld beautifully and the cream to firm up, making the cake much easier to slice and serve. Rushing this step can result in a messy presentation.
To unmold your exquisite Tiramisu cake, gently wrap a warm, wet towel around the outside of the cake pan for about 30 seconds to a minute. The warmth will slightly loosen the cream from the pan edges. Carefully slide a thin, flexible knife around the perimeter of the cake, then gently push the cake upwards from the bottom of the springform pan, or invert it onto a serving plate if using a regular pan. Once unmolded, the final flourish awaits: generously dust the top of the Tiramisu cake with a fine layer of unsweetened cocoa powder using a sieve. For an extra touch of elegance, you can garnish it with chocolate shavings, fresh berries, or even a sprig of mint. Your homemade Tiramisu cake is now ready to be admired and devoured!
Your Homemade Tiramisu Cake Awaits: Enjoy This Delightful Dessert!
Congratulations! You’ve successfully crafted a magnificent Tiramisu cake that is not only a feast for the eyes but also an explosion of classic Italian flavors. This easy-to-follow, beginner-friendly recipe proves that making impressive desserts at home is entirely achievable. The combination of the tender cocoa sponge, the invigorating coffee soak, and the cloud-like mascarpone cream creates a harmonious balance that is truly unforgettable.
Whether you’re serving it at a special gathering, celebrating a milestone, or simply indulging in a luxurious treat for yourself, this homemade Tiramisu cake is sure to be a crowd-pleaser. Don’t hesitate to personalize your garnishes – perhaps a sprinkle of chocolate shavings, a few fresh raspberries, or a dusting of cinnamon for a different twist.
A huge thank you and all credit for the inspiring visuals and foundational techniques go to HidaMari Cooking via YouTube. We highly recommend checking out her other incredible content and following for more fantastic baking ideas and tutorials!
Easy Tiramisu Cake Recipe FAQ
Here are some frequently asked questions to help you perfect your Tiramisu cake:
Can I make this Tiramisu cake ahead of time?
Absolutely! Tiramisu actually tastes even better the next day as the flavors have more time to meld and deepen. You can prepare the entire cake up to 2-3 days in advance and store it covered in the refrigerator. Just dust with cocoa powder right before serving.
What kind of coffee should I use for the sponge?
Strong, freshly brewed espresso or a very strong instant coffee works best. Make sure it’s cooled before brushing onto the sponge to prevent the cake from breaking down. Avoid flavored coffees, as they can overpower the delicate Tiramisu flavor.
Can I substitute mascarpone cheese?
While mascarpone is traditional and highly recommended for its unique richness and texture, a good quality cream cheese (full-fat, softened) mixed with a little heavy cream could be a very distant substitute in a pinch. However, the authentic Tiramisu flavor and texture will be significantly altered. For the best results, stick to mascarpone.
How long does homemade Tiramisu cake last?
When stored properly in an airtight container in the refrigerator, your Tiramisu cake should remain fresh and delicious for 3-4 days. Due to the raw eggs, it’s best to consume it within this timeframe.
My egg whites aren’t whipping to stiff peaks, what am i doing wrong?
The most common reasons are traces of fat (even a tiny bit of yolk) in the egg whites or a greasy bowl/utensils. Ensure your bowl and whisk are impeccably clean and dry. Also, make sure your eggs are at room temperature, as they whip better. Start slowly and gradually increase speed.
Can I make this recipe without alcohol?
Yes, this recipe is already alcohol-free! Traditional Tiramisu often includes a splash of rum or Marsala wine in the coffee, but this version omits it, making it suitable for everyone. If you wish to add it, you can mix a tablespoon or two into your cooled coffee before brushing the sponge.