
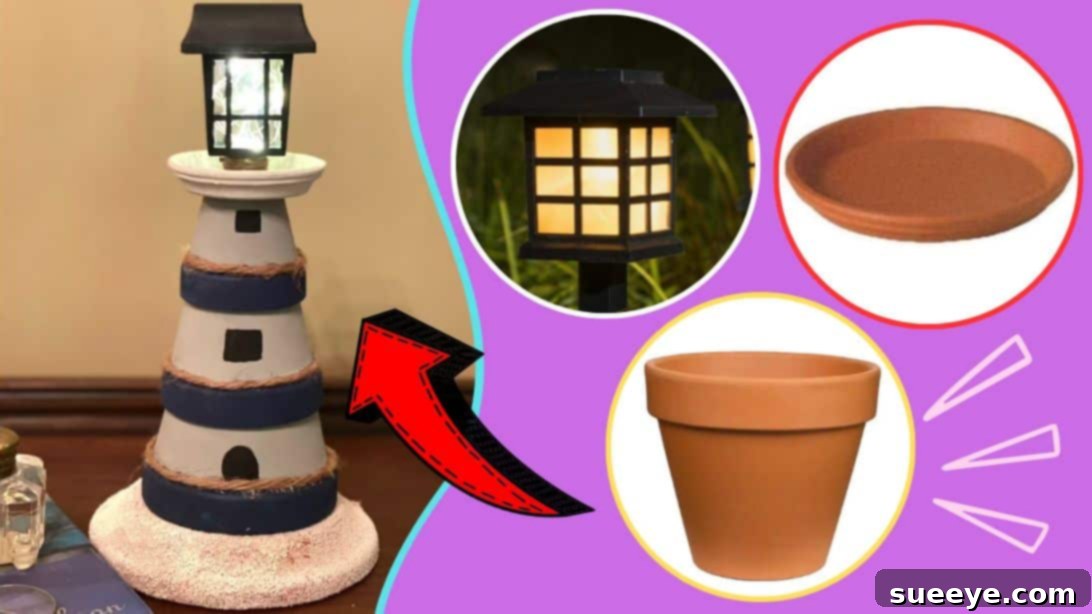
Transform your outdoor space or indoor shelves with a touch of coastal charm! This delightful DIY terra cotta pot lighthouse project, inspired by the creative minds at Chalk It Up Fancy on YouTube, offers an incredibly easy and rewarding crafting experience. Imagine a miniature lighthouse, crafted from readily available terra cotta pots, casting a gentle glow in your garden, on your patio, or even as a whimsical centerpiece. This project is not only simple enough to complete in just a few minutes but also produces a fully functional, illuminated piece of decor that promises to add a unique, personalized touch to any setting. Whether you’re an experienced crafter or just starting your DIY journey, the minimal cost and high visual impact of this homemade lighthouse make it an irresistible endeavor. Get ready to gather your materials, most of which can be found at your local dollar store, and embark on a creative adventure that brightens your home and garden.
Creating your own decorative lighthouse is an excellent way to infuse a sense of coastal tranquility and playful charm into your surroundings. This guide will walk you through each step, from painting your terra cotta pots to assembling your illuminated masterpiece. We’ll delve into useful tips for achieving professional-looking results, discuss potential customizations, and answer common questions to ensure your crafting experience is smooth and enjoyable. Embrace the joy of crafting and design a beacon of light that reflects your personal style and creativity!
Essential Materials for Your DIY Lighthouse
Before diving into the creative process, ensuring you have all the necessary supplies on hand will make your crafting experience seamless and enjoyable. Most of these items are easily accessible and budget-friendly, often found at craft stores, hardware stores, or even dollar stores. Here’s a detailed list to prepare for your charming terra cotta pot lighthouse:
- 1 Large Terra Cotta Pot: This will form the sturdy base of your lighthouse structure, providing a solid foundation.
- 1 Medium Terra Cotta Pot: Positioned above the large pot, it contributes to the lighthouse’s tapering shape.
- 1 Small Terra Cotta Pot: The smallest pot completes the main body, leading up to the light fixture.
- 1 Large Terra Cotta Saucer: This saucer will serve as the sandy base for your lighthouse, adding a realistic beach-like aesthetic.
- 1 Small Terra Cotta Saucer: This piece will cap off the top of your lighthouse, just beneath the solar light.
- Gray Chalk Paint: The primary color for the lighthouse body, mimicking classic stone or concrete. Chalk paint adheres well to terra cotta and provides a matte finish.
- Navy Blue Chalk Paint: Perfect for adding a contrasting rim to the pots, evoking traditional nautical themes.
- Black Chalk Paint: Used for detailing the lighthouse, such as drawing windows and a door, giving it character.
- White Chalk Paint: Essential for painting the small top saucer, creating a clean and bright finish that highlights the light.
- Paintbrush or Foam Applicator: You’ll need various sizes for broad strokes and fine detailing. A foam applicator can provide a smooth, even coat.
- Fine Sand: To create a realistic sandy beach effect on the large saucer base. Any clean craft sand will work.
- Mod Podge: A versatile craft glue, sealer, and finish. It will be used to adhere the sand to the saucer base.
- E6000 Adhesive: A strong, permanent industrial-strength glue perfect for bonding the terra cotta pots and saucers securely for outdoor durability.
- Hot Glue Gun and Glue Sticks: Excellent for quick bonds, especially for attaching the jute rope and twine, providing immediate hold while E6000 cures.
- X-Acto Knife or Scissors: For cutting jute twine and rope precisely. Exercise caution when using an X-Acto knife.
- Jute Twine: A thinner natural fiber cord used for decorative accents around the solar light.
- Jute Rope: A thicker natural fiber rope used to embellish the rims of the pots, adding texture and a rustic, nautical feel.
- Small Solar Light: The functional beacon of your lighthouse. Choose one that fits aesthetically and provides sufficient light.
- Fairy Lights (battery-operated): Optional, but highly recommended for an additional magical glow from within the lighthouse structure.
Step-by-Step Guide to Crafting Your Terra Cotta Lighthouse
Follow these detailed instructions to bring your charming terra cotta pot lighthouse to life. Each step is designed for clarity and ease, ensuring a successful and enjoyable crafting experience.
Step 1: Preparing and Decorating the Terra Cotta Components
Begin by preparing your terra cotta pots and saucers. Ensure they are clean and dry for optimal paint adhesion. Take your three terra cotta pots (large, medium, and small). Using your paintbrush or foam applicator, generously apply a coat of gray chalk paint to the exterior of each pot. Strive for an even and smooth application, ensuring no terra cotta shows through. Once the first coat is applied, set them aside in a well-ventilated area and allow them to dry completely. Depending on your paint, this could take 20-30 minutes, or longer if you apply a thick coat. After the gray paint is thoroughly dry, carefully paint the rim of each pot with navy blue chalk paint. This contrasting color will define the top edge of each section of your lighthouse. Again, allow the navy blue paint to dry completely before moving on to the next embellishment.
Next, enhance the nautical theme by adding jute rope to the rims. Dab small amounts of hot glue around the top edge of the navy blue rim on the large pot. Quickly, before the glue cools, adhere the jute rope, carefully wrapping it around the rim. Press firmly to ensure good contact. Once you’ve completed a full circle, cut off any excess rope. Repeat this process for the medium and small pots, creating a consistent decorative detail across all sections. For the small terra cotta saucer, which will form the very top of your lighthouse, paint it entirely with white chalk paint and set it aside to dry. This white top will beautifully complement the gray and navy blue body.
Now, it’s time to add the iconic features to your lighthouse. Using black chalk paint and a fine-tipped paintbrush, carefully draw a small, rectangular door onto the side of the large pot, positioned centrally at the bottom. For the medium and small pots, draw small, circular or rectangular windows at the center of each, aligning them vertically with the door below. These details will give your lighthouse character and realism. Allow all the painted details to dry completely. Finally, prepare the base. Lay the large terra cotta saucer upside down. Apply a generous layer of Mod Podge over the entire surface of the saucer. While the Mod Podge is still wet, carefully pour fine sand all over the sticky surface until it is completely covered, creating a realistic sandy beach effect. Gently pat the sand to ensure it adheres well, then shake off any loose grains. Set this sandy base aside to dry and cure fully.
Step 2: Assembling the Lighthouse and Adding Illumination
With all your individual components painted and dry, it’s time for assembly and to integrate the lighting elements that will bring your lighthouse to life. Start by preparing your small solar light. Take a length of jute twine and tie it securely around the bottom of the solar light, creating a decorative wrap. Apply a small dab of hot glue to secure the twine in place and prevent it from unraveling. Trim any excess twine and set the solar light aside for now.
Now, prepare the internal lighting if you’re using fairy lights. Gently take your string of fairy lights. Begin by inserting one end of the fairy light string through the drainage hole at the bottom of the large terra cotta pot. Carefully thread the lights up through the inside of the medium pot, and then finally through the small pot, ensuring the main string extends all the way to the top of the smallest pot. Once threaded, gently pull the excess fairy light string down the side of the stacked pots, ensuring the battery pack is accessible near the base of the large pot for easy on/off access or battery replacement. You can temporarily secure the fairy light string to the inside wall of the pots with a tiny dot of hot glue if needed, just enough to prevent it from sliding out during assembly.
Next, it’s time to permanently join the terra cotta sections. Apply a generous bead of E6000 adhesive around the rim of the medium pot and then carefully center and place the small pot on top. Press firmly and hold for a moment. Repeat this by applying E6000 to the rim of the large pot and carefully centering the medium pot on top. While E6000 provides a strong, durable bond, it has a longer curing time. To provide immediate stability, you can add a few dots of hot glue around the edges of the E6000 bead before placing the pots together. The hot glue will hold the structure in place while the E6000 fully cures, ensuring a lasting bond. Once the main pot structure is stable, apply both E6000 and hot glue to the rim of the smallest pot. Carefully place the painted small saucer on top, right side up, forming the lookout platform for your lighthouse. Press firmly and allow to set. Finally, apply E6000 and hot glue to the center of this small white saucer. Firmly adhere the prepared solar light directly onto this spot, ensuring it is centered and upright. Gather any excess fairy lights that might be peeking out and tuck them neatly inside the top pot, ensuring they don’t interfere with the solar light’s operation.
Once the adhesives have set sufficiently and the structure feels stable, replace the lid of the solar light (if it was removed during preparation). Gently lift the entire assembled terra cotta lighthouse structure. With care, center and place it securely on top of the large dish with the sand, as demonstrated in the original video tutorial. Ensure it stands upright and stable on its sandy base. Your illuminated terra cotta pot lighthouse is now complete! Allow all adhesives to fully cure according to their manufacturer’s instructions before placing your lighthouse in its permanent display location, especially if it’s outdoors.
Why You’ll Love This DIY Terra Cotta Pot Lighthouse
This charming craft offers more than just a decorative item; it’s a project brimming with benefits and possibilities:
- Unleash Your Creativity: While the tutorial provides a fantastic base, this project is highly customizable. Experiment with different paint colors to match your garden theme, add miniature sea creatures, shells, or even tiny flags for a personalized touch.
- Cost-Effective Decor: Terra cotta pots are inexpensive, and with most other materials readily available at dollar stores or craft shops, you can create a stunning piece of decor without breaking the bank.
- Beginner-Friendly: The steps are straightforward and require no specialized crafting skills, making it perfect for crafters of all levels, including families looking for a fun weekend project.
- Versatile Display: Whether gracing your garden, illuminating your patio, or adding a coastal vibe to your living room, this lighthouse adapts beautifully to various settings. Its solar light makes it ideal for outdoor use without needing external power.
- Unique Gift Idea: Handmade gifts always carry special meaning. This lighthouse makes a thoughtful and unique present for garden enthusiasts, beach lovers, or anyone who appreciates quirky, handcrafted decor.
- Instant Whimsy: The gentle glow and iconic structure of a lighthouse bring an immediate sense of wonder and charm, transforming any ordinary space into something special.
Tips for Success and Customization
To ensure your DIY terra cotta pot lighthouse turns out perfectly and truly reflects your style, consider these expert tips and customization ideas:
- Surface Preparation is Key: Before painting, wipe down all terra cotta pots and saucers with a damp cloth to remove any dust or debris. Ensure they are completely dry before applying paint for optimal adhesion.
- Multiple Thin Coats: For a professional, streak-free finish, apply several thin coats of paint rather than one thick coat. Allow each coat to dry thoroughly before applying the next. This prevents dripping and ensures even coverage.
- Strategic Adhesive Use: Hot glue provides an instant bond, perfect for holding pieces in place. However, for permanent outdoor display, always reinforce with a strong adhesive like E6000, which offers superior weather resistance and durability.
- Experiment with Colors: Don’t feel limited to gray and navy. Consider a classic red and white stripe pattern, or pastel shades for a beach cottage feel. You could even use metallic paints for a more modern look.
- Add Extra Embellishments: Beyond jute, consider adding miniature life preservers, tiny anchors, or small faux shells around the base for an even richer nautical theme. Small pebbles around the sandy base can also enhance the look.
- Weatherproofing for Outdoors: If your lighthouse will be exposed to the elements, after all paint and glue have dried, apply several coats of a clear, outdoor-safe sealant or varnish. This will protect the paint and adhesives from moisture and UV rays.
- Alternative Lighting: If a solar light isn’t suitable, you could use a battery-operated flickering LED candle for indoor display, or a small, waterproof LED puck light for outdoor use, especially if you’re not stacking pots directly.
- Different Sizes: While this tutorial uses specific pot sizes, you can adapt the concept to create smaller or larger lighthouses. Just ensure your pots stack stably and your saucers fit proportionally.
Frequently Asked Questions (FAQs)
Here are answers to some common questions about making your own terra cotta pot lighthouse:
Can I use regular acrylic paint instead of chalk paint?
While chalk paint is recommended for its excellent adhesion to terra cotta and matte finish, you can use outdoor-grade acrylic paint. If using regular acrylics, you might want to prime the pots first and definitely seal the finished project with a clear, weather-resistant topcoat, especially if it will be placed outdoors.
How long does the project typically take?
The actual crafting time is relatively short, perhaps 1-2 hours. However, factoring in drying times for paint and adhesives, the project might span over a day or two to ensure everything is properly cured and durable.
What if I don’t have a solar light?
No problem! You can use a battery-operated LED pillar candle or small LED fairy lights (as suggested for internal lighting) for a warm glow. For outdoor use, ensure any alternative light source is waterproof or protected from the elements.
How can I make my lighthouse more stable, especially if I live in a windy area?
Using E6000 adhesive is crucial for a strong bond. For added stability, you could place a heavy object (like a rock or sand-filled bag) inside the bottom pot before sealing, or secure the large sandy base saucer to a heavier outdoor paving stone using construction adhesive.
Can I add a rotating light effect?
Achieving a true rotating light effect with a simple solar light can be challenging. However, some advanced crafters might integrate a small, battery-operated motor and light kit designed for model lighthouses. For most, the steady glow of a solar light or fairy lights provides sufficient charm.
How do I clean and maintain my terra cotta lighthouse?
For outdoor lighthouses, gently wipe them down with a damp cloth to remove dust and dirt. Avoid harsh chemicals. If you’ve sealed it properly, it should withstand light rain, but bringing it indoors during severe weather or winter months will prolong its life.
Creating this DIY terra cotta pot lighthouse is more than just a craft; it’s an opportunity to bring a piece of handcrafted beauty and a beacon of light into your home or garden. With its straightforward steps, affordable materials, and endless possibilities for personalization, this project is guaranteed to bring joy and a sense of accomplishment. We encourage you to try your hand at this charming craft, inspired by the wonderful tutorial from Chalk It Up Fancy on YouTube. Let your creativity shine and illuminate your space with your very own unique, handmade lighthouse. Happy crafting!
*All image credit belongs to Chalk It Up Fancy via YouTube. Follow and subscribe to her channel for more inspiring DIY projects!