
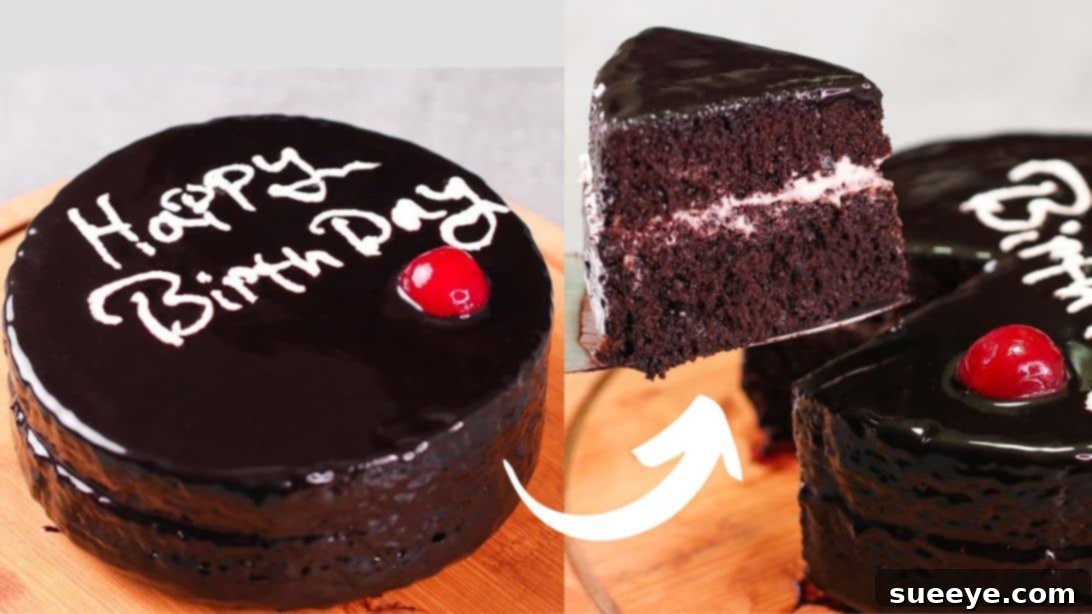
Bake a Delicious Stovetop Chocolate Oreo Cake: The Ultimate No-Oven Birthday Treat!
Celebrating a loved one’s birthday doesn’t always require an expensive, store-bought cake. Imagine the joy and pride of presenting a beautiful, homemade chocolate cake that’s not only incredibly delicious but also surprisingly simple to make! This budget-friendly DIY cake recipe, generously shared by N’Oven – Cake & Cookies on YouTube, is a game-changer for home bakers. What makes it truly special? It requires only a handful of common ingredients and, perhaps most impressively, you don’t even need an oven to achieve a perfectly moist and decadent result. Whether you’re a seasoned baker or a complete novice, this stovetop method will empower you to create a memorable birthday treat that’s made with love and thoughtfulness, proving that delicious desserts can be accessible to everyone.
This recipe transforms humble Oreo cookies into a rich chocolate cake, complete with a luscious cream filling and a glossy chocolate glaze. It’s an ideal solution for those without an oven, living in small spaces, or simply looking for an easy, no-fuss baking project that delivers maximum flavor with minimal effort. The allure of a homemade cake, especially one as delightful as this chocolate Oreo creation, adds a personal touch to any celebration. Get ready to impress your friends and family with a delightful dessert that tastes like it came from a professional bakery, all from the comfort of your kitchen stovetop.
Essential Ingredients for Your Stovetop Chocolate Oreo Cake
Gathering your ingredients is the first step towards baking success. This recipe boasts remarkable simplicity, utilizing common pantry staples to create something extraordinary. Each component plays a crucial role in building the cake’s delightful flavor and texture. Here’s a detailed look at what you’ll need:
- 34-36 pieces of Oreo cookies (approximately 300-350 grams). These iconic chocolate sandwich cookies form the foundation of our cake, providing both flavor and structure. You can use any similar chocolate sandwich cookie if Oreos are unavailable.
- 1 cup of milk (about 240 ml), primarily used for the cake batter. This helps to soften the crushed cookies and create a smooth, pourable consistency for baking. Whole milk is recommended for richness, but any milk will work.
- 1 sachet of Eno fruit salt (approximately 5-6 grams), optional, but highly recommended. This is our secret weapon for a light and airy cake, acting as a leavening agent.
- 2-3 tablespoons of milk (about 30-45 ml), specifically for the cream filling. This small amount helps transform the stiff Oreo cream into a smooth, spreadable consistency.
- ¼ cup of granulated sugar (about 50 grams), essential for creating the rich chocolate glaze. It balances the bitterness of the cocoa and provides sweetness.
- 2 tablespoons of unsweetened cocoa powder (about 10-15 grams), for the chocolate glaze. Choose a good quality cocoa powder for the best chocolate flavor.
- ½ cup of water (about 120 ml), to be combined with sugar and cocoa for the glaze, ensuring a smooth and pourable texture.
Ingredient Spotlight: The Magic of Eno Fruit Salt
You might be wondering about the inclusion of Eno fruit salt in a cake recipe. In this context, Eno is not used for its antacid properties but rather as an ingenious leavening agent. When Eno (which contains sodium bicarbonate and citric acid) is combined with a liquid and a slight acid (like the cocoa in the Oreos and milk), it reacts to produce carbon dioxide bubbles. These bubbles get trapped in the batter, causing the cake to rise beautifully and achieve a surprisingly soft, spongy, and light texture—all without the need for traditional baking powder or baking soda. If you cannot find Eno, finding a direct substitute for its unique blend in a no-oven cake can be tricky, but some bakers might experiment with a small amount of baking soda combined with a teaspoon of lemon juice or vinegar. However, for optimal results with this specific recipe, Eno is truly the secret ingredient.
Essential Kitchen Equipment You’ll Need
Having the right tools can make the baking process significantly smoother and more enjoyable. Here’s a quick checklist of the basic kitchen equipment you’ll need to create this amazing stovetop cake:
- Food processor: Ideal for quickly crushing the Oreo cookies into fine crumbs. Alternatively, a sturdy Ziploc bag and a rolling pin will work just as well, albeit with a bit more manual effort.
- Mixing bowls: Several sizes will be useful for separating ingredients, mixing batter, and preparing fillings.
- Whisk or spatula: For stirring ingredients and combining the batter and fillings.
- Round cake pan: A 6-7 inch (approximately 15-18 cm) diameter cake pan is recommended for the best results and cooking time.
- Large pot with a lid: This will serve as your “stovetop oven.” Ensure it’s large enough to comfortably fit your cake pan and has a tight-fitting lid to trap heat effectively.
- Wire stand or trivet: Essential for elevating the cake pan inside the large pot, preventing direct contact with the pot’s bottom and ensuring even heat distribution.
- Small saucepan: For preparing the delicious chocolate glaze.
- Serrated knife: Crucial for carefully leveling and dividing the cooled cake into layers.
- Wire rack: For cooling the cake completely after baking, allowing air to circulate around it.
Step-by-Step Directions: Crafting Your Stovetop Chocolate Cake Masterpiece
Step 1: Preparing the Cake Base – The Heart of Your Dessert
This initial phase focuses on creating the rich, chocolatey foundation of your cake. Paying close attention to each detail will ensure a perfectly moist and flavorful cake base.
- Separate Cookies and Cream: Begin by carefully twisting open each Oreo cookie. With a small spoon or knife, gently scrape the white cream filling into one clean bowl. Place the chocolate biscuit wafers into a separate, clean bowl. This meticulous separation is crucial as the cream will be used for a delightful filling later, while the biscuit wafers will form the cake batter.
- Crush the Cookies and Form Batter: Transfer all the chocolate biscuit wafers into a food processor. Pour in 1 cup of milk. Process thoroughly for approximately 1 minute, or until the mixture transforms into a smooth, lump-free batter with a consistency similar to pancake batter. If you don’t have a food processor, place the cookies in a strong Ziploc bag, seal it, and crush them finely with a rolling pin until they are very fine crumbs. Then, transfer these crumbs to a mixing bowl and gradually stir in the milk until a smooth batter forms, ensuring no large chunks remain.
- Incorporate the Leavening Agent (Eno): Pour the smooth Oreo-milk batter into a spacious mixing bowl. Now, add the entire 1 sachet of Eno fruit salt. Using a whisk or spatula, gently fold and mix the Eno into the batter until it is just combined. Be careful not to overmix at this stage, as the leavening action of the Eno begins immediately upon contact with the liquid. You’ll notice the batter becoming slightly frothy and expanding a little – this effervescence is exactly what you want, indicating the Eno is working its magic to create a light cake!
- Prepare the Cake Pan for Baking: Take your chosen round cake pan (6-7 inch recommended) and lightly grease its interior with a thin layer of oil or butter. You can also dust it with a little cocoa powder or flour to prevent sticking, though greasing alone is usually sufficient. This step ensures your cake will release easily and cleanly from the pan after baking. Pour the prepared cake batter into the greased pan, spreading it gently with a spatula to create a nice, even layer across the bottom.
- Preheat Your Stovetop “Oven”: Place a large, heavy-bottomed pot (one that can comfortably fit your cake pan) on your stove over medium-low heat. Position a metal wire stand or trivet inside the pot, elevating it from the bottom. Cover the pot with its lid and allow it to preheat for about 5 minutes. This creates a hot, enclosed environment, mimicking an oven, which is essential for even baking.
- Stovetop Baking: Carefully lift the cake pan and place it onto the wire stand inside the preheated pot. Ensure the lid fits snugly to trap the heat and steam effectively. Allow the cake to cook undisturbed for approximately 35 to 40 minutes. The cooking time may vary slightly depending on your stove’s heat intensity and the thickness of your pot. To check for doneness, carefully lift the lid (minimize opening it during baking), and insert a clean toothpick into the center of the cake; it should come out clean. If not, cover and cook for another 5-10 minutes.
- Oven Baking (Alternative Method): If you prefer to use a conventional oven, preheat it to 180°C (350°F). Bake the cake in the preheated oven for about 30 to 35 minutes, or until a toothpick inserted into the center comes out clean. Oven baking typically offers more consistent results but requires an oven!
- Cooling Down – The Crucial Step: Once cooked, carefully remove the cake pan from the pot or oven using oven mitts. Set it aside on a wire rack and allow the cake to cool down completely to room temperature. This step is absolutely crucial; attempting to unmold, trim, or frost a warm cake can lead to crumbling, breaking, and a generally messy outcome. Patience here will be rewarded!
Step 2: Preparing the Fillings and Assembling Your Masterpiece
With your cake base cooled and ready, it’s time to create the delightful cream filling and the rich chocolate glaze, then bring all these delicious elements together for a truly impressive and memorable presentation.
- Whip the Oreo Cream Filling: Retrieve the bowl containing the reserved white Oreo cream filling. Add 2 to 3 tablespoons of milk to it. Begin with 2 tablespoons and mix thoroughly with a spoon or whisk until the cream is well combined and reaches a smooth, spreadable, frosting-like consistency. If you desire a slightly thicker filling, use less milk; for a thinner, more pourable consistency, add a tiny bit more. This creates a sweet, nostalgic filling that perfectly complements the chocolate cake layers.
- Prepare the Rich Chocolate Glaze: In a small saucepan, combine the ¼ cup of granulated sugar, 2 tablespoons of unsweetened cocoa powder, and ½ cup of water. Place the saucepan on a stove over medium heat. Stir continuously with a whisk to dissolve the sugar and prevent any lumps from forming, ensuring a smooth glaze. Continue to cook the mixture, stirring occasionally, until it thickens into a glossy, pourable chocolate glaze. This typically takes about 5-7 minutes. The glaze should coat the back of a spoon. Once it reaches the desired consistency, remove it from the heat and allow it to cool slightly while you prepare the cake for assembly.
- Unmold and Trim the Cake: Once your cake is completely cool to the touch, carefully run a thin knife around the edges of the pan and then invert it onto your serving plate or a clean cutting board to unmold. Using a long, serrated knife, gently trim off any uneven top layer (the ‘dome’) of the cake to create a perfectly flat surface. This step is crucial for achieving perfectly even and stable cake layers. Then, carefully slice the cake horizontally into two equal layers.
- Assemble the Cake Layers:
- Place the first (bottom) layer of the cake onto your chosen serving plate or cake stand.
- Optional Sugar Syrup Brush: For an extra boost of moisture and subtle sweetness, you can lightly brush the cake layer with a simple sugar syrup (made by heating equal parts sugar and water until the sugar dissolves, then letting it cool). This step isn’t strictly necessary but significantly enhances the cake’s tenderness and keeps it fresh longer.
- Generously spread the prepared Oreo cream filling evenly over the first cake layer, extending it almost to the edges.
- Carefully lift the second cake layer and place it gently on top of the cream filling, aligning it as best as possible.
- Pour the slightly cooled chocolate glaze all over the top of the assembled cake, allowing it to naturally drip down the sides for a rustic yet elegant look. Use a spatula or an offset knife to gently spread the glaze evenly across the top and down the sides, ensuring a smooth, polished, and full coverage finish.
- Set and Decorate: Allow the assembled cake to rest for about 5 to 10 minutes at room temperature, giving the chocolate glaze a chance to set slightly and firm up. For a truly personal touch, gather any leftover Oreo cream filling (or use a small amount of whipped cream or melted white chocolate in a piping bag) to pipe a heartfelt birthday message or decorative swirls on top of the cake. Finish your masterpiece with a fresh cherry, vibrant berries, chocolate shavings, or any fruit of your choice for a beautiful pop of color and freshness.
Pro Tips for a Perfect Stovetop Chocolate Birthday Cake
Even though this recipe is incredibly straightforward, a few expert tips can further enhance your baking experience and help you achieve a flawless, bakery-worthy cake every single time:
- Don’t Rush the Cooling Process: Patience is truly a virtue when it comes to baking, especially after the cake comes off the heat. A warm cake is fragile and will crumble easily when you attempt to unmold or layer it. Furthermore, any frosting or glaze applied to a warm cake will simply melt and slide off, creating a messy situation. Always allow the cake to cool completely to room temperature on a wire rack before proceeding with trimming or decorating.
- Achieving a Silky Smooth Batter: Whether you opt for a food processor or crush the cookies by hand, the goal is to achieve the finest possible Oreo crumbs. Any large chunks of cookies left in the batter can create an uneven texture in the baked cake. Blend or crush until the mixture is as smooth as possible, creating a uniform base.
- Mastering Stovetop Heat Management: Maintaining consistent medium-low heat during stovetop baking is critical. If the heat is too high, the bottom of your cake will burn before the center has a chance to cook through. Conversely, if the heat is too low, the cake will take an excessively long time to bake and might dry out. A heavy-bottomed pot is highly recommended as it helps distribute the heat more evenly, reducing hot spots.
- Reliable Doneness Checks: The toothpick test remains the most reliable method to check if your cake is fully cooked. Insert a clean toothpick into the very center of the cake; if it comes out with wet batter or moist crumbs, continue cooking for a few more minutes and re-check. A clean toothpick indicates your cake is perfectly baked.
- Leveling for Professional Layers: A long, sharp serrated knife is your best friend for trimming any domed top off the cooled cake and for neatly splitting it into even layers. A level top and uniform layers are key to a stable and aesthetically pleasing stacked cake.
- Perfecting Glaze Consistency: The chocolate glaze should be pourable yet thick enough to coat the cake. If your glaze appears too thick, add a tiny bit more water (a teaspoon at a time), stirring well, until it reaches the desired pourable consistency that still coats the back of a spoon. If it’s too thin, return it to the heat and cook for another minute or two, stirring constantly, until it thickens sufficiently.
- Embrace Creative Decorations: While a cherry is a classic touch, don’t limit your imagination! Consider adding chocolate shavings, colorful sprinkles, mini chocolate chips, edible glitter, or even fresh mint leaves for a professional and personalized finish. Your cake is a canvas!
Variations and Customizations for Your Oreo Cake
This delightful Stovetop Chocolate Oreo Cake recipe serves as a fantastic base, but don’t hesitate to get creative and customize it to suit your unique taste preferences or to adapt it for different occasions:
- Cookie Swap Adventures: While Oreos provide a distinct and beloved chocolate flavor, you could easily experiment with other types of sandwich cookies. Imagine the possibilities with mint Oreos for a refreshing twist, peanut butter Oreos for a nutty flavor profile, or even vanilla sandwich cookies for a lighter, more classic vanilla cake base.
- Flavor Boosts and Aromatics: To deepen the overall flavor of your cake, consider adding a teaspoon of pure vanilla extract to the cake batter. For a richer, more intense chocolate experience, a pinch of instant coffee powder (espresso powder works wonders!) can be incorporated into either the cake batter or the chocolate glaze. A hint of orange zest can also provide a bright contrast to the chocolate.
- Alternative Layer Fillings: Instead of the classic Oreo cream filling, you have a wealth of options. A simple, lightly sweetened whipped cream can offer a lighter contrast. A decadent chocolate ganache between the layers would double down on the chocolate indulgence. For a fruity touch, a berry compote or a thin layer of fruit jam could add a lovely tang.
- Different Glazes or Frostings: The chocolate glaze is delicious, but don’t stop there! A rich chocolate buttercream frosting would offer a more traditional cake finish. For a visually striking contrast, a smooth white chocolate ganache or a cream cheese frosting could be used. Even a simple dusting of cocoa powder or powdered sugar can be elegant for a less intensely sweet option.
- Mini Cakes or Cupcakes: This batter can easily be adapted to make smaller individual cakes in ramekins or even stovetop cupcakes in muffin tins (if you have a setup for that in your pot). Adjust cooking times accordingly.
Why This Stovetop Cake Is a Must-Try for Every Occasion
In a culinary landscape brimming with complex baking recipes and the perceived necessity of high-end kitchen appliances, this Stovetop Chocolate Oreo Cake truly stands out for several compelling and practical reasons:
- No Oven Required: This is arguably its most significant and appealing selling point. It makes delicious homemade cake accessible to anyone, regardless of whether they have a traditional oven. It’s perfect for small apartments, dorm rooms, RVs, or simply when your oven is already occupied with other dishes.
- Incredibly Budget-Friendly: Made with readily available and inexpensive ingredients like Oreos, milk, and basic pantry staples, it’s an exceptionally cost-effective way to create a show-stopping dessert without breaking the bank.
- Beginner-Friendly: The steps are straightforward, easy to follow, and don’t require advanced baking techniques. This makes it an excellent introductory recipe for those new to baking, building confidence in the kitchen.
- Delicious and Impressive: Despite its simplicity, the cake tastes incredibly rich, moist, and utterly decadent. Once decorated, it looks stunning, making it perfectly suitable for birthdays, anniversaries, holiday gatherings, or any special celebration where you want to impress.
- Highly Customizable: As explored in the variations section, this recipe is easily adaptable to different tastes, dietary preferences (within limits), and creative whims, ensuring you can make it uniquely your own.
- Time-Saving (and Energy-Saving): Stovetop baking can sometimes be quicker than preheating a large oven, and it certainly uses less energy than running a conventional oven for an hour.
- Unique Baking Experience: The stovetop method itself is a novel and satisfying experience that many home cooks enjoy exploring, adding another layer of fun to the baking process.
Storage Tips for Optimal Freshness
To ensure your delicious homemade cake remains fresh, moist, and flavorful for as long as possible, follow these simple storage guidelines:
- Room Temperature Storage: Any leftover cake can be stored in an airtight container at room temperature for up to 2-3 days. Ensure it’s in a cool, dry place away from direct sunlight.
- Refrigeration: For longer storage, especially in warmer climates or if your home is quite warm, refrigerate the cake in an airtight container for up to 5 days. Before serving, allow refrigerated slices to come to room temperature for about 30 minutes. This helps soften the cake and frosting, restoring its optimal texture and flavor.
- Freezing (Optional): For very long-term storage, you can freeze individual slices or the entire cake (without final decorations like fresh fruit). Wrap tightly in plastic wrap, then in aluminum foil, and freeze for up to 1 month. Thaw in the refrigerator overnight before bringing to room temperature to serve.
Creating a homemade birthday cake doesn’t have to be daunting or expensive. This Stovetop Chocolate Oreo Cake recipe proves that with a little creativity, a few simple ingredients, and an innovative no-oven method, you can whip up a truly magical dessert. It’s a wonderful way to show your affection and celebrate special moments without breaking the bank or needing fancy equipment. So go ahead, give this incredibly satisfying recipe a try, and delight in the delicious outcome!
*All image credit belongs to N’Oven – Cake & Cookies via YouTube. We highly recommend following and subscribing to her channel for more inspiring and delicious recipes and baking tutorials!
Simple Stovetop Chocolate Birthday Cake Recipe Card
Recipe Summary
Yields: One 6-7 inch cake (serves 6-8 people)
Prep time: Approximately 20 minutes
Cook time: 35-40 minutes (stovetop method) / 30-35 minutes (oven method)
Cooling time: 1-2 hours (essential for best results)
Ingredients:
- 34-36 pieces Oreo cookies
- 1 cup milk (for cake batter)
- 1 sachet Eno fruit salt (optional, for lightness)
- 2-3 tablespoons milk (for cream filling)
- ¼ cup granulated sugar (for chocolate glaze)
- 2 tablespoons unsweetened cocoa powder (for chocolate glaze)
- ½ cup water (for chocolate glaze)
Instructions:
- Prepare Batter: Separate Oreo cream from biscuits. Crush biscuits with 1 cup milk in a food processor until smooth. Transfer to a bowl, add Eno, and mix gently until just combined.
- Pan Preparation: Grease a 6-7 inch cake pan. Pour the prepared batter evenly into the pan.
- Bake Cake:
- Stovetop: Place a large pot with a wire stand on medium-low heat for 5 minutes (preheat). Carefully place the cake pan on the stand, cover tightly, and cook for 35-40 minutes, or until a toothpick comes out clean.
- Oven (Alternative): Bake in a preheated oven at 180°C (350°F) for 30-35 minutes, or until a toothpick comes out clean.
Let the cake cool completely on a wire rack before proceeding.
- Cream Filling: Mix the reserved Oreo cream with 2-3 tablespoons milk until smooth and spreadable.
- Chocolate Glaze: In a saucepan, combine sugar, cocoa, and water. Cook on medium heat, stirring continuously, until thickened into a glossy glaze. Let it cool slightly.
- Cake Assembly Prep: Unmold the completely cooled cake. Using a serrated knife, trim off any uneven top and then carefully slice the cake horizontally into two equal layers.
- Layer and Fill: Place the first cake layer on a serving plate. (Optional: brush with sugar syrup for extra moisture). Spread the prepared Oreo cream filling evenly over this layer. Place the second cake layer on top.
- Glaze and Decorate: Pour the slightly cooled chocolate glaze all over the cake, spreading it evenly on the top and sides. Allow the glaze to set for 5-10 minutes. Decorate with leftover cream, fresh cherries, or other desired fruits and toppings.
- Serve: Slice and enjoy your delicious homemade stovetop chocolate Oreo cake!