
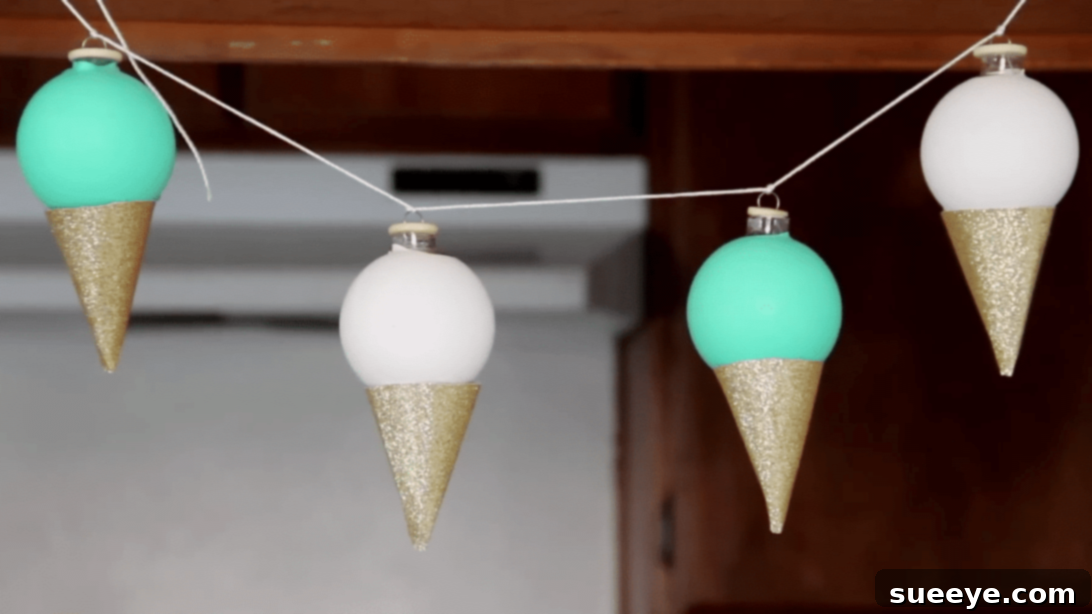
As winter fades and the vibrant hues of spring emerge, our homes often yearn for a touch of fresh, seasonal decor. If you’re looking for an incredibly charming and budget-friendly way to usher in the new season, look no further than this brilliant DIY project from HGTV Handmade on YouTube. This creative idea offers a fantastic solution for repurposing those clear Christmas ball ornaments that are currently gathering dust, transforming them into delightful springtime garlands. The beauty of this project lies in its temporary nature; when the holiday season rolls around again, you can easily remove the spring design and reuse your ornament balls as originally intended. It’s a wonderfully convenient and eco-conscious approach to seasonal decorating, allowing you to refresh your home’s look repeatedly without breaking the bank.
RELATED: Learn How to Make an Easy Spring DIY Fairy Doll with a Straw Hat
Garlands are a versatile decorative element, capable of adding a festive touch to any space, from fireplace mantels to windowsills, doorways, and even outdoor patios. This tutorial introduces you to crafting two distinct styles of springtime garlands, both utilizing simple balloons and clear ornaments. The possibilities for color and theme are virtually endless, giving you complete creative freedom. Should you wish to elevate your garlands even further, feel free to incorporate additional embellishments. Just remember to secure them in a way that allows for easy and clean removal later on, preserving your ornaments for future use. Get ready to dive into this fun and rewarding DIY experience!
Discover the Joy of DIY Spring Garlands: Transform Your Space Affordably
Spring is a season of renewal, and what better way to celebrate than by infusing your living space with handmade decorations that reflect this vibrant energy? Crafting your own garlands not only provides a unique decorative touch but also offers a sense of accomplishment and a creative outlet. This project, specifically, champions sustainability by encouraging the reuse of holiday items, turning potential clutter into charming decor. Imagine the delight of guests as they admire your unique, custom-made spring garlands, all while knowing you’ve given new life to old treasures.
The flexibility of this DIY approach means you can tailor each garland to suit different rooms or themes. Perhaps a pastel palette for a serene bedroom, or bold neon colors for a lively living area. The ease of assembly makes it a perfect activity for crafters of all skill levels, including families looking for a fun project to do together. Let’s gather our supplies and begin creating these eye-catching DIY Springtime Garlands.
Essential Materials for Crafting Your DIY Springtime Garlands
Before embarking on any craft project, ensuring you have all the necessary supplies at hand is crucial for a smooth and enjoyable experience. The materials for these festive spring garlands are surprisingly simple and readily available, many of which you might already own. This keeps the project incredibly budget-friendly.
- Balloons: Choose a variety of colors and sizes. Standard party balloons work perfectly. Opt for bright, cheerful spring colors like pastels, neons, or even patterns to add extra flair. The more colors, the more vibrant your garland!
- Clear Christmas Ball Ornaments: These are the stars of our repurposing project. Any size will do, but a consistent size will create a more uniform garland. Ensure they are clean and free from any previous decorative residue.
- Scissors: A good pair of sharp craft scissors will make cutting balloons and patterns much easier and cleaner.
- String/Twine: You’ll need a durable string or twine for hanging your finished garlands. Consider fishing line for an almost invisible hang, or decorative twine for an added rustic touch. The length will depend on where you plan to display your garland.
- Tape: Standard clear adhesive tape will be essential, especially for assembling the ice cream cone pattern.
- Craft Glue: A strong, quick-drying craft glue will be useful for securing embellishments or ensuring balloon pieces stay put if needed.
- Ice Cream Pattern: This downloadable pattern is specific for the whimsical ice cream garland design. Make sure to download and print it before you begin. (Click here to download the pattern)
Beyond these core items, feel free to gather any optional decorative elements you might want to add, such as glitter, sequins, small craft flowers, ribbons, or paint pens for drawing details. The more creative you get, the more personalized your unique spring decor garlands will be!
Step-by-Step Guide to Crafting Your Springtime Garlands
Now that you have all your materials ready, let’s get into the exciting part: assembling your beautiful springtime garlands. This tutorial covers two distinct designs, each offering its own charm and appeal. Follow these detailed instructions to bring your creative vision to life.
Project 1: The Vibrant Colorblocked Neon Garland
This garland design is all about bold colors and modern simplicity. It’s perfect for adding a pop of energy to any space. The key is to select balloons with strong, contrasting colors to create that eye-catching color-blocked effect.
- Prepare Your Balloons: Take a balloon and use your scissors to cut off the top half. You’ll be using the wider, bottom half of the balloon. The exact cutting point can vary slightly, depending on how much of the ornament you want to cover and how taut you want the balloon to be.
- Stretch and Cover: Carefully stretch the cut balloon piece. It’s important to be gentle to avoid tearing the latex. Once stretched, wear it over the bottom part of your clear Christmas ball ornament. The elastic nature of the balloon will allow it to snugly fit and cover a portion of the ornament, creating a seamless, colorful shell.
- Add Inner Embellishments (Optional): Before completely covering all your ornaments, consider adding small decorative elements inside the clear balls. This is a fantastic way to add sparkle or texture. Think glitters, small sequins, tiny beads, miniature faux flowers, or even small handwritten messages. This step makes each ornament truly unique and adds depth to your garland.
- Repeat for All Ornaments: Continue these steps for all the clear Christmas ball ornaments you intend to use in your garland. Aim for a consistent look or mix and match colors for a more eclectic style.
- String Your Garland: Once all your ornaments are covered, it’s time to assemble your garland. Take your chosen string or twine. Starting from one end, tie each ornament onto the string, spacing them evenly. You can create small loops with the string and secure the ornament’s hanger through them, or gently knot the string around the ornament’s top. Even spacing ensures a balanced and aesthetically pleasing garland.
- Display: Hang your vibrant color-blocked neon garland in a prominent spot where its cheerful colors can brighten your day. It looks fabulous against a plain wall, draped over a mantel, or across a window frame.
Project 2: The Whimsical Ice Cream Garland
This design is utterly adorable and brings a playful, summery vibe that transitions beautifully into spring. It’s perfect for children’s rooms, party decor, or anyone who loves a bit of quirky charm.
- Prepare Your Balloons: For this design, you’ll need to cut off only the neck of the balloon. This leaves you with the main body of the balloon, which will completely encase the clear ornament, mimicking the “ice cream” scoop.
- Cover the Ornament: Gently stretch the balloon piece and carefully wear it around the entire clear ball ornament, ensuring it’s fully covered. Smooth out any wrinkles to achieve a neat, spherical “ice cream” look. Pastel-colored balloons work wonderfully here to resemble different ice cream flavors.
- Download and Prepare the Cone Pattern: If you haven’t already, download and print the provided ice cream cone pattern.
- Cut and Assemble the Cone: Carefully cut out the shape from the printed pattern. Then, connect the edges together using tape to form a cone shape. You can use brown paper or cardstock for a more realistic cone appearance.
- Attach the Cone: Adhere the paper cone underneath the balloon-covered ball ornament. You can use a dab of strong craft glue or secure it with discreet tape to ensure it stays firmly attached, completing your ice cream ornament.
- String Your Garland: Once all your ice cream ornaments are assembled, string them onto your chosen string or twine. Again, maintain even spacing for a cohesive look. You can thread the string through the top hanger of the ornament or use a small loop and knot.
- Display: This whimsical ice cream garland is perfect for birthday parties, decorating a playroom, or adding a sweet touch to your kitchen or dining area. Its playful design is sure to bring smiles!
Creative Tips and Customization Ideas for Your DIY Spring Garlands
One of the greatest joys of DIY is the ability to personalize your creations. Here are some ideas to further customize your spring garlands and make them truly unique:
- Mix and Match: Don’t feel limited to making just one type of garland. You can create a longer, dynamic garland by alternating between the color-blocked and ice cream designs.
- Add Textures: Incorporate other elements like small pom-poms, faux floral stems, fabric scraps, or even painted wooden beads along the string between the ornaments for added texture and visual interest.
- Scented Ornaments: For a subtle sensory touch, you could place a small piece of cotton ball soaked in an essential oil (like lavender or citrus) inside the clear ornaments before covering them with balloons.
- Lighting: For an enchanting evening glow, weave a delicate strand of battery-operated fairy lights through your garland. This will make your ornaments sparkle and create a magical ambiance.
- Varying Sizes: Experiment with different sizes of clear ornaments and balloons to create a garland with varied dimensions, adding more visual depth.
- Themed Garlands: Beyond spring, adapt these techniques for other seasons or holidays. Use orange and black balloons for Halloween, or red and green for a different take on Christmas decor.
- Personalized Messages: If using clear ornaments, write small notes or draw tiny designs on parchment paper and insert them inside before applying the balloon covers.
These easy DIY Springtime Garlands are not just decorations; they are expressions of creativity and a commitment to sustainable living. They provide a cheerful and welcoming atmosphere, perfect for greeting the new season. Have fun experimenting with colors, patterns, and additional embellishments. Remember, there’s no right or wrong way to craft, only your unique artistic vision!
This tutorial offers a wonderful opportunity to reuse, recycle, and create something beautiful. Whether you’re a seasoned crafter or just starting out, these projects are accessible and incredibly rewarding. So grab your supplies, put on some inspiring music, and let your imagination soar!
*All image credit belongs to HGTV Handmade via YouTube. Follow and subscribe to their channel for more inspiring DIY projects and creative ideas!