
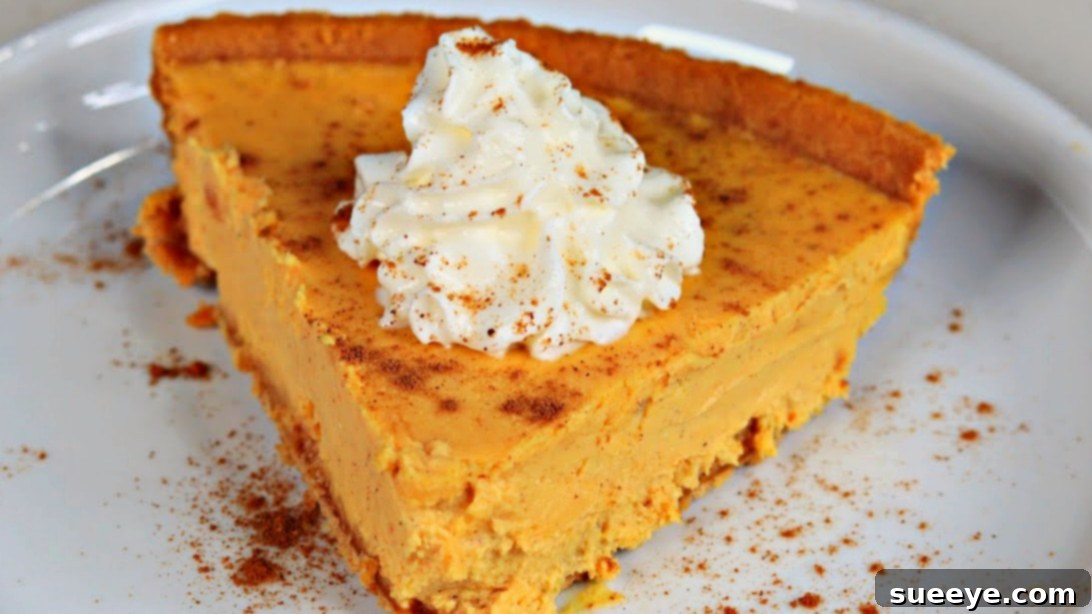
Mouthwatering Pumpkin Cheesecake: Your Ultimate Fall Dessert Recipe
Prepare to fall in love with a dessert that perfectly captures the essence of autumn: our incredibly easy and utterly delicious Pumpkin Cheesecake. This isn’t just any cheesecake; it’s a creamy, spiced masterpiece that literally melts in your mouth, promising to become a cherished addition to your recipe collection. Requiring only about 8 readily available ingredients, this spectacular treat can be whipped up in mere minutes, making it perfect for both seasoned bakers and beginners alike. Whether you’re hosting a holiday feast, enjoying a family dinner, or simply craving a taste of fall, this homemade pumpkin cheesecake delivers unparalleled flavor with minimal effort. We’ve gathered insights and inspiration for this recipe, particularly from the excellent video tutorial by Whip It Up With Jay on YouTube, ensuring you have all the guidance you need to create a truly unforgettable dessert.
Crafting the perfect pumpkin cheesecake often seems daunting, with worries about cracks, uneven textures, or bland flavors. However, we’re here to demystify the process, offering a foolproof guide that focuses on simplicity without sacrificing the rich, velvety texture and aromatic spice blend that makes this dessert so irresistible. Forget complicated water baths (unless you want the extra assurance!) or elaborate techniques; this recipe is designed for success, yielding a perfectly baked cheesecake every single time. Get ready to impress your family and friends with a dessert that tastes gourmet but is surprisingly simple to make. Let’s dive into the essential ingredients and straightforward steps that will lead you to pumpkin cheesecake bliss.
Essential Ingredients for a Perfect Pumpkin Cheesecake
The beauty of this easy pumpkin cheesecake lies in its straightforward ingredient list. Each component plays a crucial role in achieving the signature creamy texture and spiced flavor. Opting for high-quality ingredients will always yield the best results, transforming a simple recipe into an extraordinary dessert that tastes like pure autumn comfort.
- 32 ounces (approximately 4 standard blocks) of full-fat cream cheese, softened at room temperature. Using full-fat cream cheese is absolutely essential for that rich, decadent cheesecake texture. Ensure it’s truly softened to room temperature, as this is the key to preventing lumps and ensuring a smooth, uniform batter. Take it out of the fridge at least 1-2 hours before you plan to bake.
- ¾ cup of granulated sugar. This amount provides the perfect balance of sweetness without overpowering the subtle tang of the cream cheese or the warm embrace of the pumpkin and spices. It’s just enough to create a beautifully flavored dessert.
- 2 tablespoons of all-purpose flour. A small but mighty addition, flour helps stabilize the cheesecake mixture, acting as a gentle binder and thickener. This tiny bit of flour is a secret weapon against cracks, contributing to its smooth, consistent texture.
- ¾ cup of pure pumpkin puree (ensure it’s not pumpkin pie filling). Make sure you’re using 100% pure pumpkin puree, typically found in a can. This provides the authentic, earthy pumpkin flavor and beautiful orange hue. It’s crucial to avoid canned pumpkin pie filling, which already contains spices and sweeteners that would alter the recipe’s balance.
- ½ tablespoon of pumpkin spice. This classic fall spice blend usually includes cinnamon, nutmeg, ginger, and cloves, delivering that quintessential warm, aromatic flavor that pairs so perfectly with pumpkin. Feel free to adjust this amount to your taste; a pinch more cinnamon or a dash of allspice can be lovely.
- 1 tablespoon of pure vanilla extract. Vanilla is a flavor enhancer, adding a layer of warmth, depth, and complexity that beautifully complements all the other ingredients. Use good quality pure vanilla extract for the best possible taste experience.
- 3 large eggs, at room temperature. Eggs are essential for binding the cheesecake and providing its structure and luxurious richness. Adding them one at a time and ensuring they are at room temperature helps them incorporate smoothly into the batter, preventing overmixing and maintaining that coveted creamy texture.
- 1 (10-inch) pre-made graham cracker pie crust. For ultimate convenience and to keep this recipe truly “easy,” a store-bought graham cracker crust is a fantastic shortcut. If you prefer, you can easily make your own by combining graham cracker crumbs, melted butter, and a touch of sugar, pressed into a pie plate.
Step-by-Step Guide to Baking Your Dream Pumpkin Cheesecake
Creating this irresistible pumpkin cheesecake is a surprisingly simple process, designed for maximum flavor with minimal fuss. Follow these detailed steps to ensure a flawless and delicious result every time, making you a cheesecake connoisseur in no time.
Step 1: Preparing the Velvety Cheesecake Batter
Achieving a smooth, lump-free batter is the absolute secret to a perfect, creamy cheesecake. This initial step focuses on combining your ingredients meticulously to create that desirable silky texture that melts in your mouth.
Begin by gathering your softened cream cheese, the vibrant pumpkin puree, all-purpose flour, fragrant pumpkin spice, pure vanilla extract, and granulated sugar. Carefully add all these prepared ingredients into the bowl of a stand mixer. If you don’t have a stand mixer, a large mixing bowl with an electric hand mixer will work just as well. Attach the whisk attachment (or use beaters with a hand mixer), and start mixing them all together on a low speed. This initial low-speed mixing is crucial; it allows the dense ingredients to combine gradually without incorporating too much air, which can be a common culprit for cracks during baking. Continue to mix until the ingredients are just combined and appear somewhat blended. Then, stop the mixer. With a rubber spatula, thoroughly scrape down the sides and bottom of the bowl. This critical step ensures that all ingredients are evenly incorporated and no stubborn pockets of unmixed cream cheese or sugar remain hidden. Resume mixing on low speed until the mixture is completely smooth, uniform, and luscious in consistency. The goal here is a truly homogenous, velvety base.
Once your cheesecake base is perfectly smooth and creamy, increase the mixer speed to medium-low. Now, it’s time to incorporate the eggs. Add one large egg at a time, allowing each egg to fully incorporate into the batter before adding the next. This incremental addition is vital because it prevents overmixing the eggs, which can introduce too much air into the batter. Excessive air can cause the cheesecake to puff up dramatically during baking, only to collapse and crack as it cools. Whip continuously after each egg addition until it’s just blended into the batter. As soon as the last egg is fully incorporated and the batter achieves its final smooth texture, immediately turn off the mixer. Remember, overmixing at this stage is the enemy of a perfectly smooth, crack-free cheesecake. Give the bowl one final, gentle scrape to ensure everything is perfectly blended, and your velvety, rich pumpkin cheesecake batter is ready for baking!
Step 2: Baking and Chilling for Perfection
This crucial stage transforms your creamy batter into a firm, luscious pumpkin cheesecake, followed by the essential chilling process that enhances its flavor and texture to perfection.
Preheat your oven to 300°F (150°C). This specific lower baking temperature is a key factor in preventing cracks and achieving that characteristic creamy, dense texture that is the hallmark of a great cheesecake. Place your prepared 10-inch graham cracker pie crust into a larger baking dish or roasting pan. For the best results and to prevent cracks, it’s highly recommended to use a water bath (or *bain-marie*). Carefully pour about an inch of hot water into the larger roasting pan, surrounding the pie crust. This water bath creates a moist, even-heat environment around the cheesecake, which is absolutely vital for gentle baking, preventing drying, and ensuring a perfectly smooth, creamy, and crack-free cheesecake. If your pie crust pan has a removable bottom, you might want to wrap the bottom in heavy-duty foil to prevent any water from seeping in.
Now, carefully pour the exquisitely smooth pumpkin cheesecake batter into the graham cracker crust. Gently shake the pie dish a bit or lightly tap it on the counter a few times. This helps the batter settle evenly and encourages any trapped air bubbles to rise to the surface and pop, ensuring a flat, uniform surface for your baked cheesecake. Carefully transfer the roasting pan with the cheesecake (and water bath, if used) to your preheated oven.
Bake for approximately 50 minutes. It’s important to remember that baking times can vary slightly depending on the calibration of your specific oven, so begin checking for doneness around the 45-minute mark. The cheesecake is done when the edges appear set and firm, but the very center still has a slight, delicate wobble when gently jiggled. A toothpick inserted into the center should come out clean, perhaps with a few moist crumbs attached, but definitely not wet batter. Crucially, do not overbake! Overbaking is a common cause of cracks and can lead to a dry, crumbly texture instead of the desired creamy one.
Once baked, turn off the oven but leave the cheesecake inside. Prop the oven door open slightly (you can use a wooden spoon) and allow the cheesecake to cool gradually inside the oven for about an hour. This slow, controlled cooling process is paramount as it helps prevent sudden temperature changes that can stress the cheesecake and lead to cracking. After an hour, carefully remove the cheesecake from the oven and, if using a water bath, gently lift it out of the water bath. Let it cool completely to room temperature on a wire rack. This step can take several hours, so patience is key for the best results.
The final and perhaps most important step for a truly perfect pumpkin cheesecake is the chilling process. Once cooled completely to room temperature, loosely cover the cheesecake with plastic wrap (ensure it doesn’t touch the surface to avoid condensation) and transfer it to the refrigerator. Allow it to chill for a minimum of 4 to 8 hours, or ideally, overnight. This extended chilling period is absolutely essential for the cheesecake to firm up, allow the flavors to meld beautifully, and achieve that signature dense, rich, and incredibly creamy texture. Resist the temptation to cut into it early!
Serving Your Exquisite Pumpkin Cheesecake
Once your homemade pumpkin cheesecake is thoroughly chilled and perfectly ready, it’s time to transform your perfectly baked creation into a stunning dessert that will impress everyone. Carefully slice the cheesecake using a sharp, thin-bladed knife. For the cleanest, most professional-looking slices, dip your knife in hot water and wipe it clean between each cut. This prevents sticking and ensures every piece is pristine. For an extra touch of elegance and an irresistible burst of flavor, top each slice with a generous dollop of freshly whipped cream. Finish with a delicate dusting of additional pumpkin spice for an aromatic flourish and beautiful visual appeal. You can also add a sprinkle of toasted pecans or a drizzle of caramel sauce for an added layer of indulgence. Serve immediately and savor every rich, creamy, and wonderfully spiced bite!
Tips for Cheesecake Perfection: Ensuring a Crack-Free and Creamy Result
Even with an easy and forgiving recipe like this, a few expert tips can elevate your homemade pumpkin cheesecake from great to absolutely phenomenal, ensuring a crack-free surface and the creamiest texture possible:
- Room Temperature Ingredients are Key: This cannot be stressed enough, especially for cream cheese and eggs. Softened cream cheese blends smoothly and evenly, preventing lumps. Room temperature eggs incorporate more easily without requiring excessive mixing, which is crucial for a creamy, dense texture without incorporating too much air.
- Don’t Overmix the Batter: This is a golden rule for cheesecake baking. Overmixing, especially after adding the eggs, incorporates too much air into the batter. This air causes the cheesecake to puff up excessively during baking and then collapse dramatically, often leading to unsightly cracks as it cools. Mix just until combined and smooth.
- Consider the Water Bath Advantage: While the original recipe makes it simple, a water bath (bain-marie) is highly recommended for cheesecakes if you want ultimate perfection. It provides a moist, even cooking environment, which helps prevent cracks, promotes slow, gentle baking, and ensures a silky-smooth texture throughout. If using a springform pan or a pie pan with a removable bottom, always wrap the bottom securely in heavy-duty foil to prevent any water seepage.
- Slow Cooling is Crucial: Drastic and sudden temperature changes are a cheesecake’s worst enemy, almost always leading to cracking. Cooling gradually in the oven with the door ajar, then slowly to room temperature on a wire rack, and finally in the refrigerator, minimizes stress on the cheesecake’s delicate structure and helps it set beautifully.
- Chill, Chill, Chill: Resist the temptation to cut into your cheesecake too early! The extended chilling period (4-8 hours, or preferably overnight) is absolutely essential. It allows the flavors to meld and deepen, the texture to firm up, and the cheesecake to reach its optimal dense, rich, and creamy consistency.
- Clean Slices Every Time: For beautiful, pristine slices that look professionally made, always dip your sharp knife in hot water and wipe it clean between each cut. This prevents the cheesecake from sticking to the knife and creates smooth, clean edges.
Creative Variations to Enhance Your Pumpkin Cheesecake Experience
While this classic pumpkin cheesecake recipe is absolutely perfect as is, feel free to get creative and customize it to your liking. Here are a few ideas to inspire your next baking adventure:
- Crust Innovations: Instead of a plain graham cracker crust, try using crushed gingersnap cookies for a spicier, more autumnal base that complements the pumpkin perfectly. Alternatively, a crust made from crushed pecan shortbread or even Biscoff cookies can add a delightful nutty or caramel twist.
- Topping Extravaganza: Beyond traditional whipped cream and a dusting of pumpkin spice, consider a luxurious drizzle of homemade caramel sauce or salted caramel. A sprinkle of toasted pecans, candied walnuts, or even a dollop of tart cranberry sauce can provide a wonderful textural and flavor contrast. For chocolate lovers, a light grating of dark chocolate or chocolate curls would be divine.
- Spice Adjustments: If you love a stronger spice profile, don’t hesitate to add a pinch more cinnamon, a dash of ground cloves, a tiny bit of freshly grated ginger, or a hint of allspice to the batter. You could even incorporate a touch of maple syrup into the batter for an added layer of fall flavor.
- Mini Cheesecakes: For elegant individual servings, bake the batter in a muffin tin lined with paper cups. Press a spoonful of graham cracker crumbs into the bottom of each cup before adding the batter. Adjust baking time accordingly (usually around 20-30 minutes).
This easy-to-make pumpkin cheesecake is more than just a dessert; it’s an experience—a slice of autumn comfort in every bite. Its smooth, rich texture and delightful blend of autumnal spices make it an instant classic, perfect for any occasion that calls for a touch of sweetness and warmth. We hope you enjoy making and sharing this delightful recipe as much as we do. For a visual guide and more fantastic culinary creations, remember to visit and subscribe to Whip It Up With Jay via YouTube. Happy baking, and enjoy your delicious homemade pumpkin cheesecake!
*A special thank you to Whip It Up With Jay via YouTube for the inspiring video tutorial and all images used here. His culinary expertise truly helps bring these delicious recipes to life for home bakers everywhere!