
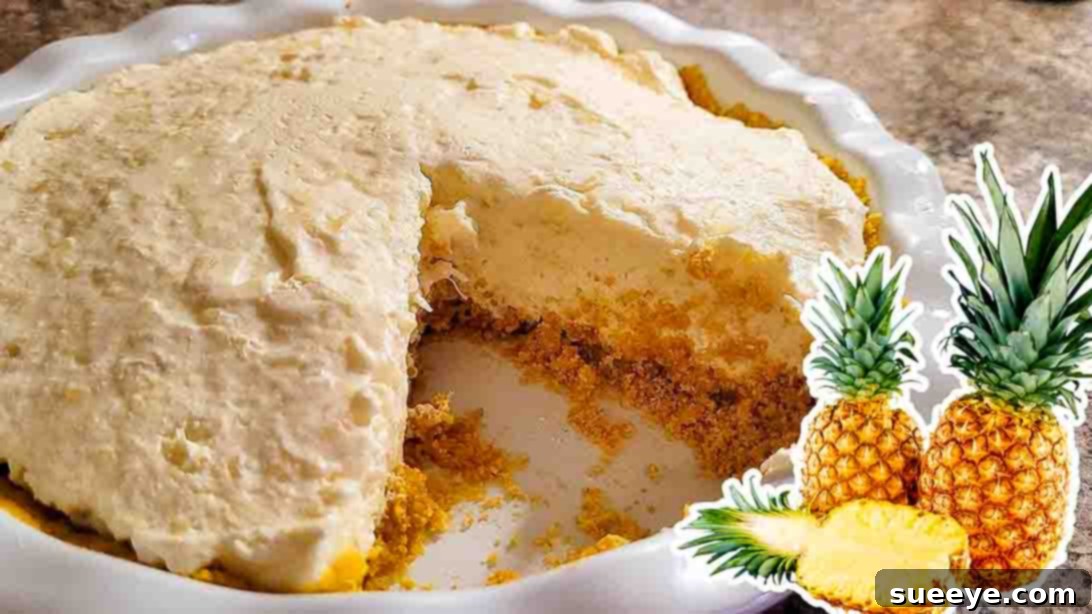
There’s an undeniable charm to a chilled dessert on a sweltering day, and when it comes to summer treats, a cool pineapple delight truly takes the crown. This fantastic no-bake pineapple pie recipe, brought to us by The Happy Homemaker on YouTube, is the quintessential solution for combating the heat with a burst of tropical flavor. Imagine a creamy, velvety, and utterly refreshing pie that requires no oven time – a dream come true for anyone looking to keep their kitchen cool and their taste buds happy. This simple yet sophisticated dessert is incredibly quick to prepare, needing only a handful of readily available ingredients. The primary wait time involves chilling, which, as the saying goes, is often worth every minute. This particular recipe stands out for its straightforward approach, making it accessible even for novice bakers, or rather, “no-bakers.” It promises a delightful blend of sweet and tangy notes, encapsulated in a smooth, cold filling perched atop a classic graham cracker crust. Whether you’re hosting a backyard barbecue, planning a picnic, or simply craving something light and refreshing, this no-bake pineapple pie is poised to become your go-to summer staple. Dive into the details below to discover how easily you can create this magnificent dessert.
RELATED: Easy Mini Pineapple Upside Down Cake Recipe
While this dessert shines brightest during the warmer months, its irresistible appeal makes it a perfect treat to enjoy all year round. Its ease of preparation and the minimal number of ingredients required mean you can whip it up for any occasion, from holiday gatherings to simple weeknight desserts. It’s an ideal candidate for potlucks, family celebrations, or just a sweet escape after a long day. The process is so straightforward that anyone can achieve delicious results, and the payoff is a dessert that looks impressive and tastes even better. Don’t just take our word for it; try this recipe today and experience the magic of a perfectly balanced, no-fuss pineapple pie. To get started and follow along with detailed visual guidance, be sure to watch the full video from The Happy Homemaker. This step-by-step instruction will ensure your no-bake pineapple pie turns out flawlessly every time, providing a truly enjoyable culinary experience.
Why Choose a No-Bake Pineapple Pie?
In the realm of desserts, no-bake options offer a unique set of advantages, particularly when the mercury rises. The most obvious benefit is the complete absence of oven heat, which means your kitchen stays cool, a welcome relief during summer. Beyond temperature control, no-bake recipes like this pineapple pie are renowned for their simplicity and speed. They typically involve fewer steps and less specialized equipment than their baked counterparts, making them ideal for busy individuals or those new to dessert making. This specific pineapple pie recipe leverages the convenience of a pre-made crust base and a quick-mix filling, significantly cutting down on active preparation time. Moreover, the chilling process not only sets the pie but also allows the flavors to meld beautifully, creating a more harmonious and intense taste experience. Pineapple, as the star ingredient, brings a natural sweetness and a refreshing tang that is perfectly complemented by the creamy texture of the filling. It’s a fruit that evokes tropical getaways and sunny days, making it an excellent choice for a dessert designed to cool and delight. This pie also serves as a fantastic crowd-pleaser; its bright flavors and smooth consistency appeal to a wide range of palates, ensuring it’s a hit at any gathering.
Unpacking the Ingredients: The Building Blocks of Flavor and Texture
The beauty of this no-bake pineapple pie lies in its minimal yet impactful ingredient list. Each component plays a crucial role in achieving the desired texture, flavor, and overall stability of the pie. Understanding the function of each ingredient can also help in future dessert experimentation or troubleshooting.
Ingredients:
For the Crust:
- 1 1/2 cups Graham cracker crumbs: These form the classic, buttery base of the pie. Graham cracker crumbs provide a slightly sweet, subtly spiced flavor and a wonderful crumbly-yet-firm texture that contrasts beautifully with the creamy filling. You can buy pre-crushed crumbs or easily make them by pulsing whole graham crackers in a food processor until fine.
- 1/4 cup granulated sugar: A small amount of sugar is added to the crust mixture to enhance its sweetness and complement the flavor of the graham crackers. It also helps in achieving a slightly caramelized taste when combined with the butter.
- A dash of salt: Just a pinch of salt is vital. It doesn’t make the crust salty; rather, it acts as a flavor enhancer, balancing the sweetness and bringing out the depth of the other ingredients. This is a common trick in baking to elevate overall taste.
- 6 tbsp unsalted butter, melted: Melted butter is the binding agent that holds the graham cracker crumbs together. It creates a rich, firm crust when chilled, preventing it from crumbling when sliced. Using unsalted butter allows you to control the salt content in your recipe precisely.
For the Filling:
- 1 can of sweetened condensed milk: This is the magical ingredient for many no-bake desserts. Sweetened condensed milk provides intense sweetness, a rich, creamy texture, and, crucially, helps the filling set without the need for baking. Its thick consistency contributes significantly to the pie’s luxurious mouthfeel.
- 1 cup crushed pineapple, strained well: Pineapple is the star! The crushed form ensures even distribution of flavor and texture throughout the filling. The instruction to “strain well” is paramount; excess liquid from the pineapple can make the pie filling runny and prevent it from setting properly. Pressing out as much juice as possible is key for a firm, delicious pie.
- 1/4 cup lemon juice: Freshly squeezed lemon juice brightens the flavor profile of the pie. Its acidity cuts through the sweetness of the condensed milk and pineapple, creating a perfectly balanced taste. More importantly, the acid in lemon juice reacts with the proteins in the condensed milk, helping the filling to thicken and set without heat, a fundamental principle in many no-bake recipes.
- 1 whole carton thawed Cool Whip: Cool Whip adds lightness, airiness, and a wonderfully fluffy texture to the filling. It incorporates volume and a delicate creaminess that makes the pie feel incredibly decadent yet light. Ensure it is thawed completely but still cold before folding it into the mixture to maintain its structure.
Mastering the Art of No-Bake: Step-by-Step Directions
Creating this delightful no-bake pineapple pie is a straightforward process, broken down into two main stages: preparing the crust and then assembling the creamy, flavorful filling. Patience during the chilling phases is the secret to a perfectly set and satisfying dessert.
Step 1: Crafting the Perfect Graham Cracker Crust
Begin by preparing your crust, which forms the sturdy and flavorful foundation of your pie. In a spacious mixing bowl, combine 1/4 cup of granulated sugar, a delicate dash of salt, and 1 1/2 cups of graham cracker crumbs. Ensure these dry ingredients are thoroughly mixed to prevent pockets of concentrated sugar or salt. Once uniformly combined, pour in 6 tablespoons of unsalted melted butter. Use a fork or a sturdy spoon to mix everything together until the mixture achieves a consistently crumbly texture, resembling wet sand. Every crumb should be moistened by the butter, as this is what will bind them together. When the mixture is ready, transfer it into a 9-inch pie pan. Using the bottom of a glass or your knuckles, firmly press the crumb mixture evenly across the bottom and up the sides of the pan. Compacting the crust is crucial; it prevents it from falling apart when you slice the pie later. Once pressed, place the pie pan, covered (a sheet of plastic wrap works well), into the refrigerator and chill for at least 30 minutes. This chilling period allows the butter to solidify, setting the crust and making it firm. While the crust is chilling, you can efficiently move on to preparing the delectable filling.
Step 2: Mixing the Creamy Pineapple Filling and Assembling the Pie
Now, it’s time to create the luscious filling. In a separate, clean bowl, combine the entire can of sweetened condensed milk with 1 cup of thoroughly strained crushed pineapple. Remember, straining the pineapple is key to avoiding a watery pie, so ensure you’ve pressed out as much liquid as possible. Mix these two ingredients well until they are smoothly integrated. Next, gently stir in 1/4 cup of fresh lemon juice. As you incorporate the lemon juice, you might notice the mixture beginning to thicken slightly due to the acid’s reaction with the condensed milk – this is a good sign! Finally, add the entire carton of thawed Cool Whip. The key here is to fold the Cool Whip into the pineapple mixture gently, using a spatula, until it is “just combined.” Overmixing can deflate the airiness of the Cool Whip, resulting in a denser filling. Once your filling is ready, retrieve the chilled graham cracker crust from the refrigerator. Carefully spoon the creamy pineapple mixture into the crust, spreading it out nicely and evenly with your spatula to create a smooth, inviting surface. Once assembled, place the pie back into the refrigerator. This final chilling period is the most crucial; allow it to chill for a minimum of four hours. Ideally, an overnight chill is even better, as it gives the pie ample time to set firmly and allows all the flavors to fully meld together, resulting in the perfect texture and taste. After the required chilling time, your exquisite no-bake pineapple pie is ready to be sliced and served. Enjoy every refreshing bite!
Tips for a Perfect No-Bake Pineapple Pie Every Time
Achieving the perfect no-bake pineapple pie is simple, but a few expert tips can elevate your dessert from good to absolutely fantastic. Paying attention to these details will ensure your pie is always a crowd-pleaser.
Ensure Thorough Pineapple Straining
This cannot be stressed enough: the success of your pie largely depends on how well you strain the crushed pineapple. Excess moisture is the enemy of a firm, set pie. After opening the can, pour the crushed pineapple into a fine-mesh sieve. Use the back of a spoon or a spatula to press down firmly on the pineapple, extracting as much liquid as possible. You might even consider letting it sit for a few minutes to drain further. Some people go as far as squeezing it in cheesecloth for maximum dryness. This step prevents your pie filling from becoming runny and ensures a perfectly scoopable, creamy texture.
Don’t Overmix the Cool Whip
When incorporating the thawed Cool Whip into your condensed milk and pineapple mixture, use a gentle folding motion. Overmixing can cause the Cool Whip to lose its airy volume, resulting in a denser, less fluffy filling. The goal is to combine the ingredients just until no streaks of Cool Whip remain, maintaining that light, cloud-like texture that makes this pie so delightful.
Proper Chilling is Non-Negotiable
The chilling time is crucial for this no-bake pie to set properly. While the recipe calls for at least four hours, an overnight chill (8-12 hours) is highly recommended for the best results. A longer chill allows the lemon juice and condensed milk to fully interact and the entire pie to firm up completely. It also gives the flavors ample time to marry, resulting in a more harmonious and pronounced taste. Don’t rush this step!
Garnish for Visual Appeal and Extra Flavor
A beautifully garnished pie is even more inviting. Before serving, consider adding a final touch. A dollop of extra whipped cream, a few fresh pineapple chunks, a sprinkle of toasted coconut flakes, or a grating of lime zest can add both visual appeal and an extra layer of flavor and texture. A sprig of fresh mint can also provide a refreshing aromatic touch.
Serving and Storage
This no-bake pineapple pie is best served cold, straight from the refrigerator. For clean slices, use a warm knife (run it under hot water and wipe dry between cuts). Any leftover pie should be stored in an airtight container in the refrigerator for up to 3-4 days. While it’s unlikely to last that long, it’s good to know how to keep it fresh!
Creative Variations to Explore
While the classic recipe is perfect, feel free to experiment with slight variations once you’ve mastered the basic version. You could try using a different type of crumb crust, such as shortbread or vanilla wafers, for a different flavor profile. For an extra tropical twist, a tiny splash of coconut extract or a handful of shredded coconut folded into the filling would be delicious. Some recipes even call for a small amount of cream cheese for an extra tangy and rich filling, though it would alter the original recipe’s light texture. You could also experiment with other canned fruits like mandarin oranges or peaches, ensuring they are equally well-drained.
With these tips in mind, you are well-equipped to create a stunning and incredibly delicious no-bake pineapple pie that will impress everyone who tries it. It’s truly a testament to how simple ingredients, combined thoughtfully, can result in an extraordinary dessert.
No-Bake Pineapple Pie: Your New Favorite Dessert!
This No-Bake Pineapple Pie is more than just a recipe; it’s an invitation to effortlessly create a dessert that embodies freshness, sweetness, and the joyous spirit of summer. With its minimal preparation time, simple ingredients, and the promise of a cool, creamy bite, it’s destined to become a beloved staple in your culinary repertoire. Whether you’re a seasoned chef or a kitchen novice, the straightforward steps ensure a perfect result every time. The refreshing tang of pineapple beautifully complements the rich sweetness of condensed milk and the airy lightness of Cool Whip, all nestled in a buttery graham cracker crust. It’s the ideal treat to serve at gatherings, enjoy with your family, or simply indulge in on a quiet afternoon. So, go ahead, gather your ingredients, follow these easy instructions, and prepare to delight in a dessert that is as easy to make as it is delicious to eat. Say goodbye to oven-induced heat and hello to a blissful, no-fuss pineapple dream. Try this recipe today and let this no-bake pineapple pie become your ultimate go-to for refreshing sweetness!