
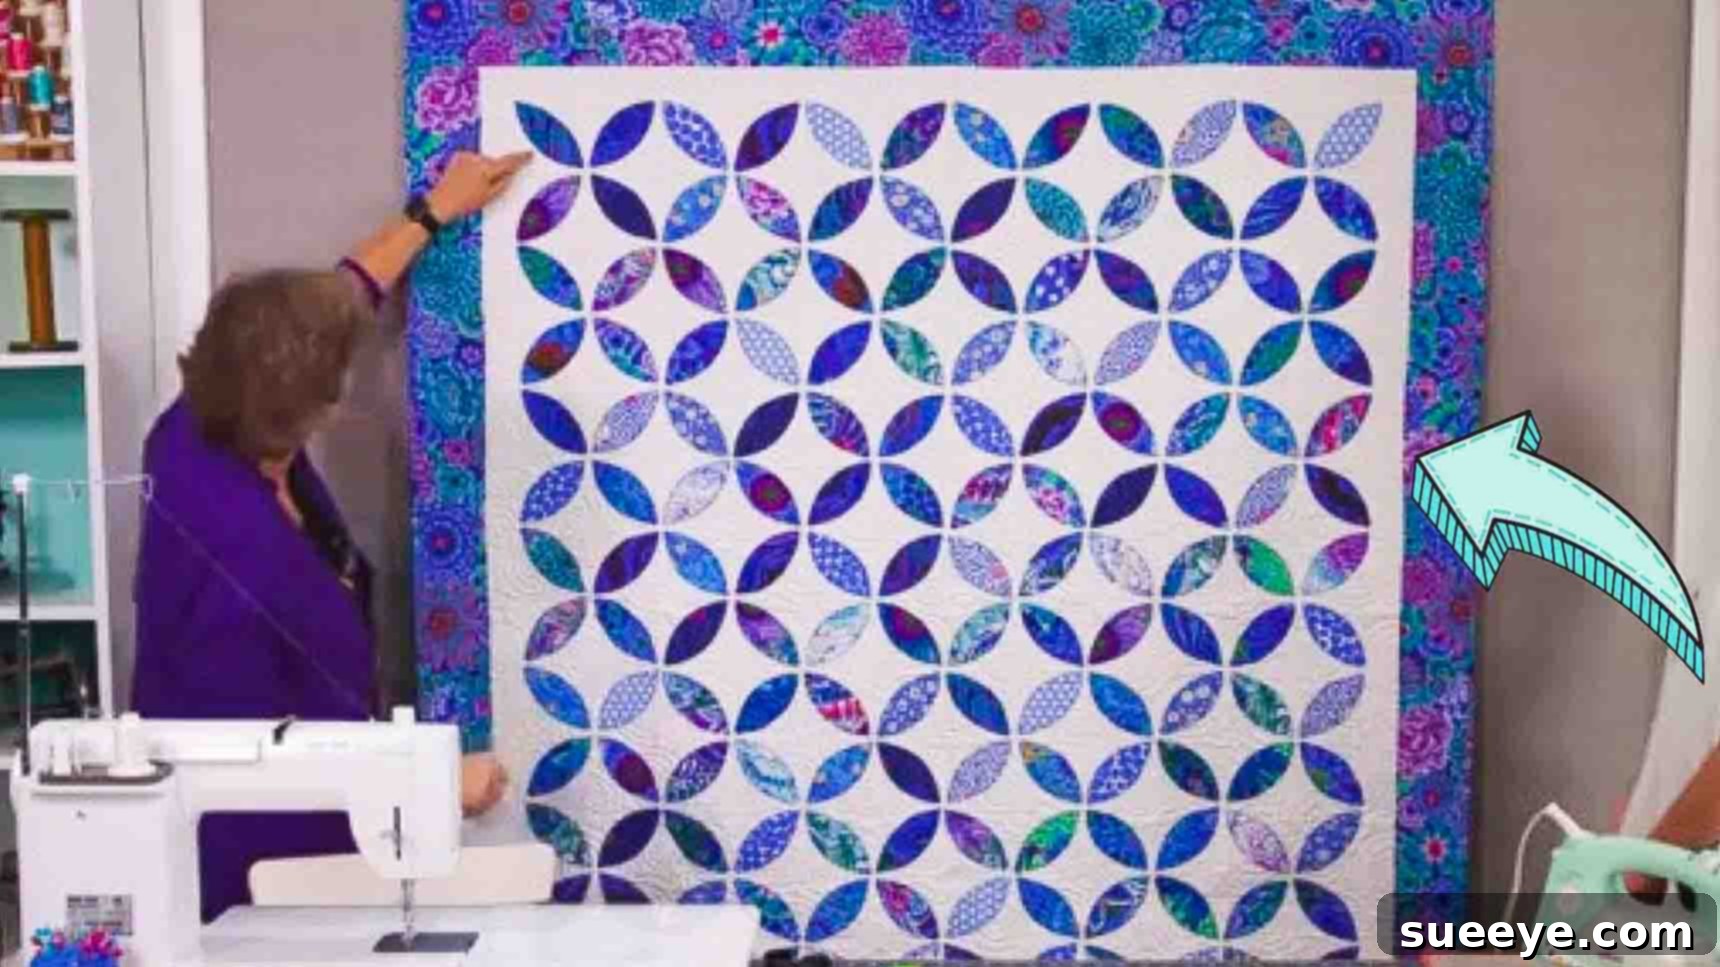
Master the Easy Orange Peel Quilt: A Beginner-Friendly DIY Tutorial
There’s an undeniable charm in a handmade quilt—a cozy embrace of warmth, a tapestry of cherished fabrics, and a testament to the love woven into every stitch. As someone who revels in the joy of creating meaningful gifts, I recently embarked on a quest to find the perfect quilt pattern for my mother’s upcoming birthday. My search led me down a delightful rabbit hole on YouTube, where I stumbled upon the exquisite Orange Peel Quilt from Missouri Star Quilt Co.
Initially, the intricate curves and precise piecing of the Orange Peel design seemed daunting. My heart sank slightly, believing it might be too complex for a quick project or even for a seasoned quilter, let alone a beginner. However, driven by the sheer beauty of the pattern and the desire to create something truly special, I decided to take the leap. To my absolute delight and surprise, this seemingly complex quilt turned out to be incredibly beginner-friendly! The process was far more straightforward and enjoyable than I had anticipated, proving that appearances can often be deceiving in the world of quilting.
The satisfaction of watching this beautiful quilt come together in less than a day was immense. The final product is simply gorgeous, a timeless design that I’m certain my mom will adore and cherish for years to come. If you’re looking for a stunning, quick, and surprisingly easy quilting project that yields professional-looking results, the Orange Peel Quilt is an absolute must-try. Join me as we dive into this comprehensive, step-by-step tutorial, inspired by the brilliant minds at Missouri Star, and discover how simple it is to create your own masterpiece.
Essential Materials for Your Orange Peel Quilt
Gathering your materials before you begin is a crucial first step for any quilting project. For this charming Orange Peel Quilt, you’ll find that pre-cut fabrics, often referred to as “charm packs,” make the process incredibly efficient and enjoyable. Here’s a detailed list of everything you’ll need, along with some helpful tips for selection:
- 4 Packs of 5″ Print Squares (Charm Packs): These pre-cut squares are perfect for the “peel” units. Opt for a variety of prints within a cohesive color palette to create visual interest, or choose a single collection for a harmonious look. Having four packs ensures you have plenty of fabric for your peels and allows for some flexibility in design choices.
- 4 Packs of 5″ Background Squares (Charm Packs): These squares will serve as the canvas for your orange peels, allowing them to pop. White, cream, or a light solid color are excellent choices for a classic look, providing good contrast. You could also experiment with subtle tone-on-tone prints for added texture.
- 3/4 Yard of Inner Border Fabric: The inner border helps frame your quilt top and provides a visual transition between the central blocks and the outer border. Choose a fabric that complements both your print and background squares, perhaps pulling out a subtle color from your charm pack prints.
- 1 1/4 Yards of Outer Border Fabric: The outer border adds significant size and acts as the grand frame for your entire quilt. This is often where you can introduce a bolder print or a more dominant color from your palette to create impact. Consider how it will interact with your binding.
- 3/4 Yard of Binding Fabric: The binding is the protective and decorative edge that finishes your quilt. Choose a durable fabric that coordinates well with your quilt top. Many quilters opt for a solid color that matches a prominent shade in the quilt, or a small coordinating print that adds a subtle touch.
- 4 3/4 Yards of Backing Fabric: The backing forms the underside of your quilt, providing warmth and comfort. Flannel, minky, or a wide cotton print are popular choices. Ensure it’s soft against the skin and complements the overall aesthetic of the quilt. This amount is typically for a standard throw size quilt.
- 1 Piece Missouri Star Small Orange Peel Template for 5″ Charm Packs: This specialized template is the key to creating perfectly uniform orange peel shapes. Its design ensures accuracy and simplifies the cutting process, which is vital for achieving a professional finish. Investing in the correct template for your charm packs will save you time and frustration.
- 6 Yards of 20″ Lightweight Fusible Interfacing: This interfacing is a game-changer for creating crisp, clean turned edges on your orange peel appliqué pieces. Its fusible nature means it will bond to your fabric with heat, providing stability and a neat finish without bulk. Ensure it’s lightweight to maintain the quilt’s drape.
Additional Recommended Tools:
While not strictly listed above, these tools are indispensable for any quilter and will greatly enhance your experience and the quality of your finished quilt:
- Sewing Machine: A reliable machine with a 1/4-inch piecing foot is ideal for consistent seam allowances.
- Rotary Cutter, Mat, and Quilting Ruler: Essential for precise and efficient fabric cutting.
- Iron and Ironing Board: Crucial for pressing seams and fusing interfacing, which significantly impacts the quilt’s flatness and appearance.
- Thread: High-quality 50wt cotton thread in a neutral color (like white or cream) is generally recommended for piecing.
- Fabric Scissors: For trimming threads and detailed cuts.
- Pins or Fabric Clips: To hold fabric pieces together securely before sewing.
- Seam Ripper: Every quilter needs one! It’s a tool for learning and perfecting.
- Quilting Batting: While not explicitly in the original list, batting is essential for the middle layer of your quilt, providing warmth and structure. Choose a type suitable for your climate and desired drape.
Step-by-Step Directions for Your Orange Peel Quilt
Now that you have all your materials and tools ready, let’s dive into the creative process. This tutorial breaks down the Orange Peel Quilt into manageable steps, making it accessible for quilters of all skill levels. Pay close attention to detail, especially with cutting and pressing, as these contribute significantly to the final outcome of your quilt.
Step 1: Preparing the Orange Peel Units
This initial stage focuses on creating the distinctive orange peel shapes that will form the heart of your quilt. Precision here is key for beautiful, symmetrical results.
- Cutting the Fabric: Take one of your 5″ print charm squares. For efficiency and to make the most of your template, fold it neatly into quarters. Place your Missouri Star Small Orange Peel template on top of the folded fabric, aligning the edges carefully. Using your rotary cutter, cut around the template to create a perfect orange peel shape. You should get four identical peels from one charm square. Repeat this process for all your 5″ print squares until you have a good quantity of fabric peels ready.
- Cutting the Interfacing: Next, take your lightweight fusible interfacing. Just like with your fabric, fold the interfacing and use the same Orange Peel template to cut out identical shapes. You’ll need one interfacing piece for each fabric orange peel you’ve cut. Ensure your interfacing pieces are as precise as your fabric pieces.
- Preparing the Interfacing for Turning: Pick up one of your interfacing pieces. Carefully make a small, approximately 1-inch slit right in the center of the interfacing. This slit will be crucial later for turning your sewn unit right side out. Repeat this for all your interfacing pieces.
- Assembling the Peel Units: Now, take one fabric orange peel piece and one interfacing orange peel piece. Place the interfacing piece on top of the *right side* of your fabric orange peel. Ensure the fusible (sticky) side of the interfacing is facing *down* onto the right side of the fabric. Align the edges perfectly.
- Sewing the Edges: Using your sewing machine, sew a scant 1/4-inch seam allowance around the entire curved edge of the aligned fabric and interfacing pieces. Do not sew across the slit in the interfacing. This creates a pocket. Repeat this step for all the remaining orange peel units, creating a stack of sewn fabric and interfacing sets.
- Clipping and Turning: Before turning, carefully clip the seam allowance around the curves, making small snips perpendicular to your stitching line, without cutting through the stitching. This will help the curve lay flat and smooth once turned. Now, gently push the fabric through the slit in the interfacing to turn the entire unit right side out. Use a point turner or a dull pencil to gently push out the curves for a smooth shape.
- Pressing the Peel Units: With the units turned right side out, use a hot iron to press them thoroughly. The heat will activate the fusible adhesive on the interfacing, bonding it to the wrong side of the fabric and creating a crisp, clean orange peel shape with perfectly finished edges. Press firmly until each peel is flat and smooth.
Step 2: Appliquéing and Assembling the Quilt Blocks
With your individual orange peel units perfectly prepared, the next phase involves attaching them to your background squares and constructing the quilt blocks that will form your quilt top.
- Adhering to Background Squares: Take one of your pressed orange peel units and one 5″ background square. Center the orange peel on the background square, aligning the corners of the peel with the midpoints of the background square’s sides for a balanced look. The fusible interfacing on the back of your orange peel unit will help it stay in place. Once perfectly positioned, use your hot iron to fuse the orange peel onto the background square. Press firmly for several seconds to ensure a secure bond. Repeat this for all your orange peel units and background squares.
- Top Stitching the Peels: To permanently secure the orange peel and add a lovely decorative touch, top stitch around the raw edges of each appliquéd orange peel. You can use a matching thread for an invisible look or a contrasting thread for added visual interest. A narrow straight stitch or a small zigzag stitch works well. This step not only holds the peel in place but also adds durability to your quilt.
- Creating Four-Patch Blocks: Now it’s time to assemble your individual orange peel units into larger quilt blocks. For this pattern, we’ll be creating a four-patch configuration. A common layout for the Orange Peel Quilt is to arrange two appliquéd orange peel units and two plain background squares (or other complementary blocks) into a 2×2 grid. Lay out your chosen units side-by-side, forming two rows of two.
- Sewing the Four-Patch:
- First, sew the two units in the top row together with a 1/4-inch seam allowance.
- Then, sew the two units in the bottom row together.
- Press your seams carefully. You can press them open for less bulk or press them to one side, alternating directions for easier nesting when joining the rows.
- Finally, sew the two rows together, carefully matching up the seams in the middle to ensure a perfect intersection. Press the final seam. You have now completed one Orange Peel quilt block! Continue this process until you have a sufficient number of blocks for your quilt top.
- Assembling the Quilt Top: Once all your individual quilt blocks are made, it’s time to arrange them into the final quilt top design. For a lovely throw-sized quilt, the original tutorial suggests laying out seven blocks down and six blocks across (7 rows x 6 columns), totaling 42 blocks.
- Carefully lay out all your blocks on a design wall or a large flat surface to finalize your arrangement. This allows you to visualize the pattern and make any adjustments to color placement or orientation before sewing.
- Once you are satisfied with the layout, begin sewing the blocks together into rows. Stitch each block to its neighbor in the same row using a 1/4-inch seam allowance. Press seams within each row.
- After all rows are complete, sew the rows together, carefully nesting the seams where they meet. Take your time with this step to ensure straight lines and perfectly matched intersections. Press your final seams to set them. Congratulations, your Orange Peel quilt top is now complete!
Adding Borders and Finishing Your Quilt
With your beautiful quilt top assembled, the next steps transform it into a complete, durable, and display-ready masterpiece. Borders add visual impact and help stabilize the quilt, while quilting and binding ensure its longevity and comfort.
Adding the Borders
Borders not only enlarge your quilt to the desired size but also provide a beautiful frame for your pieced design. For this project, we have both an inner and an outer border.
- Preparing Inner Border Strips: Measure the length and width of your quilt top accurately. Cut your inner border fabric into strips of the appropriate width (typically 1.5 to 2.5 inches wide, depending on preference). You will need two strips for the side borders and two for the top and bottom borders.
- Attaching Inner Borders: Sew the two side border strips to the left and right sides of your quilt top first. Press the seams towards the border. Then, attach the top and bottom border strips. Press these seams towards the border as well. This method helps to keep the quilt square.
- Preparing Outer Border Strips: Repeat the measuring and cutting process for your outer border fabric. These strips will be wider than your inner border strips, often 4 to 6 inches, to create a more substantial frame.
- Attaching Outer Borders: Following the same method, sew the two outer border strips to the sides of your quilt, press, and then attach the top and bottom outer border strips, pressing again. Your quilt top is now fully framed and ready for the next stage.
The Quilt Sandwich and Quilting
The “quilt sandwich” consists of three layers: the quilt top, a layer of batting, and the backing fabric. Batting provides warmth, loft, and helps to hold the layers together.
- Preparing Your Batting: You will need batting that is slightly larger (at least 3-4 inches larger on all sides) than your quilt top. Common batting types include cotton, polyester, or a blend. Each offers different properties in terms of warmth and drape.
- Layering the Quilt Sandwich:
- Lay your backing fabric wrong side up on a clean, flat surface, smoothing out all wrinkles. Secure it with painter’s tape if working on a floor.
- Next, lay your batting evenly over the backing, again smoothing it out.
- Finally, center your finished quilt top right side up over the batting. Ensure all three layers are taut but not stretched.
- Basting the Layers: Basting is the process of temporarily securing the three layers together to prevent shifting during quilting. You can use safety pins (pin basting), spray adhesive (spray basting), or hand-basting stitches. Ensure your basting is dense enough to hold the layers firmly.
- Quilting Your Quilt: This is where you add the decorative stitching that holds all three layers together permanently. For a beginner, simple straight-line quilting using your walking foot or stippling (free-motion quilting with a continuous meandering line) are excellent choices. You can follow the lines of your orange peel appliqué, quilt a grid, or choose a design that complements your fabric. This step adds texture and enhances the overall beauty of your quilt.
Binding Your Quilt
The binding is the final edge finish that encloses the raw edges of your quilt, providing durability and a professional look.
- Preparing Binding Strips: From your binding fabric, cut 2.5-inch wide strips. You will need to join these strips together to create one continuous length long enough to go around the entire perimeter of your quilt, plus about 10-12 inches extra. Join strips on the diagonal for less bulk.
- Attaching the Binding: Fold your long binding strip in half lengthwise and press. Starting on one side of your quilt, align the raw edges of the binding with the raw edges of your quilt top. Sew the binding to the quilt using a 1/4-inch seam allowance, leaving a tail at the beginning and end for joining. Miter the corners for a neat finish.
- Finishing the Binding: Once sewn to the front, flip the binding over to the back of the quilt. You can then hand-stitch the binding to the backing fabric for an invisible, elegant finish, or machine-stitch it for a quicker, more durable result.
Tips for a Perfect Orange Peel Quilt
Achieving a beautiful Orange Peel Quilt, especially as a beginner, involves a few key practices:
- Accuracy is Paramount: Take your time with cutting and sewing. A precise 1/4-inch seam allowance is critical for blocks to fit together perfectly. Use a seam gauge or your machine’s 1/4-inch foot.
- Pressing vs. Ironing: Remember to “press” (lift and place the iron) rather than “iron” (slide the iron), especially with delicate seams and appliqué. This prevents distorting your fabric and blocks.
- Chain Piecing: When you have many identical units or seams to sew, chain piecing is a fantastic time-saver. Sew one seam, feed the next unit under the needle without cutting the thread, and repeat. You can cut them apart later.
- Test Stitches: Always test your sewing machine tension and stitch length on a scrap piece of fabric before starting on your actual quilt pieces.
- Fabric Selection: Don’t be afraid to play with colors and patterns! The Orange Peel design is incredibly versatile. Consider how light and dark fabrics interact to create contrast and movement.
- Embrace Imperfections: While aiming for perfection is great, remember that handmade items carry a unique charm. A slight wobble here or there tells the story of your creative journey.
Why the Orange Peel Quilt is a Beginner-Friendly Favorite
Despite its sophisticated appearance, the Orange Peel Quilt has earned its reputation as a fantastic project for new quilters for several reasons:
- Utilizes Pre-Cuts: Working with 5-inch charm packs eliminates the need for extensive fabric cutting, allowing beginners to jump straight into sewing.
- Repetitive Units: The design relies on the repetition of a single unit, which allows for mastering the technique quickly. Once you’ve made a few orange peel units, you’ll gain confidence and speed.
- Appliqué with Ease: The fusible interfacing method makes turned-edge appliqué incredibly accessible, bypassing more complex hand-appliqué techniques often associated with curved shapes.
- Visually Rewarding: The stunning finished look of the Orange Peel Quilt provides immense satisfaction, encouraging new quilters to continue their creative journey.
- Customizable: While the core technique is simple, the design is highly customizable through fabric choices, color placement, and quilting patterns, allowing for personal expression.
Conclusion: Your Quilting Journey Awaits
Creating this Orange Peel Quilt has been a wonderfully rewarding experience, from the initial “aha!” moment of discovering the pattern to the final, satisfying stitch. What seemed like a complex design quickly transformed into an approachable and enjoyable project, proving that with the right guidance and a little patience, even intricate-looking quilts are within reach for beginners.
The joy of crafting a beautiful, handmade gift for someone special, like my mother, is truly unparalleled. Knowing that this quilt carries not just warmth, but also my love and effort, makes it all the more precious. I am absolutely thrilled with the outcome and can’t wait to see her reaction on her birthday.
I hope this detailed tutorial empowers you to confidently tackle your own Orange Peel Quilt. Don’t be intimidated by curves; the Missouri Star method, with its clever use of interfacing, makes it surprisingly simple. So, gather your fabrics, fire up your sewing machine, and get ready to create a stunning piece that will be cherished for generations. Happy quilting!