
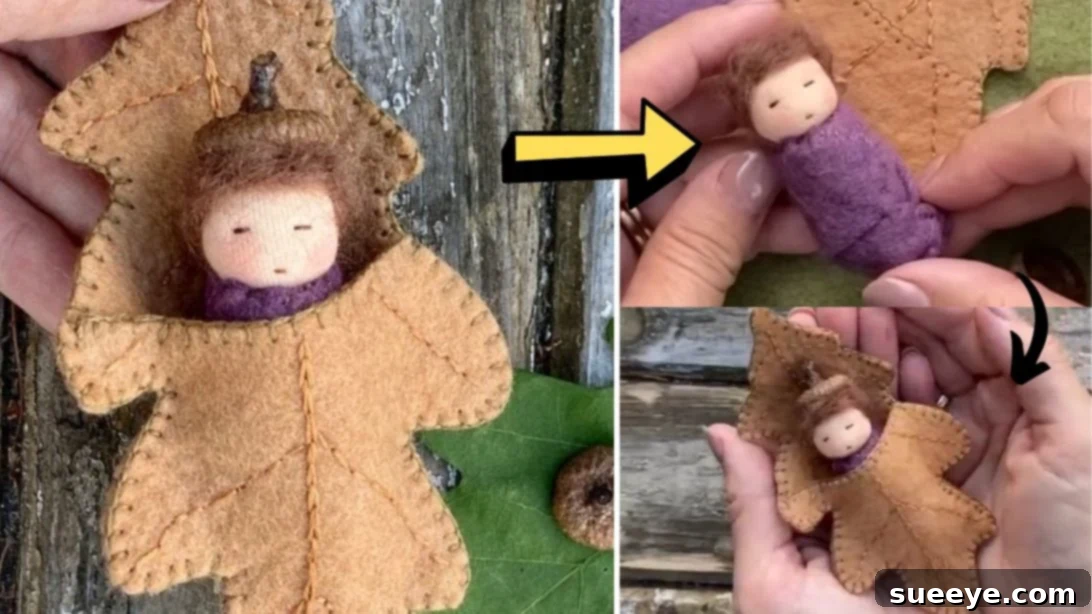
Unlock your creativity and bring a touch of woodland magic into your home with this delightful Oak Leaf Doll sewing project. Perfect as a heartwarming gift for a loved one, or as a charming, unique ornament to enhance your seasonal decor, this craft promises to bring a smile to both the maker and the recipient. Whether you’re a seasoned crafter or just starting your journey into the world of fabric arts, these clear and simple steps, expertly guided by The Everyday Artisan at Wingfelder Fiber Studio on YouTube, will empower you to create several of these adorable dolls with ease and joy.
Handmade items carry a special sentiment, and this Oak Leaf Doll is no exception. Imagine the delight on someone’s face when they receive a gift crafted with such care and personal touch. Each doll embodies a whimsical spirit, capturing the essence of autumn and the beauty of nature. Beyond gifting, these little treasures can add a cozy, autumnal feel to any space – nestled on a bookshelf, perched on a mantelpiece, or adorning a festive display. This tutorial not only walks you through the construction but also encourages personalization, allowing each doll to truly reflect your unique style and artistic flair.
Essential Materials for Your Oak Leaf Doll
Gathering your materials is the first exciting step in any creative project. For this charming Oak Leaf Doll, you’ll need a carefully selected array of items, each playing a crucial role in bringing your woodland friend to life. Quality materials will ensure your doll is not only beautiful but also durable.
- Oak Leaf: A real oak leaf serves as your initial template. Choose one that is well-preserved and has a pleasing shape.
- Sharp Scissors: Essential for precise fabric cutting, ensuring clean edges for your leaf pieces.
- Marking Pen or Pencil: For tracing the leaf shape onto your felt and marking details. A fabric-specific marker is ideal.
- Felting Needles: These specialized needles are vital for compacting and shaping the core wool. Always handle with care.
- Sewing Needles: A variety of sizes might be useful for different stitching tasks, from delicate embroidery to securing fabric.
- Fabric Pins: To hold fabric pieces securely in place during cutting and sewing, preventing shifting.
- Embroidery Thread: Choose colors that complement your felt for the leaf veins, outer edges, and facial features. Standard cotton embroidery floss works well.
- Felting Surface: A foam pad or felting mat provides a safe and effective surface for needle felting, protecting your work area and needles.
- Felt: High-quality wool felt in an appropriate leaf color (e.g., shades of green, brown, or rust) for the outer leaf pocket.
- Skin Fabric: A small piece of skin-toned fabric for the doll’s head, ensuring a soft and realistic appearance.
- Core Wool (for doll making): This unspun wool is the foundation of your doll’s body, providing shape and structure.
- Skewer: A simple wooden skewer acts as a temporary core for shaping the wool.
- Hot Glue Gun and Glue Sticks: For securely attaching the acorn cap and other embellishments.
Step-by-Step Guide to Crafting Your Oak Leaf Doll
Step 1: Constructing the Leaf Pocket and Doll’s Core
The journey begins with creating the cozy leaf pocket that will cradle your little doll, followed by shaping the doll’s foundational core. Precision and patience are key in these initial stages.
Begin by selecting your felt for the leaf pocket. Lay your chosen oak leaf onto the wool felt. You have two options here: either carefully pin the oak leaf in place and meticulously cut around its perimeter, or trace its shape onto the felt with your marking pen/pencil before cutting. The latter often yields a more accurate outline. Once you have your first felt leaf piece, place it back onto the wool felt. This time, you will create a second, slightly smaller piece. Trace and cut out this second piece, ensuring it is only approximately halfway up the length of the first leaf piece. To create the ‘pocket’ opening, gently curve the top edge of this half-piece. This curved edge will form the top opening where your doll will peek out.
Now, it’s time to add the intricate details that give the leaf its realistic charm. Using your marking pen, delicately draw the natural vein patterns onto both felt leaf pieces. These guidelines will help you in the next step. With your embroidery thread, begin sewing the central vein on each piece using a chain stitch. This stitch creates a slightly raised, rope-like line, perfect for the prominent central vein. For the delicate side veins, switch to a back stitch, which produces a clean, continuous line. Choose complementary thread colors – perhaps a slightly lighter shade for the veins to add depth and dimension.
To finish the leaf pocket, take your darker embroidery thread and sew along the outer edges of the top, curved half-piece using a blanket stitch. This not only reinforces the edge but also adds a beautiful decorative detail. Align the two felt leaf pieces perfectly, pinning them together to prevent any movement. Continue the blanket stitch along the entire outer perimeter of the joined leaf pieces, ensuring a secure and aesthetically pleasing finish. Once sewn, set your beautifully crafted leaf pocket aside. It’s now ready for its tiny inhabitant.
Next, prepare the doll’s core. Take your core wool and begin wrapping it tightly around one end of the skewer. The goal is to create a dense, uniform shape. Continue wrapping and compacting the wool until you achieve a firm, pod-like or cigar-shaped form. Aim for a length of approximately 2 inches and a thickness of about ¾ inch. The tighter you wrap the wool at this stage, the more solid and manageable your doll’s body will be.
Step 2: Shaping the Doll and Adding Charming Details
With the leaf pocket and core ready, this step focuses on bringing your doll to life with facial features, hair, and a final snug fit into its leafy home.
Carefully remove the skewer from the wool core. The wool will retain its basic shape, but it will likely be a bit loose. This is where your felting needles come into play. Using a single felting needle (and always being mindful of safety, as these needles are very sharp), begin poking the entire surface of the wool piece. This process, known as needle felting, compacts the fibers, creating a much firmer and more defined shape for your doll’s body. Continue poking until the wool piece feels dense and holds its form well. Pay particular attention to smoothing out any bumps or uneven areas.
Next, define the doll’s neckline. Take a length of sturdy sewing thread and wrap it tightly around the wool piece at the point where you want the neck to be. Cinch the thread firmly, creating an indentation, and secure it with a knot. This simple technique gives your doll a clear head-and-body separation. Now, take your skin fabric. Wrap it smoothly around the wool piece, ensuring it covers the entire ‘head’ area. Secure the fabric with small, neat stitches at the back or base of the head. Once the skin fabric is in place, repeat the neckline definition: wrap another tight thread around the same indentation, cinching the fabric and wool to create a well-defined neck.
To give your doll a soft “body” beneath the leaf, cut a small piece of felt that can comfortably wrap around the lower portion of the wool piece (below the neckline). This felt piece should match or complement your leaf color, or you can choose a neutral tone. Wrap this felt around the doll’s body and sew it securely in place with small, neat stitches. This adds a soft texture and a bit of volume.
Now for the delightful facial features! For a natural, rosy blush on the cheeks, take a small fabric scrap and gently rub it on a red crayon or even a touch of real blush makeup. Dab this lightly onto the doll’s cheeks, building up the color gradually. This adds a sweet, lifelike glow. For the eyes and mouth, use two strands of embroidery thread. With a sewing needle, carefully embroider small, simple stitches to create the eyes and a gentle curve for the mouth. You can experiment with different expressions to give your doll a unique personality.
Finally, for the doll’s hair, you have creative freedom. You can either embroider delicate strands directly onto the head using embroidery floss, creating a stylized look, or you can use wool roving (unspun wool fibers) which can be carefully needle-felted or glued onto the head for a softer, more voluminous hairstyle. Once the hair is done, take a real acorn cap. Apply a small amount of hot glue to the inside of the acorn cap and carefully adhere it to the top of the doll’s head, positioning it like a charming hat. Ensure the glue sets firmly. The last magical touch is to gently insert your completed doll into the leaf pocket you created earlier. The doll should fit snugly, peeking out from its autumnal dwelling.
Congratulations! You’ve successfully created a charming Oak Leaf Doll. This project is more than just sewing; it’s about infusing a piece of your creativity and warmth into a tangible object. These dolls make enchanting additions to any autumn or winter decor, bringing a touch of nature-inspired whimsy indoors. They are also perfect for seasonal gifting, offering a unique and personalized present that will be treasured.
Feel free to experiment with different colors of felt for the leaves, various embroidery floss shades for the details, and even different types of wool for the hair. You could add tiny buttons, beads, or other small embellishments to further personalize your dolls. Imagine a family of Oak Leaf Dolls, each with its own character! This tutorial provides a solid foundation, but your imagination is the only limit.
We encourage you to share your beautiful creations and inspire others. Crafting is a wonderful way to express yourself and connect with a community of makers. For more inspiring tutorials and creative ideas, be sure to follow and subscribe to the channel of The Everyday Artisan at Wingfelder Fiber Studio on YouTube. Happy crafting!
Easy Oak Leaf Doll Sewing Tutorial: Your Guide to Charming Handmade Gifts and Decor
Discover the joy of crafting your own adorable Oak Leaf Dolls. This comprehensive tutorial simplifies the process, making it accessible for crafters of all skill levels. From selecting your materials to adding the final, delicate touches, you’ll learn everything needed to create these enchanting figures. Whether for festive decor, a unique handmade gift, or simply for the pleasure of making, this project is sure to delight. Dive into the world of fabric and felt, and bring these whimsical woodland characters to life with ease and confidence.