
Stitch Your Own Galaxy: The Enchanting Milky Way Quilt Tutorial (Free Pattern Included!)
Quilting is more than just a hobby; it’s a creative journey, a therapeutic escape, and a wonderful way to craft personalized treasures. For many, including myself, the satisfaction of transforming fabric pieces into a cohesive, beautiful design is truly rewarding. Every completed project fuels the desire to explore new patterns and techniques, making each weekend a delightful adventure in fabric arts. Quilts, with their intricate designs and cozy warmth, also make exceptionally thoughtful and cherished gifts, conveying a personal touch that store-bought items simply cannot replicate.
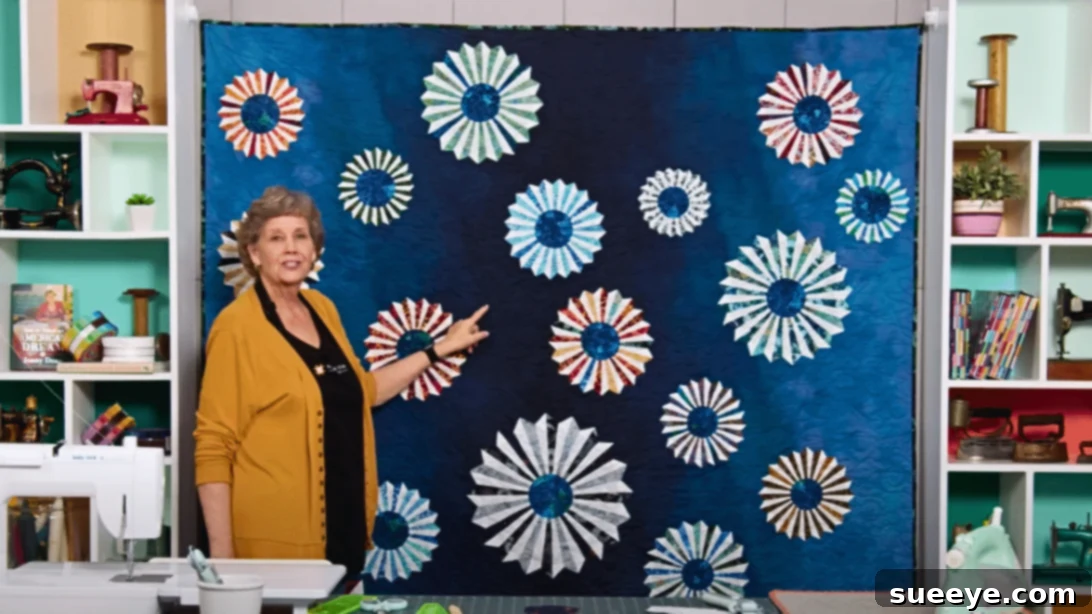
Among the myriad of patterns available, some truly stand out for their unique charm and visual appeal. My most recent obsession, and one I’m thrilled to share, is the stunning Milky Way Quilt design. This captivating project, masterfully demonstrated by Missouri Star on YouTube, transforms ordinary fabric squares into a celestial masterpiece. Imagine twinkling stars scattered across a night sky, brought to life through fabric and thread – that’s the magic of this quilt. Its mesmerizing aesthetic makes it an ideal choice for children’s rooms, adding a touch of wonder, or for adults who appreciate galaxy-themed decor and unique textile art. Dive into this tutorial to learn how to sew your own piece of the cosmos.
RELATED: If you’re looking for another captivating design to add to your repertoire, check out this Easy Optical Illusion Star Quilt Block Tutorial (Free Pattern Included).
Why Choose the Milky Way Quilt Pattern?
The Milky Way Quilt is a fantastic project for several compelling reasons. Firstly, its design is visually striking, evoking the vast beauty of our galaxy. The clever use of contrasting fabrics creates an illusion of depth and movement, making the “stars” truly pop against the background. Secondly, while the finished quilt looks intricate, the construction method, especially with the clear guidance from Missouri Star, is surprisingly manageable. This makes it an excellent choice for quilters who have moved beyond absolute basics and are ready for a moderately challenging yet highly rewarding project. Furthermore, the versatility of this pattern allows for endless customization. You can choose vibrant, playful colors for a child’s quilt or sophisticated, muted tones for a more elegant, adult-oriented piece. The end result is always a unique, eye-catching quilt that’s sure to be a conversation starter and a cherished item.
Essential Materials for Your Milky Way Quilt Journey
Gathering the right materials is the first crucial step in any successful quilting project. For the Milky Way Quilt, precision and quality in your fabric and tools will significantly enhance your experience and the final outcome. Here’s a detailed list of what you’ll need, along with some insights into why each item is important:
- 1 (42-count) package of 10″ print squares: These pre-cut squares, often called “Layer Cakes,” are a fantastic time-saver, offering a curated selection of coordinating prints. A “42-count” package provides a generous assortment, perfect for creating a varied and dynamic starry effect. Opt for high-quality quilting cottons for best results, as they are easier to work with, more durable, and less prone to fraying.
- 1 (42-count) package of 10″ white squares: These squares will serve as the essential contrasting element, helping to define the “stars” and other design features within your quilt blocks. White provides a crisp, clean backdrop, but you could also explore very light grays or creams for a softer, more subtle celestial glow, depending on your artistic vision.
- ⅞ yard of accent fabric: The accent fabric adds a subtle pop of color or texture, often used for specific smaller elements within the quilt blocks to enhance the overall design and draw the eye. Choose a color that beautifully complements your print squares and provides a pleasing contrast without overpowering the main design.
- 6 yards of background fabric: This substantial amount of fabric will form the expansive “night sky” of your Milky Way. Traditional choices to truly mimic the cosmos include dark blues, deep purples, or even rich blacks. Ensure it’s a good quality quilting cotton that presses well, holds its shape, and provides a stable foundation for your appliqué.
- ⅞ yard of binding fabric: The binding is the finished edge of your quilt, framing your masterpiece and protecting the raw edges from wear. Choose a fabric that either harmonizes with the quilt top’s color palette or provides a striking contrasting border, offering a professional and polished finish to your project.
- 9 yards of backing fabric, vertical seams, or 2½ yards of 108″ wide: The backing is the bottom layer of your quilt, providing warmth and stability. The “9 yards, vertical seams” option refers to standard width fabric that you’ll need to piece together to cover the large quilt area. Alternatively, 2½ yards of “108″ wide” fabric (often called “wide back”) is a convenient choice that significantly minimizes or entirely eliminates the need for piecing seams.
- 1 package of Missouri Star Sew Light Fusible Adhesive: This adhesive is crucial for applying specific elements (like the circular pieces in this pattern) without needing to turn under raw edges or perform complex appliqué stitching. It provides a secure, lightweight, and durable bond, making the process much smoother.
- Missouri Star Large Dresden Plate Template: This specialized template is key to achieving the distinctive pointed shapes that form the “stars” or radiating elements in the Milky Way design. Using the correct template ensures consistency and accuracy across all your blocks, which is vital for a harmonious finished quilt.
- Marking pen, pencil, or chalk: Essential for transferring pattern lines and marking cutting or sewing guides onto your fabric. Choose a marking tool that is easily removable with water, heat, or disappears over time, ensuring your finished quilt is free of unwanted lines.
- Scissors or rotary cutter and a cutting mat: A sharp rotary cutter and a self-healing cutting mat are indispensable tools for precise, efficient fabric cutting, especially when working with multiple layers. This combination ensures straight, accurate cuts, which are fundamental to successful quilting.
- Needle and thread: High-quality polyester or cotton thread that either matches or subtly blends with your fabric colors will ensure strong, durable seams that stand the test of time and washings.
- Fabric pins: Used extensively to hold fabric layers together securely before sewing, preventing shifting and ensuring accurate seam alignment, especially when piecing intricate blocks.
- Sewing machine: A reliable sewing machine with a straight stitch capability is fundamental for constructing this quilt. Ensure it’s well-maintained and that you have appropriate needles for quilting.
- Pattern: Don’t forget to download the official pattern! This downloadable guide provides crucial cutting dimensions, layout instructions, and often visual aids that complement the video tutorial. Click here to download the free pattern and keep it handy throughout your project.
Step-by-Step Guide: Crafting Your Own Milky Way Quilt
Now that you have all your materials ready, let’s embark on the exciting process of assembling your Milky Way Quilt. Take your time with each step, focusing on precision, and remember that quilting is a journey of creativity and patience, where each stage brings you closer to your stunning finished piece.
Step 1: Preparing Your Fabric for the Starburst Effect
Begin by selecting one 10″ print square and one 10″ white square. These will form the core of your individual “star” units. Carefully stack these two squares together, ensuring their right sides are facing each other and all edges are perfectly aligned. This precision is vital for accurate cutting and ensuring your blocks come together seamlessly. With your stacked squares, proceed to cut them into several uniform strips. While the video tutorial offers a clear visual guide, typical strip widths for such designs might be 2.5-inch or 3-inch, depending on the desired finished size of your Dresden Plate segments. Once you have a set of these strips (the tutorial demonstrates working efficiently with three strips at a time), stack three of these freshly cut strips neatly, one on top of the other, ensuring all edges align. Then, cut them in half together, maintaining a clean, straight line. This step ensures symmetry and efficiency. Finally, utilizing your Missouri Star Large Dresden Plate Template, align it precisely with each half-strip and carefully cut out the distinctive pointed segments. The template simplifies this process significantly, ensuring all your pieces are uniform in shape and size for a professional and consistent finish. Repeat this process until you have enough segments for your desired number of Dresden Plate blocks for the entire quilt.
Step 2: Assembling the Dresden Plate Segments
Now it’s time to bring these individual segments together to form the radiant “stars.” Take one print segment and one white segment. With their right sides together, carefully sew along the wide, straight edges of each pair. A consistent ¼-inch seam allowance is highly recommended for accurate piecing and to ensure your finished block dimensions are correct. After stitching, gently trim the corner of the seam allowance at an angle, close to the stitching line but without cutting through it. This step is important as it helps to reduce bulk in the corner when you turn the piece right side out, allowing for a crisp, flat point. Turn the joined piece right side out, making sure to gently push out the corner to achieve a sharp, well-defined point. The seams should naturally line up at the center, creating a clean dividing line between your print and white fabrics. Press the piece thoroughly with a warm iron to set the seams and flatten the fabric completely. Repeat these exact steps with the remaining pairs of segments until all have been sewn, trimmed, turned, and pressed. Once you have several finished pairs, begin stitching them together, one at a time, along their narrower edges, to form a complete circular or semi-circular Dresden Plate. As you attach each segment to the growing circle, remember to give it a good press after each join. Consistent and mindful pressing throughout the quilting process is absolutely key to achieving flat, professional-looking blocks and preventing distortion.
Step 3: Finishing Your Dresden Plate Blocks and Assembling the Quilt Top
With your Dresden Plate circles now complete, you’ll notice a small, open hole in the very center. This is where the Missouri Star Sew Light Fusible Adhesive and your background fabric come into play to give a polished finish. Take a round object (such as a small plate, a thread spool, or a specific template if one is provided in the pattern) and trace a perfect circle onto the paper side of the fusible adhesive. Carefully cut out this adhesive circle. Position it on a piece of your chosen background fabric (the “night sky” fabric), then press it down firmly with a warm iron according to the adhesive’s specific instructions. This process will bond the adhesive securely to the fabric. Once cooled, carefully cut out the background fabric circle, which now has adhesive on its back. Place this fabric circle precisely over the hole in the center of your patchwork Dresden Plate. Press it down firmly with your iron to secure it, effectively hiding the raw edges of the hole and providing a neat, finished center to your “star” block. Continue making more of these complete Dresden Plate blocks, ensuring each one is perfectly formed and pressed. Once you have all your blocks, arrange them creatively and thoughtfully on your main background fabric according to the Milky Way Quilt pattern layout. Use fabric pins to hold them securely in place, then stitch them down carefully to the background fabric using your sewing machine. This appliqué technique brings the entire quilt top together, creating the breathtaking celestial scene. After appliquéing all your blocks, give the entire quilt top a final, thorough press to ensure everything is flat and settled. From here, you are ready to complete your quilt by adding batting and backing, choosing your preferred method of quilting (whether it’s machine quilting to add texture, hand quilting for a traditional touch, or tying for a simple finish), and finally, binding the edges. The possibilities for personalization are endless, allowing you to truly make this Milky Way Quilt your own unique masterpiece.
Beyond the Basics: Tips for a Stellar Milky Way Quilt
To ensure your Milky Way Quilt truly shines and stands the test of time, consider these additional tips and best practices for quilting:
- Thoughtful Fabric Selection: While the pattern suggests specific color contrasts, don’t be afraid to experiment and let your creativity flow! Imagine a vibrant, rainbow galaxy for a child’s playful room, or a sophisticated palette of deep blues, silvers, and grays for a modern, elegant aesthetic. Always pre-wash your fabrics before cutting and sewing to prevent any potential shrinkage and color bleeding, especially if you are mixing different fabric types or intense colors.
- Precision is Paramount: Quilting, by its nature, thrives on accuracy. Take your time with every cut, using a sharp rotary blade and consistently squaring up your fabric and blocks. When sewing, meticulously maintain a consistent ¼-inch seam allowance throughout the entire project. This unwavering attention to detail will ensure your blocks fit together perfectly, your points match up beautifully, and your finished quilt lays flat.
- Mastering the Press: As mentioned in the step-by-step instructions, pressing isn’t just about flattening fabric; it’s a critical technique that helps set seams, square up blocks, and generally improves the overall quality and professional appearance of your quilt. Press after every seam, and be mindful of pressing seams open or to one side to reduce bulk and create flatter intersections, depending on the pattern’s requirements.
- Practice Makes Perfect: If you’re new to specific techniques like Dresden Plates or appliqué, or if it’s been a while since you’ve tackled them, consider making a practice block or two with scrap fabric. This allows you to get comfortable with the technique, troubleshoot any challenges, and perfect your approach before committing to your main project fabrics.
- The Art of Quilting and Binding: Once your quilt top is meticulously assembled, you’ll layer it with your chosen batting and backing fabric. This is where you decide on your quilting method – whether it’s simple stitch-in-the-ditch to outline the shapes, free-motion quilting to add intricate texture and design, or a more elaborate hand-quilting pattern. Finally, the binding is the protective frame for your quilt, encasing all the raw edges. There are many binding techniques, from machine-stitched for speed to hand-stitched for a classic finish, each offering a slightly different aesthetic and level of durability.
The Enduring Joy of DIY Quilting
Completing a quilt, especially one as visually stunning and intricate as the Milky Way Quilt, brings immense satisfaction and a profound sense of accomplishment. It’s a testament to your patience, dedication, and creative skill. Each stitch tells a story, and the finished product is not just a blanket but a unique piece of art, imbued with your personal touch and effort. Handmade quilts make incredible, heartfelt gifts, warming both body and soul, and often becoming treasured family heirlooms passed down through generations. Beyond the tangible product, quilting offers significant therapeutic benefits, reducing stress, fostering mindfulness, and providing a creative outlet for self-expression. The entire process – from choosing fabrics and cutting, to piecing, appliquéing, and quilting – allows for mindful engagement, transforming a hobby into a truly enriching and rewarding experience.
We sincerely hope this detailed guide encourages and inspires you to embark on your own Milky Way Quilt adventure. Don’t forget to watch the inspiring video tutorial by Missouri Star for visual clarity and expert tips that will guide you through each stage. Happy quilting, and may your journey through fabric be as boundless, beautiful, and full of wonder as the galaxy itself!
*All image credit belongs to Missouri Star via YouTube. Follow and subscribe to their channel for more inspiring quilting projects, innovative techniques, and fantastic tutorials!
Easy Milky Way Quilt Tutorial (with Free Pattern)
This comprehensive tutorial has provided you with everything you need to know to create your very own stunning Milky Way Quilt. With the free pattern and our detailed, step-by-step instructions, you now have all the resources needed to confidently embark on this beautiful and rewarding project. Embrace the journey of fabric, thread, and imagination as you bring a piece of the cosmos into your home or create a cherished gift for a loved one. Enjoy the process of crafting a masterpiece!