
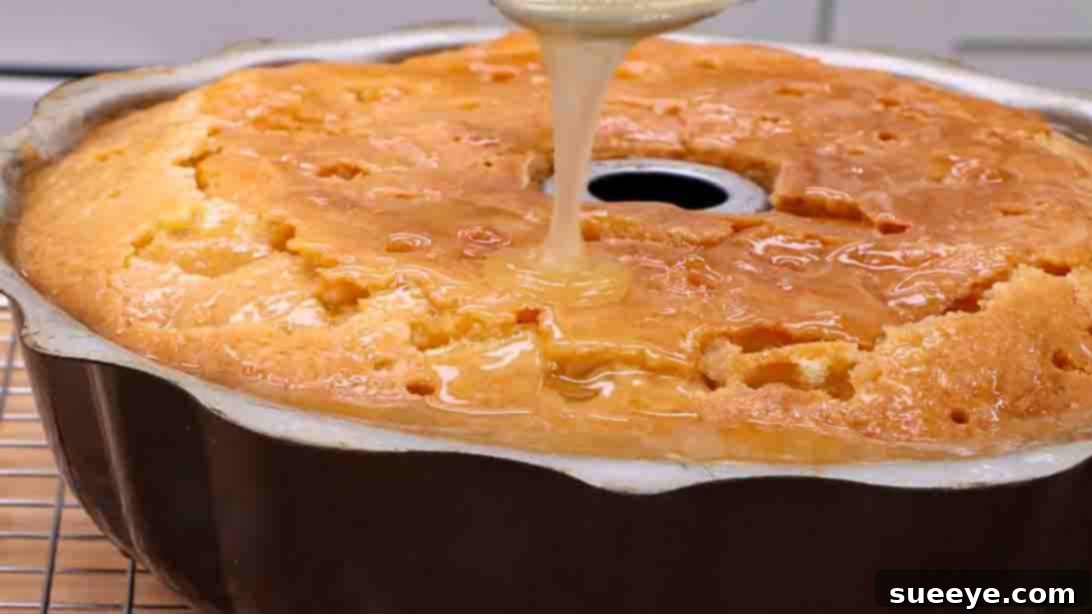
Prepare to fall in love with a dessert that embodies the warmth and richness of Southern baking: the Kentucky Butter Cake. This extraordinary cake, inspired by the culinary genius at Divas Can Cook, isn’t just a recipe; it’s an experience. Imagine a cake so incredibly moist, infused with a luxurious, buttery syrup that permeates every crumb, creating an unparalleled texture and flavor profile. It’s light yet decadent, sweet but perfectly balanced, making it an instant classic in any home. If you’ve been searching for that quintessential comforting dessert, your quest ends here. Dive into this detailed guide and discover why the Kentucky Butter Cake is destined to become your new favorite indulgence.
The Ultimate Kentucky Butter Cake Recipe: A Southern Classic
The Kentucky Butter Cake is a beloved Southern staple, renowned for its golden crust, tender crumb, and an irresistible buttery glaze that soaks deep into the cake, creating an almost melt-in-your-mouth sensation. This particular rendition, a fantastic adaptation inspired by Divas Can Cook, elevates the traditional recipe to new heights, ensuring a moist, flavorful cake every single time. Whether you’re a seasoned baker or just starting your culinary journey, this recipe is designed to be straightforward yet yield truly spectacular results. Get ready to bake a cake that will impress guests and satisfy every sweet craving.
Why This Kentucky Butter Cake Recipe is a Must-Try
- Unmatched Moisture: The secret lies in the warm butter syrup, poured over the cake immediately after baking, allowing it to fully absorb and create an incredibly moist texture that lasts for days.
- Rich Buttery Flavor: With butter in the cake batter and a generous amount in the syrup, every bite is a celebration of rich, creamy flavor, a hallmark of Southern baking.
- Simple Elegance: Despite its impressive taste and appearance, the recipe uses straightforward ingredients and techniques, making it accessible for bakers of all skill levels.
- Versatile Delight: Perfect for potlucks, family gatherings, holidays, or a simple afternoon treat with coffee, this cake adapts to any occasion.
- A Taste of Tradition: This cake brings a piece of authentic Southern comfort and hospitality right to your table, invoking nostalgic warmth.
Ingredients for Your Kentucky Butter Cake Perfection
Achieving the perfect Kentucky Butter Cake starts with selecting quality ingredients and ensuring they are at the correct temperature. Room temperature butter and eggs are crucial for a smooth, homogenous batter that bakes beautifully.
For the Cake:
- 3 cups (approximately 360g or 12.7 oz) all-purpose flour
- 1 teaspoon baking powder
- 1/2 teaspoon fine sea salt
- 16 tablespoons (2 sticks or 226g) unsalted butter, softened to room temperature
- 1/2 cup (approximately 113g or 4 oz) butter-flavored shortening (e.g., Crisco Butter Flavor)
- 3 cups (approximately 600g or 21 oz) granulated sugar
- 5 large eggs, at room temperature
- 2 teaspoons pure vanilla extract
- 1/4 teaspoon rum extract (optional, but highly recommended for an added layer of aromatic depth)
- 1 cup (240ml) buttermilk, at room temperature
For the Irresistible Butter Syrup:
- 12 tablespoons (1 1/2 sticks or 170g) unsalted butter
- 1 1/2 cups (approximately 300g or 10.6 oz) granulated sugar
- 1/3 cup (80ml) water
- 1 teaspoon pure vanilla extract
- 1/2 teaspoon rum extract (optional, to complement the cake’s flavor profile)
Detailed Directions for Baking Your Kentucky Butter Cake
Follow these meticulously detailed steps to ensure a perfectly baked and gloriously moist Kentucky Butter Cake that will be the star of any dessert table.
Step 1: Prepare Your Oven and Bundt Pan with Precision
Begin by preheating your oven to a consistent 325°F (160°C). This slightly lower temperature is instrumental in ensuring the cake bakes evenly through to the center, achieving a tender crumb without drying out. Next, prepare a 10-12 cup capacity bundt pan. This step is critical: liberally grease every nook and cranny of the pan with butter or shortening. Then, dust it thoroughly with all-purpose flour, rotating the pan and tapping out any excess. This meticulous preparation is your best defense against the cake sticking. Set the prepared pan aside.
Step 2: Expertly Combine Dry Ingredients
In a medium-sized mixing bowl, combine 3 cups of all-purpose flour, 1 teaspoon of baking powder, and 1/2 teaspoon of fine sea salt. Whisk these ingredients together thoroughly for about 30 seconds to a minute, ensuring they are well-aerated and evenly distributed. This process helps to prevent lumps and ensures the leavening agent (baking powder) is uniformly mixed for an even rise. Set this dry mixture aside.
Step 3: Cream the Wet Ingredients for a Velvety Cake Batter
In a large mixing bowl, preferably using a stand mixer fitted with a paddle attachment, or with a powerful handheld electric mixer, cream together the 16 tablespoons of softened unsalted butter and 1/2 cup of butter-flavored shortening. Beat on medium speed for 2-3 minutes until the mixture is visibly light, fluffy, and pale in color. This aeration incorporates air, which contributes significantly to the cake’s tender texture. Gradually add the 3 cups of granulated sugar, one cup at a time, beating well after each addition until the mixture is even lighter and fluffy, approximately 5-7 minutes in total. Scrape down the sides of the bowl frequently to ensure even mixing. Next, add the 5 room-temperature eggs, one at a time, beating thoroughly after each addition until fully incorporated before adding the next. The mixture may appear slightly curdled at this point, which is normal. Finally, mix in the 2 teaspoons of pure vanilla extract and 1/4 teaspoon of rum extract until just combined, being careful not to overmix.
Step 4: Gradually Combine Wet and Dry Ingredients for a Smooth Batter
Now, it’s time to bring the cake batter to its final consistency. With your mixer set to the lowest speed, slowly add about one-third of the reserved dry flour mixture to the wet ingredients, mixing only until just incorporated. Then, pour in half of the 1 cup of room-temperature buttermilk, mixing until smooth. Repeat this alternating process: add another third of the dry mixture, followed by the remaining buttermilk, and finally the last third of the dry mixture. Mix only until the flour streaks have completely disappeared. The key here is not to overmix, as excessive mixing can develop gluten, resulting in a tough or rubbery cake. The batter should be thick, smooth, and homogenous.
Step 5: Fill the Bundt Pan and Bake to Golden Perfection
Carefully transfer the luxurious cake batter into your meticulously prepared bundt pan. Use a rubber spatula to ensure every last bit of delicious batter is transferred. Once filled, gently shake and lightly tap the pan several times on your countertop. This helps to release any trapped air bubbles, ensuring an even texture and a beautifully shaped cake. Place the bundt pan into your preheated 325°F (160°C) oven and bake for approximately 1 hour and 15 minutes. Begin checking for doneness around the 60-minute mark; the cake is ready when a wooden skewer or toothpick inserted into the center comes out clean or with only a few moist crumbs attached. Oven temperatures can vary, so visual cues and the skewer test are essential.
Step 6: Prepare the Heavenly Butter Syrup While the Cake is Hot
While your cake is still in its final minutes of baking, or immediately after it emerges from the oven, begin preparing the crucial butter syrup. In a small, heavy-bottomed saucepan, melt the 12 tablespoons of unsalted butter over medium heat. Once the butter is fully melted, add the 1 1/2 cups of granulated sugar and 1/3 cup of water. Stir continuously with a whisk or spoon until the sugar has completely dissolved. Bring the mixture to a gentle boil and allow it to bubble gently for 2-3 minutes, stirring occasionally. This brief cooking time helps to slightly thicken the syrup and ensures the sugar is fully integrated.
Step 7: Infuse the Cake with the Irresistible Syrup
As soon as your cake is removed from the oven, while it’s still piping hot and in the bundt pan, take a wooden skewer, a thin knitting needle, or a thin knife, and poke numerous holes all over the top surface of the cake. Be generous with the holes, but ensure you don’t poke all the way through to the bottom of the pan; the goal is for the syrup to saturate the cake, not escape beneath it. Remove the saucepan with the butter syrup from the heat and stir in the 1 teaspoon of pure vanilla extract and 1/2 teaspoon of rum extract. Immediately and slowly pour the warm syrup evenly over the hot, poked cake in the pan, allowing it ample time to seep into every hole. Be patient during this step. Reserve about 1/4 cup of this divine syrup for a final, glorious brush later.
Step 8: Cool, Unmold, and Deliver the Final Touch
Allow the cake to remain in the bundt pan, continuing to absorb the intoxicating butter syrup, for at least 20-30 minutes. This crucial resting period ensures maximum syrup penetration and helps the cake to firm up slightly before unmolding, preventing breakage. After this time, carefully invert the cake onto a wire rack to cool completely. Once the cake is fully unmolded and resting on the rack, take the reserved 1/4 cup of butter syrup and, using a pastry brush, gently and evenly brush it all over the entire surface of the cake. This adds an extra layer of glaze, shine, and moisture. Allow the cake to cool completely before slicing and serving. This patience will be richly rewarded with the best texture and flavor. Slice, serve, and prepare for endless compliments!
Baker’s Notes and Tips for Kentucky Butter Cake Success
Mastering the Kentucky Butter Cake is simple with these expert tips:
- Room Temperature Ingredients are Non-Negotiable: This is perhaps the most important tip. Softened butter and eggs at room temperature emulsify perfectly, creating a light, airy batter. Cold ingredients will lead to a lumpy, curdled batter and a denser cake. Plan ahead by taking them out of the fridge at least 30-60 minutes before baking.
- Bundt Pan Mastery: A thoroughly greased and floured bundt pan is your secret weapon against sticking. Don’t rush this step. For extra assurance, consider using a baking spray specifically designed with flour (like Baker’s Joy or Pam Baking).
- The Art of Not Overmixing: Once you add the flour, mix only until the streaks of flour disappear. Overmixing develops gluten, which can result in a tough, chewy cake rather than the desired tender crumb.
- Patience with Syrup Infusion: Don’t skimp on poking holes! More holes mean more pathways for that glorious butter syrup to penetrate every inch of the cake. Pour the syrup slowly and evenly to maximize absorption.
- The Importance of Cooling Time: While the aroma of a warm Kentucky Butter Cake is incredibly tempting, resisting the urge to slice it prematurely is vital. Allowing the cake to cool completely helps its structure set and gives the butter syrup time to fully meld with the cake, resulting in the perfect moist texture.
- Oven Thermometer: Invest in an oven thermometer to ensure your oven is truly at the set temperature. Inaccurate oven temperatures are a common cause of baking failures.
The Southern Legacy of the Kentucky Butter Cake
The Kentucky Butter Cake holds a cherished place in Southern culinary tradition, steeped in history and hospitality. While its exact origins might be somewhat veiled in time, it’s widely believed to have originated in the bustling kitchens of Kentucky, quickly becoming a celebrated staple at family gatherings, church potlucks, and festive holiday celebrations. Its enduring appeal lies in its deceptively simple composition and the profound indulgence of its buttery nature. Unlike the denser, heavier pound cakes, the Kentucky Butter Cake often features a lighter, more delicate texture that is exquisitely balanced by the intense, moist sweetness imparted by its signature syrup. It stands as a delicious testament to the Southern philosophy of generosity and comfort – a rich, heartwarming dessert that feels like a welcoming embrace, a true symbol of home.
Serving Suggestions and Creative Variations
This cake is undeniably delicious on its own, showcasing its pure, buttery essence. However, here are some delightful ideas to elevate your serving experience or to add a unique twist:
- Classic Simplicity: Serve a generous slice alongside a freshly brewed cup of hot coffee or a tall glass of iced tea for an elegant and comforting afternoon treat.
- Decadent Dessert: Transform it into an extraordinary dessert by pairing a warm slice with a scoop of premium vanilla bean ice cream, a dollop of freshly whipped cream, or even a drizzle of caramel sauce.
- Fruity Twist: Garnish with an array of fresh berries such as sliced strawberries, plump blueberries, or vibrant raspberries for a refreshing pop of color and a touch of delightful tartness that cuts through the richness.
- Citrusy Brightness: For a zesty note, add 1-2 teaspoons of finely grated lemon or orange zest to the cake batter. A tiny pinch of zest can also be added to the syrup for an invigorating aroma.
- Nutty Crunch: Introduce a delightful textural contrast by folding 1/2 cup of finely chopped and toasted pecans or walnuts into the cake batter just before pouring it into the pan.
- Bourbon Infusion (Adult Version): For an authentic Kentucky experience, especially for those who appreciate a sophisticated kick, substitute half of the rum extract in the syrup (or even in the cake batter) with a high-quality Kentucky bourbon. This adds a complex, warm, and distinctly Southern flavor profile.
Storage for Your Kentucky Butter Cake
Your delicious Kentucky Butter Cake is designed to remain wonderfully moist and flavorful for several days, thanks to its generous syrup infusion. To preserve its freshness, store the cake at room temperature, tightly covered with plastic wrap or in an airtight cake dome, for up to 3-4 days. For extended enjoyment, you can freeze individual slices or the entire cake (ensuring it is meticulously wrapped in plastic wrap and then aluminum foil) for up to 2-3 months. Thaw at room temperature before serving to bring it back to its delectable state.
Troubleshooting Common Kentucky Butter Cake Issues
Even experienced bakers can encounter challenges. Here are solutions to common Kentucky Butter Cake dilemmas:
- Cake Sticking to the Pan: This is the most common issue and almost always stems from improper greasing and flouring. Ensure every single crevice and curve of your bundt pan is thoroughly coated with fat and then lightly dusted with flour. Using a baking spray with flour can provide extra insurance. Additionally, allowing the cake to cool slightly in the pan (as per Step 8) before inverting helps it release cleanly.
- Dry Cake: The primary culprit here is almost always overbaking. Start checking for doneness 5-10 minutes before the suggested bake time. A dry cake can also occur if the syrup wasn’t fully absorbed, so ensure those holes are plentiful and the syrup is poured slowly over a hot cake.
- Uneven Baking: This can be due to an oven that isn’t properly calibrated (use an oven thermometer to verify accuracy) or opening the oven door too frequently, which causes temperature fluctuations. Resist the urge to peek too often!
- Syrup Not Soaking In Effectively: Ensure the cake is still piping hot when you begin pouring the warm syrup over it. The heat helps the cake’s pores expand, allowing it to absorb the liquid more efficiently. Also, ensure you’ve poked enough generous holes.
Easy Kentucky Butter Cake Recipe Summary
From the moment you gather your ingredients to the final, delectable bite, making a Kentucky Butter Cake is a truly joyful and rewarding culinary journey. Its rich, buttery flavor and incredibly moist, tender texture make it an unforgettable dessert that perfectly embodies the spirit of Southern hospitality and comfort. Don’t just read about this magnificent creation – try this recipe today and experience the magic for yourself. We guarantee it will become a cherished addition to your recipe repertoire. Happy baking!