
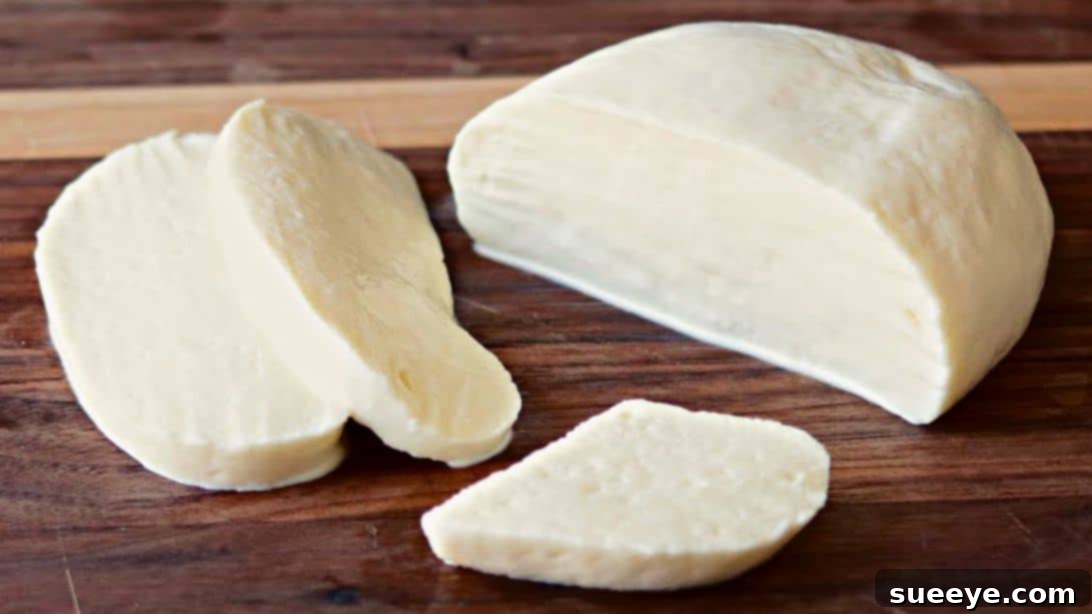
There’s an undeniable magic to fresh mozzarella. Its soft, pillowy texture and delicate, milky flavor elevate countless dishes, from a simple Caprese salad to a gourmet pizza. For many, the idea of making this beloved cheese at home seems daunting, a task reserved for artisan cheesemakers. However, what if we told you that crafting your own delicious mozzarella could be incredibly simple, requiring just two core ingredients and a little patience? This guide will show you how to unlock the secrets to homemade mozzarella, transforming your kitchen into a personal fromagerie.
I once believed the same, savoring store-bought mozzarella while dreaming of the real deal. Then, I discovered a game-changing recipe from a fantastic YouTube channel, In The Kitchen With Matt. This revelation transformed my approach to cheese. Suddenly, making fresh mozzarella at home became not just possible, but easy and remarkably inexpensive. The results were so impressive that my family and friends were not only delighted but inspired to try their hands at this delightful culinary adventure too. Prepare to be amazed by the freshness and flavor of your very own homemade mozzarella cheese!
Why Homemade Mozzarella Is a Must-Try Culinary Experience
Beyond the sheer satisfaction of creating something delicious from scratch, there are numerous compelling reasons to embark on your homemade mozzarella journey. First and foremost is the unparalleled taste and texture. Freshly made mozzarella boasts a delicate creaminess and a subtle sweetness that simply cannot be replicated by most mass-produced varieties. You’ll notice the difference immediately – a more tender bite and a purer milk flavor that sings on your palate.
Another significant advantage is the control over ingredients. When you make mozzarella at home, you know exactly what goes into it: wholesome milk and a touch of acid. There are no mysterious additives, preservatives, or stabilizers often found in commercial cheeses. This makes it an excellent choice for those seeking cleaner eating options or who have dietary sensitivities.
Cost-effectiveness is another powerful motivator. High-quality fresh mozzarella can be quite pricey at specialty stores. By making it yourself, you can significantly reduce the cost, especially if you source your milk wisely. Plus, it’s an incredibly rewarding kitchen project that fosters a deeper connection with your food. Imagine serving a dish featuring cheese you’ve crafted with your own hands – it’s a talking point and a testament to your culinary prowess!
Gather Your Simple Ingredients for Fresh Mozzarella
One of the most appealing aspects of this mozzarella recipe is its incredible simplicity, requiring minimal ingredients that are readily available. The quality of your milk is paramount here, as it forms the foundation of your cheese.
- ½ gallon (approximately 2 liters) of raw or pasteurized whole milk. For the best results and a truly authentic flavor, opt for whole milk. Avoid ultra-pasteurized milk if possible, as the intense heating process can alter the milk proteins, making it more challenging to form curds effectively.
- 7 tablespoons of white distilled vinegar. This common pantry staple acts as the acid that curdles the milk, separating the solids (curds) from the liquids (whey).
Optional Enhancement:
- ¼ teaspoon of cheese salt, flaky sea salt, or kosher salt. Adding salt enhances the flavor of your mozzarella. You can adjust the amount to your personal preference during the kneading process.
Tools for Your Cheesemaking Adventure
While the ingredients are minimal, having the right equipment ensures a smooth and successful cheesemaking process. Most of these items are likely already in your kitchen:
- Large Pot: A heavy-bottomed pot, preferably non-stick, that can hold at least 1 gallon (4 liters) to prevent boil-overs.
- Accurate Thermometer: A crucial tool for precise temperature control. A candy thermometer or an instant-read digital thermometer works perfectly.
- Long-Handled Spoon or Spatula: For gentle stirring and pressing the curds.
- Large Mixing Bowl: To collect and handle the curds.
- Microwave-Safe Bowl: For reheating the curds to achieve the perfect stretching consistency.
- Rubber Gloves (Optional but Recommended): For handling the hot cheese during the stretching phase, protecting your hands from the heat.
- Colander: For draining the whey from the curds.
- Measuring Cups and Spoons: For accurate ingredient measurements.
Step-by-Step Guide to Homemade Mozzarella
Follow these detailed steps closely, and you’ll soon be enjoying your very own fresh mozzarella!
Step 1: Heating the Milk and Forming Curds
Begin by placing your large pot on a stove and pouring in the whole milk. Heat the milk gently over medium-low to medium heat. This slow heating is crucial for an even temperature distribution. Stir the milk continuously and gently with your spoon to prevent scorching on the bottom and to ensure the heat is evenly distributed. Monitor the temperature carefully with your thermometer until it reaches precisely 115°F (46°C). Consistency in temperature is key for optimal curd formation.
Once the milk reaches the target temperature, immediately remove the pot from the heat. Pour in the 7 tablespoons of white distilled vinegar. Stir gently but thoroughly for about 30 seconds. You’ll observe the magical transformation almost instantly as the milk begins to curdle, separating into solid white curds and yellowish, watery whey. This is a sign that the acid is working its magic!
Cover the pot with a lid and allow the mixture to rest undisturbed for approximately 15 to 20 minutes. This resting period allows the curds to fully set and separate from the whey. After resting, gently push the large mass of curds to one side of the pot using your spoon or hand. Carefully scoop the accumulated curds into a large mixing bowl. Avoid pressing too hard at this stage; just gather the curds.
Now, gently squeeze the curds in your hands, allowing the excess whey to drain away. This initial squeeze is light, just to consolidate the curd mass. Continue to gently squeeze, gradually increasing the force each time. The goal is to expel as much whey as possible, leading to a firmer, more pliable cheese. At this point, if you desire salted mozzarella, you can sprinkle in the optional ¼ teaspoon of cheese salt and gently work it into the curd mass. Transfer the squeezed curds into a microwave-safe bowl. Heat the curds on a high setting in the microwave for approximately 30 seconds. This initial heating prepares the cheese for stretching.
Step 2: Stretching, Kneading, and Shaping Your Mozzarella
After the first microwave heating, carefully remove the bowl. Give the cheese a quick stir with a spoon or your gloved hands to distribute the heat. Return it to the microwave and heat for another 20 seconds. At this stage, the cheese should be hot and pliable. Ideally, it should reach an internal temperature of around 160°F (71°C) for optimal stretching. If it’s too cool, it won’t stretch properly; if it’s too hot, it can become tough.
Using a spoon initially (or your gloved hands if the temperature is manageable), begin to stretch and fold the cheese dough repeatedly. Think of it like kneading bread dough, but with a stretching motion. The cheese will transform from a lumpy, fragile mass into a smooth, shiny, and elastic ball. As it cools slightly, you can switch to using your hands directly. Pull and fold, pull and fold, until the mozzarella is beautifully smooth and shiny, with a texture like taffy. This stretching develops the classic mozzarella texture.
Once you’ve achieved the desired smooth consistency, gently shape the cheese into a tight, uniform ball. Work quickly but carefully to maintain the internal temperature. The goal is a seamless, round orb of fresh mozzarella.
Step 3: The Cold Bath for Setting and Storage
Immediately after shaping, transfer your fresh mozzarella ball into a bowl filled with cool water. This sudden temperature change helps to stop the cooking process and firms up the cheese, setting its shape and texture. Allow it to sit in the cool water for about 10 minutes. For an even firmer and longer-lasting cheese, after this initial cool bath, add several ice cubes to the water to create an ice bath. Let the cheese chill thoroughly in the ice bath for another 15-20 minutes, or until completely cool to the touch. This step is vital for achieving that desirable firm-yet-pliable texture.
Once chilled, remove the mozzarella from the water bath. Gently pat the cheese dry with a paper towel to remove any surface moisture. Your homemade mozzarella is now ready to be served and enjoyed!
Pro Tips for Your Best Homemade Mozzarella
While the recipe is straightforward, a few expert tips can elevate your homemade mozzarella from good to absolutely fantastic:
- Mind Your Milk: The quality and type of milk significantly impact the outcome. Whole milk is essential for richness and proper curd formation. Avoid ultra-pasteurized milk, as its proteins are denatured and won’t curdle as effectively. Raw milk or simply pasteurized whole milk works best.
- Temperature Precision: An accurate thermometer is your best friend. Hitting the exact temperature of 115°F (46°C) for initial curdling and around 160°F (71°C) for stretching is crucial. Too hot or too cold, and your cheese might not come together correctly.
- Don’t Overwork It: While stretching is necessary to develop texture, overworking the cheese can make it tough. Stretch just until it’s smooth, shiny, and elastic.
- Adjust Salt to Taste: The ¼ teaspoon of salt is a suggestion. Feel free to adjust based on your preference. You can taste a tiny piece of the warm cheese during the stretching phase to check the seasoning.
- Gloves Are Your Friends: Handling hot cheese can be uncomfortable. Invest in a pair of good quality rubber gloves to protect your hands during the stretching process.
- Experiment with Acid: While vinegar is simple and effective, some cheesemakers prefer citric acid for curdling. This recipe focuses on vinegar for its accessibility.
Delicious Ways to Enjoy Your Fresh Mozzarella
Now that you’ve created your masterpiece, it’s time to enjoy it! Fresh homemade mozzarella is incredibly versatile:
- Classic Caprese Salad: Slice your mozzarella, layer it with ripe tomatoes and fresh basil leaves, then drizzle with balsamic glaze and extra virgin olive oil. A true taste of summer!
- Gourmet Pizza Topping: Tear pieces of fresh mozzarella and scatter them over your homemade pizza before baking for a truly authentic pizzeria experience.
- Pasta Perfection: Add chunks of mozzarella to warm pasta dishes, allowing it to melt slightly into the sauce for a creamy, rich finish.
- Simple Appetizer: Serve slices of mozzarella with a sprinkle of sea salt, a drizzle of high-quality olive oil, and some crusty bread.
- Melted in Sandwiches: Elevate a simple grilled cheese or a panini with the superior melting quality of fresh mozzarella.
Storing Your Homemade Mozzarella
Fresh mozzarella is best enjoyed within a few days of making it. To maximize its freshness and extend its shelf life:
- Brine Storage: Store the mozzarella ball in an airtight container filled with a light brine (about 1 teaspoon of salt dissolved in 1 cup of cool water). This mimics the traditional way fresh mozzarella is sold and keeps it moist and flavorful.
- Refrigeration: Keep the container in the refrigerator for up to 3-5 days. While it can last a bit longer, the texture and flavor are at their peak shortly after production.
- Freezing (Not Recommended): Freezing fresh mozzarella is generally not recommended as it significantly alters its delicate texture upon thawing, often making it crumbly and less desirable for fresh consumption. It might still be usable for cooked applications like pizza, but expect a change in quality.
Your Journey to Homemade Mozzarella Begins Now!
Making fresh mozzarella at home is a rewarding and surprisingly simple culinary endeavor. With just two main ingredients, a few basic tools, and this detailed guide, you can create cheese that rivals artisan varieties in flavor and texture. It’s an experience that not only saves money but also provides immense satisfaction and a delicious addition to your meals. Don’t be intimidated; embrace the process, enjoy the transformation, and savor the incredible taste of your very own homemade mozzarella. Happy cheesemaking!
*All images and the original recipe inspiration are credited to In The Kitchen With Matt via YouTube. We highly recommend visiting his channel and subscribing for more fantastic culinary insights and recipes!